
Summary of Contents for CEAG COOPER CG-Controller
- Page 1 Operating Instructions CG-Controller for CG 2000/ZB-S Target group: Skilled Electricians 300 80 001 458 (B)
-
Page 2: Table Of Contents
9.7.1 Status of electrical Contents circuit (device type=CG2000) ..1 7 Safety instruction ..4 9.7.2 Status of electrical Important information 4 circuit (device Conformity to standards6 type=ZB-S) ....1 7 Specifications ..... 6 9.7.2.1Circuit status of ZB-S Specifications ..... 6 in line 2 ....... - Page 3 „Setup device“ 10.3.1.1 Transfer text to the m e n u ......2 6 device ......3 3 9.9.1 Find devices autom. 2 6 10.3.1.2 Transfer network 9.9.1.1„Searching for device“ configuration to the message (CG2000) .. 2 6 device ......3 3 9.9.1.2„Searching for device“...
-
Page 4: Safety Instruction
2 Safety instructions significant hazards to persons significant damage to In accordance with specifi- plant and machinery cations, the CG-Controller faults and interruptions must be operated in an in the production proc- undamaged and fault-free ess. state! Once the system has been When performing tasks on assembled, connected up and the emergency lighting sys-... - Page 5 (e.g. removing tact your local CEAG of- the fuses, key-operated fice or experts of author- switch, safety signage) ised organisations. –...
-
Page 6: Specifications
IP 65 tronic devices are subject to Ambient mandatory CE marking. temperature: -5 °C ... +40 °C relative CEAG products comply with humidity: 0 - 95 %, non- the requirements of EC Direc- condensing tives 89/336/EEC (EMC direc- Connection tive) and 73/23/EEC as terminals: max. - Page 7 CG 2000/ZB-S! regulations. CEAG can give no warranty or accept any liability for damage or consequential damage caused as a result of improper use,...
-
Page 8: Installation
Bus cables It is also possible to mount the The bus line from the con- device on a 35-mm DIN rail. nected CEAG systems must be connected to Terminals A(2) 5.2 Electrical connection B(2) (Figure 3). 4 terminals are present for each input. -
Page 9: Necessary Entries And First Steps
5.3 Necessary Entries and first steps To ensure that all logbook entries are correctly recorded in the emergency lighting system, all system clocks must be calibrated under the “Synchronize clocks” menus after the CG-Controller is placed in service. After you have turned on the power supply, please enter the current time and date and confirm your entry with the... -
Page 10: Definitions Of Keys
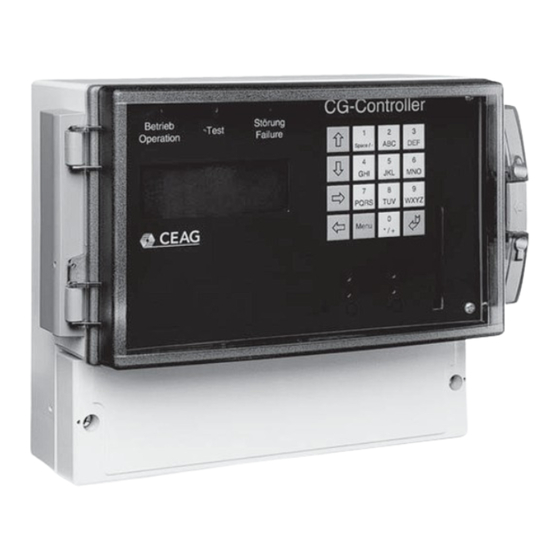
7 Definitions of keys Main meaning Table 1: Definitions of keys Menu If main screen, switch to the main menu selection Switch to the menu one level higher and accept the changes ENTER Confirm Select menu item=open Exit input and accept the changes Select the menu item above Select the menu item below Back... -
Page 11: Status Display And Fault Display
8 Status display and 8.2.1 Sum failure A sum failure is present if more fault display than one fault error is present at the same time. 8.1 Status display Sum failure = The status display is located on more than one fault Line 2 in the main screen (see Table 2). - Page 12 Table 2: Status display Priority Line 2 (main screen) 1 DT running High 2 FT running 3 Blocked 4 Battery operation 5 Mains failure of UV-A 6 Deep discharge protection 7 Manual reset 8 DLS/TLS failure ) Displayed if the mains failure affects the RS485 substation. Table 3: Fault display Priority Line 3 (main screen)
-
Page 13: Menus
9 Menus 9.2.2.1 Conditions for switching off cyclic data reception 9.1 Menu overview If one or more of the following You can use the «Menu» key to conditions are met, the polling bring up the machine will be switched off. main menu. - Page 14 Table 4: Menu overview Main menu 1. Submenu 2. Submenu Test menu Funcitontest all dev Functiontest one dev Select device Durationtest all dev Durationtest one dev Select device Cancel durationtest Block, reset Block all Release all Manual reset Select device Info device Select device Device status...
-
Page 15: Test" Menu
9.4 «Test» menu Selection (main menu) Operation: The menu displays in the «Test» Line Flashing cursor = current menu and its submenus are Test menu cursor position/selection described below. Block, reset Menu Back to the main screen Submenus that work in a similar Info device Setup CG-Controller Cursor position lower... -
Page 16: Block/Reset" Menu . 1
9.5 «Block/reset» menu Selection (main menu) Operation: Line Test menu Flashing cursor = current Block, reset cursor position/selection Info divice Menu Back to the main screen Setup CG-Controller Cursor position lower Setup device Cursor position higher Select menu item (Enter) Selection (submenu) Line 9.5.1 Block / reset... -
Page 17: Info Device" Menu (Submenu 1)
9.6 «Info device» menu (submenu 1) First, select a device in the first submenu. The device cannot be selected until all the information has been read. After this, “Con- tinue with “ appears in Line 4 Selection (main menu) Operation: Selection (device) Line Line... - Page 18 9.7.2.1 Circuit status of ZB-S in line 2 Priority high Luminaire-search mode AC Luminaire-search mode DC Circuit-learn mode AC Circuit-learn mode DC Durationtest mode Functiontest mode AC Functiontest mode DC Battery mode (Battery emergency light) Mains mode Normal operation mode block 9.7.2.2 Circuit failure of ZB-S in line 3 Priority...
- Page 19 9.7.3 Luminaire status (device type=CG2000) During communication with the system, «Please wait...» is dis- played. If there is an error, the faulty communication process is automatically repeated. The read process then lasts somewhat longer. Directly after a functiontest it takes 100s until all datas are on the LON-bus.
- Page 20 9.7.5 DLS/TLS/3PhW-status (device type=CG2000) During communication with the system, «Please wait...» is dis- played. If no communication with the CG 2000 is possible, the message «Transmission fault» appears in Line 2. You can refresh the display by switching to another circuit/input. Selection (status display) Display (DLS/3PhW module) Operation:...
-
Page 21: Select Language
9.8 «Setup CG-Controller» menu Selection (main menu) Operation: Line Test menu Flashing cursor = current Block, reset cursor position/selection Info device Menu Back to the main screen Setup CG-Controller Cursor position lower Setup device Cursor position higher Select menu item (Enter) 9.8.1 Select language Selection (submenu) Operation:... -
Page 22: Next Ft Safety Function
9.8.3 Next FT Selection (submenu) Display: Operation: Line Line Select language Next FT Menu Accept and Setup time and date 14:15 13.09.2002 one menu level higher Next functiontest Change Insertion pointer in days: 007 (cursor) left/right Next durationtest Interval Reduce/increase value Relay settings Start... -
Page 23: Relay Settings
9.8.5 Relay settings The relay is only activated if at least one emergency lighting sys- tem has reported. An asterisk at the end of a line indicates that the relay will switch for this status or fault display. Selection (submenu) Display: Line Operation:... -
Page 24: Default Relay Setting 2
9.8.5.2 Default relay setting If the default setting in Line 20 is activated, the relay settings indicated in the sample display with an asterisk will become active Status message Fault message Deep discharge protection Sum failure Battery failure Circuit failure Charge/isol. -
Page 25: Password
9.8.8.3 Activate submenu password Operation: Display: Line Enter password 0 ... 9 Password entry Activated Accept Password (6 digits) Password 123456 To enter numbers, use the numeric keypad. 9.8.8.4 Menu password inquiry If the password is activated, functions on the CG-Controller are not possible unless the password has been previously entered. -
Page 26: Setup Device
9.9 «Setup device» menu Selection (main menu) Operation: Line Test menu Flashing cursor = current Block, reset cursor position/selection Info device Menu Back to the main screen Setup CG-Controller Cursor position deeper Setup device Cursor position higher Select menu item (Enter) 9.9.1 Find devices autom. -
Page 27: 5Error Analysis For Finding Device Autom
(standard delivery con- figuration of CG 2000 emergency systems). If the domain of your emergency lighting system needs to be reinitialised, please con- tact the CEAG plant customer service department. 9.9.2 Adding/deleting manually (device type=CG2000/ZB-S) 9.9.2.1 Device already present... -
Page 28: Synchronising Clocks 2
9.9.3 Synchronising clocks A precondition for synchronising the clocks of all emergency lighting systems is that at least one emergency lighting system must be logged in on the CG-Controller. Selection (submenu) Line Find device autom. 9.9.3.1 Initiating synchronisation manually Manually add/delete Synchronize clock? Line... -
Page 29: Delete Logbook
9.10.2 Delete logbook Sample display: Operation: Selection (submenu) Line Line Delete logbook Menu One menu level higher Display logbook yes / no Delete logbook Confirm selection All devices -> SD Contr. config.→SD Contr. config.<-SD Dev.config.-> Attention: After this action the logbook has been deleted irrevocable! 9.10.3 All devices ->... -
Page 30: Saving The Device Conf
9.10.6 Saving the device configuration in the CG-Controller to SD (dev. config. → → → → → SD) Selection (submenu) Display Operation: Line Line All devices→SD Device address Menu One menu level higher Contr.config.→SD Line 1: Dev. config.→SD Contr.config.←SD Next device Start Dev. -
Page 31: Reading Texts From The Device And Saving To S
9.10.8 Reading texts from the device and saving to SD (Text → → → → → SD) Display Operation: Line Selection (submenu) Line Device address Menu One menu level higher All devices→SD Text→SD Line 1: Contr.config.→SD Start Next device Contr.config.←SD Device name Previous device Dev. -
Page 32: Cg Controller Configuration Created From Pc Software
10 CG-Controller configuration created from PC software After a SD is inserted, the address 0x060 inconfigcg.dat is tested. If the CG-Controller detects a new CG-Controller configuration for the PC software, the place is 0x01. Display: Operation: Line Menu One menu level higher New CG controller Accept configuration of Select yes/no... -
Page 33: Transfer Text To The Device
Display: Operation: Line New network devices Menu One menu level higher Select yes/no Accept configuration of Confirm selection If confirmed with „Yes“, the new network configuration and texts will be accepted as follows: 10.3.1.1 Transfer text to the device Display: Operation: Line Update dev. -
Page 34: Led Displays
11 LED displays 11.1.1.2 Test mode The front plate of the CG-Con- troller shows the “Test mode” 11.1 LED indicators state with a yellow LED. „Ready for operation“ LED yellow on = “Test mode” One or more emergency and „Failure“ lighting systems arein test mode. -
Page 35: Secure Digital Memory Card
12 Secure-Digital- By default, the SD holds 66 or 130 files: Memory Card SD configcg.dat = CG controller configuration 12.1 Device configurations logbook.dat = CG controller logbook and (CG 2000): 12.1.1 Configuring devices config01.dat – config32.dat with SD = configurations of network You can use the «Setup device»... - Page 36 PC via CG-Controller and The “Emergency lighting sys- tem” means the corresponding CG 2000 or ZB-S controller systems for the respective controller type. CEAG Notlichtsysteme GmbH Senator-Schwartz-Ring 26 D-59494 Soest/Germany Phone + 49 (0)29 21/69-870 + 49 (0)29 21/69-617 Internet www.ceag.de...
Need help?
Do you have a question about the COOPER CG-Controller and is the answer not in the manual?
Questions and answers