Advertisement
Advertisement

Subscribe to Our Youtube Channel
Related Manuals for Bowflex Dumbbell Stand


Summary of Contents for Bowflex Dumbbell Stand
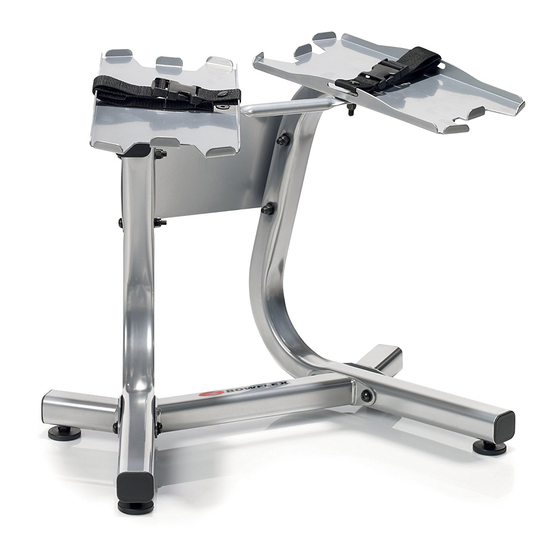
- Page 1 ® ® Dumbbell Stand Assembly Manual...
-
Page 2: Table Of Contents
Printed in China | © 2011 Nautilus, Inc., All rights reserved. ™ and ® indicate a trademark or registered trademark. Nautilus, Inc. (www.NautilusInc.com) trademarks include NAUTILUS®, BOWFLEX®, SCHWINN® and UNIVERSAL® and respective logos. Other trademarks are the property of their respective owners. -
Page 3: Important Safety Instructions
Important Safety Instructions This icon means a potentially hazardous situation which, if not avoided, could result in death or serious injury. Before using this equipment, obey the following warnings: Read and understand all warnings on this equipment. Carefully read and understand the Assembly Manual. •... -
Page 4: Safety Warning Labels And Serial Number
Safety Warning Labels and Serial Number The equipment is shipped with safety warning labels in English affixed to the frame. Safety warning labels in other languages are supplied on a separate sheet of labels for the customer to apply to the equipment. If a label becomes damaged or illegible or is removed, contact your local distributor for a replacement label. -
Page 5: Parts
Parts Ref. Description Bottom Cross Brace Rear Left Stabilizer Rear Right Stabilizer Stand Leg Center Plate Dumbbell Platforms Towel Bar Hold Down Straps, 2F 2M 2 Pairs... -
Page 6: Hardware
Hardware Guide Ref. Description Nut Nylock M10 Flat Washer M10 Regular Button Head Hex Screw M10 X 75 Button Head Hex Screw M10 X 70 Button Head Hex Screw M10 X 20 Flat Head Hex Screw M10 X 30 Tools Not Included Included Utility knife or scissors to cut nylon ties... -
Page 7: Assembly Steps
Assembly Steps Step 1: Attach Stabilizers to Stand Legs Note: Do not completely tighten the hardware at this time. If the feet (4a) are not pre-installed, install them on the legs and stabilizers. - Page 8 Assembly Steps Step 2: Install Bottom Cross Brace Note: Make sure that the narrower edge of the Bottom Cross Brace (1) is closer to the Stand Leg uprights. Do not completely tighten the hardware at this time.
- Page 9 Assembly Steps Step 3: Install Center Plate Note: Make sure that the Center Plate edges are on the outer sides of the legs, and that the logo on the Center Plate is right side up. Tighten all hardware from Steps 1, 2 and 3.
- Page 10 Assembly Steps Step 4: Install Dumbbell Platforms Note: Make sure that the screw holes (6a) in the Dumbbell Platforms are toward the center of the stand.
- Page 11 Assembly Steps Step 5: Install Towel Bar Note: Tighten all hardware completely.
- Page 12 Assembly Steps Step 6: Attach Hold Down Straps to Dumbbell Platforms Note: Make sure that the snaps are securely fastened.
- Page 13 Assembly Steps Step 7: Apply Label to Frame Assembly Apply Safety Warning Labels in the applicable language if the equipment will be used by persons who do not read English. Note: Record serial number in the Serial Number field at the beginning of this manual. Serial number - Read and understand the complete user manual.
- Page 14 Assembly Steps Step 8: Final Inspection Inspect your equipment to ensure that all fasteners are tight, the equipment is level, and components are properly assembled. If necessary, adjust the feet until they all contact the floor. Do not use the equipment until the equipment has been fully assembled and inspected for correct performance in accordance with the Owner’s Manual.
-
Page 15: Maintenance
Maintenance Equipment must be regularly examined for damage and repairs. The owner is responsible to make sure that regular maintenance is done. Worn or damaged components must be replaced immediately or the equipment removed from service until the repair is made. Only manufacturer supplied components can be used to maintain and repair the equipment. - Page 16 Nautilus ® Bowflex ® Schwinn ® Fitness Universal ® 004-4672-031612B...
Need help?
Do you have a question about the Dumbbell Stand and is the answer not in the manual?
Questions and answers