
Related Manuals for FLAIRMO FLAIR 4 AIR Series

Summary of Contents for FLAIRMO FLAIR 4 AIR Series
- Page 1 AUTOMATIC SILENT COMPRESSORS AUTOMATISKE STØJSVAGE KOMPRESSORER S33.4 S33.15 S33.24 S66.24 S66.50 S99.50 FLAIRMO Authorized service center Baldersgade 12 DK-90000 Aalborg www.FLAIRMO.com YEAR Rev.0 - 29/12/09...
-
Page 2: Table Of Contents
Contents Indhold 1 General information 1 Generel information 1.1 Importance and use of the manual..3 1.1 Betydning og anvendelse 1.2 Content ...........3 af den manuelle........3 1.3 Storage ...........3 1.2 Indhold..........3 1.4 Weights and dimensions ....3 1.3 Opbevaring........3 1.5 Packing disposal......4 1.4 Vægt og dimensioner.......3 1.6 Lifting ..........4 1.5 Pakning bortskaffelse .......4... -
Page 3: General Information
General information General information 1.1 Importance and use of the manual 1.1 Betydning og anvendenelse af den This manual is an integral part of the com- manuelle Denne vejledning udgør en integreret del af pressor and must always accompany it, kompressoren og skal altid ledsage denne, even in the event of sale. -
Page 4: Packing Disposal
1.5 Packing disposal 1.5 Pakning bortskaffelse After having removed the compressor from Når kompressoren er taget ud af pakningen, the packing, check that no parts have been kontrolleres det, at der ikke er nogen dele, damaged during transport. der er blevet beskadiget under transporten. The packing material has to be disposed of Indpakningsmaterialet skal bortskaffes i in compliance with the regulation in force in... -
Page 5: Main Components
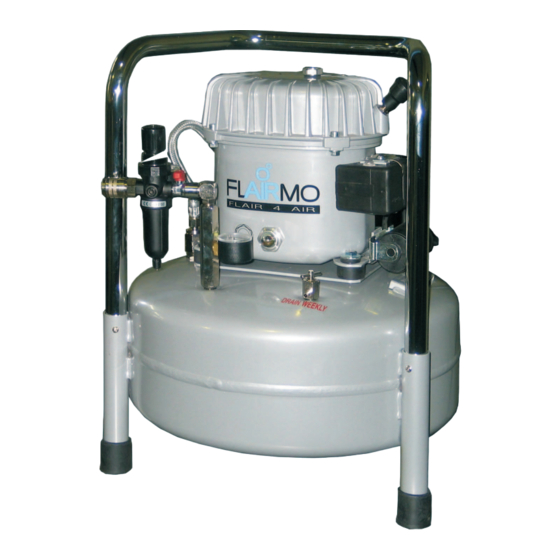
1.8 Main components 1.8 Hovedkomponenter 1 - Motor 1 - Motor 2 - Air tank 2 - Lufttank 3 - Pressure switch 3 - Pressostat 4 - Tank pressure gauge 4 - Tankmanometer 5 - Filter reducer 5 - Trykluftfilter og regulator 6 - Outlet pressure gauge 6 - Manometer til måling af udgangstryk 7 - Safety valve... -
Page 6: Technical Specifications
Technical specifications Tekniske data 2.1 Technical data 2.1 Tekniske data Modello Volt/Hz Lt/min. dB(A)1m KW - AMP Model 1ph ±10% C.F./min Gal. dB(A)40" 230/50 0,34 - 2,40 S33.4 115/60 0,40 - 4,80 2,10 0,93 230/50 0,34 - 2,40 S33.15 115/60 0,40 - 4,80 2,10 3,96... -
Page 7: Wiring Diagrams
2.3 Wiring diagrams 2.3 Ledningsdiagrammer MOTOR TYPE 33 MOTOR TYPE 33 Starting relay Brown Startrelæ Brun Overload protector Blue Overbelastningssikring Blå Terminal box Yellow/Green Klemkasse Gul/grøn Pressure switch Black Pressostat Sort Capacitor White Kondensator Hvid Brown Brun Sky blue Sky blue Yellow/Green Gul/grøn... -
Page 8: Operation
Operation Operation 3.1 Machine set up 3.1 Opsætning af maskine Install the compressor on a flat surface, in a Kompressoren placeres på jævnt underlag i suitably sized room, well ventilated and not et lokale, der er tilstrækkeligt stort, ventileret wet, where the temperature is not likely to og ikke fugtigt og hvor temperaturen ikke rise above 35°C. -
Page 9: Operating Instructions
NEVER USE AN OIL DIFFERENT FROM DER MÅ ALDRIG ANVENDES ANDEN THE ONE RECOMMENDED BY THE OLIE END DEN, DER ANBEFALES AF MANUFACTURER; THIS WOULD VOID ALL PRODUCENTEN. HVIS DER ANVENDES GUARANTEES. ANDEN OLIE, BORTFALDER ALLE GARANTIER. Keep any oil remaining in the bottle for fu- ture topping up. - Page 10 The pressure switch stops the compressor Pressostaten stopper kompressoren, når when the pressure in the tank reaches the trykket i tanken når den tilladte maximum value allowed (8 maksimumværdi (8 bar=116psi stan- bar=116psi standard) and starts it dard) og starter den igen, når trykket again when the pressure drop to the falder til minimumsværdien.
- Page 11 If the pressure switch does not work Hvis pressostaten ikke virker (overtryk), (overpressure), the safety valve will auto- aktiveres sikkerhedsventilen automatisk og matically operate and open when the pres- åbnes, når trykket overstiger den indstillede sure exceeds the max. setted value. maksimumværdi.
-
Page 12: Limits For Continuous Operatio
3.3 Limits for continuous operation 3.3 Begrænsninger for kontinuerlig drift Curve n°1 (fig.5) indicates the length of Kurve nr. 1 angiver varigheden af kontinu- · · continuous running at varying pressures, erlig drift ved forskelligt tryk, indtil overbe- until the overload protector switces off the lastningssikringen standser motoren (ved motor (at approx. -
Page 13: Filling Up
3.4 Filling up 3.4 Fyldningstid Filling up time of the tank from 0 to max. pressure (in seconds) Fyldningstid for tank fra 0 til maks. tryk (i sekunder) Volt/Hz S33.4 S33.15 S33.24 S66.24 S66.50 S99.50 230/50 115/60 Test temperature 20°C Testemperatur 20°C 3.5 Check of filling time 3.5 Kontrol af fyldningstid... -
Page 14: Maintenance
Maintenance Vedligeholdelse 4.1 Periodic maintenance 4.1 Periodisk vedligeholdelse WARNING! Advarsel! All following operations, must be done by a De følgende indgreb må kun foretages af specialised personnel. faglært personale. once a once a once a week month year once a once a once a year... -
Page 15: Oil Replacement
4.2 Oil replacement 4.2 Oliesubstitution Act as follows (fig.10): Fungere som følger (fig.10): 1. remove the motor unit from the tank, if ne- 1. fjerne motoren enhed fra tanken, hvis det cessary. er nødvendigt. 2. remove the finned cover by loosing the 4 2. -
Page 16: Troubleshooting
Troubleshooting Fejlfinding WARNING Advarsel! Before any operation on the compressor, Stikket skal fjernes fra stikkontakten, før · · disconnect the plug from the socket. der foretages indgreb på kompressoren. Empty air tank of air before dismantling Lufttanken tømmes for luft, før der demon- ·... - Page 17 5.2 The compressor does not reach the 5.2 Kompressoren når ikke op på maks tryk maximum pressure a) Check any air leak (See point 5.6). Det kontrolleres, om der er utætheder (se · · b) Check the pressure switch efficency and punkt 5.6).
- Page 18 5.7 Leak from the valve placed under the 5.7 Utæthed ved ventil placeret under pressure switch pressostat Damaged valve, replace it. a) Defekt ventil. Ventil udskiftes. · · The defect can be due to an unperfect val- b) Defekt kan også skyldes dårlig ·...
-
Page 19: Special Informations
Special informations Specielle oplysninger 6.1 Compressor demolition 6.1 Nedtagning af kompressor During the compressor demolition all Ved nedtagning af kompressor skal alle possible safety regulations must be ob- sikkerhedsregler iagttages for at forhin- served in order to avoid any damage to dre personog tingsskade.
Need help?
Do you have a question about the FLAIR 4 AIR Series and is the answer not in the manual?
Questions and answers
Compressor not switching on power supply is ok but not working limit switch indication showing green every 05 minutes