Table of Contents
Advertisement
Advertisement
Table of Contents

Subscribe to Our Youtube Channel
Summary of Contents for POSEIDON Pharos
- Page 1 Poseidon Pharos GMDSS Simulator Instrument Manual Sailor MF/HF CU5100 Pharos 7.8...
- Page 2 INSTRUMENT MANUAL – SAILOR MF/HF CU5100 Page 2 Pharos 7.8 [15-23] Poseidon Simulation AS...
-
Page 3: Table Of Contents
Loudspeaker ON / OFF Output power Squelch On/Off Scanning Mode Menu Adjust / Tune Soft keys Handset Distress DISTRESS COMMUNICATION Undesignated Distress Distress Call with Chosen Frequency and Nature of Distress Self Composed Distress Relay Poseidon Simulation AS Pharos 7.8 [15-23] Page 3... - Page 4 Receiving an Individual Call Sending a test call Calling a ship Sending an area call DSC Log - Repeat a call Composed DSC calls Station Menu Scanning DSC Watch Dual Watch Multi Watch Telephony Watch Page 4 Pharos 7.8 [15-23] Poseidon Simulation AS...
- Page 5 Setup manually: Setup by DSC: Channel selection Transmitting a message Editing a message Editing keys Receiving a message Example of ARQ Transmission Example of FEC Transmission MENU ‘INFO & TEST’ MENU DIAGRAM Poseidon Simulation AS Pharos 7.8 [15-23] Page 5...
-
Page 6: About The Manual
INSTRUMENT MANUAL – SAILOR MF/HF CU5100 About the manual This manual covers the Sailor MF/HF CU5100 in the Pharos GMDSS simulator. The simulation of this instrument is kept as close to the manual and the real instrument as possible. Therefore most of the information found in this manual can also be read in the original Sailor manual, which this manual is based on. -
Page 7: Control Unit
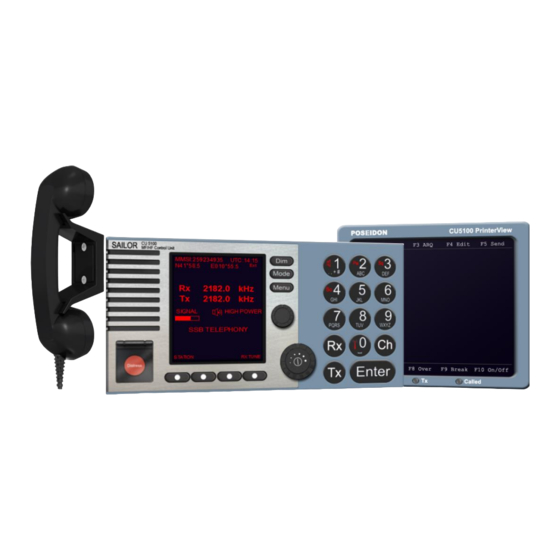
INSTRUMENT MANUAL – SAILOR MF/HF CU5100 Control unit Descriptions On/Off Volume control and On/Off switch for main supply. Click with the mouse pointer to turn the knob. Poseidon Simulation AS Pharos 7.8 [15-23] Page 7... -
Page 8: Input Keys
Loudspeaker ON / OFF Switch loudspeaker ON / OFF Output power Change the output power between High and Low Squelch On/Off Change between squelch on and off Used to adjust the light intensity. Page 8 Pharos 7.8 [15-23] Poseidon Simulation AS... -
Page 9: Scanning
The function of each key is described in its respective field in the display above each key. Quick Select: In the main menu it is also possible to select a menu item by pressing the corresponding number key on the keypad Poseidon Simulation AS Pharos 7.8 [15-23] Page 9... -
Page 10: Handset
INSTRUMENT MANUAL – SAILOR MF/HF CU5100 Handset The MF/HF is operated by means of the handset Distress Flip the lid open before pressing the distress button. Page 10 Pharos 7.8 [15-23] Poseidon Simulation AS... -
Page 11: Distress Communication
Distress Call with Chosen Frequency and Nature of Distress Click on and select DSC call. Confirm with OK. Select distress and confirm with OK Select distress Alert and confirm with OK button. Poseidon Simulation AS Pharos 7.8 [15-23] Page 11... - Page 12 INSTRUMENT MANUAL – SAILOR MF/HF CU5100 Select SSB Telephony and confirm with OK. Select correct nature of distress and confirm with OK. Select correct frequency and confirm with OK. Press distress for 3 seconds to send. Page 12 Pharos 7.8 [15-23] Poseidon Simulation AS...
-
Page 13: Self Composed Distress Relay
In this menu you can choose between sending the distress relay to a coast station, an individual ship, all ships or to all ships within a specific geographic range from your own ship, depending on the power output of your transmission. Poseidon Simulation AS Pharos 7.8 [15-23] Page 13... - Page 14 Enter MMSI of ship in distress and confirm with OK button. If MMSI number is unknown then press button Unknown and continue. Select mode of SSB Telephony and confirm with OK button. Select correct nature of distress and confirm with OK. Page 14 Pharos 7.8 [15-23] Poseidon Simulation AS...
- Page 15 OK button. Your own position will be automatically added to the outgoing distress relay. Select correct frequency and confirm with OK. Select and Press send to transmit Are you sure? Press yes for 3 seconds. Poseidon Simulation AS Pharos 7.8 [15-23] Page 15...
-
Page 16: Tuning Rx/Tx Frequency
To fine tune the Rx value turn the Adjust/Tune knob or press the RX TUNE soft key. Pressing RANGE soft key more times will toggle the detail of tuning (10Hz, 100Hz or 1kHz). Turn the Adjust/Tune knob to fine tune the value or use the softkeys. Page 16 Pharos 7.8 [15-23] Poseidon Simulation AS... -
Page 17: Channel Entry
3. If the channel number is free, press the STORE softkey to store the channel (with the current Rx/Tx frequencies). Softkeys: CANCEL: selects the previous display. STORE: stores the channel. : deletes previous entry. Poseidon Simulation AS Pharos 7.8 [15-23] Page 17... -
Page 18: Delete A Channel
Select REPLACE to overwrite/replace the existing channel with new Rx/Tx. Softkeys: CANCEL: selects the previous display. REPLACE: replaces the entered channel : deletes previous entry. OK: selects the entered channel Page 18 Pharos 7.8 [15-23] Poseidon Simulation AS... -
Page 19: Dsc Operation
The composing wizards are same as found under DSC CALL menu except that the DSC is being stored instead of sent. DSC Setup 1. Press the Menu button 2. Select 5. SETUP. 3. Select 1. DSC SETUP. Poseidon Simulation AS Pharos 7.8 [15-23] Page 19... - Page 20 Shown in the picture below. To turn off external GPS source select the ship at the instructor station in the ‘Object Browser’ and uncheck the GPS failure check box. Page 20 Pharos 7.8 [15-23] Poseidon Simulation AS...
-
Page 21: Watch Receiver Setup
2187.5 and 8414.5 kHz. Reception of a distress call is indicated by a specific sound signal which continues until a key is pressed. Additional DSC channels can be used if enabled in the watch receiver setup (see above). Press View to read the call Poseidon Simulation AS Pharos 7.8 [15-23] Page 21... - Page 22 Coast station, Ship or Area. Press ACK to send a distress acknowledgement on the distress. The instrument will also make a connection CANCEL returns to previous telephony display Press CANCEL to return to previous telephony display. Page 22 Pharos 7.8 [15-23] Poseidon Simulation AS...
-
Page 23: Receiving An Individual Call
When handset is placed on hook or CANCEL is pressed, the equipment returns to previous telephony setting. Poseidon Simulation AS Pharos 7.8 [15-23] Page 23... -
Page 24: Sending A Test Call
. Select 1. DSC CALL and then 7. TEST CALL. Select COAST STATION TEST CALL Key in the coast station MMSI number using the number pad. Select frequency to send test call on. Press OK when ready. Page 24 Pharos 7.8 [15-23] Poseidon Simulation AS... - Page 25 4 ½ minutes, thought this is made a bit shorter on the simulator. The acknowledgement is generated automatically by the coast station. No further communication is intended to take place. Poseidon Simulation AS Pharos 7.8 [15-23] Page 25...
-
Page 26: Calling A Ship
Press CHANGE if you want to change working channel. Press OK when finished. PS: Be aware that the ship you are going to call MUST be scanning the 2177.0 DSC frequency, else the call will not get through. Page 26 Pharos 7.8 [15-23] Poseidon Simulation AS... - Page 27 Before the DSC is sent, the wizard sums up all the information about the DSC. Press SEND to transmit the DSC. Transmission of a DSC call on MF/HF takes approx. 8 seconds. Poseidon Simulation AS Pharos 7.8 [15-23] Page 27...
- Page 28 Pressing CONNECT is an alternative to lifting the handset. Press VIEW to only see the content of the DSC without connecting. When properly connected, a notification about this status is given on the screen. Page 28 Pharos 7.8 [15-23] Poseidon Simulation AS...
-
Page 29: Sending An Area Call
Select the Longitude position of the centre in the area circle. W/E: Toggle between West and East : Erases the last digit entered on the longitude. OK: Moves to the Radius entering. CANCEL: Returns to the previous screen Poseidon Simulation AS Pharos 7.8 [15-23] Page 29... - Page 30 Select Telephony mode of call Select Telephony mode, FEC Telex or SSB Telephony. CANCEL to return to previous screen. OK to move to the Enter Working Frequency Screen. Page 30 Pharos 7.8 [15-23] Poseidon Simulation AS...
- Page 31 CANCEL: Takes you back to the previous screen OK: Takes you to the summery screen Summary screen Press SEND to actually send the composed DSC Press CANCEL to go back to the previous screen. Poseidon Simulation AS Pharos 7.8 [15-23] Page 31...
- Page 32 After transmitting the DSC Call, the MF-HF is set to SSB Telephony (or Telex mode if FEC Telex was chosen as Telephony mode). The working frequencies will change to those indicated in the call. Page 32 Pharos 7.8 [15-23] Poseidon Simulation AS...
-
Page 33: Dsc Log - Repeat A Call
CANCEL: Brings you back to the previous screen. Transmit page Have a overview of the data for the DSC about to be sent, and then press SEND to transmit it. CANCEL: Brings you back to the previous screen. Poseidon Simulation AS Pharos 7.8 [15-23] Page 33... -
Page 34: Composed Dsc Calls
Type of calls to select from. Select between a call to station, ship or group by using the Up/Down soft keys and select OK. Alternatively use quick select by pressing either 1,2 or num pad button. Page 34 Pharos 7.8 [15-23] Poseidon Simulation AS... -
Page 35: Station Menu
ARROW UP: Scroll up in the list of stations. ARROW DOWN: Scroll down in the list. EDIT: Edit the selected station. NEW: Add new station to the list. Visible when >>New Station << is selected. Poseidon Simulation AS Pharos 7.8 [15-23] Page 35... - Page 36 DSC frequency pairs. The CHANNEL field at the ‘Edit station’ screen is incremented by one. To use the created station open the list of stations from the main screen by soft key STATION. Page 36 Pharos 7.8 [15-23] Poseidon Simulation AS...
-
Page 37: Scanning
NEXT>: Moves to the next scanned DSC frequency for editing Changes up/down to the next ITU DSC frequency. You may also use the key pad for quick navigation to a specific band. OK: Finishing editing mode. Returns to scanning. Poseidon Simulation AS Pharos 7.8 [15-23] Page 37... -
Page 38: Dual Watch
(MULTI WATCH) Changes up/down to the next ITU DSC frequency. You may also use the key pad for quick navigation to a specific band. OK: Finishing editing mode. Returns to scanning. Page 38 Pharos 7.8 [15-23] Poseidon Simulation AS... -
Page 39: Multi Watch
If the DSC frequency is highlighted, you may use the arrow keys to switch between the ITU DSC frequencies. NEXT> Highlights the next channel or DSC frequency to edit. OK: Finishing editing mode. Returns to scanning. Poseidon Simulation AS Pharos 7.8 [15-23] Page 39... -
Page 40: Telephony Watch
Changes up/down to the next ITU Telephony channel on the highlighted item. Or use the number pad to key in a valid channel. NEXT> Highlights the next valid telephony channel. OK: Finishing editing mode. Returns to scanning. Page 40 Pharos 7.8 [15-23] Poseidon Simulation AS... -
Page 41: Radio Telex
The radio telex supports ARQ (Automatic Repetition Request) and FEC (Forward Error Correcting) connections. FEC has also two options, selective or broadcast. 1 MFHF 5100 CU and Poseidon Telex Printer View. Indicator Lamps Steady light indicates that the terminal is ready. -
Page 42: Function Keys
MMSI number and answerback code are printed. Telex will automatically be turned on, when entering telex mode on the control unit. If F10 is pressed while in connection, the key press will have same effect as Break F9. Page 42 Pharos 7.8 [15-23] Poseidon Simulation AS... -
Page 43: Switching On
If you are in telex connection F10 will have same effect as Break(F9). If Radio Telex is switched off by pressing the Mode button on the control unit, any current connection will be interrupted. Poseidon Simulation AS Pharos 7.8 [15-23] Page 43... -
Page 44: Prepare Equipment For Telex Connection
5. Connect/Ack the DSC at receiver(s) When you receive the DSC with a telex request, you can connect/Acknowledge the DSC and the control unit will automatically enter telex mode with the frequencies specified in the DSC. Page 44 Pharos 7.8 [15-23] Poseidon Simulation AS... -
Page 45: Channel Selection
Send (F5) key. The radio connection is terminated by pressing the Break (F8) key. Poseidon Simulation AS Pharos 7.8 [15-23] Page 45... -
Page 46: Editing A Message
Reception is possible whenever the terminal is on and in ‘Standby’ mode indicated by a steady lit Standby light. The radio must be set to ‘Telex’ mode and the desired working channel. When an incoming call is detected the ‘Called’ indicator lamp is turned on. Page 46 Pharos 7.8 [15-23] Poseidon Simulation AS... -
Page 47: Example Of Arq Transmission
DE key F7: “123456789 abcd x” 6. Break the connection by F9. The printer view responds by printing “Breaking connection”. It is now possible to start a new telex session. Poseidon Simulation AS Pharos 7.8 [15-23] Page 47... -
Page 48: Example Of Fec Transmission
The communication according with the procedures specified for distress traffic can take place. The connection is terminated by pressing the Break F9 key, and the terminal will be ready for a new telex session. Page 48 Pharos 7.8 [15-23] Poseidon Simulation AS... -
Page 49: Menu 'Info & Test
It is not real simulated information, but shows information that it might look like at real live equipment 2. Check a. The checks is not real simulated checks since Pharos do not simulate the internal physics of the instrument. 3. Monitor a. -
Page 50: Menu Diagram
Freq Edit MMSI Channel *) Nature of distress: FIRE, EXPLOSION, FLOODING, COLLISION, GROUNDING, DANGER OF CAPSIZING, SINKING, DISABLED AND ADRIFT, UNDESIGNATED (Default), ABANDONING SHIP, PIRACY, MAN OVERBOARD, EPIRB EMISSION (Distress Relay only) Page 50 Pharos 7.8 [15-23] Poseidon Simulation AS... - Page 51 TX Test Send dot Send Y Send B 4. Factory Reset 5. MMSI Reset 4. Watch Receiver Enable band Setup Disable band 5. Telex Setup Enable Disable Slave Delay (0-140ms) 6. Config Status Poseidon Simulation AS Pharos 7.8 [15-23] Page 51...
- Page 52 4. TU Serial Number 2. Check 1. TX Protection 2. Interface 1. Sound & Display 2. Alarm Panel 3. NMEA Input 3. Selftest Manual 3. Monitor 1. Power TX 2-Tone 2. WR Audio Page 52 Pharos 7.8 [15-23] Poseidon Simulation AS...
Need help?
Do you have a question about the Pharos and is the answer not in the manual?
Questions and answers