
Subscribe to Our Youtube Channel
Summary of Contents for Kestrel Ballistics HUD
- Page 1 Instructions Kestrel HUD Heads Up Display for 5700 Ballistics Meters www.kestrelballistics.com...
-
Page 2: Table Of Contents
CONTENTS Get to Know Your Kestrel HUD ........4 Out of the Box..............5 Hardware Installation ............ 6 Optional Remote Accessory .......... 9 HUD + Kestrel Connectivity ......... 10 Screen Views & Features ..........14 Settings Menu ............... 20 Firmware Updates ............22... - Page 3 CONGRATULATIONS ON THE PURCHASE OF YOUR KESTREL HUD LEAVE SCREEN PROTECTOR ON For additional help, support Point the camera in your videos and a full manual visit phone at the QR code www.kestrelballistics.com/help to watch installation and or contact us at (610) 447-1555...
-
Page 4: Get To Know Your Kestrel Hud
(Hold 2 seconds) (Hold 1 second) BACKLIGHT ON/OFF: (Double Tap) NAVIGATION BUTTONS: Left (Up), Right (Down) and Select Buttons NOTE: The function of the three buttons on the optional HUD remote mirrors the three center navigation buttons on the HUD. -
Page 5: Out Of The Box
OUT OF THE BOX Remove HUD from clip and insert battery: To remove the HUD from the clip, push back on the clip tab and pull the HUD forwards. Press the button to open battery door. Battery Door Release Push clip tab back... -
Page 6: Hardware Installation
Insert HUD in clip: Nest the notch on the front of HUD with the groove on the clip arm & line up the clip with the clip retention slots on the rear of the HUD, then press HUD into clip. - Page 7 Attach Clip to Mount: Use the included 3/32 hex key to attach the HUD clip to the mount. The clip can be mounted higher or lower depending on the holes chosen. NOTE: The HUD mount can be set up for left-handed shooters by removing the center screw and re-attaching the mount arm in the opposite con guration.
- Page 8 Mount HUD on Gun: Find a Picatinny rail spot on your ri e and hand tighten the mount securely.
-
Page 9: Optional Remote Accessory
(If front mounting, ensure there is no interference with your bolt.) 1. Connect the HUD to your ri e and insert the remote connector to the cable port on the rear of the HUD. Make sure to line up the white dot on the remote cable with the red dot on the HUD cable port. -
Page 10: Hud + Kestrel Connectivity
HUD + KESTREL CONNECTIVITY Turn HUD and Kestrel ON Press and hold the power button on the HUD. Press and hold the power button on the Kestrel. - Page 11 Connect HUD to your Kestrel » Enter the Kestrel’s Settings Menu by pressing the Settings Button. » Scroll down to Bluetooth line, ensure Bluetooth is toggled ‘On’ and press the center button. » Toggle Conct to Device using the left or right buttons.
- Page 12 NOTE: Check to the serial number either from the ‘About’ menu in the HUD Settings, or from the serial number sticker on the the back of your HUD to con rm it matches the HUD you choose to connect. NOTE: If your HUD does not appear, check the Bluetooth ON/ OFF setting in your HUD’s Settings menu and make sure you...
- Page 13 » Selecting your HUD will bring up the HUD Management screen. Once the connection is established the Rename eld will change from being underlined to being highlighted in black, indicating the connection is fully active. » Exit the Bluetooth menu by pressing the Settings Button until you return to the Solutions Screen.
-
Page 14: Screen Views & Features
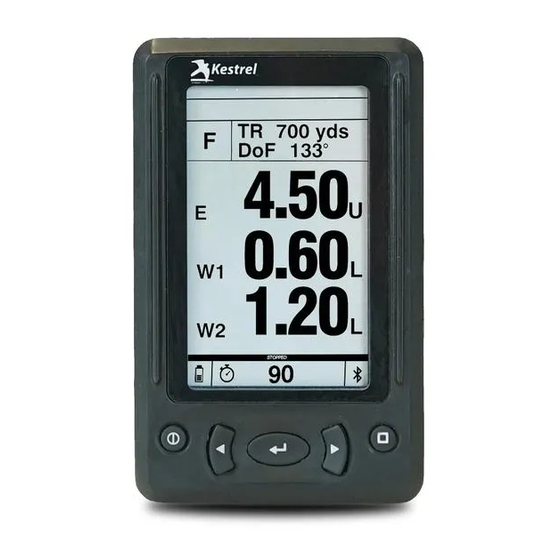
SCREEN VIEWS & NAVIGATION Single Target Screen - Regular Font Function Buttons (On HUD or Remote if available) Start/Stop Stage Timer Remote Change Target Range Change Wind Direction » Enter the Settings Menu and go to Single Target setup to change the values displayed on the two user settable elds, Single Target Row 1 and Single Target Row 2. - Page 15 Single Target Screen - Large Font Function Buttons (On HUD or Remote if available) Change Target Range Remote Change Wind Direction NOTE: Stage Timer not available on Single Target Large Font Screen.
-
Page 16: Function Buttons
Target Card Screen - Regular Font Function Buttons (On HUD or Remote if available) Start/Stop Stage Timer Remote Change Third Column » Enter the Settings Menu to change the Stage Timer Limit value. *Target Card and DOPE Card screens available only when paired with the... - Page 17 Target Card Screen - Large Font Function Buttons (On HUD or Remote if available) Start/Stop Stage Timer Remote Change Targets » Enter the Settings Menu to change the Stage Timer setting. *Target Card and DOPE Card screens available only when paired with the...
- Page 18 » Enter DOPE Card in the Settings Menu to update DOPE card data from a paired Kestrel. Set up the Range Card in your Kestrel rst as the HUD DOPE Card will mirror the Gun pro le, Environmentals, Wind etc in the Kestrel.
- Page 19 Settings Menu Navigation Function Buttons (On HUD or Remote if available) Scroll Up/Down Remote Enter Sub Menu / Start Command Make setting editable or start command Change setting Accept setting Exit Settings Menu...
-
Page 20: Settings Menu
SETTINGS MENU Bluetooth: » Bluetooth On/O - Turn Bluetooth o to lock HUD values and disable the radio. » Unlock (Appears if HUD is locked by a Kestrel) Stage Timer (Press center button to enter sub menu): » Timer Limit - Sets the starting amount of time on the stage timer. - Page 21 » Auto Shutdown - The time without button presses before automatic shutdown. NOTE: When HUD is connected to the Kestrel meter, auto shutdown is disabled. You must manually turn the HUD o . » Backlight - Choose between white, red or no backlight.
-
Page 22: Firmware Updates
FIRMWARE UPDATES NOTE: The Kestrel HUD is able to connect to the Kestrel LiNK Ballistics app for rmware updates ONLY. Connect Your HUD to the LiNK Ballistics App » Turn on your HUD and ensure Bluetooth is turned on. »... -
Page 23: Speci Cations
CE certi ed, RoHS, FCC, IC tested and WEEE compliant » Display and battery operational temperature limits: 14F – 131F/-10C – 55C Storage temperature: -22F – 140F / -30C – 60C » » Size & Weight – 2.25”x3.5”x1.125” (HUD Only) 185 grams (HUD & Mount) - Page 24 Kestrel Weather and Environmental ® Meters are designed and manufactured NIELSEN-KELLERMAN in the USA 21 Creek Circle Boothwyn, PA 19061 For more information and videos go to www.KestrelHUD.com 319063_1_20.01.10...
Need help?
Do you have a question about the HUD and is the answer not in the manual?
Questions and answers