Table of Contents
Advertisement
Quick Links
Paraquda
Startup & Safety Manual
Object No./Index
Released Date
Content
Reference
0000003/11
November 4, 2014
Advertisement
Table of Contents

Related Manuals for Essemtec Paraquda

Summary of Contents for Essemtec Paraquda
- Page 1 Paraquda Startup & Safety Manual Object No./Index 0000003/11 Released Date November 4, 2014 Content Reference...
- Page 2 The Paraquda works as is. Screenshots and description cover the actual behavior as far as possible. The content of this manual does not give any claim to software performance or implemented software features.
-
Page 3: Table Of Contents
Safety Cover..................................1-11 1.6.4 Operating Modes ................................1-12 Specific Warnings ................................. 1-13 1.7.1 Electrical Hazard................................1-13 1.7.2 Heat Hazard / High Temperatures .......................... 1-13 1.7.3 Chemical Hazard ................................1-14 1.7.4 Material Handling ................................. 1-14 Paraquda Startup & Safety © Essemtec AG... - Page 4 Overview .................................... 2-1 Equipment Application, Purpose ..........................2-2 2.2.1 Typical Application of a Paraquda ..........................2-2 2.2.2 Typical Application of a Paraquda with Dispenser ..................... 2-3 Module Description / Terms / Definitions ......................2-3 2.3.1 Safety Cover ..................................2-3 2.3.2 Conveyor ....................................
- Page 5 Solve Malfunctions / Handle unordered Stops ....................4-37 4.4.1 PCB could not be loaded ............................4-37 4.4.2 PCB could not be aligned automatically ......................4-37 4.4.3 Dot diameter could not be adjusted automatically (Option SC-ARM) ............4-37 Paraquda Startup & Safety © Essemtec AG...
- Page 6 Configure Directories (Paths) ............................5-2 Configure Network Drives ............................5-4 Configure the User Management ..........................5-5 Organize the Option Management .......................... 5-7 Recover the System ................................ 5-8 Material Safety Data Sheet (MSDS) Loctite 638 ..................................6-1 © Essemtec AG Paraquda Startup & Safety...
- Page 7 Contents Loctite 7063 ..................................6-7 Antistatik 100 bulk ............................... 6-13 Essemtec P&P Head Grease SP26/HG01 ....................... 6-18 Microlub GBU-Y 131 ..............................6-26 AFB-LF ....................................6-30 Paraquda Startup & Safety © Essemtec AG...
- Page 9 Paraquda. This Startup & Safety Manual and especially the safety regulations have to be observed by all persons who work with or at the Paraquda. Additionally, all local safety and environmental regulations have to be observed.
- Page 10 Meaning of pictogram: a pop up window giving a hint or a warning. The text of the pop up window is written next to the pictogram in a non proportional font. Example: Make sure that all boards are removed before continuing calibration © Essemtec AG Paraquda Startup & Safety...
- Page 11 Recipe Splitting Screen Screens are written in bold using capital and ... on Produce screen small letters. Cross Written in blue italic. see page Fehler! Es wurde Reference kein Textmarkenname vergeben. Paraquda Startup & Safety © Essemtec AG...
- Page 12 Context Info with QuickHelp and How to information – Info Page – Info Finder The Info Finder makes it easy to find the correct Paraquda manual, GUI tab or training block for a particular topic. Topic Manual GUI Tab Training...
- Page 13 Startup & Safety Settings Startup & Safety Setup / Produce Recipe Generating Startup & Safety Teach Safety Installation Startup & Safety Danger Zones Startup & Safety Labels Startup & Safety Schematics Maintenance xiii Paraquda Startup & Safety © Essemtec AG...
-
Page 14: November
Reader' added (handling of barcodes used for traceability, read by the top camera). Chapter 'Operating of the Machine - Teach a Recipe - Set up Label / Label Feeder' added (handling of label feeders, instruction how to create labels). © Essemtec AG Paraquda Startup & Safety... - Page 15 June 10, 2014 Adding description of eez feedback softkey in chapter GUI - screen sections. Description of setting up new touch screen monitor added to chapter HMI operating elements. Nov. 4, 2014 Handling of hyQ feeder enhanced. Paraquda Startup & Safety © Essemtec AG...
-
Page 17: Safety
Prohibited Use Not known at issue date. 1.2.3 Modifications It is forbidden to make any software or hardware modifications or extensions to the Paraquda. All modifications require the written consent of the equipment's manufacturer. Paraquda Startup & Safety © Essemtec AG... -
Page 18: Personnel Requirements
Management Responsibilities The management has to take care, that · personnel working with or at the Paraquda equipment is well trained in safety aspects and accident prevention and adhere to safety regulations. · the user documentation (machine manuals) is available at all times. -
Page 19: Installation / Movement / Storage - Personnel Profile
· Knows how to interpret material safety data sheets (MSDS). · Interprets hints and errors and takes correct action. · Follows approved technical methods in the operating of the Paraquda, modules or options of · Participates in regular trainings to maintain the required level of knowledge related to operate equipment and trains subordinate personnel as required. -
Page 20: Maintenance (Preventive And Corrective) - Personnel Profile
1.3.5 Conformation Statement All persons who are assigned to work with or at the Paraquda have to agree to the following statements before they start working with the Paraquda for the first time. They must commit themselves with their signature: ·... -
Page 21: Safety Information In User Documentation
Safety 1.4 Safety Information in User Documentation This section describes the safety information used in product manuals, instructions and other collateral information materials of the Paraquda machine. 1.4.1 Signal Words Throughout all manuals and other collateral information materials, attention is drawn to safety... -
Page 22: Safety Labels Attached To System
Indicates an electrical hazard. Contact may cause electric shock or burn. The machine must be switched off before removing any cover with this decal on it. CE mark for Paraquda The CE marking is a key indicator of a product's compliance with EU legislation. -
Page 23: Danger Zones And Location Of Safety Labels
HANDS CLEAR' are properly in place (see picture). A total of 4 labels are placed on the Plexiglas cover, two on the frontside of the machine and two on the rear side of the machine. Paraquda Startup & Safety © Essemtec AG... - Page 24 The cassette and the trays can move unexpectedly. Reaching into the tray changer can cause severe injury. Check that the safety labels indicating 'KEEP HANDS CLEAR' are properly in place (see picture). A total of 1 label is placed. © Essemtec AG Paraquda Startup & Safety...
-
Page 25: Safety Concept
DANGER / WARNING / CAUTION / NOTICE 1.6.2 Shutdown Appliances Note: The motors don't have mechanical breaks. Therefore after shutdown and turning off the main switch the axes can be moved manually. Paraquda Startup & Safety © Essemtec AG... - Page 26 The cover will remain locked. Electrical power supplies are switched off. Power between inlet and main switch is still alive 1-10 © Essemtec AG Paraquda Startup & Safety...
-
Page 27: Safety Cover
It is locked by the machine to avoid unintended opening. It can only be opened after request on GUI ( or after pressing the emergency switch. The machine will halt all moving parts. 1-11 Paraquda Startup & Safety © Essemtec AG... -
Page 28: Operating Modes
In the safety mode, the machine stops all moving parts. The safety covers can be opened. After closing both safety covers and pressing the START button or any move command, the covers will be locked again automatically. 1-12 © Essemtec AG Paraquda Startup & Safety... -
Page 29: Specific Warnings
High temperatures can ignite chemical substances. Avoid any contact of chemical substances with hot surfaces The X and Y Motors can reach temperatures of up to 95°C. Never touch the motors as long as the machine is powered up 1-13 Paraquda Startup & Safety © Essemtec AG... -
Page 30: Chemical Hazard
The XY Gantry with the Head may move left or right, back and forth unexpectedly. The head axes may move up and down unexpectedly. Keep body, hands and loose clothing clear of the XY Gantry and the head. 1-14 © Essemtec AG Paraquda Startup & Safety... -
Page 31: Magnetic Field
'no pacemaker' label. Keep ferromagnetic objects, tools, bankcards etc away from all parts with a strong magnetic field label. The Paraquda does not contain any remarkable magnetic fields. 1.7.7 Flash Light To stare into the bright light of the Bottom Camera could be harmful for the eyes. -
Page 32: Electrostatic Discharge (Esd)
The owner of the equipment is responsible for ensuring that this Startup & Safety Manual manual is available all the time. As a general rule it is kept close to the equipment, visible and easily accessible. 1-16 © Essemtec AG Paraquda Startup & Safety... -
Page 33: Ce-Declaration Of Conformity
Safety 1.9 CE-Declaration of Conformity 1-17 Paraquda Startup & Safety © Essemtec AG... -
Page 35: Equipment Overview
2.1 Overview For better visibility of subjacent functions, covers have been removed or opened before taking pictures. In standard operating mode all covers have to be in place at any time. Paraquda Startup & Safety © Essemtec AG... -
Page 36: Equipment Application, Purpose
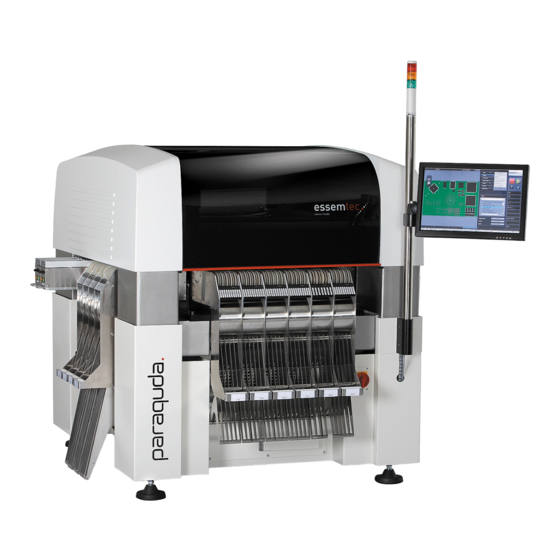
Signal Tower 2.2 Equipment Application, Purpose The Paraquda equipment with all its components is designed to fulfill the requirements of a SMT (Surface Mount Technology) production. The SMD (Surface Mount Device) components are picked out of feeders or trays and placed on a Printed Circuit Board (PCB). -
Page 37: Typical Application Of A Paraquda With Dispenser
Equipment Overview 2.2.2 Typical Application of a Paraquda with Dispenser Empty Printed Circuit Paraquda equipped Component filling with dispenser Board (PCB) or any Applying adhesive other substrate bumps Solder paste, adhesive etc. or other media 2.3 Module Description / Terms / Definitions 2.3.1... -
Page 38: Conveyor
500 mm or 750 mm. The extension is screwed on the input/output stage and uses the motor of the stage. The existing belt of the input/output stage has to be exchanged with a belt of the correct length. © Essemtec AG Paraquda Startup & Safety... -
Page 39: Production Area
PCB from machine to machine in an inline system. 2.3.3 Production Area Overview The production area contains the whole travel range of the head, usable for production, inclusive of PCB table, conveyor range, feeder pick positions etc. Paraquda Startup & Safety © Essemtec AG... -
Page 40: Pcb Table
The PCB holders are universal and do not need any tooling to change from one PCB size to another. All parts are fixed magnetically, which allows a quick modification but strong force during operation. © Essemtec AG Paraquda Startup & Safety... -
Page 41: Machine Coordinate System
Point of origin of the Z axis (Z zero height) is the surface of the calib station. An ascending Z value means axis moving from bottom to top. Theta axis (T) Rotational axis, rotation around Z axis. Paraquda Startup & Safety © Essemtec AG... -
Page 42: Rack / Feeder
Feederracks can be mounted on all four sides of the machine. Each side has rack space for 60 feeder lanes. This gives a maximum of 240 feeder lanes with 8 mm width. © Essemtec AG Paraquda Startup & Safety... - Page 43 Pick-&-Place system. Tape Feeder Tape feeders are designed for tape-packed SMD components (tape carriers, tape and reel). Stick Feeder Stick feeders are designed for stick-packed SMD components (stick carriers). Paraquda Startup & Safety © Essemtec AG...
- Page 44 Therefore in the recipe, the labels are handled as a component. 2-10 © Essemtec AG Paraquda Startup & Safety...
-
Page 45: Tray Area
Tray areas can be defined on screen System - Accessories - Feeder. There is the choice of three different sizes for the tray area. Usually for Paraquda machines, the medium size is chosen. 2.3.8 Tray Holder Overview Large components (i.e. -
Page 46: Tray Changer Q (Tcq)
(access to all components on the single tray without tray changer activity). The TCQ can be mounted at various positions on the machine. 2-12 © Essemtec AG Paraquda Startup & Safety... -
Page 47: Toolchanger
Equipment Overview 2.3.10 Toolchanger Overview The Paraquda is capable to support up to three toolchangers to ensure machine performance for fully equipped machines. To place with confidence the different component types and sizes there are different types of nozzles available to match these requirements. - Page 48 Y motors (Y, Y1) and which builds the X axis for the head. P&P Head The Pick-&-Place Head includes the top camera and the ZT elements (Z and Theta axis). 2-14 © Essemtec AG Paraquda Startup & Safety...
- Page 49 ZT Elements The ZT elements consist of Z and Theta axis. The Paraquda has a total of 4 independent ZT elements (4 independent axes for Z, 4 independent axes for rotation), driven by servo motors. The rotation axis is also known as the Theta axis and can rotate a component 360°.
-
Page 50: Vision
Equipment Overview Z Elements The Z elements consist of the Z axis. Depending on the machine configuration, the Paraquda can have a total of 4 independent Z elements (4 independent axes for Z), driven by servo motors. 2.3.12 Vision Overview... - Page 51 (rotation) of the workpiece by means of fiducials. · to detect badmarks and badchecks on multiple printed panels. The top vision consists of a high-resolution video camera and a direct illumination system controlled by the software. 2-17 Paraquda Startup & Safety © Essemtec AG...
-
Page 52: Calib Station
· CVU (Component Verification Unit), the unit for electrical measurements · Cleaning Station, to suck away contamination on dispense tips · Dispense Plate, for checking dispensed dots and lines 2-18 © Essemtec AG Paraquda Startup & Safety... -
Page 53: Reject Bin
2.3.16 Medium Trash Overview The purpose of the medium trash is a drain for the collection of dispense material during purge cycles or if the head is on park position. 2-19 Paraquda Startup & Safety © Essemtec AG... -
Page 54: Machine Identification
Equipment Overview 2.4 Machine Identification Identification Plate The identification plate is located at the front side of the machine (right hand side), close to the main power switch. 2-20 © Essemtec AG Paraquda Startup & Safety... -
Page 55: Human Machine Interface Hmi
For better visibility of subjacent functions, covers have been removed or opened before taking pictures. In standard operating mode all covers have to be in place at any time. Paraquda Startup & Safety © Essemtec AG... -
Page 56: Operating Elements
The energy for the motors will be switched off as soon as all axes stopped. Electronic control system, PC and monitor are still powered. Compressed air is not discontinued. © Essemtec AG Paraquda Startup & Safety... - Page 57 1440 x 900 pixels is mounted at the signal tower on the right side of the machine. Depending on the serial number of the machine, different monitor types are possible (monitor a, monitor b etc.) Paraquda Startup & Safety © Essemtec AG...
- Page 58 But in case of a bad setup, the settings below are possible. For a detailed description, consult the manual of the monitor. Every button can have different functions, depending on the menu. On/Off Switch on and off © Essemtec AG Paraquda Startup & Safety...
- Page 59 MENU Opens the OSD menu. Navigate with +/- buttons and press MENU again to enter the selected submenu. Close the OSD menu by pressing AUTO POWER To switch on or off the monitor Paraquda Startup & Safety © Essemtec AG...
- Page 60 The USB connectors are used to plug in memory sticks for storing and/or loading data or to connect option dongles. There are up to 2 USB connectors in front of the machine (front connectors of the PC). © Essemtec AG Paraquda Startup & Safety...
-
Page 61: Feeder Led
The Feeder LEDs are showing status and usage of the feeder lanes. Note: Not all of the feeders have control LEDs Refer to the online help Produce - Pick Control for details of the various status. Paraquda Startup & Safety © Essemtec AG... -
Page 62: Barcode Reader
It is also a basis for traceability solutions. 3.1.7 LAN Connection Overview The LAN interface (Ethernet 10/100/1000) allow the network connection for remote troubleshooting, recipe transfer, CAD data transfer, database access etc. © Essemtec AG Paraquda Startup & Safety... -
Page 63: Graphical User Interface (Gui)
The screen is divided into seven main sections. This structure appears on most screens. Per Tab, Menu and Submenu, a complete Screen exists. For example it is said 'the screen Overview', which consist of graphics, parameters, submenus and softkeys. # Term Description Paraquda Startup & Safety © Essemtec AG... - Page 64 An additional softkey is for calling the eez-Feedback. In case of wrong behavior of the machine, by means of this function an e-mail can be sent to the manufacturer or a zip file can be created. 3-10 © Essemtec AG Paraquda Startup & Safety...
-
Page 65: Color Concept
Selected or active items on graphical section in some use cases. Indicates the completion of a setup or process. In general red indicates a fault, a problem or a missing operation. 3-11 Paraquda Startup & Safety © Essemtec AG... - Page 66 Module Before 1st Initialization Initialized Real Not initialized (error) Yes Real Initialized Real Not initialized (error) No Real Initialized Real Not initialized (error) Yes Real Initialized Real Not initialized (error) No Real 3-12 © Essemtec AG Paraquda Startup & Safety...
-
Page 67: Navigation Techniques
Settings GUI Settings Edit On-screen keyboard Save If the keyboard pops up at an inappropriate position on the screen, it can be moved to any position by using the moving buttons (1). 3-13 Paraquda Startup & Safety © Essemtec AG... -
Page 68: Toolbar
To indicate that the bottom view is shown, the button gets blue and the text 'Bottom View' pops up in the bottom left corner of the graphical section. 3-14 © Essemtec AG Paraquda Startup & Safety... - Page 69 Toggles through 8 auxiliary lines (none, crosshairs, small square, medium square, big square, small circle, medium circle, big circle). Virtual component / recipe overlay. Measurement function. 3-15 Paraquda Startup & Safety © Essemtec AG...
-
Page 70: Online Help
· Next Step (optional): next logical steps · Quick Access: fast access to toolbar function description to activate Context Info The Context Info is displayed within the graphical section. press again to deactivate Context Info (toggle button) 3-16 © Essemtec AG Paraquda Startup & Safety... - Page 71 The following information can be retrieved or downloaded: · Safety Information · Glossary, Acronyms and Abbreviations · Manuals Unpacking Instruction – Installation – Startup & Safety – Machine Maintenance – 3-17 Paraquda Startup & Safety © Essemtec AG...
-
Page 72: Alarm Messages
The Alarm Log is displayed within the graphical section (1). On top of the alarm list a statistical summary is displayed. To filter out certain alarm levels (2) Note: For detailed information, please consult the online help. 3-18 © Essemtec AG Paraquda Startup & Safety... -
Page 73: Operating Of The Machine
In standard operating mode all covers have to be in place at any time. 4.1 Power up the Machine Read the Safety chapter in this manual before powering up the machine. Paraquda Startup & Safety © Essemtec AG... - Page 74 [H_1] is displayed to set the hysteresis. It must be set to '0'. Press Set again to save the hysteresis, afterwards press Set for 2 seconds to finalize the adjustment and change to the measurement mode. © Essemtec AG Paraquda Startup & Safety...
- Page 75 Make sure the emergency stop buttons on both sides of the machine are released (turn clockwise to release). Make sure no foreign objects are inside of the machine and no risk of collision exists. Paraquda Startup & Safety © Essemtec AG...
- Page 76 ID and enter the password (if required). Login Note: As long as no user has been logged in, ePlace always appears in English. After the login, ePlace switches to the user related language immediately. © Essemtec AG Paraquda Startup & Safety...
- Page 77 (by measuring the electrical current). The machine is now ready for production. Selecting another User ID Overview Logout After logout follow the login procedure described above. Paraquda Startup & Safety © Essemtec AG...
-
Page 78: Stop And Shut Down The Machine
The energy for the motors will be switched off as soon as all axes stopped. Electronic control system, PC and monitor are still powered. Compressed air is not discontinued. © Essemtec AG Paraquda Startup & Safety... -
Page 79: Power Loss
In case of any differences between the picture of the machine and the real appearance on the board, detailed information how to proceed can be found in chapter 'Solve Malfunctions / Handle unordered Stops' on page 4-37 Paraquda Startup & Safety © Essemtec AG... -
Page 80: Unordered Stops
(START button) to continue production. If the problem is more serious an error message or warning will be displayed giving detailed information for troubleshooting. © Essemtec AG Paraquda Startup & Safety... - Page 81 PCB logically. This ensures that the machine keeps track of the status of all material. For details in problem solving, refer to chapter 'Solve Malfunctions / Handle unordered Stops' on page 4-37. Paraquda Startup & Safety © Essemtec AG...
-
Page 82: Operate The Production
A job consists of many information for the machine. The following page provides an insight into the huge data pool of a P&P job. The subsequent page shows the parameter interactions for a Dispense job. 4-10 © Essemtec AG Paraquda Startup & Safety... - Page 83 Operating of the Machine 4-11 Paraquda Startup & Safety © Essemtec AG...
- Page 84 Operating of the Machine 4-12 © Essemtec AG Paraquda Startup & Safety...
-
Page 85: Prepare The Production
Tighten the lever screws on both sides of the conveyor backrail (see picture). If there is any reason the lever screw cannot turn all around, pull it out slightly and turn it back. Close the cover. 4-13 Paraquda Startup & Safety © Essemtec AG... - Page 86 Check PCB Support Pins Check for correct height, for correct support spots and in case of double sided assembly that the pins do not destroy any placed components. 4-14 © Essemtec AG Paraquda Startup & Safety...
- Page 87 · Production Speed [%]: for each move the speed is set to the appropriate percentage (1 .. 100%). Note: Production speed less than 100% will decrease the CPH (Components / Dispensing Patterns Per Hour). 4-15 Paraquda Startup & Safety © Essemtec AG...
-
Page 88: Run The Production
PCBs defined in the job. 4.3.3 Stop the Production Stop at any time Any Tab Any Menu Any Submenu (STOP button) The already picked component will be processed before the machine stops. 4-16 © Essemtec AG Paraquda Startup & Safety... -
Page 89: Handle Flx Feeders (Tape&Reel)
Note: A continuous red light could also indicate a bad pick position (X/Y/height). After a certain amount of faulty repicks (default 3), the LED turns to continuous red. 4-17 Paraquda Startup & Safety © Essemtec AG... - Page 90 Pull out the cover tape spool with the winded cover tape. Pull apart the magnetic held cover tape spool. Remove the winded cover tape and cut it up. Open the downholder. Pull the remaining tape out of the machine 4-18 © Essemtec AG Paraquda Startup & Safety...
- Page 91 Thread the tape as shown on picture (for lower positioned reels). Slide it into the empty rail. Position the tape over the sprocket in the manner that the teeth gear into the sprocket holes of the tape. 4-19 Paraquda Startup & Safety © Essemtec AG...
- Page 92 Look after the correct placement of the face gear, it must be on gear side of the feed mechanism (see next picture). Place the cover tape spool on the feed mechanism. 4-20 © Essemtec AG Paraquda Startup & Safety...
- Page 93 If the comparison is successful the component will get the checked status. 4-21 Paraquda Startup & Safety © Essemtec AG...
-
Page 94: Handle Hyq Feeders (Tape&Reel)
Note: A continuous red light could also indicate a bad pick position (X/Y/height). After a certain amount of faulty repicks (default 3), the LED turns to continuous red. 4-22 © Essemtec AG Paraquda Startup & Safety... - Page 95 The 8 mm feeder has two lanes, therefore contains also two reels (upper reel for left lane, lower reel for right lane). Insert the new reel, full of components (upper and/or lower reel). 4-23 Paraquda Startup & Safety © Essemtec AG...
- Page 96 (1). Lift the downholder (2) and thread the tape like on picture (without cover tape). Release the downholder. From lower reel, thread up tape and cover tape on right lane (1). 4-24 © Essemtec AG Paraquda Startup & Safety...
- Page 97 (without cover tape). Release the downholder. Thread up the cover tape passing the edge like on picture (left and/or right lane). Cut the cover tape by means of the built in cutter. 4-25 Paraquda Startup & Safety © Essemtec AG...
- Page 98 Operating of the Machine Pass the cover tape along the outside of the feeder (see picture). 4-26 © Essemtec AG Paraquda Startup & Safety...
- Page 99 Check the correct feeding of the component, it must be presented correctly, ready for picking (1). Check also for correct orientation of the component. Check the correct feeding of tape and cover tape. 4-27 Paraquda Startup & Safety © Essemtec AG...
- Page 100 If the comparison is successful the component will get the checked status. 4-28 © Essemtec AG Paraquda Startup & Safety...
-
Page 101: Handle Feeders (Sticks)
In case of the orientation is not known, do the following steps: Produce Pick Control In the graphical section zoom in the pick position of the appropriate stick to detect the required orientation (1). 4-29 Paraquda Startup & Safety © Essemtec AG... - Page 102 If the comparison is successful the component will get the checked status. 4-30 © Essemtec AG Paraquda Startup & Safety...
-
Page 103: Handle Trays
In case of the orientation is not known, do the following steps: Produce Pick Control In the graphical section zoom in a pick position of the appropriate tray to detect the required orientation (1). 4-31 Paraquda Startup & Safety © Essemtec AG... - Page 104 (correct position and correct orientation). Select the component on the appropriate tray by double clicking. The camera window opens automatically and the camera moves to the pick up position (see picture). 4-32 © Essemtec AG Paraquda Startup & Safety...
-
Page 105: Handle Tray Changer Q (Tcq)
Close the door after finishing. No further actions are necessary. Unload Tray Changer Produce Production Settings Unload Traychanger to unload the tray changer (from the production area to the cassette). 4-33 Paraquda Startup & Safety © Essemtec AG... - Page 106 The Elev button, as an exception, is described above ('Manipulate Tray(s) and Cassettes'). Some of the buttons are used in case of a malfunction. This case is described in the chapter 'Solve Malfunctions / Handle unordered Stops' on page 4-37. 4-34 © Essemtec AG Paraquda Startup & Safety...
-
Page 107: Qualify The Output
The results can be used to correct or improve the process on the Paraquda. Analyze output manually off-site the machine Similar to the AOI the dispensed PCBs are inspected off-site the machine manually by means of magnifying glass or other utilities. - Page 108 · correct dot sizes and dispensing patterns · correct dispensing result (no splashes etc.) The results can be used to correct the process on the Paraquda. Correct the Process The corrections of the process are manyfold, depending on the result of the inspection. In most cases expert knowledge is necessary to adjust parameters on the machine.
-
Page 109: Solve Malfunctions / Handle Unordered Stops
· Check if the adjust factor has the correct setting on screen Teach - Medium - Setting - Dot- /Linestyle. · Check if the medium is still within the pot life. · Check if the medium is not empty. 4-37 Paraquda Startup & Safety © Essemtec AG... -
Page 110: Component Pick Up Was Not Successful
XY position is correct. If this is not the case, do the above steps before (wrong X/Y position of component) Autocorrect offset to correct the Z height. 4-38 © Essemtec AG Paraquda Startup & Safety... -
Page 111: Jumping Components During Feed
Probably improve clamping by cleaning the tape disposal and removing components lying around. If the actions do not show any effect, set up another feeder with the component. Indicate problematic feeder lane for an analysis by Essemtec. 4.4.6 Tape jam on feeder Possible cause: Tape disposing channel blocked or jammed components Clean the tape disposal and remove components lying around. -
Page 112: Pick Position Covered With Cover Tape
Pull back the tape to avoid wasting components and to avoid aftereffects like tape jam. Check the claw for damages. If the actions do not show any effect, set up another feeder with the component. Indicate problematic feeder lane for an analysis by Essemtec. 4.4.8 Component get lost during movement... -
Page 113: Component Vision Inspection Failed
Out of the package list, select the appropriate package. Edit Teach Package Dimension Possible cause: Geometrical parameters not valid Compare the geometrical specs of the appropriate component with the values in the recipe. 4-41 Paraquda Startup & Safety © Essemtec AG... -
Page 114: Components Visible On Gui, But Missing On Pcb
The reasons are manyfold. Check the tray changer conveyor for correct function. Check for components lying on the conveyor or the stage at pick position. Check for smooth sliding of the trays. 4-42 © Essemtec AG Paraquda Startup & Safety... - Page 115 Reset on the tray changer control panel to reset the tray changer. The system should be ready now to continue. 4-43 Paraquda Startup & Safety © Essemtec AG...
-
Page 116: Set Up The Production
A job consists of many information for the machine. The following page provides an insight into the huge data pool of a P&P job. The subsequent page shows the parameter interactions for a Dispense job. 4-44 © Essemtec AG Paraquda Startup & Safety... - Page 117 Operating of the Machine 4-45 Paraquda Startup & Safety © Essemtec AG...
- Page 118 Operating of the Machine 4-46 © Essemtec AG Paraquda Startup & Safety...
-
Page 119: Define A Job
PCBs to produce. Parameter text field Product name and enter a product name (optional). Parameter text field Order number and enter an order number (optional). Parameter text field Customer and enter the customer (optional). 4-47 Paraquda Startup & Safety © Essemtec AG... -
Page 120: Assign Components To The Feeder
The proposal can be printed and used as picking list to set up the machine. Note: For the optimization only the current job is taken into account. 4-48 © Essemtec AG Paraquda Startup & Safety... - Page 121 Save setup as... if the setup must be stored. Type in a name and confirm with Save. Program feeders to assume the new setup. Print to get a printout for the setup. 4-49 Paraquda Startup & Safety © Essemtec AG...
-
Page 122: Assign Medium To Dispense Valves
· the process (e.g. glue / solder / dam etc.) Steps 1 to 3 are preparation steps in case of non existent medium and dispense set. Step 4 is the real kitting procedure. 4-50 © Essemtec AG Paraquda Startup & Safety... - Page 123 See online help for further information. If available and desired, a datasheet can be attached (press key Add datasheet) Teach Medium Save or Save as... to save the new medium. 4-51 Paraquda Startup & Safety © Essemtec AG...
- Page 124 If a new dispensing set was created, some dispensing functions are not executable (e.g. Testdot etc.) as long as step 4 has not been performed . 4-52 © Essemtec AG Paraquda Startup & Safety...
- Page 125 · A purge cycle should be performed to get the media through the valve. Probably the cycle has to be repeated. · Calibrate valve. Save to save the configuration (5). 4-53 Paraquda Startup & Safety © Essemtec AG...
-
Page 126: Set Up And Connect The Feeders
Feeder Assistant Parameter text field Barcode, type in the barcode of the feeder to place or use the barcode reader The correct position to slide in is displayed In the graphical section. 4-54 © Essemtec AG Paraquda Startup & Safety... -
Page 127: Optimize The Process
If the comparison is successful the component will get the checked status. 4-55 Paraquda Startup & Safety © Essemtec AG... -
Page 128: Change Over A Product
Note: Please refer to the online help for detailed information on each topic. Recipe Modifications: if recipe data changes during running production (e.g. new light profile), the job has to be re-loaded to assume the changes. 4.6.1 Define Components Overview Composition of a Recipe 4-56 © Essemtec AG Paraquda Startup & Safety... - Page 129 Operating of the Machine 4-57 Paraquda Startup & Safety © Essemtec AG...
- Page 130 Type in the name of the new carrier type and click Save Note: If the packages applicable to the new carrier type already exist, they can be assigned to the new carrier type by using the menu Teach - Carrier Types - Package. 4-58 © Essemtec AG Paraquda Startup & Safety...
- Page 131 Choose and define the desired marking of the package (e.g. pin 1 etc.). See online help for details. Teach Package Process Parameters Type in the correct process parameters for the new package (see online help for detailed information of each parameter). 4-59 Paraquda Startup & Safety © Essemtec AG...
- Page 132 Choose the found profile or store a new one with the exact settings found. Teach Fiducial Save as... Type in the name of the new fiducial and click Save. 4-60 © Essemtec AG Paraquda Startup & Safety...
-
Page 133: Define Dispense Components
Usually a dispense pattern is assigned to a package. However a dispense component is a pattern without any assignment to a package. A dispense component can be a dot, a line, a circle, rectangle or any domino pattern. Overview Composition of a Recipe 4-61 Paraquda Startup & Safety © Essemtec AG... - Page 134 Operating of the Machine 4-62 © Essemtec AG Paraquda Startup & Safety...
- Page 135 (online help) for creating a dot, line, curve or pattern. Change process sequence Teach Recipe Process Sequences Change the default process Pick-&-Place to the previously defined dispensing process for the new dispensing component. 4-63 Paraquda Startup & Safety © Essemtec AG...
-
Page 136: Configure Feeders
Configuration Feeders New feeder Enter feeder name, choose type and model and enter ID and barcode. Save to save the new created feeder. Note: It is not possible to edit a feeder 4-64 © Essemtec AG Paraquda Startup & Safety... -
Page 137: Edit/Convert Cad Data
(2) Taught component orientation in the – carrier (pick orientation) Common component placements. Note: As illustrated on the right this is a suggestion of common component placement and can differ from client to client 4-65 Paraquda Startup & Safety © Essemtec AG... - Page 138 In case the CAD data are splitted into 2 files, load the second CAD file as follows: Load second CAD file (1). Select the second CAD file out of the poping up CAD file list (2). Load (3). 4-66 © Essemtec AG Paraquda Startup & Safety...
- Page 139 Note: As long as the adjust file is enabled, the enforced replacements (column designator, column separator, package, value, rotation) are recorded to build up or to extend the file. The file will be stored after changing the menu or a tab. 4-67 Paraquda Startup & Safety © Essemtec AG...
- Page 140 The component changes to green (1) and get a name. That means the package with the dedicated value has been recognized what further means a component with appropriate package and value already exists. No further action is necessary. 4-68 © Essemtec AG Paraquda Startup & Safety...
- Page 141 Teach - Fiducial) then click on the red component field of the appropriate fiducial row (1). Select Type Fiducial (2) and select the adequate fiducial out of the drop down list (3). Save 4-69 Paraquda Startup & Safety © Essemtec AG...
- Page 142 · First Line / Last Line: Some CAD files have heading and footing rows which are not relevant for the machine. To mask out these rows select the first relevant row and press the softkey Define first line, select the last relevant row and press the softkey Define last line. 4-70 © Essemtec AG Paraquda Startup & Safety...
- Page 143 This list shows all unknown Components (unknown values). Select one to define a new component (2). New (3) to create the new component. Go to step 'Create new Component' in chapter 'Define Components' (page 4-56). 4-71 Paraquda Startup & Safety © Essemtec AG...
-
Page 144: Generate A Recipe
· Process parameters (speed, offset, nozzle, light etc.) · Electrical value with unit and tolerances · Component position and orientation on PCB · Component orientation on feeder Teach Recipe Select recently created recipe Edit 4-72 © Essemtec AG Paraquda Startup & Safety... - Page 145 · Production Variants: up to 4 variants can be defined (same PCB, various components). · Process Sequences: up to four processes can be defined (e.g. pick-&-place, glue, solder etc.) 4-73 Paraquda Startup & Safety © Essemtec AG...
-
Page 146: Generate A Panel Recipe
Type in the offset in X and Y (edge distance of single cut PCB to the edge of the panel). Enter the number of single cut PCBs in X and in Y. Enter the pitch in X and Y. 4-74 © Essemtec AG Paraquda Startup & Safety... -
Page 147: Set Up Head Barcode Reader
To use a barcode as PCB ID for the traceability, read by the top camera of the machine, a few steps are necessary: · Create barcode which defines the physical size of the barcode and the code type. · Add barcode to recipe and assign it as PCB ID. 4-75 Paraquda Startup & Safety © Essemtec AG... - Page 148 Recipe The dialog pops up to save the created barcode. Yes to save the new created barcode. In the Save as dialog, type in a name for the barcode and press Save 4-76 © Essemtec AG Paraquda Startup & Safety...
-
Page 149: Set Up Label / Label Feeder
· Add the component to the recipe at the position where the label shall be placed. · Add the barcode to the recipe, assign it as PCB ID and link it to the identifier of the created component. · Define the process sequences and constraints if needed. 4-77 Paraquda Startup & Safety © Essemtec AG... - Page 150 Operating of the Machine Note: To access package and carrier type, described in following steps, the Essemtec Library and the Actual Library have to be synchronized (System - Library - Package / System - Library - Carrier types)). Add a Label to the Chip Template As factory setting, a label has been added as chip package to the package library.
- Page 151 Produce - Pick Control. · Increase Place time [ms] if the label sticks on nozzle when rejecting on reject bin during production (max. to 500ms, try with less). 4-79 Paraquda Startup & Safety © Essemtec AG...
- Page 152 · Size X [mm], the width of the used label carrier · Y pitch [mm], the pitch (feed motion) of the physical label tape Teach Carrier Types Save as... to save the new carrier type under a different name. 4-80 © Essemtec AG Paraquda Startup & Safety...
- Page 153 The width (size X) of the carrier type (tape) shall always be 56 mm so that the tape is centered on the label feeder. The pitch in Y has to be according to the tape where the label is on. The created component will be stored in the next step. 4-81 Paraquda Startup & Safety © Essemtec AG...
- Page 154 The machine lists the existing light profiles which are close to the found settings. Choose one of the found profile. The created barcode will be stored in the next step. 4-82 © Essemtec AG Paraquda Startup & Safety...
- Page 155 In the columns 'X', 'Y', 'Rot', type in the necessary coordinates to place the label at the correct position on the PCB (the label is visualized in the graphical section). The recipe will be stored in a later step. 4-83 Paraquda Startup & Safety © Essemtec AG...
- Page 156 Teach Recipe Placement Constraints To finalize the recipe, go back to: Teach Recipe Save or Save as... to save the recipe. 4-84 © Essemtec AG Paraquda Startup & Safety...
-
Page 157: Install And Configure Software
Install and Configure Software 5.1 Install new Software or Updates Note: When the Paraquda is delivered, the software is already installed. Because of continuous product improvement it might become necessary to update the software. Installer To install new software or to update existing software, do the following: ·... -
Page 158: Configure Directories (Paths)
Note: In case of dispersed data places (data placed in a network), see also chapter 'Configure Network Drives' on page 5-4. © Essemtec AG Paraquda Startup & Safety... - Page 159 Parameter, select one of the following value for each parameter: · Default: to set the default path on local drive. · File location: for freely path entry. · Database: to select the database entered on database settings. Paraquda Startup & Safety © Essemtec AG...
-
Page 160: Configure Network Drives
On the PC containing the directory to share, start the Windows Explorer (File Explorer). Right click on the desired directory. Properties. Click on tab Sharing. Share. Select Everyone (1) and (2). Add (3). Set Permission Level to Read/Write. Share. Done. © Essemtec AG Paraquda Startup & Safety... -
Page 161: Configure The User Management
· Enter New password (the password is optional, can be omitted). · Confirm new password (if a password is used, otherwise leave it blank). Save Paraquda Startup & Safety © Essemtec AG... - Page 162 To delete a super user is only possible if this super user is logged in. Select the user to delete (1) Delete Yes to confirm deletion © Essemtec AG Paraquda Startup & Safety...
-
Page 163: Organize The Option Management
Select Read only to define what user group (and lower) should read only rights to the choosen tabs, screens, parameters and commands. Save Select the Display level (e.g. Standard user) again to check the new setup. 5.5 Organize the Option Management Note: Not available at print time. Paraquda Startup & Safety © Essemtec AG... -
Page 164: Recover The System
Install and Configure Software 5.6 Recover the System Note: Not available at print time. © Essemtec AG Paraquda Startup & Safety... -
Page 165: Material Safety Data Sheet (Msds)
Material Safety Data Sheet (MSDS) 6.1 Loctite 638 Paraquda Startup & Safety © Essemtec AG... - Page 166 Material Safety Data Sheet (MSDS) © Essemtec AG Paraquda Startup & Safety...
- Page 167 Material Safety Data Sheet (MSDS) Paraquda Startup & Safety © Essemtec AG...
- Page 168 Material Safety Data Sheet (MSDS) © Essemtec AG Paraquda Startup & Safety...
- Page 169 Material Safety Data Sheet (MSDS) Paraquda Startup & Safety © Essemtec AG...
- Page 170 Material Safety Data Sheet (MSDS) © Essemtec AG Paraquda Startup & Safety...
-
Page 171: Loctite 7063
Material Safety Data Sheet (MSDS) 6.2 Loctite 7063 Paraquda Startup & Safety © Essemtec AG... - Page 172 Material Safety Data Sheet (MSDS) © Essemtec AG Paraquda Startup & Safety...
- Page 173 Material Safety Data Sheet (MSDS) Paraquda Startup & Safety © Essemtec AG...
- Page 174 Material Safety Data Sheet (MSDS) 6-10 © Essemtec AG Paraquda Startup & Safety...
- Page 175 Material Safety Data Sheet (MSDS) 6-11 Paraquda Startup & Safety © Essemtec AG...
- Page 176 Material Safety Data Sheet (MSDS) 6-12 © Essemtec AG Paraquda Startup & Safety...
-
Page 177: Antistatik 100 Bulk
Material Safety Data Sheet (MSDS) 6.3 Antistatik 100 bulk 6-13 Paraquda Startup & Safety © Essemtec AG... - Page 178 Material Safety Data Sheet (MSDS) 6-14 © Essemtec AG Paraquda Startup & Safety...
- Page 179 Material Safety Data Sheet (MSDS) 6-15 Paraquda Startup & Safety © Essemtec AG...
- Page 180 Material Safety Data Sheet (MSDS) 6-16 © Essemtec AG Paraquda Startup & Safety...
- Page 181 Material Safety Data Sheet (MSDS) 6-17 Paraquda Startup & Safety © Essemtec AG...
-
Page 182: Essemtec P&P Head Grease Sp26/Hg01
Material Safety Data Sheet (MSDS) 6.4 Essemtec P&P Head Grease SP26/HG01 6-18 © Essemtec AG Paraquda Startup & Safety... - Page 183 Material Safety Data Sheet (MSDS) 6-19 Paraquda Startup & Safety © Essemtec AG...
- Page 184 Material Safety Data Sheet (MSDS) 6-20 © Essemtec AG Paraquda Startup & Safety...
- Page 185 Material Safety Data Sheet (MSDS) 6-21 Paraquda Startup & Safety © Essemtec AG...
- Page 186 Material Safety Data Sheet (MSDS) 6-22 © Essemtec AG Paraquda Startup & Safety...
- Page 187 Material Safety Data Sheet (MSDS) 6-23 Paraquda Startup & Safety © Essemtec AG...
- Page 188 Material Safety Data Sheet (MSDS) 6-24 © Essemtec AG Paraquda Startup & Safety...
- Page 189 Material Safety Data Sheet (MSDS) 6-25 Paraquda Startup & Safety © Essemtec AG...
-
Page 190: Microlub Gbu-Y 131
Material Safety Data Sheet (MSDS) 6.5 Microlub GBU-Y 131 6-26 © Essemtec AG Paraquda Startup & Safety... - Page 191 Material Safety Data Sheet (MSDS) 6-27 Paraquda Startup & Safety © Essemtec AG...
- Page 192 Material Safety Data Sheet (MSDS) 6-28 © Essemtec AG Paraquda Startup & Safety...
- Page 193 Material Safety Data Sheet (MSDS) 6-29 Paraquda Startup & Safety © Essemtec AG...
-
Page 194: Afb-Lf
Material Safety Data Sheet (MSDS) 6.6 AFB-LF 6-30 © Essemtec AG Paraquda Startup & Safety... - Page 195 Material Safety Data Sheet (MSDS) 6-31 Paraquda Startup & Safety © Essemtec AG...
- Page 196 Material Safety Data Sheet (MSDS) 6-32 © Essemtec AG Paraquda Startup & Safety...
Need help?
Do you have a question about the Paraquda and is the answer not in the manual?
Questions and answers