
Subscribe to Our Youtube Channel
Summary of Contents for Extech Instruments RH550
- Page 1 USER MANUAL Humidity/Temperature Chart Recorder with Touch-Screen and Dew Point calculation MODEL RH550...
-
Page 2: Table Of Contents
Table of Contents 1. INTRODUCTION 1.1 Key Features 1.2 Common Applications 2. DESCRIPTION 3. BASIC OPERATION 3.1 Setting up the RH550 3.2 Meter Power 3.3 Main Interface Screen 3.4 Main Operating Modes (LIVE and RECORD) 4. MAIN MENU 4.1 GENERAL SETUP 4.2 RECORDING SETUP... -
Page 3: Introduction
Thank you for selecting the Extech RH550 Humidity/Temperature Chart Recorder with Touch- Screen. The RH550 measures and records temperature, relative humidity, and dew point in real time and displays the readings in digital and graphic formats. The touch-screen menu allows you to program datalogging parameters and to customize the graphic display. -
Page 4: Description
USB jack (for powering the meter and connecting to a PC) Temperature/Relative Humidity sensor (shown connected to the cradle jack) Power ON-OFF button Sensor extension cable (RH550-C) Wall mount bracket Desktop tilt stand Sensor cradle jack (shown with sensor installed) Wall mount screw holes 10. -
Page 5: Basic Operation
RH550 sensor cradle jack (8). Mount the RH550 on a wall using the supplied wall mount bracket (6) and screws. Mount the bracket on the wall first and then snap the RH550 onto the bracket. Note that the wall mount bracket has a swivel arm (10) for convenient angling. -
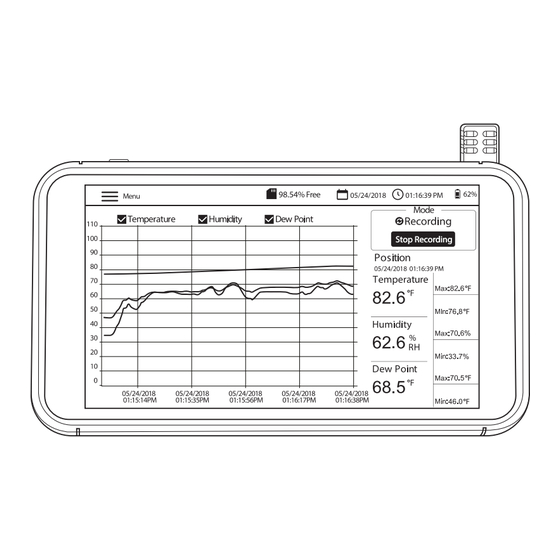
Page 6: Main Interface Screen
12. X-axis for date and time cursor position 13. Y-axis for measurement scale (slide up and down to view entire scale) 14. Color-coded Temperature, Humidity and Dew Point Temperature values (tap anywhere on curves to move the cursor position) RH550-EN_V1.3 1/20... -
Page 7: Main Operating Modes (Live And Record)
00:00:01 ~ 09:59:59), schedule a start time, and set a limit on the number of data points to record (500, 1k, 5k, 10k, 20k, or MAX). Note that when you select MAX, the RH550 creates multiple 20,000 data point files, not one large file. -
Page 8: Main Menu
Click SAVE to store your settings or click X to cancel and exit the sub-menu. 4.2 RECORDING SETUP Set the datalogging sample rate by tapping the hours, minutes, and seconds fields to open an interactive numerical keypad. Enable/disable ‘Schedule Recording’ by tapping ON or OFF. RH550-EN_V1.3 1/20... -
Page 9: View Alarms
Screen) or until it fills the internal memory (16GB). Note that when you select MAX, the RH550 creates multiple 20,000 data point files, not one large file. Click SAVE to store your settings or click X to cancel and exit the sub-menu. -
Page 10: Display Setup
To delete one file, Tap the right hand end of the file to check its check box, and then tap DELETE. To transfer/view data files on a PC, connect the RH550 to a PC using the supplied USB cable. For complete details. Refer to the section PC Interface. -
Page 11: Date & Time Settings
Set the system date and time by tapping the small arrow on the programming field to open the interactive calendar. 4.7 INFORMATION SCREEN View manufacturer name, model number, current firmware version, date/time of last firmware update. See the Firmware Upgrade section for details on updating the RH550 firmware RH550-EN_V1.3 1/20... -
Page 12: Pc Interface
The RH550 internal rechargeable battery will charge while connected to a PC USB port. Windows PC Connect the USB cable to the RH550 USB jack (2) and then to the PC USB port. Once connected, the PC will recognize the RH550 as a USB storage device. View the RH550 internal memory as you would any external storage device. -
Page 13: Specifications
(W x H x D) 19.4 x 10.8 x 1.6 cm (7.625” x 4.25” x 0.625”) Included Items RH550, Micro-USB cable, universal AC adaptor, 2m (6.6’) sensor extension cable, wall-mount bracket, sensor. *Temperature and Humidity accuracy specifications apply after a 15-minute warm-up... - Page 14 Customer Support Telephone: U.S. (866) 477-3687; International +1 (603) 324-7800 Calibration, Repair, and Returns email: repair@extech.com Technical Support: https://support.flir.com Copyright © 2020 FLIR Systems, Inc. All rights reserved including the right of reproduction in whole or in part in any form www.extech.com RH550-EN_V1.3 1/20...
Need help?
Do you have a question about the RH550 and is the answer not in the manual?
Questions and answers