Advertisement
Quick Links
Advertisement

Related Manuals for Fulltone Solid State Tape Echo

Summary of Contents for Fulltone Solid State Tape Echo
- Page 1 Manual v2.0 For SSTEs #429 and higher ...
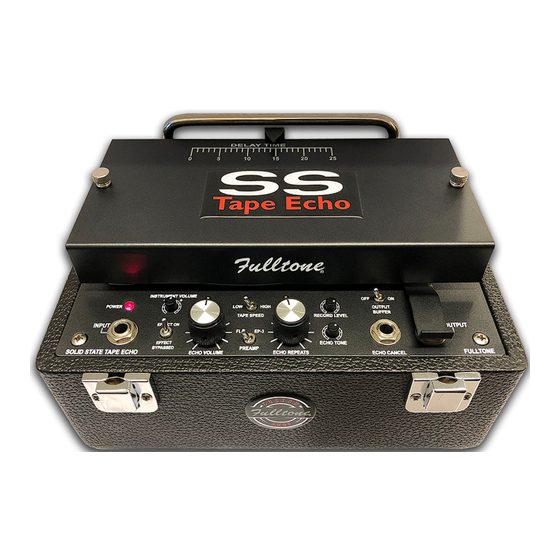
- Page 2 NEW FEATURES ON SSTE v2 1) The SSTE has always had a low‐impedance JFET buffer on its output to isolate it from being affected by other devices in the signal chain, and to alleviate the loading from other effects and the many feet of cable in your signal chain. SSTE v2 includes a Buffer Bypass switch to remove that JFET buffer and (just like a vintage Echoplex EP‐3) get significant loading on the signal, which results in a considerable warming‐up of the echo repeats. Going for “Vintage?” Turn OFF the Buffer! 2) The Preamp, Echo Repeats, and Echo Playback circuits are now isolated from each‐other, allowing for: a) only one repeat with Echo Repeats knob turned down all the way, no matter how loud the echoes are set to. Not possible on v1. b) “100% Wet” (no Instrument sound present) with Instrument Volume set full counterclockwise. Helpful for studio use when you want to feature or pan only the echo. Not possible with SSTE v1. c) “100% Dry” (no echo sound present) with Echo Volume knob set full counterclockwise. 3) Echo Tone Knob replaces the old tone‐switch for infinite control of the brightness of the echo repeats. This knob only affects the echo repeats, not your guitar (instrument) sound. 4) Increased shielding around the Output jack area inside the unit. ...
- Page 3 Table of Contents Page 1 Specifications Page 2 Top Panel Diagram Page 3 Additional Diagrams Page 4 Additional Diagrams Page 5 Initial Set‐Up Page 6 Features Page 7 Maintenance & Warranty info ...
- Page 4 Page 1 SSTE v2 Specifications Impedance‐ Input impedance‐ 1.1megaohms Output impedance switch set to Buffered (BUF)‐ 10k ohms Output impedance switch set to Buffer‐Bypass (BYP)‐ 220K‐500K (depending on where the ECHO VOLUME knob is set) Size‐ 9.56” wide x 7.8” deep x 6.3” tall (with lid on and closed) Weight‐ 9.2 lbs. Tape format‐ You may only use the Fulltone Echo Tape Cart (ETC‐2) a normal Echoplex cart is the wrong size. Carts made for the TTE and Echoplex will NOT function in a SSTE. We try to only use BASF LGR‐50 tape for our Carts which is no longer made, but I have many thousands of yards of it, enough for 30 years or more. It is one of the only tapes that works because it has a white lubricated backing, helping to keep the tape from sticking, then binding. You may also use the Fulltone Tape Loop Transport (TLT), giving the choice of using any available ¼” tape. Make the tape loop exactly the recommended length (see TLT box) Electrical info‐ 100‐120VAC, 60hz, 6 watts. The wiring for the transformer can be easily modified for 220/240 VAC 50hz operation inside the unit. Fuse‐ 0.25amp/250mA 5mm x 20mm glass Slow‐Blow fuse. Included‐ 1 x Detachable 10’ IEC type AC power cable 1 x 3‐to‐2 Prong ground lift adapter for AC power cable 1 X ETC‐2 Tape cartridge (pre‐installed in SSTE) Optional: Echo‐Cancel Footswitch‐ To cancel the echo on a SSTE v2, you can use a latching “amp channel switcher” footswitch that grounds out the TIP of a ¼” male phono plug. But, if you want to have LED status indicators without having to supply any power, the only footswitch to get is the Fulltone Echo Cancel Footswitch. Get ...
- Page 5 Page 2 SSTE v2 Top Panel Diagram ...
- Page 6 Page 3 Additional Diagrams ...
- Page 7 Page 4 Additional Diagrams ...
-
Page 8: Initial Setup
Page 5 Initial Set‐Up Refer to Diagrams on Pages 2‐4 Warning! A Tape Machine is a delicate, intricate, complex machine that must be maintained and cleaned periodically. If you are not interested or incapable in doing this, your unit will inevitably get dirty, the echo repeats will become dull, out of tune, followed by cart failure and a tantrum. Watch the set‐up video BEFORE playing this device. If you have not watched the install video and then have a problem…it will be all on you. See it here https://www.youtube.com/watch?v=bQXrGr1pFCw 1) Remove the Tape Cover (page 3, diagram item #34) by unscrewing the 2 thumbscrews (#’s 33) and sliding the plate carefully off to the left, being careful not to bump it against anything. 2) Make sure that the Thumbscrews for the Echo Tape Cartridge (ETC‐2) are secure (#’s 30) and that the tape is following the correct path (Tape Path diagram, Page 3) Make sure that the tape is not too loose, knotted up, or has not slipped away from any of the Tape Guides (#25 & #19) Make sure that it is seated properly on the Fixed Tape Guide Post (#28), resting under the Tape Felt (#26), and Tape Felt Tension Arm. (#27) Now check that the tape is resting between the Capstan and Pinch‐roller (#16 & #17) 3) Insert the detachable AC cable (#36) in to the TTE AC Inlet ( #35) and connect other end to a wall power outlet. Make sure to use the same outlet as your guitar amplifier to avoid possible grounding issues. It is possible that you may choose to lift the ground on the SSTE with the supplied 3‐to‐2 prong Ground Lift Adapter (page#4) to eliminate hum issues. Only do so if you know what you’re doing, and check to make sure there’s no possibility of electrical shock hazard, especially if you’re singing into a Microphone…check for shock hazard always! Warning! Improper grounding can cause injury or even death. Do not attempt unless you are experienced, and you assume full responsibility for any damage or injuries incurred by lifting the ground on any of your devices. 4) Turn on the Power Switch (see #37). 5) Plug your guitar cable into the Input Jack. (#2) 6) Slide the Transport Clutch lever (#13) to the right…this starts the Tape Rolling. Hold it there and insert another guitar cable into the Output jack (#12). This cable holds the Transport Clutch Lever in place and ... - Page 9 Page 6 FEATURES 1) Turn on the effect using the Bypass Switch (#3) 2) Set the Record Level knob (#10) to from 12 o’clock to 1 o’clock, never lower. Turn this knob clockwise (CW) to increase signal recording to tape...turn it counterclockwise (CCW) to reduce the record level. If set too high the echo repeats will sound distorted, set too low and the echo Repeats will be too quiet while the hiss increases. Tape machines are all about “balancing the signal” to suite the sound you’re after. 3) The Playback Head (#21) slides from left to right along a track (#18). The further right you slide the head, the longer the delay times will be. The further left you slide, the shorter the delay time. 4) The Echo Repeats knob (#8) determines how many echo repeats happen. Tip: For longer delay setting I like to set this knob around 9‐10 o’clock, which gives one loud repeat, a second repeat at about half that volume, then a couple more repeats trailing off in volume. Led Zeppelin Tip #1: Jimmy Page used to strike a chord, then turn up the Echo Repeats knob full CW and the repeats oscillate, the pitch of these oscillations then can go up and down by quickly sliding the Playback Head left or right. Fun stuff! 5) The Tape Speed toggle switch (#7) controls the speed at which the capstan motor runs. Low Speed will get longer delays, and the echo sound will be warmer and softer. High Speed gives cleaner, brighter repeats and will allow for shorter delay times which is great for super‐quick slap‐back Plate Reverb sounds. Led Zeppelin Tip #2: Jimmy Page made great use of this Plate reverb effect on his Echoplexes both live and in the studio: Slide the Playback head fully to the left, Set the Tape Speed switch (#7) to High, Turn the Echo Repeats knob (#8) to around 11‐12 o’clock, and you will achieve this Plate Reverb effect. I cannot over emphasize how much he used this sound; in videos you can see him turning stepping on the Echo ON button for almost every solo! 6) Set the Instrument Volume (#4) to between 11‐12 o’clock for relatively similar‐to‐bypassed guitar. If you go too high the SSTE will act like a booster, but then you will have to turn the Echo Volume knob (#5) up accordingly to achieve the balance between guitar and echo. Remember, the higher the Echo Volume is set. The more hiss and noise will be evident. ...
-
Page 10: Maintenance
Page 7 MAINTENANCE This manual is constantly revised, for the latest version of the manual in PDF format go to: https://www.fulltone.com/products/solid‐state‐tape‐echo The web manual is complete with live web links going to required maintenance products and other resources, Also check regularly with www.YouTube.com/fulltoneeffects for current and upcoming videos demonstrating how to maintain your Tape echo. Tools you should have: 1) Tape head cleaning solution and Capstan Roller rejuvenator fluid, buy the pair here 2) Tape head cleaning swabs (don’t use Q‐Tips, they leave fuzz) Buy here 3) Head Demagnetizer (do not use until you have researched how on youtube) get one here Replacing Fuse Use only a glass Slow‐Blow 5mm x 20mm 250volt, 0.25 amp (also called 250mA) These are widely available, standard type fuses, one place to get them is at amazon.com here Warranty Information: The SSTE carries a 5‐year Limited Warranty Parts and Labor to the original owner only. This warranty covers failure due to manufacturer’s error only and does not cover items that are prone to daily wear including the ETC‐2 tape cart. Owner is responsible for all shipping and insurance charges both ways. Fulltone Musical Products Inc. (and its employees) is not liable for any damages or injuries resulting from the misuse of this unit and/or carelessness of the user. For service, please contact engineer@fulltone.com Resources: *For the newest version of the manual go here * Before operating this unit please view the “ETC‐2 Tape cart Installation” video here * To purchase Tape Carts, fill out and submit a ETC‐2 Order Form here * To have existing carts rewound, fill out and submit a Rewind Order Form here. ...
Need help?
Do you have a question about the Solid State Tape Echo and is the answer not in the manual?
Questions and answers