Table of Contents
Advertisement
Available languages
Available languages
Quick Links
Advertisement
Table of Contents

Related Manuals for Suaoki PS5B


Summary of Contents for Suaoki PS5B
- Page 1 首次发行 郭窑元 160704 内容更新 杨 寻 170116 封底 目录 封面 16.061.00034-02A1 说明书示 图 封底 封面 技术要求 成品尺寸:A5(145*210mm). PS5B 材质:封面封底157G双铜版纸+裱哑膜, OPS005-644A1 (HQC81) 内页80G双铜版纸,装钉。 PS5B六国语言说明书 颜色:黑白印刷。 郭窑元 16.061.00034-02 160704...
- Page 2 Suaoki Portable Power Supply User Manual www.suaoki.com...
- Page 4 CONTENTS English.................01---12 Deutsch...............13---24 Français...............25---36 Italiano.................37---48 Español................49---61 日本語 .................62---73...
- Page 6 Friendly tips: Thank you for choosing suaoki.Please read the User Manual carefully before using this product so that you can be familiar with this product quickly and use it correctly.(Photos are for reference only,product in kind prevail) Introduction This product is designed to keep you powered while you’re doing what you love.Whether you’re climbing a mountain,living in your van while you travel the world,or camping in the open,we will keep you powered.
-
Page 7: Master Power Button(On/Off) 4
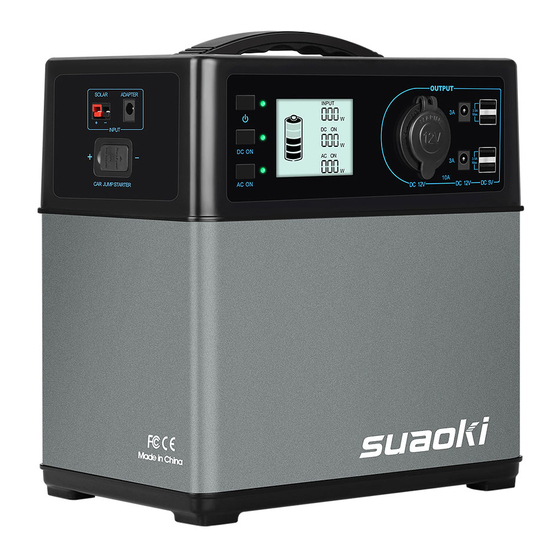
1. Get To Know Your Portable Power Supply 1. Handle 8. Power ON/OFF Indicators 2. Solar Charging Port 9. LCD Display 3. Adapter Charging Port 10. USB Output Port 4. Jumping Port For 12V Vehicles 11. DC 12V Output Port 5. - Page 8 1. Master Power Button(ON/OFF) 2. DC Power Button(ON/OFF) 3. AC Power Button(ON/OFF) 4. Master Power ON/OFF Indicator 5. DC Power ON/OFF Indicator 6. AC Power ON/OFF Indicator 7. Battery Capacity 8. Charging Power 9. DC Output State(ON/OFF) 10. DC Output Power 11.
- Page 9 3-5 Recharges 1. Power on the portable power supply by press master power button for 2 seconds. 2. Place your solar panel(We recommend Suaoki 50W/100W Semi Flexible Solar Module) where it can get as much direct sunlight as possible. 3. Connect the solar panel by solar charging cable,then insert the Anderson plug of the cable into the solar charging port on the left side of the portable power supply.You can know the charging...
- Page 10 ■ Charge with adapter Power your laptop or Charge from wall outlet other devices Power on the portable power supply by press master power button for 2 seconds.Plug the adapter into wall outlet.then attach the other side to the input port of the portable power supply,you can know the charging state from the LCD display.It will take around 8 to 10 hours to charge the portable power supply with the adapter.It will stop being charged when it’s full of energy,with the built-in advance system control circuit module.
-
Page 11: Battery Capacity
4. Using your portable power supply ■ What to power with the portable power supply USB:Smart phone,MP3 Players,Digital Cameras,Tablets,E-readers,etc. DC 12V Output Ports:Dual ports for LED lamp mainly Cigarette Lighter Socket:Car on-board Fridges,12V appliances,etc. AC Output Port:Electrical appliances(power rate under 300W),such as Televisions,Laptops,Cooker,etc ■... - Page 12 very quickly and you may not get exactly 400Wh energy.On the flipside,if you’re charging devices that draw power slowly(a small TV),you will get closer to 400Wh from the portable power supply.If you’re experiencing shorter runtimes,you may need to check the device’s power requirements, refer to TROUBLESHOOTING which will be discussed below.
-
Page 13: Car Charger
1. Make sure the gas engine displacement of the vehicle is not more than 4L. 2. Make sure the power is over 60%(four battery segments on). 3. Make sure the clamps of the battery clamps is not broken. Steps: 1. Plug the intelligent battery clamps into the jumping port of your portable power supply.If green and red lights are on simultaneously,the connection is confirmed to be correct. -
Page 14: Frequently Asked Questions
To check the charging state of your portable power supply,refer to the LCD Battery Display.When lit up,you will see a battery outline with five segments,indicating the current charge level.You can turn on the Battery Display by pressing the Master Power Button.It is OK to use your PS5B even when it’s not fully charged. -
Page 15: Troubleshooting
■ Here are some common devices and their watt-hour requirements: Smart phone(2~4W) 80+ Recharges Tablet(25~42W) 7+ Recharges Laptop(50W) 6+ Hrs Desktop Computer(100W) 3+ Hrs Mini Fridge(30~60W) 5~10 Hrs 30’’ LCD TV (98~156W) 2~4 Hrs Vacuum Cleaner(200~300W) 1~2 Hrs Blender/Processor(200~300W) 1~2Hrs When you are going to power your device with the portable power supply,you can do some research about the watt consumption of your device. - Page 16 2nd Battery String Over-Voltage Disconnect the charger and restart it 3rd Battery String Over-Voltage Disconnect the charger and restart it Charge it in time and restart it after fully 1st Battery String Low Voltage charged Charge it in time and restart it after fully 2nd Battery String Low Voltage charged Charge it in time and restart it after fully...
- Page 17 Check if the output port overload or short- Protection circuit 8. Warranty The Suaoki portable power supply is covered by Suaoki warranty for 12 months from the date of purchase.Please email support@suaoki.com with your order number for technical assistance and warranty claim. 9. Contact US Website: www.suaoki.com...
- Page 18 Freundliche Tipps: Vielen Dank, dass Sie sich für suaoki entschiedet haben. Bevor Sie dieses Produkt verwenden, lesen Sie bitte das Benutzerhandbuch sorgfältig durch, so dass Sie mit diesem Produkt schnell vertraut und es richtig zu verwenden sein können.(Fotos sind nur für Information, Produkt ist in der Art verbindlich.)
-
Page 19: Hauptnetz - Taste (Ein / Aus) 4
1. Verstehen Sie Ihre tragbare Stromversorgung 1. Tragegriff 8. Strom EIN / AUS - Anzeigen 2. Solar - Ladeanschluss 9. LCD Bildschirm 3. Adapter Ladeanschluss 10. USB Ausgabeanschluß 4. Springen - Anschluss für 12V Fahrzeuge 11. DC 12V Ausgabeanschluß 5. Hauptnetz - Taste (EIN / AUS) 12. - Page 20 1. Hauptnetz - Taste (EIN / AUS) 2. DC Netzschalter (EIN / AUS) 3. AC Netzschalter (EIN / AUS) 4. Hauptnetz EIN / AUS - Anzeige 5. DC Stromversorgung EIN / AUS - Anzeige 6. AC Stromversorgung EIN / AUS - Anzeige 7.
- Page 21 1. Schalten Sie den tragbaren Stromversorgung durch Drücken Hauptschalter - Taste für 2 Sekunden ein. 2. Legen Sie Ihre Solar - Panel daran (Wir empfehlen Suaoki 50W / 100W halbflexible Solarmodul ), wo es so viel direktes Sonnenlicht wie möglich sein kann.
- Page 22 Batterie vollgeladen ist. ■ Laden mit Adapter Aufladen aus der Versorgung für Ihre Laptop oder anderen Geräten Steckdose Schalten Sie den tragbaren Stromversorgung durch Drücken Hauptschalter - Taste für 2 Sekunden ein. Stecken Sie den Adapter in die Steckdose. Schließen Sie dann den andere Anschluss an den Eingangsanschluss des tragbaren Stromversorgung ein, können Sie den Ladezustand aus der LCD - Anzeige kennen.
-
Page 23: Batteriekapazität
Es kann nicht aufgeladen werden, wenn das Fahrzeug mit dem 12 V System nicht gestartet. 4. Verwenden Ihrer tragbaren Stromversorgung ■ Was kann mit der tragbaren Stromversorgung versorgt werden USB: Smart - Phone, MP3 - Player, Digitalkameras , Tablets, E - Reader, etc. DC 12V - Ausgang: Dual - Ports für LED - Lampe vor allem Zigarettenanzünderbuchse : Auto Kühlschränke, 12V Geräte usw. - Page 24 - Anzeige. Wenn Sie das Gerät, das eine hohe Leistung (Kühlschrank) verbraucht, stecken, kann die Änderung Niveau der tragbaren Stromversorgrn sehr schnell fallen und nicht genau 400Wh Energie bekommen. Auf der anderen Seite, wenn Sie die Strom des Gerätes (z. B. ein kleiner TV), das die Leistung langsam verwendet, versorgt sind, werden Sie von der tragbaren Stromversorgung 400Wh näher kommen.
- Page 25 1. Stellen Sie sicher, dass der Gasmotor für Antrieb des Fahrzeugs nicht mehr als 4L ist. 2. Achten Sie darauf, dass die Leistung über 60% (vier Batterie Segmente) ist. 3. Achten Sie darauf, dass die Klemmen der Batterie nicht gebrochen werden. Schritte: 1.
-
Page 26: Auto - Ladegerät
Batterie - Anzeige. Wenn es leuchtet, werden Sie eine Batterie Umriss mit fünf Segmenten, die den aktuellen Ladezustand anzeigt, gesieht. Sie können der Batterie - Anzeige durch das Drücken der Hauptschalter - Taste einschalten. Es ist OK, um Ihre PS5B zu verwenden, auch wenn es nicht voll geladet wird. - Page 27 Zweitens müssen Sie die Kapazität für die einzelnen Ausgangsanschlüsse überprüfen. Zum Beispiel wird der AC - Anschluss durch einen Wechselrichter überwacht, die für 300W Dauerleistung ermöglicht. Das bedeutet, dass die tragbare Stromversorgung abgeschaltet wird, wenn Ihr Gerät ein mehr als 300W für einen längeren Zeitraum benötigt. ■...
- Page 28 Fehlercode Störung Ursache Fehlerbehebung Überprüfen Sie die Umgebungstemperatur, System - ob es mehr als 45 ℃ ist. Der Ausgang wird Übertemperaturschutz wieder beginnt, wenn das Produkt abkühlt wird. Batterie - Trennen Sie das Ladegerät und neu starten Überspannungsschutz Schutz vor Batterieschaden Kontaktieren Sie uns Überspannungsschutz für die Trennen Sie das Ladegerät und neu starten...
- Page 29 Ausgang oder Kurzschluss ist. 8. Garantie Die Suaoki tragbare Stromversorgung wird durch Suaoki Garantie für 12 Monate ab dem Kaufdatum gedeckt. Bitte senden Sie E-Mail mit Ihrer Auftragsnummer für die technische Unterstützung und Garantieanspruch an support@suaoki.com. 9. Kontaktieren Sie uns Website : www.suaoki.com...
- Page 30 Conseils : Merci d’avoir choisi Suaoki. Veuillez lire attentivement le Manuel de l’Utilisateur avant d’utiliser ce produit afin que vous puissiez vous familiariser avec ce produit rapidement et l’utiliser correctement. (Les Photos sont fournies à titre de référence uniquement) Introduction Ce produit est conçu pour maintenir votre appareil sous tension pendant que vous faites ce que...
- Page 31 1. Connaître votre dispositif d’alimentation portable 1. Poignée 8. Indicateurs d’alimentation ON/OFF 2. Port de Charge Solaire 9. Affichage LCD 3. Port de Charge d’Adaptateur 10. Port de Sortie USB 4. Port de démarrage de 12V véhicule 11. Port de Sortie 12V CC 5.
- Page 32 1. Bouton d’alimentation principale (ON/OFF) 2. Bouton d’alimentation CC (ON/OFF) 3. Bouton d’alimentation CA (ON/OFF) 4. Indicateur d’alimentation principale ON/OFF 5. Indicateur d’alimentation CC ON/OFF 6. Indicateur d’alimentation CA ON/OFF 7. Capacité de Batterie 8. Puissance de Charge 9. État de sortie CC (ON/OFF) 10.
- Page 33 2 secondes. 2. Mettez votre panneau solaire (Nous vous recommandons le module solaire semi-flexible 50W/100W Suaoki) à l’endroit ensoleillé. 3. Connectez le panneau solaire avec le câble de charge solaire, puis insérez la prise Anderson du câble dans le port de charge solaire sur le côté gauche du dispositif d’alimentation portable. Vous pouvez voir l’état de charge sur l’affichage LCD.
- Page 34 recharge solaire. Ce produit a une puissance maximale de charge solaire de 120W. La tension à circuit ouvert du panneau solaire devrait être entre 14V et 40V. 5. Grâce au module de circuit de contrôle du système intégré avancé, la charge s’arrêtera lorsque la batterie est complètement chargée.
- Page 35 Branchez un bout du chargeur de voiture à votre dispositif d’alimentation portable, branchez l’autre bout à la prise d’allume-cigarette de votre voiture. Vous pouvez connaître l’état de charge sur l’affichage LCD. Remarque : La prise d’allume-cigarette 12V ne peut pas charger complètement le dispositif d’alimentation portable, il faut utiliser une prise de 24V.
- Page 36 8. N’oubliez jamais de mettre le produit hors tension si vous ne l’utilisez pas. 9. Si possible, assurez-vous que votre dispositif d’alimentation portable soit pleinement rechargé avant une longue non-utilisation. ■ Utilisation Optimale Lors du chargement d’autres appareils avec le dispositif d’alimentation portable, prêtez une attention à...
- Page 37 ■ Démarrage d’un véhicule Black Car batter y 1. Assurez-vous que la cylindrée du véhicule n’est pas supérieure à 4L. 2. Assurez-vous que la capacité de batterie est supérieure à 60% (quatre segments de batterie sont pleins). 3. Assurez-vous que les pinces de batterie ne sont pas endommagées. Procédure : 1.
- Page 38 4. Retirez le produit de la batterie en 30 secondes après le démarrage du moteur pour empêcher d’endommager le dispositif d’alimentation portable ou même de causer un accident. 5. Vérifiez la capacité de batterie avant chaque redémarrage. Assurez-vous que l’énergie soit supérieure à...
- Page 39 Sur l’écran, vous verrez une icône de batterie de cinq segments, indiquant le niveau de charge actuel. Vous pouvez allumer l’affichage de batterie en appuyant sur le bouton d’alimentation principale. Vous pouvez utiliser votre PS5B même l’appareil n’est pas pleinement chargé. ■ Comment sais-je si mon appareil peut être alimenté par ce produit ? D’abord, vous devez connaître la puissance de fonctionnement de votre appareil.
- Page 40 3. Vérifiez la capacité restante de la batterie, si elle affiche 20% ou moins, vous avez besoin de recharger le dispositif d’alimentation portable. 4. Vérifiez si votre appareil est approprié pour être chargé avec ce produit. Tous les ports de sortie ont leur propre capacité...
- Page 41 8. Garantie Le dispositif d’alimentation portable Suaoki est fourni par Suaoki d’une garantie de 12 mois à compter de la date d’achat. Veuillez envoyer votre nombre d’ordre à support@suaoki.com pour une assistance technique ou une réclamation de garantie.
- Page 42 Suggerimenti amichevoli: Grazie per scelto suaoki. Leggere attentamente il Manuale Utente prima di utilizzare questo prodotto in modo che si può avere familiarità con questo prodotto rapidamente e usarlo in modo corretto. (Le foto sono solo di riferimento, prevale il prodotto in natura) Introduzione Questo prodotto è...
- Page 43 1. Conoscere il vostro alimentatore portatile 1. Maniglia 7. Pulsante di Alimentazione CA (ON / OFF) 2. Porta Ricarica Solare 8. Spie ON/OFF 3. Porta Ricarica Adattatore 9. Display LCD 4. Porta di avvio per veicoli 12V 10. Porta di uscita USB 5.
- Page 44 1. Principale Pulsante di Alimentazione (ON / OFF) 2. Pulsante di Alimentazione CC(ON / OFF) 3. Pulsante di Alimentazione CA(ON / OFF) 4. Spia Principale Pulsante di Alimentazione ON/OFF 5. Spia ON/OFF Alimentazione CC 6. Spia ON/OFF Alimentazione CA 7. Capacità della batteria 8.
- Page 45 1. Accendere l'alimentatore portatile premendo il principale Pulsante di Alimentazione per 2 secondi. 2. Posizionare il pannello solare (Si consiglia Suaoki 50W/100W Modulo Solare Semi Flessibile), dove si può ottenere tanto luce diretta solare il più possibile. 3. Collegare il pannello solare con il cavo di ricarica solare, quindi inserire la spina Anderson del cavo nella porta di ricarica solare sul lato sinistro dell'alimentatore portatile.
- Page 46 dovrebbe essere da 14V a 40V. 5. Si fermerà la ricarica quando la batteria è piena di energia, con l’incassato modulo di circuito di controllo del sistema di anticipo. ■ Ricaricare con adattatore Ricaricare con la presa Alimentare il vostro computer portatile o altri dispositivi a pareti.
- Page 47 4. Uso dell'alimentatore portatile ■ Che cosa si ricarica con l'alimentatore portatile USB: smart phone, lettori MP3, Fotocamere digitali, Tablet, E-reader, etc Porte Uscita CC 12V: doppie porte per principalmente lampada a LED Presa accendisigari: Frigorifero auto a bordo, elettrodomestici 12V, etc. Porta di uscita CA: Elettrodomestici (tasso di potenza sotto 300W), come televisori, computer portatili, Fornello, ecc ■...
- Page 48 più brevi, potrebbe essere necessario controllare i requisiti di alimentazione del dispositivo, fare riferimento alla RISOLUZIONE DEI PROBLEMI che verranno discussi di seguito. ■ Uso Tempo Freddo Le temperature fredde (sotto lo zero) possono influire la capacità della batteria di alimentazione portatile.
- Page 49 Passi: 1. Inserire i morsetti della batteria intelligente nella porta salto del vostro alimentatore portatile. Se le luci verdi e rosse sono accese simultaneamente, la connessione va confermata di essere corretta. 2. Collegare le polarità positiva e negativa dei morsetti della batteria alle polarità positiva e negativa (rosso a +, nero a -).
- Page 50 Si può attivare la Display Batteria premendo il Principale Pulsante di Alimentazione. È OK ad utilizzare il PS5B anche quando non è completamente ricaricata. ■ Come si fa a sapere se il dispositivo funziona con questo prodotto? In primo luogo, si deve determinare la quantità...
-
Page 51: Risoluzione Dei Problemi
Questo significa che se il vostro dispositivo è un traino più di 300W per un prolungato periodo di tempo, l'alimentatore portatile si spegnerà. ■ Profondità di scarico (DOD) Per prolungare la durata della batteria, abbiamo progettato la profondità del 80% per questo alimentatore portatile, il che significa che solo l'80% di 400Wh carica può... - Page 52 Codice di Causa Errore Risoluzioni Errore Controllare la temperatura ambiente, se è Protezione Temperatura Eccessiva superiore a 45 ℃ . L’uscita riprenderà in del Sistema quanto il prodotto si raffredda. Protezione Sovratensione Batteria Scollegare il caricabatteria e riavviarlo Protezione Danni Batteria Contattaci Sovratensione Linea Prima Batteria Scollegare il caricabatteria e riavviarlo...
- Page 53 USB2 sovracchi o abbia cortocircuito 8. Garanzia L’alimentazione portatile Suaoki è coperto dalla garanzia Suaoki per 12 mesi dalla data di acquisto. Inviare e-mail a support@suaoki.com con il vostro numero d’ordine per l’assistenza tecnica e la richiesta di garanzia. 9. Contattaci Sito web: www.suaoki.com...
- Page 54 Consejos amigables: Gracias por elegir suaoki usted. Por favor, lee el manual del usuario antes de utilizar este producto de manera que pueda estar familiarizado con este producto de forma rápida y utilizarlo correctamente. (Las fotos son sólo de referencia, y prevalece el producto en clase) Introducción...
- Page 55 1. Conozca a su fuente de alimentación portátil 1. Manija 8. Indicador de Alimentación de Encendido / 2. Puerto de Carga Solar Apagado 3. Puerto de Carga del Adaptador 9. Pantalla de LCD 4. Puerto de Salto para vehículos de 12V 10.
-
Page 56: Contenido Del Paquete
1. Botón Principal de Alimentación (Encendido / Apagado) 2. Botón de Alimentación de DC (Encendido / Apagado) 3. Botón de Alimentación de AC (Encendido / Apagado) 4. Indicador de Alimentación Principal de Encendido / Apagado 5. Indicador de Alimentación de DC de Encendido / Apagado 6. - Page 57 1. Encienda la fuente de alimentación portátil pulsando el botón principal de encendido en por 2 segundos. 2. Coloque el panel solar (Recomendamos el semi módulo solar flexible 50W / 100W de Suaoki) donde puede conseguir tanta luz solar directamente posible.
- Page 58 solar. Es capaz de acoger a 120 W de potencia de carga solar. La tensión de circuito abierto del panel solar debe ser de 14V a 40V. 5. Se dejará de cargarse cuando la batería esté llena de energía, con el módulo de circuito de control del sistema de avance integrado.
- Page 59 toma de cigarrillos de su vehículo. Se puede conocer el estado de carga por la pantalla de LCD. Nota: El Toma del cigarrillo del coche del vehículo 12 no puede cargar la fuente de alimentación portátil totalmente, pero el 24 puede. No se puede cargar cuando el vehículo 12 no se inicia.
- Page 60 largo plazo sin utilización. ■ Estrategia de Mejor Uso Al cargar otros dispositivos con la fuente de alimentación portátil, atienda a la pantalla LCD de la batería. Si conecta los dispositivos que drenan un alto poder (como el refrigerador), el nivel de cambio del portátil puede caer muy rápidamente y no se puede obtener energía de exactamente 400Wh.
- Page 61 ■ Impulse un vehículo Black Car batter y 1. Asegúrese de que el desplazamiento del motor de gas del vehículo no es más que 4L. 2. Asegúrese de que la alimentación es superior al 60% (hay cuatro segmentos de la batería). 3.
- Page 62 inicia, de lo contrario podría causar daños a la fuente de alimentación portátil e incluso causar un accidente. 5. Por favor, compruebe la capacidad de la batería antes de cada nueva puesta en marcha. Asegúrese de que la potencia es superior al 60% (cuatro segmentos de pila sucesivamente). 6.
- Page 63 Puede activar la visualización de la batería presionando el botón Principal de Alimentación. No hay problema en usar su PS5B incluso cuando no está completamente cargada. ■ ¿Cómo va a saber si su dispositivo funcionará con este producto? En primer lugar, es necesario determinar la cantidad de energía que su dispositivo requiere.
- Page 64 7. Solución de Problemas Si el dispositivo se puede cargar con esta fuente de alimentación portátil, siga estos pasos: 1. Asegúrese de que el botón Principal de Alimentación está encendido. 2. Asegúrese de que el puerto de salida se ha encendido. La luz LED verde que indica su estado debe estar iluminado.
- Page 65 8. Garantía La fuente de alimentación portable Suaoki está cubierto por la garantía Suaoki de 12 meses desde la fecha de compra. Por favor envíe un correo electrónico al support@suaoki.com con su número de orden para la asistencia técnica y la garantía.
- Page 66 9. Ponga en Contacto con Nosotros Sitio Web: www.suaoki.com E-mail: support@Suaoki.com Nos esforzamos para ofrecer soporte al cliente excepcional. Si usted tiene un problema, queremos saber al respecto por lo que puede mejorar los productos y su experiencia. Nos esforzamos para responder a todas las cuestiones tan pronto como sea posible.
- Page 67 初めに suaoki をお買い上げいただきありがとうございます。ご利用にあたり、本製品に関するポイント を快速的に習得し、正しく操作できるように本ユーザマニュアルをよくお読みください。(本マ ニュアルにある写真はあくまでも参考用とし、優先的に実物をご参照ください。) 概要 本製品は電源供給を確保するものです。山登りの途中であっても、世界一周旅をする時でも、又 は野外でキャンプ生活を送る時でも、電源が供給されることを確保します。 ポータブルパワーサプライはプラグ・アンド・プレイなので、緊急事態に備える発電機を保有し てことで、いつでも、どこでも必要に応じて、充電できます。400 Wh が持つ本電源はお使いの ラップトップ、携帯、テレビ、並びにその他の電気デバイスを数時間もサポートできます。 日本語...
- Page 68 1. パワーサプライの本体及びアクセサリ 1. ハンドル 11. DC 12V 輸出ポート 2. ソーラー充電ポート 12. シガーライターソケット 3. アダプタ充電ポート 13. AC 輸出ポート 4. 12V 自動車用ジャンプポート 5. メインパワーボタン (ON/OFF) 6. DC パワーボタン (ON/OFF) 7. AC パワーボタン (ON/OFF) 8. パワー ON/OFF 表示ライト 9. LCD ディスプレイ 10. USB 輸出ポート...
- Page 69 1. マスターパワーボタン (ON/OFF) 2. DC パワーボタン (ON/OFF) 3. AC パワーボタン (ON/OFF) 4. メインパワー ON/OFF 表示ライト 5. DC パワー ON/OFF 表示ライト 6. AC パワー ON/OFF 表示ライト 7. バッテリ容量 8. 充電効率 9. DC 輸出状態 (ON/OFF) 10. DC 輸出パワー 11. AC 輸出状態 (ON/OFF) 12.
- Page 70 に消失し、残存容量を示します。充電が始まると、バッテリセグメントは 1 秒おきに点滅します。 これは当時の充電ステータスを示します。尚、INPUT の下の数字はその際の充電効率を示します。 電力が一旦フルになった後、全てのバッテリセグメントがついています。 バッテリセグメントが一つしかないと、充電してください ! ■ ソーラーパネルで充電する ラップトップ ソーラーパネ ル 4-6 時間 3-5 再充電 1. メインパワーボタンを2秒押して、ポータブルパワーサプライを立ち上げます。 2. お使いのソーラーパネル(Suaoki 50W/100W セミフレキシブルソーラーモジュールを推薦す る) を直射日光に最も多く当たる所に置いてください。 3. ソーラー充電ケーブルをソーラーパネルに接続し、ケーブルの端子 をポータブルパワーサプラ イの左側にあるソーラー充電ポートに挿入してください。LCD ディスプレイに充電状態が見えま す。 4. 複数のソーラーパネルを使えば、充電時間を短縮できます。ソーラー充電パワーの最高値の 120W に達せます。ただし、ソーラーパネルの電圧は範囲が 14V から 40V までとします。 5. バッテリの電力がフルになる次第、内蔵式回路制御モジュールが作動し、充電は中止します。...
- Page 71 ■ アダプタで充電する コンセントから充電す ラップトップ或はその他のデ る バイスを充電する メインパワーボタンを2秒押して、ポータブルパワーサプライを立ち上げます。アダプタをアウ トレットに挿入し、向こう側をポータブルパワーサプライの輸入ポートに入れます。これで、LCD ディスプレイから充電状態がわかります。アダプタでポータブルパワーサプライを充電すると、 約 8 時間より 10 時間までかかります。フル充電後、内蔵式制御回路モジュールが作動し、充電は 完了します。 アダプタは二つの部分からなっていますが、ケーブルをボックスに挿入することで、二つの部分 を繋げます。 ■ カーチャージャーで充電する カーシガーソケットで充 ラップトップ或はその他のデバ 電する イスを充電する 長時間運転する時に、気楽な充電方法になります。メインパワーボタンを2秒押して、ポータブル パワーサプライを立ち上げます。カーチャージャーの片側をポータブルパワーサプライに挿入し、 相手側をカーシガーソケットに差し込みます。 それで、 LCD ディスプレイより充電状態が見えます。 ご注意:12V 自動車のカーシガーソケットだと、ポータブルパワーサプライをフ ルに充電できませんが、24 自動車だったらできます。...
- Page 72 4. ポータブルパワーサプライを利用する ■ ポータブルパワーサプライを使い、何を充電できますか? USB:スマホ、MP3 プレイヤー、デジタルカメラ、タブレットなど電子デバイス。 DC12V アウトプットポート:主に LED ランプ向けのポートが二つ シガーライターソケット:車載冷蔵庫、12V 設備など。 AC アウトプットポート:電気設備(電力が 300W 以下)。例えば:テレビ、ラップトップ、調理 器具など。 ■ 使用方法 1. メインパワーボタンを 2 秒押して、ポータブルパワーサプライを立ち上げます。それで、パワ ー表示ライトも LCD も点灯します。 2. メインボタンの下にある DC パワーボタンを 2 秒押して、DC デバイスを立ち上げます。その 下にある AC パワーボタンを2秒押して、AC デバイスを立ち上げます。(電力節約に、使わない ポートの電源をオフにしてください) 3. お使いのデバイスをポータブルパワーサプライに接続してください。 4.
- Page 73 動作(充電)時間が短い場合、お使いのデバイスのパワー効率基準をご確認ください。(トラブ ルシューティングをご参照ください。) ■ 低温環境に対するご注意 低温環境(凍結以下)はポータブルパワーサプライのバッテリ容量に影響します。 もし、0 度以下の環境で本製品をご使用になる場合、ぜひ本製品を充電してはいけません。さもな いと、リチウムイオンバッテリが破損され、バッテリの容量が回復できない恐れがあります。 低温充電防止:本製品は低温充電防止機能がついています。0 度以下の環境において、ポータブル パワーサプライは自動的に充電を中止します。温度が 5℃以上になったら、再度充電がスタートし ます。 低温放電防止:本製品は低温放電防止機能がついています。環境の温度が -20℃以下になると、本 製品は AC と DC アウトプットを中止します。 それで、 15 秒以内に自動的に遮断します。 温度が -15℃ 以上になると、本製品はまた出力できるようになります。 ■ 保管及びメンテナンス 弊社の保証対象はこの取扱説明書に従った正常な使用状態であるものなので、下記手順でポータ ブルパワーサプライを保守してください。 1. 保管前、ポータブルパワーサプライをフル充電してください。尚、3 ヶ月に一回フル充電を実 施してください。乾燥で風を通す場所に保管してください。 2. もし、本製品がバッテリの低電力(10%)により、自動的に遮断した場合、2 ヶ月以内再充電 してください。さもないと、バッテリ容量は回復できなくなります。 ■ 自動車をジャンプスタートする Black Car batter y 1.
- Page 74 4. バッテリクランプの一端をポータブルパワーサプライのジャンプポートに挿入してください。 緑と赤のライトが同時に点灯することは、接続が正しいということです。 5. バッテリクランプのもう一端の陽極と陰極をそれぞれバッテリの陽極と陰極(+:赤,-:黒) に接続してください。緑のランプが点灯してから、車を起動してもいいです。もし、緑と赤のラ イトが同時に点灯すると、車のヘッドランプかエアコンをオンしてみてください。(クランプは アクティベートされる必要がある) 6. キーで自動車を起動してください。 7. バッテリクランプの一端を本製品から外してください。 ステップ 1 とステップ 2 は入れ替えてもいいです。ただし、クランプの表示ライトが緑になって から車を起動してください。 ご注意 1. 自動車を起動後、 エンジンの振動によるクリップの脱落や衝突を防ぐために、 スタートする前に、 赤と黒のクリップがしっかりと車のバッテリ極にクランプしたことを確認し、尚、二つのクリッ プの間に十分な安全距離を開けてください。 2. 赤と黒のクリップを直接に接続することを厳禁します。さもないと、事故が発生しかねません。 3. 車のエンジンの動作による人身事故を防ぐために、車を起動時、エンジンから離れてください。 4. エンジン起動後 30 秒以内に、本製品を自動車のバッテリから外してください。さもないと、 本製品にダメージを与えるか、事故を引き起こす恐れがあります。 5. 再起動する前に、バッテリ容量をチェックしてください。電力が 60%(4 セグメント)以上に なっていることを確保してください。 6. 本製品の操作に慣れていない人(特に子供)による本機能の使用を禁止します。 5.
- Page 75 ■ バッテリのタイプは何ですか ? リチウム-イオンバッテリです。普通の SLA バッテリと比べて、小型で軽いし、普通の SLA か AGM バッテリより長持ちです。完全に放電しない限り、もっと長持ちできます。 ■ お使いのポータブルパワーサプライが充電されているか如何に判断できます か ? LCD バッテリディスプレイを見ながら、お使いのポータブルパワーサプライの充電状態が確認で きます。ライトアップされた後、五つのセグメントからなっているバッテリ輪郭(現在の充電レ ベルを示す)が見えます。メインパワーボタンを押すことで、バッテリディスプレイを立ち上げ られます。フル充電ができていなくても、PS5B を使ってもいいです。 ■ 本製品がデバイスに働くかどのようにわかりますか ? まず、お使いのデバイスに必要な電力量を確認する必要があります。そのデバイスの説明書をチ ェックするとすぐわかります。 次、それぞれの輸出ポートの容量を確認する必要があります。例えば、本製品の AC ポートは 300W です。即ち、もしお使いのデバイスは長時間 300W 以上の電力を引くと、ポータブルパワ ーサプライは遮断します。 ■ DOD(Dept h Of Discharge) DOD は放電深度で、電気容量に対して、放電できる電気量を比率で表したものです。...
- Page 76 7. トラブルシューティング もし、お使いのデバイスはポータブルパワーサプライで充電できる場合、下記ステップに従って ください: 1. メインパワーボタンがオンされたことを確保してください。 2. 輸出ポートがオンにされたことを確保してください。その状態を示す緑の LED ライトは点灯さ れるべきです。 3. バッテリ容量ディスプレイを確認してください。もし、20% 以下であれば、ポータブルパワー サプライを充電する必要があります。 4. お使いのデバイスは本製品に似合うかを確認してください。デバイスは本製品の各輸出ポート の電力容量の最高値以内にあることを確保してください。 もし、下記トラブルシューティングでやってみても不具合が存在する場合、当社までご連絡くだ さい。 不具合コー 不具合原因 トラブルシューティング ド 周辺の温度が 45℃以上になったかチェッ システムの高温防止 クする。本製品の温度が下がると、アウ トプットは再びスタートする バッテリ過電圧防止 充電器の接続を遮断し、再起動する バッテリダメージ保護 US に連絡する 1 番目のバッテリケーブル過電圧 充電器の接続を遮断し、再起動する 2 番目のバッテリケーブル過電圧 充電器の接続を遮断し、再起動する 3 番目のバッテリケーブル過電圧...
- Page 77 12V シガーライターソケット過電 アウトプットポートが過負荷か短絡にな 流防止 っていないか確認する 12V シガーライターソケット過負 アウトプットポートが過負荷していない 荷防止 か確認する アウトプットポートが過負荷か短絡にな 12V DC アウトプット 過電流防止 っていないか確認する アウトプットポートが過負荷か短絡にな 12V DC アウトプット 過負荷防止 っていないか確認する アウトプットポートが過負荷か短絡にな USB1 アウトプット 過電流防止 っていないか確認する アウトプットポートが過負荷か短絡にな USB2 アウトプット 過電流防止 っていないか確認する 8. 保証 Suaoki ポータブルパワーサプライは、本取扱説明書に従った正常な使用状態でお買上げ日より 12 ヶ月以内を保証期間と致します技術支援及び保証期間内のクレームについて、support@suaoki. com までご連絡ください。...
- Page 78 9. ご問い合わせ ウェブサイト : www.suaoki.com E-mail: support@Suaoki.com 当社は優れたカスタマサポートの提供に取り込んでいます。何か問題があったら、ご連絡いただ くことで、当社による製品改善及びお客様の体験改善に貢献します。 当社は全ての問合せについて、最速な回答に力をお尽きします。...
- Page 79 Made in China 16.061.00034-02A1...
Need help?
Do you have a question about the PS5B and is the answer not in the manual?
Questions and answers