Table of Contents
Advertisement
Advertisement
Table of Contents

Subscribe to Our Youtube Channel
Related Manuals for 3devo SHR3D IT


Summary of Contents for 3devo SHR3D IT
- Page 1 SHR3D IT Version 1.0 November 2017 English user guide...
- Page 2 COMPANY INFO 3devo B.V. Zonnebaan 12F 3542 EC Utrecht The Netherlands service@3devo.com www.3devo.com...
-
Page 3: Table Of Contents
TABLE OF CONTENTS SAFETY INSTRUCTIONS ..........................4 OVERVIEW ................................8 2.1. MACHINE FEATURES ........................8 2.2. INCLUDED ACCESSORIES ......................14 2.3. OPTIONAL ACCESSORIES ......................15 2.4. TECHNICAL SPECIFICATIONS ....................16 INSTRUCTIONS.............................. 17 3.1. QUICK USER GUIDE ........................17 3.2. INSTALLATION INSTRUCTIONS ....................17 3.3. -
Page 4: Safety Instructions
The SHR3D IT is a powerful and effective plastic processing machine. Processing your plastic waste plastic to granulate, The processing process inside the SHR3D IT consist of a multitude of moving components, moving at high speeds and/or great force. Which if improperly used can cause serious harm. - Page 5 Single person lift could cause injury. Use assistance when moving or lifting. WARNING Never modify or manipulate any of the safety switches or other components of the machine, this can cause extremely dangerous situations. WARNING Only use the SHR3D IT with the 3devo hopper mounted on the machine.
- Page 6 WARNING Never change or remove guards when the machine is powered. WARNING Inspect datasheets of the to be processed materials for flammability. Some plastics can emit flammable dust or gasses that have potential ignition risks. Always make sure to have a fire distinguisher nearby and know how to use it.
- Page 7 CAUTION Check if the voltage in your power socket corresponds to that of the purchased product. Consult the sticker on the back of the machine.
-
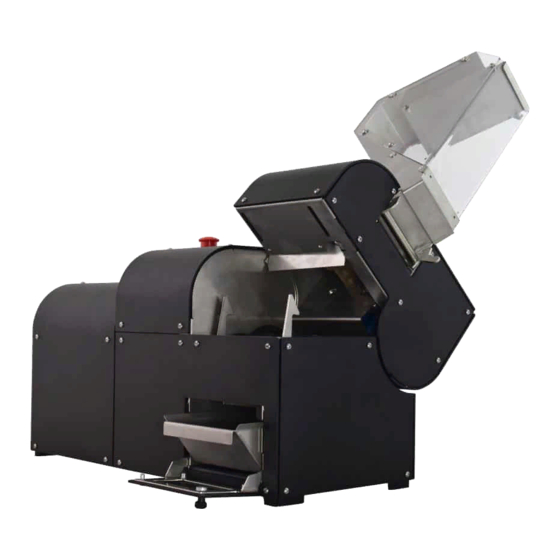
Page 8: Overview
2. OVERVIEW 2.1. MACHINE FEATURES 1. Shredder compartment The Shredder compartment is the compartment where the first stage of the plastic processing happens. The shredder is designed to shred, cut and tear chunks of plastic waste into smaller chunks so that the Granulator compartment (4) can do its own operation easier. - Page 9 2. Hopper The hopper prevents the user from getting in contact with the shredder blades and prevents plastic waste from escaping the machine. 3. Hopper locking lever The Hopper locking lever allows the user to assemble and disassemble the hopper safe and easy. The Hopper locking lever is a safety system for both holding the hopper in place and preventing the user from entering his/her hands in a running shredder.
- Page 10 7. Interlock guard In order to reach the granulate collector, the interlock guard must be opened first. The interlock guard can be opened by simply pulling the button in the top right corner. The emergency break circuit is activated when the interlock guard is opened with the machine running.
- Page 11 the hopper is not mounted correctly on the machine, the filter screen is not installed correctly the shredder compartment is not closed correctly the interlock guard is not closed, the motor temperature has been too high, ...
- Page 12 10. Stop button (red) Press the stop button to turn the machine off. Note that the red button will emit light if the machine is turned off but is connected to the power socket. 11. High temperature indicator When the high temperature indicator light is turned off, it means that the machine was stopped due to an overheated motor.
- Page 13 Press the switch to (“I“mode) to power on the machine. The red light of the Stop button will turn on. Press the switch to (“O” mode) to disconnect all power from the machine. The red light of the Stop button will now turn off as well.
-
Page 14: Included Accessories
2.2. INCLUDED ACCESSORIES Power cable (230 V or 120 V) Quick start guide Granulate collector Hopper Filter screen 4 mm holes (already installed) -
Page 15: Optional Accessories
2.3. OPTIONAL ACCESSORIES Granulator rotary knives Granulator stator knife Extra granulate collector Extra hopper Filter screen 3 mm holes ... -
Page 16: Technical Specifications
2.4. TECHNICAL SPECIFICATIONS Type SHR3D IT Black powdercoated Color 35 kgs Weight 585 mm (23.0 in) x 310 mm (12.2 in) x 620 Dimension with hopper mm (24.4 in) (Width x Depth x Height) Dimension without 550 mm (21.7 in) x 310 mm (12.2 in) x 310 hopper mm (12.2 in) (Width x Depth x Height) -
Page 17: Instructions
For the fast starters out there we have made a short and simple out of the box quick start guide. This is shipped in your NEXT extruder accessory box, or you can download it from www.3devo.com/manuals 3.2. INSTALLATION INSTRUCTIONS Place the machine on a flat stable surface close to a power socket. -
Page 18: Preperation Instructions
Remove as much as possible to prevent any damage to the machine and keep the output material as pure as possible. If SHR3D IT is used before with different materials, clean out the machine first. More information about cleaning the machine can be found in Chapter 3.4.5. -
Page 19: Adjusting And Maintenance
3.4. ADJUSTING AND MAINTENANCE For all adjustments and maintenance to the machine, make sure to turn the machine off and remove the power cable. 3.4.1. INSTALLING AND REMOVING THE HOPPER Removing the hopper is useful in the following situation: Circular parts or waste with big diameters for example, are difficult to ... - Page 20 Step 2. Release the Hopper locking lever To remove the hopper from the machine, make sure that the shredder compartment is empty from big chunks. If the shredder compartment isn’t empty, let the machine run in reverse first. Step 1. Push the Hopper locking lever down and slide the hopper out.
-
Page 21: Opening The Machine
3.4.2. OPENING THE MACHINE Opening the machine is really useful for adjustment and/or cleaning purposes. Step 1. Remove power plug from machine Step 2. Slide in the hopper Step 2. Open the interlock guard Step 3. Remove the granulate collector. Step 3. - Page 22 Step 4. Push the Shredder compartment latch towards the back of the machine with the palm of the hand. Hold the Filter screen with the tops of your fingers to assist the pushing force. Step 5. While the Shredder compartment latch is pushed forward, tilt the Shredder compartment open 90 degrees.
-
Page 23: Removing And Mounting Filter Screen
3.4.3. REMOVING AND MOUNTING FILTER SCREEN In order to clean out the Granulator compartment dismounting the Filter screen is highly recommended. The Filter screen is placed underneath the granulator knives and is visible when the Interlock guard is opened. Different Filter screens can be used to create different granule sizes. The machine can only be turned on when the Filter screen is placed in the correct way. - Page 24 Step 2. Open Interlock guard Step 3. Take out the granulate collector Step 4. Push the shredder compartment latch and tilt the shredder compartment open (as explained in 3.4.2). Step 5. Reach for the two plunger knobs attached to the Filter screen and pull them toward each other [1].
- Page 25 back of the Filter screen at the two shafts and rotate the front part of the Filter screen up until the plungers click in place.
-
Page 26: Adjusting The Static Granulator Knife
3.4.4. ADJUSTING THE STATIC GRANULATOR KNIFE The granulator knives are wear components, they will become blunt after processing for a long time. When processing very hard materials or non- plastics the life span of the knives is drastically reduced. Replacing them is necessary to have the optimal efficiency. WARNING Always wear cutting proof hand protection when working with the granulator knives. -
Page 27: Cleaning The Machine
3.4.5. CLEANING THE MACHINE Step 1. Switch the machine on and let it run until the granulator stops This can be heard by the decreasing noise or processing granulate. checked by regularly turning off the machine and checking the granulate collector. -
Page 28: Replacing The Granulator Knives
3.4.6. REPLACING THE GRANULATOR KNIVES WARNING Always wear cutting proof hand protection when working with the granulator knives. Step 1. The rotating granulator knives are positioned by shoulder screws. Apply Loctite 243 on the shoulder screws and tighten them with 30Nm. Step 2. -
Page 29: Troubleshooting
4. TROUBLESHOOTING Trouble Probable cause Measures Machine shuts off Material is too strong Run the machine in and material is stuck to be shredded, reverse and shut it between shredder overcurrent sensor down. Remove the blade and its triggered. hopper and take out counterpart. - Page 30 2: Ensure that the following parts are in place and locked: The interlock guard, the filter, hopper and the shredder compartment.
-
Page 31: Transportation
TRANSPORTATION Keep the original packaging. When the machine is shipped back to 3Devo for service or maintenance the machine should be packed in the same way as how it arrived. For additional questions, please contact us via Service@3devo.com... -
Page 32: Notes
6. NOTES... -
Page 33: Company Info
7. COMPANY INFO 3devo B.V. Zonnebaan 12F 3542 EC Utrecht The Netherlands service@3devo.com www.3devo.com...
Need help?
Do you have a question about the SHR3D IT and is the answer not in the manual?
Questions and answers
Ive check all posibles it the troubleshooting guide, and the machine wont start.
If your 3devo SHR3D IT machine won't start after troubleshooting, check if both the Current indicator light and the High temperature indicator light are on. If they are, the machine is ready to start. If the machine keeps turning off right after turning it on, the motor temperature is still too high and needs more time to cool down. Wait for the motor to cool, then press the Stop button to reset the high temperature indicator.
This answer is automatically generated
@Mr. Anderson , seems it had a loose cable. Got it ti start. Thanks