
Subscribe to Our Youtube Channel
Related Manuals for Nevco MPCX

Summary of Contents for Nevco MPCX
- Page 1 Scoreboard Operator’s Instructions MPCX Segment Timer Control Since 1934 Retain this manual in your permanent files Rev: 3/13/12 135-0211...
- Page 2 S60-LED May not be compatible with certain older scoreboards Thank You Thank You for choosing NEVCO. We appreciate your business. The following instructions will help you become familiar with the operation and features of the scoreboard system. Please take a few minutes to study this manual, and to practice with the control.
- Page 3 Power Input Not Used (9 V DC) Battery Compartment Cover (2 x AA) MPCX CONTROL (rear view) MPCX Receiver LCD Display (16 characters x 2 lines) Scroll forward and backwards through segments Saves changes to segments when editing Power ON / OFF Switch...
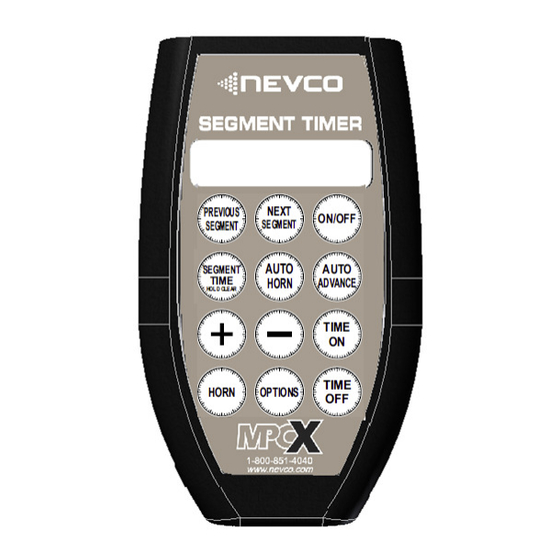
- Page 4 MPCX Segment Timer CONTROL (front view)
-
Page 5: Table Of Contents
1. Time ON ..........................10 Segment Selection......................... 10 Segment Editing ........................10 Horn Function........................11 Time Function........................11 MPCX Power function ......................11 2. Time Off..........................11 Segment Selection......................... 11 Setting Time......................... 12 Setting Segment Function Options..................12 Horn Function........................13 Inserting a Segment ...................... - Page 6 SPECIFICATIONS........................22...
-
Page 7: Segment Timer
The MPCX Segment Timer Control controls the Portable Segment Timer and compatible Nevco scoreboards. The MPCX Segment Timer Control can also be used to run segments on a compatible Nevco scoreboard. The segment number displays in the “Home Score” position and the time displays in the main time position. -
Page 8: Example Segment Timer Project
Example Segment Timer Project Seg: 1 of 5 H Stretching and Calisthenics Segment 1 10:00 Time: ON Strikes:0 Horn Sounds to indicate segment 1 complete Time On is pressed to begin Segment 2 Agility Training Seg: 2 of 5 HA Segment 2 10:00 Time: ON Strikes:0... -
Page 9: Model Type
The Scoreboard settings on the segment timer change the MPC-X to be compatible to different (compatible) Nevco scoreboard types. There are two settings that are specifically for the segment timer. These two change the display options for the segment timer. -
Page 10: Scoreboard
Model Type Display Functionality Scoreboard Indoor (A), 3000 Series (B), 7000 Series (C), and 1000 Series (D) all display the same on a scoreboard. • The segment number is recorded in the home score section of the scoreboard. • Segment time is displayed and counts down in the main time area. •... -
Page 11: Factory Settings
FACTORY SETTINGS Segment Timer Project The Segment timer MPC-X is preprogrammed with a full segment timer project from the factory. Following is the project settings: Segment Set to 40 Total Segments Auto Horn Enabled Segment 1 (the maximum amount) on all segments Auto Advance Enabled All Segment time on all segments... -
Page 12: Quick Start Guide
To Begin Note: It is assumed here that the control has been linked to the desired receiver(s) and, the MPCX is configured to the scoreboard/timer being used. This function is explained in the setup guide that comes with a new control. -
Page 13: T O Edit A Segment
Setting a time of 0:00 on a segment will delete the current Seg: 6 of 40 HA segment being modified and all segments after it 0:00 Time: OFF Strikes:0 To do this using this segment first set the time to 0:00 Seg: 5 of 5 HA Then press NEXT SEGMENT or PREVIOUS SEGMENT 5:00 Time: OFF... -
Page 14: Keyboard Functions
KEYBOARD FUNCTIONS Segment Timer GREETING screen »»» GREETING When the control is Powered ON the segment timer greeting displays for two to three seconds. Accessed ON/OFF pressing Hold (+) to Skip Option to SKIP screen »»» SKIP The skip screen offers to skip the start up process allowing segment set up without using the display. -
Page 15: Main Screen
SEGMENT pressing 1. Time ON Following are the MPCX controls with time set to ON Segment Selection When selecting a segment when time is ON, the segment timer will flash which segment it is currently on for 5 seconds then continue counting down the segment time. -
Page 16: Horn Function
Turns the control and segment timer off 2. Time Off Following are the MPCX controls with the time set to OFF Segment Selection When selecting a segment when time is on the segment timer will flash which segment it is currently on for 5 seconds. -
Page 17: Setting Time
Setting Time Follow these steps to set the time on each segment desired to use. Seg: 1 of 40 HA One press of the SET TIME button will highlight the minutes of the current segment to be edited 0:31 Time: OFF Strikes:0 Seg: 1 of 40 HA Additional presses will toggle between editing minutes and... -
Page 18: Horn Function
Horn Function HORN Sounds the horn Inserting a Segment Insert Segment To insert a segment first press “OPTIONS” the first option Press (+) OPTIONS to come up will be to insert a segment. Press the “+” and new segment will be placed in the current Seg: 1 of 7 H place and the “of ##”... -
Page 19: Removing A Segment
Turns the control and segment timer off 3. After SKIP connection or not connected. Following are the MPCX controls when not linked to a receiver Segment Selection With no link to a receiver segment selection is functionally to select a segment to modify. -
Page 20: Setting Segment Function Options
Seg: 1 of 40 HA Two presses of the SET TIME button will highlight the seconds of the current segment to be edited 0:31 Time: OFF Strikes:0 Seg: 1 of 40 HA Then use the “+” or “-” keys to change the time in 5:31 Time: OFF minutes or seconds Strikes:0... -
Page 21: Removing A Single Segment
0:28 Time: OFF Strikes:0 Removing a Single Segment There are two ways to remove segments programmed into a segment timer MPCX The first is individually as follows: Seg: 1 of 39 HA Hold to delete current segment. Each segment number will... -
Page 22: Options Menu
OPTIONS Menu Several option settings are available to fine tune the scoreboard system to your needs. These settings are saved in the control. They are remembered even if the control is turned OFF or the batteries removed. When a control turns ON the segment timer, these settings are sent to the segment timer and are used to define how it operates. -
Page 23: Advanced Options
Procedure to mate a control and receiver(s) Step 1. Insert the batteries included with the MPCX control or turn the control ON by pressing Step 2. Power up one to eight receivers using the 9V wall plug-in power supply provided with the receiver. - Page 24 / how many receivers are linked. If more receivers than intended are linked to the control, then power down any MPCX receivers in the area that are within 2000’ and repeat the process. If you cannot find these receivers, or they are located on an adjacent property, you may have to perform this process in another location.
- Page 25 The next press of the options key will display one of the following screens. It indicates which of the scoreboard model series the control is currently configured to operate. Use the “+” key to toggle thru the scoreboard models. Press OPTIONS PREVIOUS SEGMENT, NEXT SEGMENT, SET TIME, TIME OFF, or TIME ON to exit the options routine.
-
Page 26: Troubleshooting Chart
ON. (d) Turn the control ON. Cannot turn OFF all receivers within Another nearby organization also has an Move the receivers to an isolated area operating range. (Linking procedure) MPCX control system. for Linking. If the problem persists please contact the Nevco Service Department. 800-851-4040... -
Page 27: Features
—Connect the equipment into an outlet on a circuit different from that to which the receiver is connected. —Consult the dealer or an experienced radio/ TV technician for help. The user is cautioned that changes and modifications made to the equipment without the approval of Nevco could void the user’s authority to operate this equipment.
Need help?
Do you have a question about the MPCX and is the answer not in the manual?
Questions and answers