Advertisement
Available languages
Available languages
Quick Links
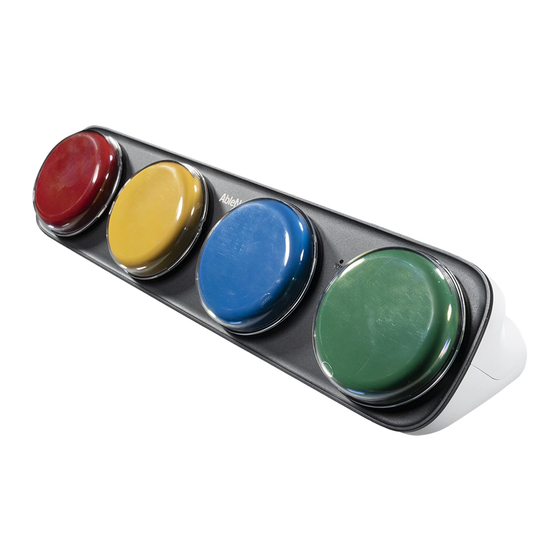
iTalk4
™
www.ablenetinc.com
(800) 322-0956
Getting Started
1.
Insert 4 AA batteries (not included)
2.
Turn iTalk4 On
3.
Press and hold the record button until the record light
activates
4.
Press and hold a switch top. Begin speaking into
recording microphone when you hear a beep. Release
when finished recording message.
5.
Repeat for remaining switch tops
6.
Press and release record button to exit record mode.
7.
Optional: Select a different recording level to record a
second and third set of messages.
8.
iTalk4 is now ready to use. Press and release desired
location to playback message
Recording Levels
iTalk4 provides three recording levels for increased
flexibility.
Use the toggle switch on the top of iTalk4 to select the
appropriate recording level. You can record separate
messages for each message location on each level.
Recording Levels
On/Off Switch and
Volume Control
Record
Speaker
Button
4 AA Batteries
RecordLight
(Not Included)
Controlling Toys and Appliances
The iTalk4 switch input/output jacks allow you to activate
switch adapted toys or appliance with this device.
1.
Plug any switch-adapted toy or appliance into any of
the switch input/output jacks
2.
Record a message into the corresponding location
3.
Press the switch top to play the message and activate
the attached toy or appliance. The toy or appliance will
turn on for the length of the message.
Mounting
Use the AbleNet Universal Mounting Plate (sold separately)
hole pattern D to mount iTalk4 to any of AbleNet's mounting
systems. Threaded mounting holes are located on the
bottom of iTalk4.
Switch Input/
Output Jacks
Playing A Message With An External
Switch
iTalk4's switch input/output jacks default to controlling toys
and appliances. To use external switch(es) with iTalk4:
1.
Turn iTalk4 off
2.
Attach switch(es) of your choice with 1/8-inch (3.5mm)
plugs into the appropriate switch input/output jack(s)
3.
While holding any external switch down, turn iTalk4 on
The toy/appliance control feature is disabled when using
an external switch(es). To revert to default toy/appliance
function, turn iTalk4 off and back on.
Switch Tops
Recording
Microphone
Speaker
PN 98000066 Rev B 02/20 FN 70500270
Updated February 10, 2020 1:33 PM
Advertisement

Subscribe to Our Youtube Channel
Related Manuals for AbleNet iTalk4 Series

Summary of Contents for AbleNet iTalk4 Series
-
Page 1: Getting Started
Use the AbleNet Universal Mounting Plate (sold separately) hole pattern D to mount iTalk4 to any of AbleNet’s mounting Recording Levels systems. Threaded mounting holes are located on the bottom of iTalk4. - Page 2 Pour rétablir la fonction l’emplacement désiré, puis relâcher pour écouter le message. l'un des systèmes de montage AbleNet. Les trous de fixation jouet/appareil, éteindre iTalk4, puis le rallumer. câblés sont situés sur le dessous du iTalk4.
- Page 3 Satz von Nachrichten aufzunehmen. Bei Verwendung von einen oder mehreren externer iTalk4 ist jetzt einsatzbereit. Drücken und Loslassen Verwenden Sie das Lochmuster D der AbleNet Universal- Taster ist die Spielzeug/Geräte-Steuerfunktion (Toy/ der gewünschten Stelle, um die Nachricht abzuspielen Montageplatte (separat erhältlich), um iTalk4 an einem der...
-
Page 4: Montaje
. Use el patrón de orificios D de la placa de montaje universal de AbleNet (vendida por separado) para montar iTalk4 en iTalk4 ofrece tres niveles de grabación para una mayor flexibilidad. cualquiera de los sistemas de montaje de AbleNet. Los... - Page 5 O iTalk4 apresenta três níveis de gravação para oferecer Use a placa de montagem universal AbleNet (vendida maior flexibilidade. separadamente) usando o padrão de furo D para montar o iTalk4 a qualquer um dos sistemas de montagem da Use o interruptor na parte de cima do iTalk4 para selecionar AbleNet.
- Page 6 オプション: 異なる録音レベルを選択し、2つ目、3つ目のメ はメッセージの時間の分だけオンになります。 おもちゃ/アプライアンス制御機能は外部スイッチ使用の際には無 ッセージを録音します。 効となります。 デフォルトのおもちゃ/アプライアンス機能に復帰 iTalk4 使用の準備が整いました。 所定の位置を押して放し するには、iTalk4 をオフにして再びオンに切り替えてください。 据え付け てメッセージを再生してください AbleNet ユニバーサルマウントプレート(別売)のホール・パタ 録音レベル ーン D を使って iTalk4 を AbleNet の取り付けシステムに据え 付けます。 取り付け用のネジ穴は iTalk4 の下部にあります。 iTalk4 は柔軟性の拡充のため3つの録音レベルを用意しています。 iTalk4 の上部にあるトグル・スイッチを使って適切な録音レベル を選択します。 それぞれのレベルについてそれぞれのメッセージ の位置に対して別のメッセージを録音することができます。 更新日 February 10, 2020 1:33 PM...
- Page 7 Hinweise zur Garantie und Kontaktinformationen AbleNet manufactured products include a two-year limited warranty. This warranty Les produits AbleNet sont assortis d’une garantie limitée de deux ans. Cette garantie Für alle von AbleNet hergestellten Produkte gilt eine zweijährige Garantie. Diese Garantie is against defects in materials and manufacturing for two-years from the date of protège contre les défauts de matériel et les vices de fabrication pendant deux ans à...
- Page 8 For private households: Pour les foyers particuliers : Für private Haushalte: Information on Disposal of Users of WEEE Renseignements quant à l’élimination des déchets d’équipements électriques et Informationen zum fachgerechten Entsorgen von Elektro- und Elektronik-Altgeräten électroniques (DEEE) This symbol on the product and/or accompanying documents means that Dieses Symbol auf dem Produkt und/oder den Begleitdokumenten bedeutet, Le symbole suivant...
Need help?
Do you have a question about the iTalk4 Series and is the answer not in the manual?
Questions and answers