
Summary of Contents for VIRDI AC-2100 Plus
- Page 1 AC-2100 Plus. USER GUIDE Version ENG-1.01 Copyright 2000 By Union Community Co., LTD.
-
Page 2: Revison History
AC-2100 Plus User Guide <Revison History> Version Date Description Firmware Version 1.00 2016-12-28 -Initial Release 10.61.00-000.00 1.01 2017-06-21 -DDNS Port default fix 10.61.00-000.05 / (05836) 12 Fl., Daemyung Valeon Building, 127, UNIONCOMMUNITY Co., Ltd. Beobwon-ro, Songpa-gu, Seoul, Korea // Tel : 82-2-6488-3062 , Fax : 82-2-6488-3100 E-mail: sales@virditech.com;... -
Page 3: Glossaries
AC-2100 Plus User Guide <Glossaries> Administrator (Admin) - The administrator can access to the terminal menu mode. He/she has the authority to add/modify/delete terminal users and to change the operating environment by changing settings. - If there is no registered administrator in the terminal, anybody can access to the terminal menu and change settings. -
Page 4: Table Of Contents
1.1. Safety Notes ....................6 1.2. Product Details ....................7 1.3. Buttons displayed during operation ..............8 1.4. ViRDI logo LED signals displayed during operation ........8 1.5. Screens displayed during operation ..............8 1.5.1. Icon Information ..................10 1.5.2. Message Information ................10 1.6. - Page 5 AC-2100 Plus User Guide 3.7. Additional Function (Extra Function) ............59 3.7.1. Terminal Lock Setting ................60 3.7.2. Card Number Inquiry ................60 3.7.3. Monitor Input Port Setting ..............62 3.7.4. Duress FP Setting ................... 63 3.8. Device Setting ....................65 3.8.1.
-
Page 6: Before Getting Started
AC-2100 Plus User Guide 1. Before Getting Started 1.1. Safety Notes Warning Do not operate the terminal with wet hands, and pay Keep the terminal away from attention not to let any liquid inflammables. such as water enter inside the →... -
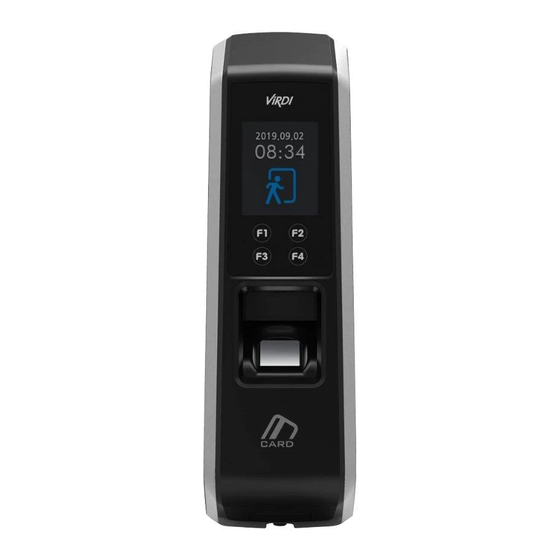
Page 7: Product Details
AC-2100 Plus User Guide 1.2. Product Details Status LED 1.77inch TFT LCD (128*160) Touch Key FP Sensor Smart Card / (05836) 12 Fl., Daemyung Valeon Building, 127, UNIONCOMMUNITY Co., Ltd. Beobwon-ro, Songpa-gu, Seoul, Korea // Tel : 82-2-6488-3062 , Fax : 82-2-6488-3100 E-mail: sales@virditech.com;... -
Page 8: Buttons Displayed During Operation
Pressing it again in the ‘Return’ mode is changed to ‘Access’ mode. - Used to enter [ENT] or move right [] in the menu mode. When pressing for more than two seconds, this is used to [ENT] button: [F4~] 1.4. ViRDI logo LED signals displayed during operation On: Normal ViRDI Power... - Page 9 AC-2100 Plus User Guide / (05836) 12 Fl., Daemyung Valeon Building, 127, UNIONCOMMUNITY Co., Ltd. Beobwon-ro, Songpa-gu, Seoul, Korea // Tel : 82-2-6488-3062 , Fax : 82-2-6488-3100 E-mail: sales@virditech.com; http://www.virditech.com...
-
Page 10: Icon Information
AC-2100 Plus User Guide 1.5.1. Icon Information ① Fire Detection A fire is detected by the fire detection sensor. Doors open state (forced open door or open the door when ② Door Status leaving) The LAN cable is not connected. - Page 11 AC-2100 Plus User Guide When authentication fails When fingerprint input fails If your finger is released too early before your fingerprint is entered When an unregistered card is swiped When 1:N Authentication is attempted under the condition that authentication priority is SN and there is no user who has been...
- Page 12 AC-2100 Plus User Guide When the terminal is set to the food service control and users attempt more than two times authentication in the same food time zone When there is no response from the server during authentication attempt When the network is disconnected during authentication attempt to the server The card input is on standby.
- Page 13 AC-2100 Plus User Guide When the terminal is locked When the food service control is set in the non-meal time When the terminal program is upgraded (Do not power off the terminal when this message is displayed.) / (05836) 12 Fl., Daemyung Valeon Building, 127,...
-
Page 14: Voice Guide Announced During Operation
AC-2100 Plus User Guide 1.6. Voice guide announced during operation Item Voice Guide When the fingerprint is entered Please enter your fingerprint. When authentication is successful You are authorized. When authentication fails Please try again. 1.7. Buzzer guide announced during operation... - Page 15 AC-2100 Plus User Guide fingerprint of another finger should be registered. / (05836) 12 Fl., Daemyung Valeon Building, 127, UNIONCOMMUNITY Co., Ltd. Beobwon-ro, Songpa-gu, Seoul, Korea // Tel : 82-2-6488-3062 , Fax : 82-2-6488-3100 E-mail: sales@virditech.com; http://www.virditech.com...
- Page 16 AC-2100 Plus User Guide Precautions subject to your fingerprint status The availability of the fingerprint may vary subject to your fingerprint status. This product consists of a fingerprint recognition system and cannot recognize the damaged or unclear fingerprints. They should be registered using a password.
-
Page 17: Product Description
AC-2100 Plus User Guide 2. Product Description 2.1. Product Features Access control system using the network (LAN) The fingerprint reader communicates with the authentication server using a UTP cable and TCP/IP protocol. This terminal can be applied to the existing LAN network and has easy expandability. - Page 18 AC-2100 Plus User Guide Various registration and authentication methods There are a total of four registration and authentication methods for general users. Before registering users or administrators, you should determine how to register and authenticate. Fingerprint Registration Fingerprint Authentication...
-
Page 19: Configuration Diagram
AC-2100 Plus User Guide 2.2. Configuration Diagram 2.2.1. Standalone Use (Access) DC12V Adapter (Lock+, Lock-, Monitor) 전기정 2.2.2. Connecting the PC server (Access, T&A, Food Service Control) TCP/IP TCP/IP Fingerprint Authentication Server (Static IP) TCP/IP UDB Sever Internet / Database (MDB or MSSQL) -
Page 20: Product Specification
AC-2100 Plus User Guide 2.3. Product Specification SPEC REMARK 구 분 32 bits RISC CPU(400MHz) 64M SDRAM 1,500 User MEMORY 32M NOR FLASH 1,500 Finger 128M NAND FLASH 10,000 Log Fingerprint Sensor Optical Authentication Speed Less than 1 second Scan Area / Resolution 12.6 * 14.8mm / 500 DPI... -
Page 21: Environment Setting
AC-2100 Plus User Guide 3. Environment Setting 3.1. Checkpoints before environment setting 3.1.1. Enter the menu When pressing [F3] button for more than 2 seconds, the administrator authentication screen will be displayed. The administrator is verified by either card or fingerprint depending on the authentication method. -
Page 22: Modify Settings
AC-2100 Plus User Guide ※ The administrator authentication menus is displayed only when there is any registered administrator. Once it is authenticated to enter the menu mode, you can access to all menus until you escape completely from the main menu. -
Page 23: Menu Configuration
AC-2100 Plus User Guide 3.2. Menu Configuration 1. User 1. Add User 2. Delete 3. Modify 4. Add admin 5. Delete All 2. Network 1. Terminal ID <Terminal ID> <Auth Mode>:NS/SN/NO/SO 2. Terminal Net <Net Type> <Terminal IP> <Subnet Mask>... - Page 24 AC-2100 Plus User Guide When setting to Cafeteria <Breakfast> <Lunch> <Dinner> <Supper> <Snack> <No Limit> <Use Printer> 2. Verify <Show User> <Only Card> <Use TOC> <Blocking Time> <Global Block> <NetErr TimeOut> 3. Doorlock <Open Duration> <Open Alarm> 4. Sound <Voice>...
- Page 25 AC-2100 Plus User Guide 4. Terminal Info Version Firmware version of the terminal WorkMode Terminal operating modes (T&A + security/T&A/food service) Language Language setting Auth Mode Authentication priority 1:1 Level Authentication level applied when 1:1 authentication 1:N Level Authentication level applied when 1:N...
- Page 26 AC-2100 Plus User Guide 5. Ext Function 1. Lock Term <Lock Term> 2. Read Card <Read Card> 3. Monitor <Monitor 1> <Monitor 2> 4. Duress FP <Duress FP> 6. Device 1. Sys Config <ID Length> <Language> 2. Card Format <Card Reader>...
-
Page 27: User Management
AC-2100 Plus User Guide 3.3. User Management Select [1.User] on the main menu, and the following screen will appear. Press [↑][↓] buttons to select the menu you want to change, and press [ENT] button. 3.3.1. Add User Select [F3~]→[1.User]→[1.Add User] on the main screen, and the following screen will appear. - Page 28 AC-2100 Plus User Guide 3.3.1.1. Register as “1. FP” Register and authenticate using the fingerprint. Default Setting: ‘0’ This screen is available to determine the authentication level for each user to be registered. By changing this value, the different authentication level may be set for each registered user.
- Page 29 AC-2100 Plus User Guide It should be noted that when entering the second fingerprint after entering the first fingerprint, you must release your finger from the fingerprint input window and then enter the second fingerprint again. When the registration is completed, select “Add FP”. If it fails, the screen returns to the “1.
- Page 30 AC-2100 Plus User Guide / (05836) 12 Fl., Daemyung Valeon Building, 127, UNIONCOMMUNITY Co., Ltd. Beobwon-ro, Songpa-gu, Seoul, Korea // Tel : 82-2-6488-3062 , Fax : 82-2-6488-3100 E-mail: sales@virditech.com; http://www.virditech.com...
-
Page 31: Delete User
AC-2100 Plus User Guide 3.3.1.4. Register with “FP and Card” The user can be registered using card and fingerprint. Authentication is performed for the card and then for the fingerprint. The user should register his/her fingerprint (see Fingerprint Registration) and then his/her card (see Card Registration). -
Page 32: Modify User
AC-2100 Plus User Guide 3.3.3. Modify User Select [F3~]→[1.User]→[3.Modify] on the main screen, and the following screen will appear. Enter the ID of the user you wish to change, and press [ENT] button long. Both general users and administrators can be changed without distinction. If the ID of an unregistered user (or administrator) is entered, the message of “Unregister”... - Page 33 AC-2100 Plus User Guide To modify, select the authentication methods referring to the aforementioned process of [3.3.1.1] to [3.3.1.4]. [2] When selecting “1:1 Level” Recommended Setting: ‘0’ To modify, the new set value should be entered. If this value is set to ‘0’, the 1:1 Level set in the terminal is used instead of the user-specific authentication level.
- Page 34 AC-2100 Plus User Guide It should be noted that when entering the second fingerprint after entering the first fingerprint, you must release your finger from the fingerprint input window and then enter the second fingerprint again. When the registration is completed, select “Add FP”. If it fails, the screen returns to the “3.
-
Page 35: Add Administrator
AC-2100 Plus User Guide 3.3.4. Add Administrator Select [F3~]→[1.User]→[4.Add Admin] on the main screen, and the following screen will appear. Enter the ID of the administrator you wish to register, and press [F4] button long. ※ Since then, the administrator registration process is same as the general user registration process. -
Page 36: Network Setting
AC-2100 Plus User Guide 3.4. Network Setting Select [2.Network] on the main menu, and the following screen will appear. Press [↑][↓] buttons to select the menu you want to change, and press [ENT] button. 3.4.1. Terminal ID Select [F3~]→[2.Network] → [1.Terminal ID] on the main screen, and the following screen will appear. - Page 37 AC-2100 Plus User Guide / (05836) 12 Fl., Daemyung Valeon Building, 127, UNIONCOMMUNITY Co., Ltd. Beobwon-ro, Songpa-gu, Seoul, Korea // Tel : 82-2-6488-3062 , Fax : 82-2-6488-3100 E-mail: sales@virditech.com; http://www.virditech.com...
- Page 38 AC-2100 Plus User Guide This menu is to determine the authentication priority between the terminal and the network, the default is ‘2. SN’, and the authentication method in each mode operates as follows. If the terminal is connected to the server, authentication is attempted from the server. If the terminal is disconnected from the server due to a network failure, etc.,...
-
Page 39: Ip Setting
AC-2100 Plus User Guide 3.4.2. IP Setting Select [F3~]→[2.Network] → [2.Terminal Net] on the main screen, and the following screen will appear. 3.4.2.1. Connection Method Setting Select [1] if Static IP is assigned, and select [2] to set IP using DHCP. -
Page 40: Server Ip Setting
AC-2100 Plus User Guide 3.4.2.3. Subnet Mask Setting Press [←][→] buttons to move to the digit you want to change, and press [↑][↓] buttons to change the numbers. Default Setting: “255.255.255.000” This is to set the subnet mask of the network connected to the terminal. - Page 41 AC-2100 Plus User Guide 3.4.3.1. Connection Method Setting Select [1] if Static IP is assigned, and select [2] to set IP using DDNS. Default Setting: ‘1.Static’ This is the way that the terminal is connected to the network. Select [1] when using the Static IP assigned from the connected network, and select [2] when using the IP assigned from the DDNS server.
- Page 42 AC-2100 Plus User Guide 3.4.3.3. Sever Port Setting Press [←][→] buttons to move to the digit you want to change, and press [↑][↓] buttons to change the numbers. Default Setting: “09870” This is to specify the Port of the network server connected to the terminal.
- Page 43 AC-2100 Plus User Guide 3.4.3.5. DDNS IP Setting Press [←][→] buttons to move to the digit you want to change, and press [↑][↓] buttons to change the numbers. Default Setting: “210.116.104.058” This is to specify the IP Address of the network server connected to the terminal.
-
Page 44: Option Setting
AC-2100 Plus User Guide 3.5. Option Setting Select [3.Option] on the main menu, and the following screen will appear. Press [↑][↓] buttons to select the menu you want to change, and press [ENT] button. 3.5.1. Application Setting Select [F3~] → [3.Option] → [1. Application] on the main screen, and the following screen will appear. - Page 45 AC-2100 Plus User Guide 3.5.1.1. When setting to “[1.Access]” or “[2.T&A]” By setting the default time for each T&A mode, after authentication, the terminal display mode can be turned into the automatically set T&A mode. If time setting is unnecessary, it is set to ‘00:00-00:00’.
- Page 46 AC-2100 Plus User Guide Default: ‘1.No’ This is the menu to select whether to use the printer or not. If the authentication is set to ‘1’ or ‘2’ with successful authentication, the Terminal ID, User ID, Date and Authentication mode are printed out through the printer connected to the RS232 port of Terminal.
- Page 47 AC-2100 Plus User Guide 3.5.1.2. When setting to “[3.Cafeteria]” If time setting is unnecessary, it is set to ‘00:00-00:00’. This is to set the breakfast time. Breakfast is unconditionally authenticated within the set time zone. After setting the breakfast time, set <Lunch>, <Dinner>, <Supper>, and <Snack> in order in the same way.
- Page 48 AC-2100 Plus User Guide When <Snack> is set, the menu to check whether to duplicate appears as shown below. Default Setting: ‘2.No’ If the mode is set to ‘No’, authentication is once allowed within the same meal time zone. When attempting authentication again, the “Duplicated!” message is displayed and the authentication fails.
-
Page 49: Authentication Method Setting
AC-2100 Plus User Guide Set whether to use each function key. When setting to ‘V’, it means that the authentication mode may be changed when pressing the function key. When setting to Blank, the authentication mode is not changed in spite of pressing the key. When this mode is used only for Attend or Leave, it is available by unchecking other function keys. - Page 50 AC-2100 Plus User Guide 3.5.2.2. Set whether to permit authentication using card only Default Setting: ‘2.No’ This option makes it possible to authenticate using card only without fingerprint. Even if the user is registered in FP and Card, he/she can be authenticated using card only in the terminal that this option is set to ‘1’.
- Page 51 AC-2100 Plus User Guide 3.5.2.4. Blocking Time Setting Default Setting: 00000 (Unit: Second) This option is to prohibit the user from re-authenticating within the set time. There is no limit when the mode is set to '0'. However, if it is set to the greater value than ‘0’, re-authentication cannot be permitted until the time lapses more than the set time after successful authentication.
- Page 52 AC-2100 Plus User Guide 3.5.2.6. NetErr TimeOut – Network Error Time Setting (Second) Default Setting: ‘05’ In the server authentication mode, if the network error time is set, the time to wait for authentication can be set. For example, if the error time is set to 5 seconds, when the user does not receive any response from the server for 5 seconds after authentication request, an error message comes out.
-
Page 53: Door Setting
AC-2100 Plus User Guide 3.5.3. Door Setting Select [F3~] → [3.Option] → [3.Doorlock] on the main screen, and the following screen will appear. 3.5.3.1. Door Open Time Setting Default Setting: ‘03’(Unit: Second) This option is to specify the time when after authentication through the terminal, the door is opened and then closed. -
Page 54: Volume Setting
AC-2100 Plus User Guide To use this function, the lock must have the function to monitor whether the door is open or close. The monitoring pin of the lock must be also connected to the terminal. To check whether the door is open or close, the mode must be set to ‘2’ or ‘3’. -
Page 55: Current Time Setting
AC-2100 Plus User Guide 3.5.4.2. Buzzer Volume Setting Default Setting: ‘3’ This option is to set the terminal buzzer volume. The buzzer occurs silent for ‘0’, small volume for ‘1’, and large volume for ‘3’. Press [ENT] button to move to the next setting. - Page 56 AC-2100 Plus User Guide Default Setting: ‘1.Auto’ This option is to set how to synchronize the current time of the terminal with the server time. Set to ‘1.Auto’ to automatically synchronize with server time, and set to ‘2.Manual’ to manually synchronize with server time.
-
Page 57: Rs485 Set
AC-2100 Plus User Guide 3.5.6.3. Current Time Setting The current time of the terminal is displayed in the order of "2009:Year, 08:Month, 01:Day, 21:Hour, 18:Min, 06:Sec". To modify, move to the desired position using [←][→] buttons, and modify the existing values using [↑][↓] buttons. -
Page 58: Terminal Information Inquiry
AC-2100 Plus User Guide 3.5.7.1. RS485 Set This option is to set RS485 ID in order to work together with RS485 device. Press [↑][↓] buttons to select the ID value, and press [ENT] button. Default Setting: ‘0’ After selecting the set value, press [ENT] button, and the screen will go to the upper menu. -
Page 59: Additional Function (Extra Function)
AC-2100 Plus User Guide Version Terminal firmware version WorkMode Terminal operating modes (T&A + security/T&A/food service) Language Language setting Auth Mode Authentication priority 1:1 Level Authentication level applied when 1:1 authentication 1:n Level Authentication level applied when 1:n authentication Terminal Id... -
Page 60: Terminal Lock Setting
AC-2100 Plus User Guide Press [↑][↓] buttons to select the menu you want to change, and press [ENT] button. 3.7.1. Terminal Lock Setting Select [F3~]→[5.Ext Function]→[1.Lock Term] on the main screen, and the following screen will appear. Default Setting: ‘2’ (Unlock Terminal) This function allows the administrator to directly lock or unlock the terminal without the server program. - Page 61 AC-2100 Plus User Guide This is an additional function regardless of the terminal environment setting. In the case of the terminal that the card reader is added, the card number can be checked for card registration via the server. Place the card on this screen, and the card number will be displayed on the LCD.
-
Page 62: Monitor Input Port Setting
AC-2100 Plus User Guide 3.7.3. Monitor Input Port Setting This option acts to connect the sensor to the terminal input port, and send a notice message to the server when the status is changed. Select [F3~]→[5.Ext Function]→[3.Monitor] on the main screen, and the following screen will appear. -
Page 63: Duress Fp Setting
AC-2100 Plus User Guide ‘1.NO’ or ‘2.NC’: When the open door status monitoring pin is connected ‘3.Fire NO’ or ‘4.Fire NC’: When the fire detection sensor is connected ‘5.Panic NO’ or ‘6.Panic NC’: When the panic situation detection sensor is connected ‘7.EMC NO’... - Page 64 AC-2100 Plus User Guide / (05836) 12 Fl., Daemyung Valeon Building, 127, UNIONCOMMUNITY Co., Ltd. Beobwon-ro, Songpa-gu, Seoul, Korea // Tel : 82-2-6488-3062 , Fax : 82-2-6488-3100 E-mail: sales@virditech.com; http://www.virditech.com...
-
Page 65: Device Setting
AC-2100 Plus User Guide 3.8. Device Setting Select [6.Device] on the main menu, and the following screen will appear. Press [↑][↓] buttons to select the menu you want to change, and press [ENT] button. Most of device settings are the option that does not need to change after installation. It is recommended that they are not changed unless there is any clear purpose. - Page 66 AC-2100 Plus User Guide / (05836) 12 Fl., Daemyung Valeon Building, 127, UNIONCOMMUNITY Co., Ltd. Beobwon-ro, Songpa-gu, Seoul, Korea // Tel : 82-2-6488-3062 , Fax : 82-2-6488-3100 E-mail: sales@virditech.com; http://www.virditech.com...
-
Page 67: Card Reader Format Setting
AC-2100 Plus User Guide 3.8.1.2. Language Setting Default Setting: ‘0.English’ If the language setting is changed, the voice message and the message on the LCD are changed into the set language. 3.8.2. Card Reader Format Setting Select [F3~] → [6.Device] → [2. Card Format] on the main screen, and the following screen will appear. - Page 68 AC-2100 Plus User Guide 3.8.3.1. 1:1 Level Setting Default Setting: ‘4’ This option is to set the match degree with the same fingerprint when comparing the fingerprint on the fingerprint input window with the user fingerprint saved in the database. The higher authentication level may ensure the higher security.
-
Page 69: Wiegand Speaker Output
AC-2100 Plus User Guide 3.8.3.3. LFD Setting Default Setting: ‘1.None’ This option is to set the LFD level that can prevent fake fingerprints from entering. The higher LFD level may ensure the higher function that prevents the input of fake fingerprints made of rubber, paper, film, and silicon. - Page 70 AC-2100 Plus User Guide Default Setting: ‘1’ This option is used only when the terminal is equipped with a separate controller operated by Wiegand input. After authentication, the following types of data are sent to the Wiegand port of the terminal.
-
Page 71: Terminal Initialization
AC-2100 Plus User Guide 3.8.4.1. Bypass Setting Default Setting: ‘2.No’ This option is available when the Wiegand card reader is used. When the mode is set to [1], the card information entering to ‘Wiegand In’ is bypassed to ‘Wiegand Out’. - Page 72 AC-2100 Plus User Guide When initialization is successfully completed, the “Ppiririck” beep occurs and the screen moves to the upper menu. 3.8.5.2. Authentication Records Initialization Select [1] to initialize, and [2] to cancel. This option deletes all authentication related logs except for set values and users.
-
Page 73: External Device Setting
AC-2100 Plus User Guide DB Backup Menu. Export Log Used when the log data saved in the AC2100 terminal is exported to USB. Data is saved with a file name of LOG.DAT in the place of “USB top-level folder →... - Page 74 AC-2100 Plus User Guide Default Setting: ‘1.None’ This option is available when connecting the Slave Reader using the card or fingerprint to the terminal in order to use as a secondary authentication device. The mode is set to ‘2’ when connecting the Wiegand card reader, and ‘3’...
- Page 75 AC-2100 Plus User Guide Access when ‘3’, F3 when ‘4’, and F4 when ‘5’. Press [ENT] button to move to the next setting. Default Setting: ‘1.None’ This screen is displayed only when <Ext Device> is not set to ‘3’. When connecting an external device of LC010 to the terminal, the mode is set to ‘2.Lock Ctrl’.
-
Page 76: How To Use Terminal
AC-2100 Plus User Guide 4. How to Use Terminal 4.1. When operating to [1.Access] Set to Menu → 3.Option → 1. Application → [1.Access]. 4.1.1. Authentication Mode Press function keys, change to the desired authentication mode such as F1, F2, F3, F4, and then perform authentication. -
Page 77: Authentication Using Card
AC-2100 Plus User Guide Place your finger on the fingerprint sensor, and the white light is on the fingerprint input window. Keep your finger until the white light is off with a beep sound. ▼ If your fingerprint is successfully authenticated, the voice message of “You are authorized”... - Page 78 AC-2100 Plus User Guide Press [F2] key to change the authentication mode to Leave. ▼ If your fingerprint is successfully authenticated, the voice message of “You are authorized” comes out and a success message is displayed on the LCD. Error Message: The following messages will appear with the voice message of “Please try again”.
-
Page 79: When Operating To [2.T&A]
AC-2100 Plus User Guide When the lamp is on the fingerprint input window with the voice message of “Please enter your fingerprint”, enter your fingerprint and keep your finger until the “beep” sound occurs. 4.2. When operating to [2.T&A] Set to Menu → 3.Option → 1. Application → [2.T&A]. -
Page 80: When Operating To [2.Cafeteria]
AC-2100 Plus User Guide 4.3. When operating to [2.Cafeteria] Set to Menu → 3.Option → 1. Application → [3.Cafeteria]. When the mode is set to the food service control, the terminal is locked in the time other than meal times. The meal time must be set to more than one meal per person. - Page 81 AC-2100 Plus User Guide When authenticating with the card Enter the card to receive authentication. When attempting authentication without pressing the menu key, it is automatically authenticated to [Menu 1]. / (05836) 12 Fl., Daemyung Valeon Building, 127, UNIONCOMMUNITY Co., Ltd.
Need help?
Do you have a question about the AC-2100 Plus and is the answer not in the manual?
Questions and answers