
Related Manuals for ET Hydrogen L/160

Summary of Contents for ET Hydrogen L/160
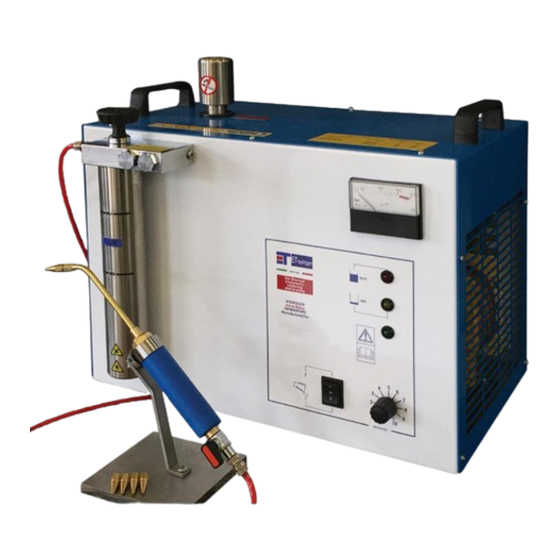
- Page 2 OPEN PACKAGE AND PLACE ALL ITEMS ON A WORKING BENCH TABLE. The package contains: burner tips; user manual; quick start guide; DVD guide; USB tutorial guide; spare fuse; plastic funnel; torch(es); fire proof plastic hose; power cord. For a better understanding, Elettronica Todescato recommends to take vision of our DVD and/or USB Key guide, and to simultaneously consult the present manual.
- Page 3 Step 3 UNSCREW THE SAFETY CAP ON TOP OF THE MACHINE. ( SAFETY CAP ) Step 4 Turn the switch into the down position ( “=” ) to refill, this will enable the operator to check the level of demineralized water. (3 POSITION SWITCH) Notice: Green light is “on”, indicating the machine is connected to the electricity (pic 1).
-
Page 4: Important Notice
Step 5 POUR ELECTROLYTE SOLUTION IMPORTANT NOTICE: The electrolyte solution’s lifetime is of one year. It must be poured when: 1- Using unit for the first time. 2- When solution has previously been poured through contaminated or dirty funnel. 3- When unnecessary or contaminated liquids have been poured inside the internal tank, such as deoxidizer, etc. - Page 5 EXAMPLE OF HERMETIC SEAL Step 7 BOOSTER TANK FILLING Take the un-attached booster tank in hand, start pouring the deoxidizer in the booster tank by placing your index on the hole in the center of the booster tank to avoid filing the interior chamber. Fill to the maximum level indicated on the outside of the booster tank.
- Page 6 STEP 8. BOOSTER TANK INSTALLATION To mount the booster tank after having it filled with the flux (deoxidized), tighten the handle knob making sure to not over screwing in order to preserve the gaskets and the internal thread of the booster tank. (BOOSTER TANK KNOB) NOTE: For daily use and refill, refer to the section called “Attention “(page 14).
- Page 7 Two outlets system is on the left side of the manual, starting from the next pages. (highlighted in BLACK); One outlet system is on the right side of the manual, starting from the next pages. With the L/160 model, you can choose different working options: SETTING THE MACHINE WITH TWO OUTLETS YOU CAN WORK WITH: •...
- Page 8 OUTLET SYSTEMS Step 9 a. Step 9. NOTE: to connect the hoses properly, see picture With the model L/160 with two outlets, you BELOW. can use between one and four torches with the following procedures: Prepare the special torch making sure the hose is...
- Page 9 TWO OUTLETS SYSTEM ONE OUTLET SYSTEM Step 10. STEP 10. IMPORTANT: Before turning on the machine set the IMPORTANT: Before turning on the machine power control knob to zero (see picture below). set the power control knob to zero (see picture below).
- Page 10 TWO OUTLETS SYSTEM ONE OUTLET SYSTEM STEP 13. STEP 13. HOW TO ADJUST THE POWER HOW TO ADJUST THE POWER ACCORDING TO BURNER TIP TIP SIZE. ACCORDING TO NEEDLE OR NOZZLE TIP SIZE. How to adjust the Power Control How to adjust the Knob Power Control Knob...
- Page 11 TWO OUTLETS SYSTEM ONE OUTLET SYSTEM Adjust the power control knob using the gas supply indicator according to the Min/Max values using Table 2 or Table 2A. NOTE: In order to insert the burner tip correctly, push and rotate this item simultaneously at the extremity of the torch, to make sure the burner tip (picture A) is properly fitted.
- Page 12 TWO OUTLETS SYSTEM ONE OUTLET SYSTEM STEP 14. Step 14. NOTE 1 (REFERED FOR SPECIAL TORCH) Wait to the gas to exit from the burner tip The operator will have to use the Gas Supply (approximately two/three minutes or more), Indicator –...
-
Page 13: Important Note
TWO OUTLETS SYSTEM ONE OUTLET SYSTEM Step 15. IMPORTANT NOTE: Wait for the gas to be produced and exiting from IMPORTANT NOTICE: the torch, (approximately 2 or 3 minutes or The electrolyte solution’s lifetime is of one more) then light the flame with a lighter or year. - Page 14 TWO OUTLETS SYSTEM ONE OUTLET SYSTEM GOOD DAILY HABITS FOR MAINTAINING GOOD DAILY HABITS THE MACHINE MAINTAINING MACHINE AT OPTIMAL PERFORMANCE OPTIMAL PERFORMANCE A T T E N T I O N A T T E N T I O N 1.
- Page 15 (step 9). Essentially the L/160 will then disconnect the hoses and then reconnect have one torch, and the operator will use the one single torch.
- Page 16 TWO OUTLETS SYSTEM ONE OUTLET SYSTEM 12. If two torches are selected, and during 12. Do not light the flame until the gas flows out from the burner tip and at same time operation, one operator desires to shut off one the power control knob (MUST) be in the torch;...
- Page 17 • ELECTROLYTE SOLUTION (LIQUID): GO TO STEP 2 IN THE QUICK START GUIDE. Electrolytic solution ready for use COUNTRY WELDER MODEL QUANTITY OF ELECTROLYTE (LIQUID) L/160 LT 3 L/160 gal 0.792 L/160 gal 0.659 • ELECTROLYTE SOLUTION IN DRY BAG: GO TO STEP 2 IN THE QUICK START GUIDE.
- Page 18 DANGER ! ATTENTION! DO NOT TURN/UNSCREW THE SAFETY CAP AND/OR THE HANDLE WHILE THE FLAME/FLAMES ARE LIT NEVER LEAVE THE MACHINE WITH THE TORCH OFF. AVOID DISPERDING GAS INTO THE ENVIROMENT. DO NOT TURN THE MACHINE WHEN THE FLAMES ARE LIT.
- Page 19 DO NOT PLACE THE FLAME NEAR THE MACHINE, IN PARTICULAR, ON THE BOOSTER TANK, SAFETY CAP, THE FILLING NECK, THE BOOSTER HANDLE KNOB OR THE GAS HOSES. DO NOT CUT THE GAS HOSES WHILE FLAMES ARE LIT. NEVER LIGHT THE FLAME IF BOOSTER TANK IS EMPTY.
- Page 20 ATTENTION: the flame reaches a very high temperature of (3200°C / 6100°F). DO NOT COME IN CONTACT WITHIN THE VICINITY OF THE FLAME, (WITH A MINIMUM OF 50 CM / 20 INCHES). THE FLAME IS VERY DANGEROUS, AND MAY CAUSE, SEVERE ENJURIES IF THE OPERATOR DOES NOT FOLLOW THESE RULES.
Need help?
Do you have a question about the L/160 and is the answer not in the manual?
Questions and answers