Table of Contents
Advertisement
Available languages
Available languages
Quick Links
Advertisement
Table of Contents

Summary of Contents for Excelvan GS70-BJ
- Page 1 SteamMe BRUGSANVISNING TØJDAMPER 1.0 - MODEL: GS70-BJ - Varenr.: 10378 INSTRUCTION MANUAL GARMENT STEAMER 1.0 - MODEL NO.:GS70-BJ - Item: 10378 Læs hele brugsanvisningen omhyggeligt, før apparatet tages i brug. Please read all instruction carefully before using.
- Page 2 Vigtige sikkerhedsanvisninger: 1. Elnettets forsyningsspænding skal svare til apparatets spænding (220-240 V vekselstrøm, 50/60 Hz). Hvis apparatet tilsluttes forkert spænding, kan apparatet blive ødelagt, og garantien vil bortfalde. 2. Undlad at bruge samme stikkontakt til andre elektriske apparater, der bruger meget strøm. 3.
- Page 3 14. Sluk altid apparatet, og tag stikket ud af stikkontakten før påfyldning, tømning, rengøring, flytning, og når apparatet ikke er i brug. 15. Kun til indendørs brug. 16. Opbevar apparatet på afstand af brændbare materialer og kemikalier. 17. Fyld ikke vandbeholderen med varmt vand eller ætsende rengørings midler, som kan beskadige apparatet. Destilleret vand anbefales kraftigt.
-
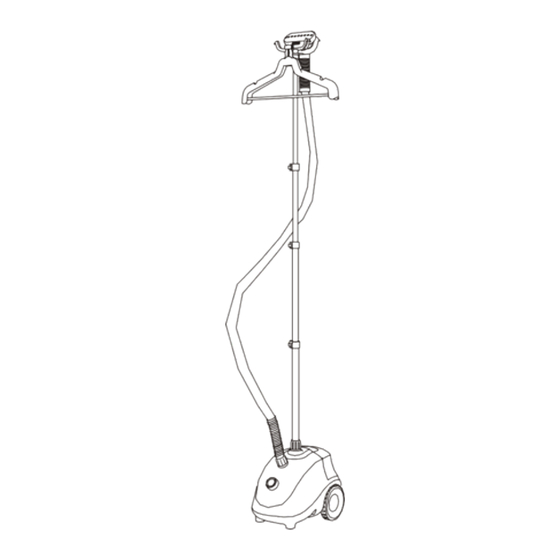
Page 4: Apparatets Dele
Vandbeholder med låg Dampdyse Drænprop Tekstilbørste Bomuld Silke Linned Specifikationer Slukket Model: GS70-BJ Varenr.: 10378 Vandbeholderens kapacitet: 1,5 l Ventetid, før der produceres damp: 45 sekunder 3 dampindstillinger til Indgangsspænding: forskellige typer stof 220-240 V vekselstrøm, 50/60 Hz Effekt: 1500-1800 W... - Page 5 KLARGØRING AF TØJDAMPEREN TRIN 1 TRIN 2 Før teleskopstangen ned i hullet, Forlæng teleskopstangen, og fastgør og stram holderen. bøjlen i toppen af teleskopstangen. Fastgør Før ned i hullet Skru op for at løsne Lås op Lås TRIN 3 TRIN 4 Monter dampslangen, og stram slange- Forlæng bøjlens arme helt, og hæng holderen.
- Page 6 SÅDAN ANVENDES DAMPEREN TRIN 2 TRIN 1 Sæt stikket i stikkontakten, og tænd Fjern låget. Fyld vandbeholderen. apparatet. Sæt vandbeholderen på plads, og skru låget på. Lås TRIN 4 TRIN 3 Klar til at dampe tøj. Lad apparatet varme op i 45 sekunder. 45 s...
-
Page 7: Vedligeholdelse Og Rengøring
VEDLIGEHOLDELSE OG RENGØRING TRIN 2 TRIN 1 Skru drænproppen af, og tøm vandbehol- Sluk apparatet, og tag stikket ud af stikkontakten. Vent mindst 30 minutter, deren. Fold teleskopstangen sammen, indtil apparatet er kølet helt af. og afmonter den og dampdysen. Bemærk: Skru dræn- proppen i igen, når vand- beholderen er tom. - Page 8 SAMLING OG BRUG AF TILBEHØR Tekstilbørste Multfunktionel bøjle SÅDAN DAMPES TØJ...
- Page 9 FEJLFINDING PROBLEM ÅRSAG LØSNING Apparatet producerer Stikket er Sæt stikket i ikke damp. ikke sat i stikkontakten. Kontrollampen lyser ikke. stikkontakten. Problemer med elforsyningen i din bolig/en Ring til en autoriseret sikring er sprunget elektriker for at få hjælp. Apparatet producerer Apparatet skal Følg proceduren ikke damp.
-
Page 10: Important Safety Instructions
Important Safety Instructions: 1. The voltage of your electrical source must correspond to that of the appliance (220-240V~50/60Hz). Connecting to the incorrect voltage may cause unrepairable damage to the appliance and will invalidate the warranty. 2. Do not share the power supply with other high-powered electric appliances. 3. - Page 11 14. Always turn off and unplug unit before refilling, draining, cleaning, moving, or when not in use. 15. For indoor use only. 16. Keep the appliance away from flammable materials and chemicals. 17. Do not fill the water tank with hot water or corrosive cleaning agents which could cause damage. Distilled or filtered water is strongly recommended. 17. Only use our accessories on your appliance. The use of accessory attachments other than those provided by us may result in fire, electric shock or irreversible damage to the appliance. 18. This appliance is not intended for use by children or near children and other persons whose physical, sensory or mental capabilities or lack of experience and knowledge prevents them from using the appliance safely without supervision or instruction by a responsible person to ensure that they...
-
Page 12: Product Specification
Telescopic Pole Water Tank with Cap Steam Nozzle Drain Plug Fabric Brush Cotton Silk Linen Product specification Model: GS70-BJ Item: 10378 Water Tank Capacity 1.5L Steam Output Time 45 seconds Input Voltage 220-240V~50/60Hz 3 steam settings for Output Power 1500-1800W... - Page 13 SETTING UP YOUR GARMENT STEAMER STEP 1 STEP 2 Insert the Telescopic Pole and tighten Extend the Telescopic Pole and insert the the Pole Connector. hanger to the top of the Telescopic Pole. Insert Unscrew to loosen Unlock Lock STEP 3 STEP 4 Install the Steam Hose and tighten the Fully extend Hanger Arms and hang the...
-
Page 14: Instructions For Use
INSTRUCTIONS FOR USE STEP 2 STEP 1 Plug in & Turn on. Remove the Cap. Fill the Water Tank. Replace & tighten the Cap. Lås STEP4 STEP 3 Heat up in 45 sec. Ready for steaming. 45 s... -
Page 15: Maintenance And Cleaning
MAINTENANCE AND CLEANING STEP 2 STEP 1 Unscrew the Drain Plug and empty the Turn off the unit and unplug it. Wait at least 30 mins until the unit cools down water reservoir. Collapse and remove the Telescopic Pole & Steam Nozzle. completely. - Page 16 ACCESSORIES ASSEMBLY AND USE Fabric brush Multfunctional hanger HOW TO STEAM...
-
Page 17: Troubleshooting
TROUBLE SHOOTING PROBLEMS REASON SOLUTION Unit fails to steam. The unit is not Plug in the unit. Indicating lamp does plugged in. not illuminate. House hold power system problem/ Call a qualified fuse is blown. electrician for help. Unit fails to steam. Mineral Follow the removal Indicating lamp...
Need help?
Do you have a question about the GS70-BJ and is the answer not in the manual?
Questions and answers