Advertisement
Thank you for purchasing
our sewing machine.
If you have any questions to our products, please contact us by E-mail:luby-business@hotmail.com. Our customer services are always
ready to offer you a satisfying solution.
Sewing Machine Manual
•
Please read this user manual carefully to use the machine correctly.
•
Before using the machine, please read "instructions for safe use"
•
Keep this manual in a safe place for reference.
JG-16 02
Advertisement

Subscribe to Our Youtube Channel
Related Manuals for Luby JG-1602

Summary of Contents for Luby JG-1602
- Page 1 Before using the machine, please read "instructions for safe use" our sewing machine. • Keep this manual in a safe place for reference. If you have any questions to our products, please contact us by E-mail:luby-business@hotmail.com. Our customer services are always ready to offer you a satisfying solution.
-
Page 2: Table Of Contents
Contents Contents ..........................Names of parts and accessories Sewing Basics ..............Various Type of Sewing ............Replacing the Needle and Thread ..........8-11 Stitch Adjustment (thread tension) ..........Troubleshooting ..............13-14 Sewing tips: Turning the handwheel to make sewing more smoothly. -
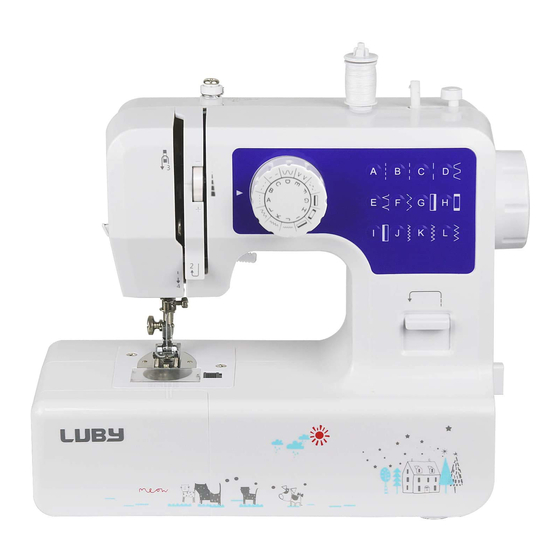
Page 3: Names Of Parts And Accessories
Names of parts and accessories This section provides the names of JG-1602 parts and accessories. After purchasing the product, make sure you have all parts. Upper thread spindle Thread cap Pattern selection dial Upper thread Tension disk Stop poling Take-up lever... -
Page 4: Sewing Basics
Sewing basics Let's try making a straight stitch, the most basic Raise the presser foot and place the fabric under it kind of sewing. Make sure the upper thread and the bobbin thread have been correctly installed. See page 11 to 12 for instructions about threading the upper thread and the bobbin thread. - Page 5 Sewing basics Start sewing again while pressing the fabric gently. Note Reverse lever How to use the foot pedal/ automatic switch ● When reverse stitching : Stop the sewing machine The machine will sew in /Foot pedal switch. reverse only while the lever reverse : The machine will automatically run slowly.
-
Page 6: Various Type Of Sewing
Various types of sewing You can choose from 12 different stitches by turning the pattern selection dial. Straight stitch Blind stitch Buttonhole sewing Zigzag stitch (Presser foot for (Normal presser foot) (Normal presser foot) buttonhole sewing) Hemming Sew around the Finishing the edge of the Fine Coarse... -
Page 7: Buttonhole Sewing
Various types of sewing Buttonhole sewing You can sew buttonholes by using the buttonhole presser foot accessory. We recommend that sew a few pieces before you sew actual material. Install the buttonhole presser foot Raise the presser foot and lift the needle Lower the presser foot to lower the presser to its highest position. - Page 8 Various types of sewing Sewing buttonhole : end of sewing Using tailor’s chalk, mark the position Pattern of the buttonhole on the fabric. selector dial Attach the buttonhole presser foot and place the fabric beneath the presser foot. Draw both of needle and bobbin thread to the left .
-
Page 9: Replacing The Needle And Thread
Replacing the needle and thread Threading the upper thread Caution Replace the thread as follows when you run out of thread or if you want to change thread color. Make sure the switch is turned “ “ ” when threading the machine Remove the thread cap, place a spool of sewing machine... - Page 10 Replacing the needle and thread See the instructions on the next page for winding thread onto an empty bobbin. Caution Threading the bobbin thread Be sure to use metal bobbins. Thread the upper thread before threading the bobbin thread.You will not be able to bring up the bobbin thread unless you have already threaded the upper thread.
- Page 11 Replacing the needle and thread Caution Winding thread onto the bobbin Be sure to use metal bobbins. This is how you wind thread onto an empty bobbin (Make sure the needle thread is not be threaded ). Place a spool of sewing machine thread onto Slide the bobbin winding spindle to the right.
- Page 12 Replacing the needle and thread Replacing the needle Use the following method to replace the needle if the needle becomes bent or broken. Caution To prevent accidents when replacing the needle, be sure to turn the switch“ ”. It is even safer to remove and the AC adaptor Rotate the hand wheel toward you Slowly rotate the hand wheel towards you to make...
-
Page 13: Stitch Adjustment (Thread Tension)
Stitch adjustment (thread tension) Try a few test stitches before you start sewing to check on the condition of the thread. Since thread tension will vary depending on the type of fabric used, do some test sewing when you change fabrics to check on the condition of the thread. -
Page 14: Troubleshooting
Troubleshooting When you think the machine may be malfunctioning due to problems while you are using it,check the following: Problems Cause Solution Turn the power supply switch No power supply. ON and supply power. Lamp does not illuminate. Make sure the AC adaptor are AC adaptor are not installed Machine runs slowly. - Page 15 Troubleshooting Problems Cause Solution Upper thread does not feed Reinstall the spool and make properly from the thread spool. sure the spool turns smoothly. Stitches are loose or See page 12. uneven. The upper thread is too loose. Remove the old needle, The needle is bent Install a new needle.
Need help?
Do you have a question about the JG-1602 and is the answer not in the manual?
Questions and answers
the tread does not pick up from bottom
The thread may not pick up from the bottom on the Luby JG-1602 due to the following possible causes:
1. Upper Thread Not Threaded Correctly – Ensure the upper thread is correctly threaded as per the instructions.
2. Bobbin Thread Not Installed Properly – Check if the bobbin thread is threaded correctly.
3. Incorrect Needle Position – Raise the needle to its highest position using the hand wheel.
4. Bent or Damaged Needle – Replace the needle if it is bent or damaged.
5. Dust Buildup in the Bobbin Case – Clean the bobbin case to remove any dust or lint.
Following the correct threading and maintenance steps should resolve the issue.
This answer is automatically generated