Table of Contents
Advertisement
Quick Links
Advertisement
Table of Contents

Summary of Contents for Hydro EvoWash
- Page 1 EvoWash...
- Page 2 (This page was intentionally left blank.)
-
Page 3: Table Of Contents
index 1.OO overview page 1.01 Package Contents 1.02 Description (North America vs. Global) 1.03 Product Features 1.04 Model table 1.05 Product Diagram 1.06 General Specifications 1.07 Intended Use 2.OO installation 2.01 Site Survey and Installation Requirements 2.10 Mechanical Installation 2.11 Installing the Vacuum Breaker (NA only) 2.12 Installation Diagram 2.13 Wall Mounting the Enclosure 2.14 Conductivity Probe... - Page 4 index (continued) 4.OO programming page 4.01 Program Mode 4.02 Program Mode Menu Settings 4.03 Program Mode Menu Trees 4.04 Configuration Mode Settings (Program Menu 2) 4.05 Probe Mode Adjustment Menu Settings (Program Menu 3) 4.06 Probeless Mode Adjustment Menu Settings (Program Menu 4) 5.OO maintenance page...
-
Page 5: Package Contents
1.O2 Description (North America vs. Global] The EvoWash is a powder or solid detergent dissolver for use with warewash machines, with an optional, integrated rinse pump. The built-in programmable control unit promotes safe and economical use of warewash supplies, ensuring accurate, automatic chemical dosage, only as needed. -
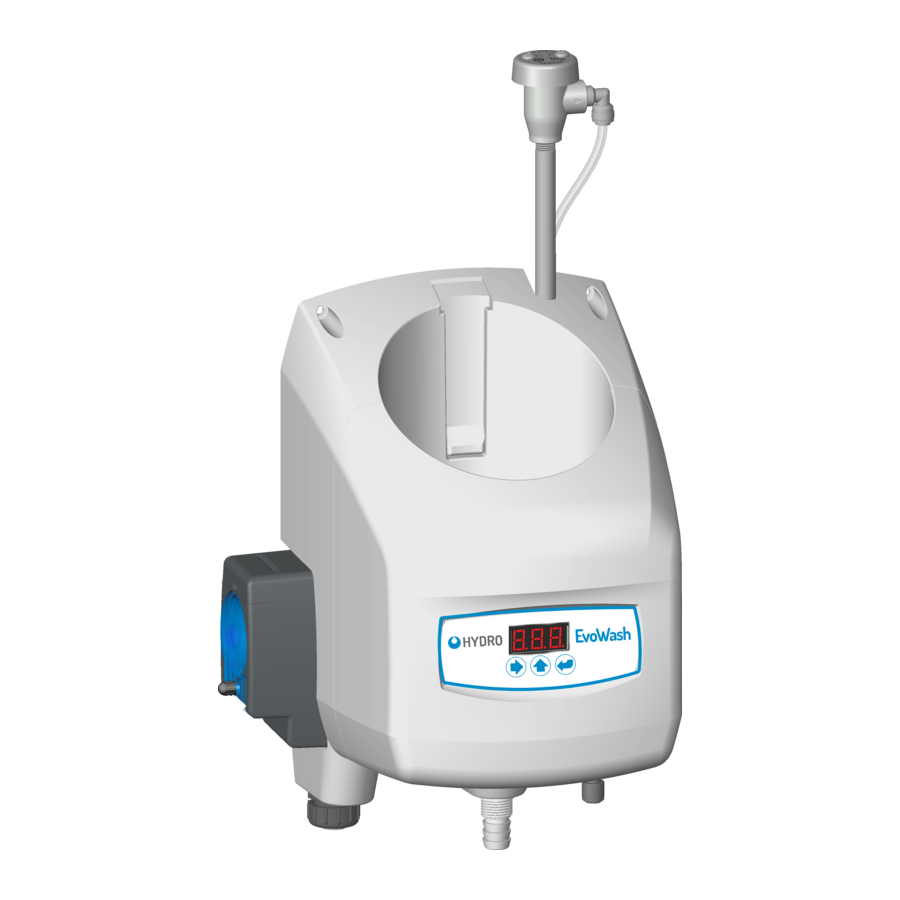
Page 6: Product Diagram
Pump Inlet Size Nozzle Style Approvals Voltage Popular UL Model HYDEVWR1008RB80SCUL RB80 NA EvoWash with Rinse Pump Popular CE Models HYDEVWR1008RB80SCCE RB80 EMEA EvoWash with Rinse Pump HYDEVWN1008RB80SCCE RB80 EMEA EvoWash No Rinse Pump 1.O5 Product Diagram 1. Safety Stop Switch Lever 2. -
Page 7: General Specifications
1.OO overview (continued) 1.O6 General Specifications Category Specification Electrical Input Voltage 100-240 VAC at 50/60 Hz up to 0.75 Amps maximum (Class II) Power Usage 12W maximum Detergent Signal Input 24-249VAC at 50/60Hz up to 20mA or 24VDC up to 20mA Rinse Signal Input 24-249VAC at 50/60Hz up to 20mA or 24VDC up to 20mA Weights and Dimensions... -
Page 8: Intended Use
2.OO installation Safety Precautions CAUTION! Before an installation takes place it is advisable to complete a site survey to ensure the EvoWash can be installed in a position that meets all the requirements below. CAUTION! Do not install unit in potentially explosive environment (ATEX) where flammable gas, steam, fog or dust can form an explosive combination with air. -
Page 9: Installation Diagram
2.OO installation (continued) 2.12 Installation Diagram NOTE: North America Model Shown front view Water Inlet side view Power Wires (with fused isolation switch). Detergent and (Optional) Rinse Signal Wires Detergent Feed Hose Conductivity Probe Wires Dish Machine Rinse Feed Inlet Hose Rinse Feed Outlet Hose From Rinse product container... -
Page 10: Wall Mounting The Enclosure
2.OO installation (continued) 2.13 Wall Mounting the Enclosure NOTE: Ensure the wall anchors are suitable for the wall being mounted to. 1) Position the enclosure against the wall at the chosen installation location and mark the wall through the four mounting holes. 2) Drill four holes in the marked positions using an 8 mm (5/16 inch) drill bit. -
Page 11: Detergent Discharge Hose
2.OO installation (continued) 2.16 Detergent Discharge Hose NOTE! Ensure there are no kinks or sharp bends in the discharge hose, between the unit and the detergent bulkhead fitting, to ensure free flow of detergent solution into the wash tank. 1) Using the supplied clear, flexible tubing, connect one end to the discharge hose outlet on the unit and secure with Push one end onto Detergent a cable-tie supplied in the mounting kit or a worm-gear... -
Page 12: Optional Rinse Pump Injection Fitting
2.OO installation (continued) 2.18 Optional Rinse Pump Injection Fitting NOTE! Only applicable to models that have the optional rinse pump fitted. You must install the rinse injection fitting downstream of any rinse solenoid. Compression fitting (1/8” tube) Rinse Feed CAUTION! Ensure there are no kinks or sharp Outlet Hose bends in the tubing between the pump and the rinse injection fitting, to ensure free flow of rinse... -
Page 13: Electrical Installation
2.OO installation (continued) 2.2O Electrical Installation WARNING! Electrical installation and maintenance should be completed by a qualified electrician. All local and national electrical regulations are to be observed. CAUTION! All electrical connections (excluding the conductivity probe) are to be made either in the dish machine control circuit panel or in a suitable, external junction box. -
Page 14: Conductivity Probe Wiring
All local and national electrical regulations are to be observed. 2.23 Main Power Input Wiring Power input to the EvoWash can be any voltage from Main Power Input Wiring: Single Phase AC Power 100-240 VAC at 50/60 Hz. For single phase systems,... -
Page 15: Rinse Signal Wiring (Optional)
2.3O Retrofit Rinse Pump Installation If an EvoWash unit was purchased without a rinse pump, you may want to add the functionality of having an integrated Rinse pump for dosing rinse aid into your system. All programming and settings are controlled through the same interface as the detergent control. - Page 16 2.OO installation (continued) 2.3O Retrofit Rinse Pump Installation (continued) 3) Remove the Rinse Pump from the packaging. 4) Remove the plastic cap from the end of the six-wire cable connector, inside the unit. NOTE: Global Model Shown 5) Clip the plug from the rinse pump to the six-connection plug on the unit, checking that the two mate together properly. NOTE: Global Model Shown...
- Page 17 2.OO installation (continued) 2.3O Retrofit Rinse Pump Installation (continued) 6) Push the rinse pump into the housing, feeding the cable under the pump and into the slot at the back of the unit. Cable Slot NOTE: Global Model Shown 7) Screw the securing clip over the cable gland at the base of the pump. 8) Use the screw and washer to secure the rinse pump into the main housing at the top of the rinse pump.
-
Page 18: Controls
3.OO operation 3.O1 Controls There are three control keys below the EvoWash display: • Next: the “right arrow” that moves to the next item. • Scroll: the “up arrow” that changes a value. • Enter: the “down and over arrow” to make a selection. -
Page 19: Alarms
3.OO operation (continued) 3.O3 User Mode Menus (continued) Menu 11: Rack Count Menu • At the Idle Home Screen press the Next key to move to Menu 11. • Press the Enter key to display the number of racks washed (divided by ten). For example, 7,324 racks will display as 732. •... -
Page 20: Program Mode
4.OO programming 4.O1 Program Mode Program Mode is password protected (factory set to “123”) with two sets of menus for installers and maintenance technicians to adjust the unit settings to meet their wash requirements. Follow the steps below to access the Program Mode Menus. 1) Press and hold the Enter key for 2 seconds. - Page 21 4.OO programming (continued) 4.O3 Program Mode Menus Entering the Program Mode password and pressing the Enter key will always move first to Program Mode Menu 2. Program Menu 2 Program Mode To “Adjustments Menu” Menu 2: Menu 3 for Probe Mode Configuration Menu 4 for Probless Mode Detergent Control...
- Page 22 4.OO programming (continued) 4.O3 Program Mode Menus (continued) At the top of Menu 2 (with a blinking middle digit 2), press the Scroll key to move to the “Adjustments” menu appropriate for the Detergent Control Mode defined in Menu 21. That will be either Menu 3 for Probe Mode, or Menu 4 for Probeless Mode. Idle Home Screen 0 0 0 —...
- Page 23 4.OO programming (continued) 4.O3 Program Mode Menus (continued) At the top of Menu 2 (with a blinking middle digit 2), press the Scroll key to move to the “Adjustments” menu appropriate for the Detergent Control Mode defined in Menu 21. That will be either Menu 3 for Probe Mode, or Menu 4 for Probeless Mode. Idle Home Screen 0 0 0 —...
- Page 24 Menu 23.1: Detergent Type (default) 2 = Solid / Powder Since the EvoWash dispenser only uses solid/powder chemistry this must always be set to “2” for the unit to operate properly. Menu 23.2: Pulse Feed (Probe Mode Only) 0 = Pulse Feed Off 1 = 1 Sec.
- Page 25 With the standard rinse pump tube, in new condition, the EvoWash rinse pump will dispense approximately 0.5 ml per revolution. Testing: With the Rinse Pump Speed displayed, press and hold Next and Enter to run the pump at the displayed speed.
- Page 26 4.OO programming (continued) 4.O5 Probe Mode Adjustment Menu Settings (continued) Menu 34: Low Detergent Alarm Delay (in Racks) 0 to 99 racks (default = O racks) A setting that delays the Low Detergent Alarm by the defined number of racks. Although the range is 0 to 99 racks, there is always a delay of at least 1 rack.
- Page 27 With the standard rinse pump tube, in new condition, the EvoWash detergent pump will dispense approximately 0.5 ml per revolution. Testing: When the Rinse Pump Speed value is being displayed, you can press and hold the Next key with the Enter key to have the rinse pump run at the displayed speed setting.
- Page 28 4.OO programming (continued) Menu 45: Rinse Feed Option (Door Machine Only) 1 = Rinse Feed on Rinse Signal or 2 = Rinse Feed on Detergent Signal (default = 1 = Rinse Feed on Rinse Signal) NOTE: This setting is only for dishwashers whose Machine Type is designated as a Door Machine in Menu 22. This setting is ignored if the Machine Type is set to Conveyor.
-
Page 29: Rinse Pump Squeeze Tube Replacement
The controller displays shown below may be helpful when troubleshooting an issue with the EvoWash’s operation. For example, it can be important to know if an EvoWash dispenser is set to Probe Mode or Probeless mode, and the detergent feed and optional rinse pump will only dispense after the appropriate signal has been detected. -
Page 30: Troubleshooting Table
No incoming main electrical power. • Check wiring from dish machine • Check for power at dish machine connection b. Bad EvoWash PC board • Replace EvoWash PC board 2. No detergent feed a. Incorrect detergent type setting •... -
Page 31: Exploded Parts Diagram (Front)
7.O2 Service Parts (Front) Part No. Description HYD90096994 Replacement spray nozzle kit HYD10099395 Front cover label, Hydro standard - 10 pack (custom labeling is available) HYD47-07502-01 (North America models only) Electrical cable conduit fitting HYD13-06396-00 Rinse pump spinner assembly HYD13-06395-01... - Page 32 WEEE. The EvoClean unit is a product placed onto market POST 13.08.05 , therefore called ‘future WEEE’. As a producer Hydro Systems Europe have the option to take responsibility for the EEE placed on the market. If Hydro Systems Europe chooses to receive WEEE they must make sure that it is disposed of in an environmentally sound way, including the treatment, reuse, recovery and recycling of the components where appropriate.
-
Page 33: Limited Warranty
How they can safely dispose of WEEE for proper treatment? When the product is at its end of life, either contact the Local Authority in charge of electrical disposal, or contact Hydro Systems Europe who will either take the item back from yourself or supply you with relevant information for a local WEEE treatment facility.
Need help?
Do you have a question about the EvoWash and is the answer not in the manual?
Questions and answers