Table of Contents
Advertisement
Quick Links
FREE OM
FreedomLiftSystems.com
1-877-947-7769
Check entire box and all packing materials for parts. Before beginning assembly, read the
instructions and identify parts using the fi gures and parts listed in this document.
It is critical that all parts be carefully inspected prior to installation. If any damage occurred in
transit, Freedom Lift Systems must be notifi ed within three days of receipt of unit.
Proper installation cannot be overstressed, as an improper installation voids the
warranty and may a ect the safety of the user.
Lift Systems
Lift safety can only be ensured if the lift is installed and
• NEVER permit children to play on or around the lift
• Do not allow children to use the lift without adult
supervision
• NEVER apply direct water pressure to the electronics
• NEVER use the lift with a dry pool
READ CAREFULLY
Power EZ
Pool Lift
PART #: APQF-333PEZNA
400 LB. [181 kg] MAXIMUM WEIGHT CAPACITY
MANDATORY
LEAVE THIS MANUAL WITH LIFT OWNER
Read and follow all instructions.
operated according to these instructions.
1
Revised 4/3/17
Advertisement
Table of Contents

Summary of Contents for Freedom Lift Systems Power EZ
- Page 1 It is critical that all parts be carefully inspected prior to installation. If any damage occurred in transit, Freedom Lift Systems must be notifi ed within three days of receipt of unit. Proper installation cannot be overstressed, as an improper installation voids the warranty and may a ect the safety of the user.
- Page 2 Accessories and Options Power EZ Components The Power EZ lift will arrive partially assembled in multiple boxes. Begin by removing all parts from the boxes and locating the parts for your lift in the parts lists below. Refer to the parts breakdown drawings in the back of this manual for assistance.
- Page 3 Anchor Installation: Retro-Fit Concrete NOTE: The concrete deck around the anchor should be a minimum of 8 inches TOOLS REQUIRED: TAPE MEASURE 4” CORE DRILL BIT thick and reinforced with #4 bars at 10 CORE DRILL FELT TIP MARKING PEN inches on center, each way.
-
Page 4: Grounding Lug
Anchor Installation: Retro-Fit Concrete Carefully insert the anchor into the hole. Pour a small amount of 2 part epoxy, or equivalent, around NOTE: Fill the hole about 1/3 full of 2 part epoxy, or equivalent, prior to inserting the anchor. As you insert the anchor, rotate it back and forth so that you can evenly distribute the cement or epoxy around the anchor. -
Page 5: Anchor Installation: New Construction
Anchor Installation: New Construction NOTE: The concrete deck around the anchor should be a TOOLS REQUIRED: minimum of 8 inches thick and reinforced with #4 bars at TAPE MEASURE STRING LINE CARPENTERS LEVEL STRING LEVEL 10 inches on center, each way. The total concrete pad area MARKING PEN should be at least 60 inches wide and 60 inches long. - Page 6 9/16” WRENCH 3/4” WRENCH 1/8” HEX KEY FLATHEAD SCREWDRIVER CONTROL BOX The Power EZ Pool Lift arrives with the boom arm attached AND BRACKET to the mast. To complete the assembly, layout all parts on a large, clean area. HOSE CLAMP (2) STEP 1.
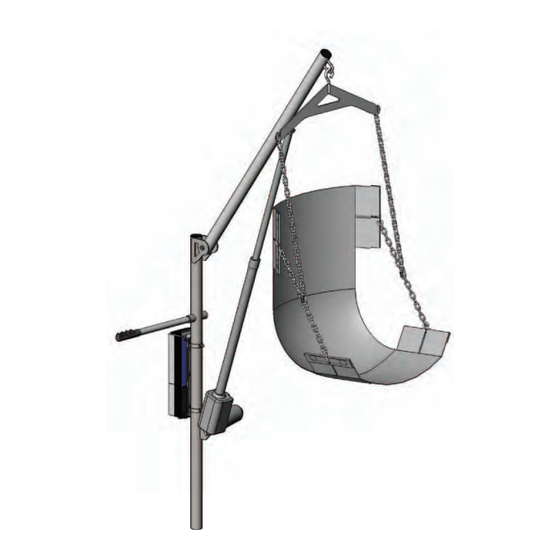
- Page 7 Assembly Instructions STEP 5. Locate the chain assembly and insert each “S” hook STEP 5 into the holes in the sling support bars (A). Attach the hanger to the boom eye on the lift (B). Adjust the chain links so that the sling is at the appropriate height to allow the user easy access (C).
-
Page 8: Operating Instructions
The Power EZ Pool Lift requires the use of an operator to assist the lift occupant with the transfer into the pool. There are two methods of loading the lift occupant into the harness. The method of loading will depend on the physical ability of the lift occupant. -
Page 9: Basic Troubleshooting
Basic Troubleshooting Problem: The lift won’t move. Solution: 1. Make sure the battery is properly seated: You should hear a click when Click! the battery is properly seated on the control box or charger. NOT Properly Attached: Properly Attached: Note: the white bracket is Note: the white bracket in front of the silver clip, is behind the silver clip,... - Page 10 Proper Care of Pool & Spa Lifts PROCEDURE DAILY WEEKLY MONTHLY Wash down lift with fresh water and dry with clean, soft, ü non-abrasive cloth. ü Recharge battery. Run the lift through a complete test cycle to verify it is ü...
-
Page 11: Parts List
Parts List ITEM # QTY PART # DESCRIPTION PEZWM-0804PEZMA MAST WELDMENT, POWER EZ PEZWM-0804PEZBA BOOM WELDMENT, POWER EZ 340643-00 ACTUATOR, LINAK, LA-34 F-038EZHB HANGER BAR, STANDARD F-034EZS EZ STANDARD SLING F-032EZB SLING BARS ONLY, SET OF 4 F-031EZCH CHAIN SET, EZ... - Page 12 Revised_1.2.2017 AQUA CREEK PRODUCTS, LLC LIMITED FIVE (5) YEAR WARRANTY : EZ SERIES LIFTS (ITEM #’s : F-03EZPLNA, F-333PEZNA, F-194PHBL-NA) Aqua Creek Products, LLC (a.k.a. Aqua Creek) warrants to the original end user purchaser that products manufactured by Aqua Creek, when properly installed in accordance with assembly and installation instructions, and properly used and maintained, s hall be free from defects in material and workmanship for a period of ve (5) years from the date of original purchase, provided that Aqua Creek receives prompt notice in writing of any defect or failure and satisfactory proof thereof, with the following exception (s): Exceptions:...
-
Page 13: Solar Charger
EZ SERIES ACCESSORIES COVERS ANCHORS EZ & Power EZ Only F-EZBL-C EZ/ Power EZ F-035EZSM Surface Mount F-4440HBC-B Super Power EZ F-30600 Wood Deck Mount F-440EZHSC EZ/ Power EZ (cover for hardseat option) SOLAR CHARGER F-BCC-11 Control Box Cover (Power EZ)
Need help?
Do you have a question about the Power EZ and is the answer not in the manual?
Questions and answers