Table of Contents
Advertisement
Advertisement
Table of Contents

Summary of Contents for Sectron BGS3 GPRS Terminal
-
Page 2: Table Of Contents
CONTENTS ..............................2 SAFETY INSTRUCTIONS ..........................3 CONTENTS OF PACKAGE ..........................5 BGS3 GPRS Terminal, EGS5 GPRS JAVA Terminal, EES EDGE Terminal ............6 PHS8 HSPA+ Terminal, PHS8-P HSPA+ Terminal Audio ................8 PLS8 LTE Terminal, PLS8 Rel.2.1 LTE Terminal, PLS8 Rel.3 LTE Terminal ............9 Optional Terminal Accessories ......................... -
Page 3: Safety Instructions
SAFETY INSTRUCTIONS • When using the device, make sure to follow the legal regulations and local restrictions. • Do not use the device in hospitals as this may impair the function of medical devices; eg. near pacemakers or hearing aids. •... -
Page 4: Contents Of Package
CONTENTS OF PACKAGE BGS3 GPRS Terminal / BGS3 GPRS Terminal USB 1. 1 pc BGS3 GPRS Terminal / BGS3 GPRS Terminal USB 2. 1 pc rail mounting bracket DIN 35 mm with a screw 3. 1 pc 2-pin terminal strip MRT9 4. -
Page 5: Bgs3 Gprs Terminal, Egs5 Gprs Java Terminal, Ees Edge Terminal
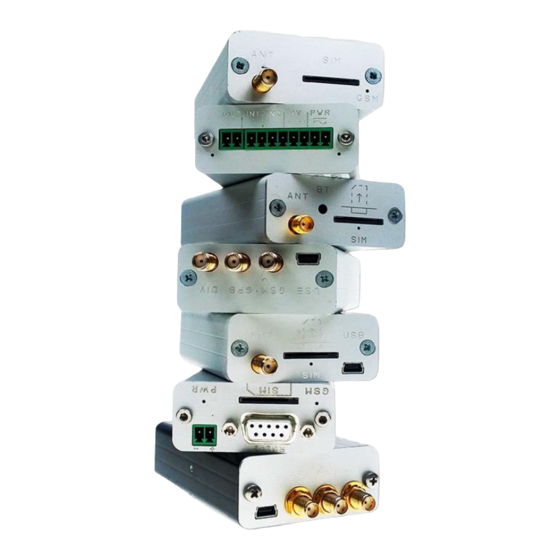
BGS3 GPRS Terminal, EGS5 GPRS JAVA Terminal, EES EDGE Terminal RS232 – Connector for terminal connection via RS232 PWR ~ – Power connection terminals 8 – 30 V AC/DC (polarity does not matter) LED power diode– LED diode that indicates the power status, it lights up green when the device is turned ANT –... - Page 6 BGS5 GPRS JAVA Terminal USB, EHS5 HSPA JAVA Terminal, EHS6 JAVA Terminal RS232 – Connector for terminal connection via RS232 PWR ~ – Power connection terminals 8 – 30 V AC/DC (polarity does not matter) LED power diode– LED diode that indicates the power status, it lights up green when the device is turned ANT –...
-
Page 7: Phs8 Hspa+ Terminal, Phs8-P Hspa+ Terminal Audio
PHS8 HSPA+ Terminal, PHS8-P HSPA+ Terminal Audio RS232 – Connector for terminal connection via RS232 – Power connection terminals 8 – 30 V DC (polarity must correspond to the engraving) – LED is inactive after the device is switched on; function can be set by command AT^SLED (option cannot be saved) –... -
Page 8: Pls8 Lte Terminal, Pls8 Rel.2.1 Lte Terminal, Pls8 Rel.3 Lte Terminal
PLS8 LTE Terminal, PLS8 Rel.2.1 LTE Terminal, PLS8 Rel.3 LTE Terminal – LED is inactive after the device is switched on; function can be set by command AT^SLED (option cannot be saved) – SIM card slot – Power connection terminals 8 – 30 V DC PWR (polarity must correspond to the engraving) LED power diode –... - Page 9 ELS61 LTE JAVA Terminal USB RS232 – Connector for terminal connection via RS232 PWR ~ – Power connection terminals8 – 30 V AC/DC (polarity does not matter) LED power diode – LED diode that indicates the power status, it lights up green when the device is turned on ANT –...
-
Page 10: Optional Terminal Accessories
Optional Terminal Accessories Type of accessory Name Code Source 12V / 1A, no connector, free end AM-RT-FPOWR Source 12V / 1A, free end AO-PWR-1201 Adapters Source 12V / 2,08A, industrial AO-PWR2512I and voltage AM-RT-DPOWR Source 12V / 1,7A, DIN sources Backup battery 12 V DC/12 V AM-T-BPACK RS232 to USB (converter) -
Page 11: Terminal Connection To Pc And Its Operation
Terminal connection to PC and its operation This manual is universal for all mentioned terminals and modems. The manual is written with regard to users with basic knowledge of the issue. 1) Unpack the device and connect the antenna (s) properly. 2) Insert an activated SIM card that has the PIN code and voicemail deactivated. - Page 12 4) Here you can setup the properties: Bits per second 115200 Data bits Parity None Stop bits Flow control Hardware Warning software hyperterminal is not the part of the package! It is also not a part of a regular operating system and must be additionally installed.
-
Page 13: Connecting To Pc Via Rs-232 Using A Usb Adaptor
CONNECTING TO PC VIA RS-232 USING A USB ADAPTOR 1) Connect serial cable with adaptor for USB to terminal and to PC. 2) Install the adaptor’s driver 3) In Windows OS, go to: Start -> Control panels -> System -> Device manager. 4) In “Ports (COM &... -
Page 14: Connection To Pc Via Usb
1) Connect the USB cable to the terminal and to PC. 2) Install the drivers for your terminal. If you do not have a driver in your disposal, you can request it at hotline@sectron.cz 3) In Windows OS, go to: Start -> Control panels -> System -> Device manager. - Page 15 5) Checking the parameters. Change the COM port speed can be done in properties -> Modem -> Maximum Port Speed. Set up the port speed 115200.
- Page 16 Warning software hyperterminal is not the part of the package! It is also not a part of a regular operating system and must be additionally installed. recommended software are PuTTY, ZOC terminal etc. 6) If you selected PuTTY, the session options must be same as the ones in the device.
-
Page 17: Using The Terminal As Modem
Using the terminal as modem A quick guide for how to use the data connection of the terminal to connect to the internet. For this type of connection, a data-enabled SIM card. Please contact your operator for more information if necessary. 1) Now go to start ->... - Page 18 3) In the advanced tab, put the following to Extra initialization commands: at+cgdcont=1,“IP“,“internet.t-mobile.cz“ In case of using a SIM card from an operator other than T-Mobile, use “internet” instead of “internet.tmobile.cz” or check the web page of your operator for more information. ATTENTION! It is necessary for this part to be typed in correctly! Confirm using the OK button.
- Page 19 5) Select Set up a new connection or network 6) Connect to the internet -> Dial-up...
- Page 20 7) Here, enter the following Dial-up phone number: *99***1# (dependent on the operator). User name and password can stay blank unless your operator/provider says otherwise. You can also fill in the connection name. 8) Click the Connect button...
- Page 21 9) If everything was setup correctly, you should see the following image: 10) Succesful connection to the internet Josefa Šavla 1271/12 709 00 Ostrava 9 - Mariánské Hory +420 556 621 000 www.sectron.cz...
Need help?
Do you have a question about the BGS3 GPRS Terminal and is the answer not in the manual?
Questions and answers