Table of Contents
Advertisement
Available languages
Available languages
Advertisement
Table of Contents

Related Manuals for Black+Decker PPRH5B

Summary of Contents for Black+Decker PPRH5B
- Page 2 PROFESSIONAL POWER STATION INSTRUCTION MANUAL Catalog Number PPRH5B Thank you for choosing Black + Decker! Go to www.Baccusglobal.com to register your new product. PLEASE READ BEFORE RETURNING THIS PRODUCT FOR ANY REASON: If you have a question or experience a problem with your purchase, go to HTTP://WWW.BACCUSGLOBAL.COM...
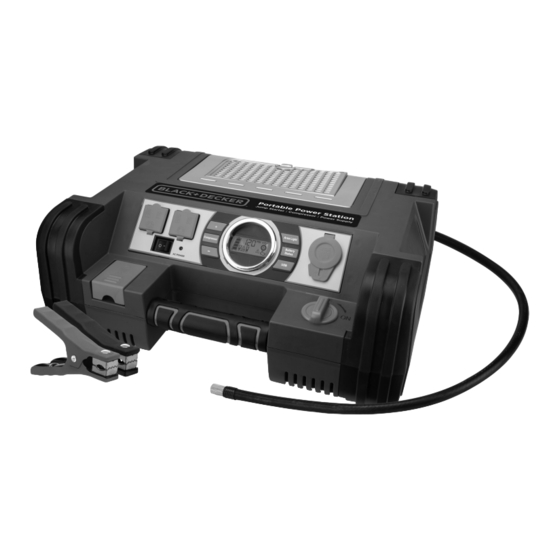
- Page 3 FEATURES 1. Built-in 120 volt AC charger (under protective cover) 12. Compressor pressure control button (+) 2. Rubber grip handle 13. LCD screen 3. Jump-starter power switch 14. Area light power button 4. Air hose and Sure Fit® nozzle connector 15.
- Page 4 DIGITAL LCD SCREEN DIGITAL DISPLAY (VARIES BY FUNCTION) USB ICON BATTERY ICON BATTERY VOLTAGE INDICATOR ALARM ICON COMPRESSOR ICON JUMP STARTER ICON COMPRESSOR PRESSURE INDICATOR This device complies with part 15 of the FCC rules. Operation is subject to the following two conditions: (1) this device may not cause harmful interference, and (2) this device must accept any interference received, including interference that may cause undesired operation.
-
Page 5: Safety Guidelines - Definitions
SAFETY GUIDELINES / • This equipment employs parts (switches, relays, etc.) that produce arcs or sparks. Therefore, if used in a garage or enclosed area, the unit MUST be DEFINITIONS placed not less than 18 inches above the floor. • Do not use this unit to operate appliances that need more than 5 amps to operate from the 12 volt DC accessory outlet. -
Page 6: First Aid
• Vehicles that have on-board computerized systems may be damaged if • Do not operate near flammable materials, fumes or gases. vehicle battery is jump-started. Before jump-starting, read the vehicle’s • Do not expose to extreme heat or flames. owner’s manual to confirm that external-starting assistance is suitable. CAUTION –... -
Page 7: Jump-Starter
OVERVIEW Recharging battery after each use will prolong battery life; frequent heavy discharges between recharges and/or overcharging will reduce battery life. Common Actions and Unit Responses Make sure all other unit functions are turned off during recharging, as this can slow the recharging process. -
Page 8: Rated Versus Actual Current Draw Of Equipment
4b. Connect negative (–) black clamp to chassis or a solid, non- • Excessive engine cranking can damage the vehicle‘s starter motor. If the moving, metal vehicle component or body part. Never clamp engine fails to start after the recommended number of attempts, discontinue directly to negative battery terminal or moving part. -
Page 9: Usb Charging Port
Power Inverter Output Waveform 1. Press the USB power power button to turn the USB port on. A beep will sound and the backlit LCD screen will continuously display the following: The AC output waveform of this inverter is known as a modified sine wave. It is a stepped waveform that has characteristics similar to the sine wave shape of utility power. -
Page 10: Care And Maintenance
2. Press the Compressor Power Button. A beep will sound and the backlit Never submerge the unit in water. If the unit gets dirty, gently clean the outer LCD screen will display the following: surfaces of the unit with a soft cloth. There are no user-replaceable parts. -
Page 11: Service Information
Portable compressor will • Make sure the compressor power button has not inflate been pressed to turn the compressor on. • Make sure the Sure Fit nozzle connector ® is securely screwed on to the valve stem when attempting to inflate tires; or that the nozzle adapter is securely screwed into the Sure Fit nozzle connector and is inserted... - Page 12 FUENTE DE ENERGÍA DIGITAL MANUAL DE INSTRUCCIÓN Número de catálogo PPRH5B ¡Gracias por elegir Black + Decker! Visite www.Baccusglobal.com para registrar su nuevo producto. LEA EL MANUAL ANTES DE DEVOLVER ESTE PRODUCTO POR CUALQUIER MOTIVO: If you have a question or experience a problem with your purchase, go to HTTP://WWW.BACCUSGLOBAL.COM...
- Page 13 CARACTERÍSTICAS 1. Cargador de CA de 120 voltios incorporado (bajo cubierta protectora) 11. Botón de alimentación del compresor 2. Manija de goma 12. Botón de control de presión del compresor (+) 3. Interruptor del puente auxiliar de arranque 13. Pantalla del LCD 4.
- Page 14 PANTALLA DEL LCD DIGITAL INDICADOR DIGITAL (VARÍA ICONO DEPENDIENDO DE LA FUNCIÓN) DEL USB ICONO DE LA BATERÍA INDICADOR DEL VOLTAJE DE LA BATERÍA ICONO DE LA ALARMA ICONO DEL JUMP STARTER ICON COMPRESOR INDICADOR DE PRESIÓN DEL COMPRESOR Este dispositivo cumple con la parte 15 de las normas de la Comisión Federal de Comunicaciones de Estados Unidos (FCC). La operación está sujeta a las dos condiciones siguientes: (1) este dispositivo no puede causar interferencia perjudicial y (2) este mecanismo debe aceptar cualquier interferencia recibida, incluida la in-terferencia que puede provocar una operación no deseada.
-
Page 15: Normas De Seguridad / Definiciones
NORMAS DE SEGURIDAD / • Uso de accesorios y suplementos. El uso de accesorios o dispositivos no recomendados para utilizar con este aparato puede resultar peligroso. DEFINICIONES Consulte la sección “Accesorios” de este manual para obtener detalles adicionales. • Manténgase alerta. Use el sentido común. No opere este equipo si está PELIGRO: Indica una situación de peligro inminente que, si no se evita, cansado o con impedimentos. - Page 16 CA de 120 voltios incorporado o la toma de CA, tire por el conectador y no vacía destellará y la unidad emitirá una alarma continua hasta que se por el cable. desconectan las pinzas. Desconecte y vuelva a conectar las pinzas de la •...
-
Page 17: Primeros Auxilios
INSTRUCCIONES DE SEGURIDAD ESPECÍFICAS Presione el botón de Sonará un bip y la pantalla retroiluminada PARA COMPRESORES alimentación USB. LCD mostrará el estado de la batería y el indicador de voltaje, así como del icono PRECAUCIÓN – PARA REDUCIR EL RIESGO DE LESIONES O DAÑO A del USB, que indica el puerto USB está... - Page 18 Notas: 2. Asegúrese de que el interruptor de encendido del puente auxiliar de Esta unidad se entrega en un estado parcialmente cargado - usted debe cargarlo completamente antes de usarlo para la primera vez. La carga inicial arranque está en la posición de apagado. de la CA debe ser por 40 horas.
- Page 19 9. Coloque el interruptor de encendido del puente auxiliar de energía del artículo que desee operar sea menor a 500 vatios. Si el consumo arranque en la posición de apagado (off) nuevamente. de energía se clasifica en CA de amperios, simplemente multiplique por los voltios de CA (120) para determinar la vatiaje.
- Page 20 2. Presione el interruptor del inversor para apagar el inversor (O). Antes de continuar, compruebe el estado de la batería de la unidad en la pantalla LCD. Cuatro barras sólidas en el icono de la batería indica una batería 3. Permita que la unidad se refresque abajo por varios minutos. llena.
-
Page 21: Cuidado Y Mantenimiento
El valor seleccionado nuevo se guarda en la memoria de la unidad hasta • Antes de desechar la batería, proteja las terminales descubiertas con cinta que se resetea manualmente. eléctrica para trabajos pesados. De esta manera previene cortos circuitos (los cortos circuitos pueden ocasionar lesiones e incendios). 4. -
Page 22: Información De Servicio
Enchufe accesorio de la CC: 12VCC, 5A El compresor portátil no • Asegúrese de que el botón de encendido del Tomacorriente de la CA dual: 120VCA, 60Hz, 500W continuo inflará compresor se ha presionado para activar el compresor. Presión máxima del aparato •...
Need help?
Do you have a question about the PPRH5B and is the answer not in the manual?
Questions and answers