Advertisement
Table of Contents
- 1 Table of Contents
- 2 Parts List
- 3 Initial Setup: Wheel Installation
- 4 Charging the Battery
- 5 Operation
- 6 To Power Cart on
- 7 Speed Control Knob
- 8 Remote Control Layout
- 9 Cart Handle Adjustment
- 10 Securing Bag to Cart
- 11 Remote Mount
- 12 Transportation
- 13 General Maintenance & Caution
- 14 Warranty Info
- Download this manual
Advertisement
Table of Contents

Summary of Contents for Callaway TRAVERSE
- Page 1 TRAVERSE REMOTE CONTROL ELECTRIC CART...
-
Page 2: Table Of Contents
TABLE OF CONTENTS Parts List..........................3 Initial Setup: Wheel Installation..................4-5 Charging The Battery......................5 Operation..........................6 To Power Cart On......................6 Speed Control Knob......................7 Remote Control Layout....................7-8 Cart Handle Adjustment....................9 Securing Bag To Cart.......................9 Remote Mount........................9 Transportation.........................9 General Maintenance & Caution..................10 Warranty Info........................11... -
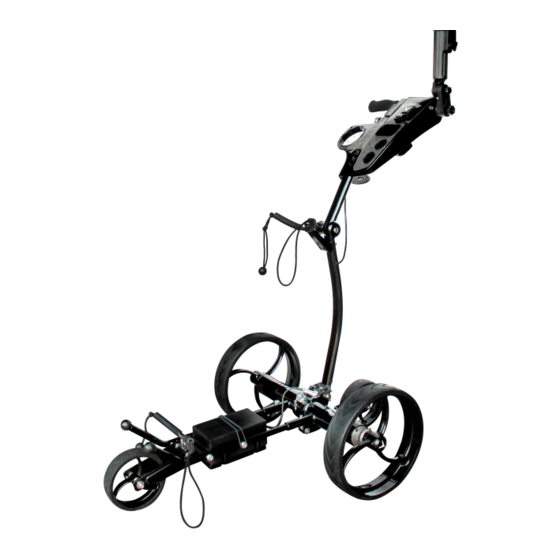
Page 3: Parts List
Vertical Arm Wheelie Bar Battery Port Battery Bag Straps Alignment Bolts Bag Holder Umbrella Mount Scorecard Holder Storage Compartment Golf Ball Holders (2) Tee Holder (4) Drink Holder Speed Control Knob Control Panel Remote Mount INCLUDES Traverse Cart Battery Charger Remote... -
Page 4: Initial Setup: Wheel Installation
INITIAL SETUP: WHEEL INSTALLATION The Traverse will require some assembly once it is removed from the package: Remove all wrapping and rubber axle caps. The wheels will need to be attached for use. In order to attach the wheels, Push and Hold the silver push pins on each of the wheels. -
Page 5: Charging The Battery
The rear wheelie bar will also need to be attached for use: • In order to attach, pull up on the knob located on the wheelie bar and slide onto the square bar located on the back of the cart. •... -
Page 6: Operation
OPERATION • First, strap the battery down on the cart so it does not move during operation. • Plug a fully charged battery to the cart. The plug and port have grooves to specifically align the battery into the cart battery port as well as a red line on the port and the plug. Align the red mark on the plug and port to correctly install. -
Page 7: Speed Control Knob
SPEED CONTROL KNOB • The silver knob located by the power button & timer button is the Speed control adjustment. • This knob controls how fast the cart runs without the remote. • The remote can only be used to stop the cart: pressing the middle “circle” button once. •... - Page 8 REMOTE CONTROL LAYOUT (continued) • To Sync the remote: if the cart does not respond using the remote: Check to make sure the battery is connected properly & that the green power light is on. Also make sure the remote is switched on and the red LED indicator light blinks when buttons are pressed.
-
Page 9: Cart Handle Adjustment
• To adjust the angle of the cart handle, loosen (rotate counterclockwise) the black knob with the Callaway Chevron located near the upper bag holder. • Adjust the handle to the desired angle and rotate the knob clockwise to tighten •... -
Page 10: General Maintenance & Caution
• The cart remote is not waterproof. Use caution when using remote in the rain. • When cleaning the cart: • The best way to clean the Callaway Traverse is to wipe off any excess dirt/grass with a wet towel. This reduces the risk of damaging the electronics in the cart. -
Page 11: Warranty Info
WARRANTY INFO The Callaway Traverse comes with a 12 month warranty which covers defects from manufacturing and premature wearing from use in accordance with the user manual. The warranty will not cover any transportation accidents, water damage, or damage caused by operator error. Any modification to the battery, charger, remote, or cart will result in voiding the warranty. - Page 12 © 2018 CALLAWAY GOLF COMPANY. Callaway Golf and the Chevron device are trademarks of Callaway Golf Company. IZZO Golf is an official licensee of Callaway Golf Company.
Need help?
Do you have a question about the TRAVERSE and is the answer not in the manual?
Questions and answers
How to check battery
To check the battery on a Callaway TRAVERSE:
1. Connect the battery to the charger.
2. Plug the charger into an outlet.
3. Observe the LED indicator on the charger:
- Red means the battery is charging.
- Green means the battery is fully charged.
This indicates the current battery status.
This answer is automatically generated
where can I purchase a replacement battery for Callaway Traverse Electric Push Cart Remote Control Golf Push Cart for Golf Clubs
Where can I buy parts for a callaway traverse trolley
Can purchase a battery mine is dead.
How do I get a battery for my Traverse and how much is it.