Table of Contents
Advertisement
Quick Links
Advertisement
Table of Contents

Related Manuals for Genius BLIZZARD 400 C ENC

Summary of Contents for Genius BLIZZARD 400 C ENC
-
Page 1: Symbols: Work Tools
BLIZZARD 400 C ENC BLIZZARD 800 C ENC... -
Page 2: 0 Mains Power Supply
© Copyright FAAC S.p.A. dal 2018. Tutti i diritti riservati. Nessuna parte di questo manuale può essere riprodotta, archiviata, distribuita a terzi né altrimenti copiata, in qualsiasi formato e con qualsiasi mezzo, sia esso elettronico, meccanico o tramite fotocopia, senza il preventivo consenso scritto di FAAC S.p.A. Tutti i nomi e i marchi citati sono di proprietà... -
Page 3: Table Of Contents
CONTENTS TABLES Symbols: notes and warnings on the instructions ....5 1 1. INTRODUCTION TO THIS INSTRUCTION MANUAL ..5 ... -
Page 4: 2 Basic Programming
Description: Gearmotors for sliding gates Model: BLIZZARD 400 C ENC; BLIZZARD 800 C ENC. comply with the following applicable EU legislations: 2014/30/EU 2011/65/EU Furthermore, the following harmonised standards have been applied:... -
Page 5: Symbols: Notes And Warnings On The Instructions
1. INTRODUCTION TO THIS INSTRUCTION MANUAL This manual provides the correct procedures and requirements RECYCLING AND DISPOSAL - The materials used in manufacturing, the batteries for installing BLIZZARD 400-800 C ENC and maintaining it in a safe and any electronic components must not be sent to landfill. They must be taken condition. -
Page 6: Safety Recommendations
2. SAFETY RECOMMENDATIONS This product is placed onto the market as “partly completed machin- ery”, therefore it cannot be commissioned until the machine in which Up indication. it will be incorporated has been identified and declared to conform to the Machinery Directive 2006/42/EC by the actual Manufacturer. Keep away from water and moisture. -
Page 7: Unpacking And Handling
- It is forbidden to use BLIZZARD 400-800 C ENC in a constructional configuration other than the one provided by the manufacturer. The GENIUS series BLIZZARD 400-800 C ENC gearmotors are designed - No component part of the product may be modified. -
Page 8: Technical Data
Radio The radio decoding system integrated in the electronic board IDENTIFICATION NUMBER MM/YY PROG allows up to 256 GENIUS RC and JLC radio codes to be stored. To do Month/year of production + this, you have to purchase the optional RQFZ radio module. progressive number for the •••... -
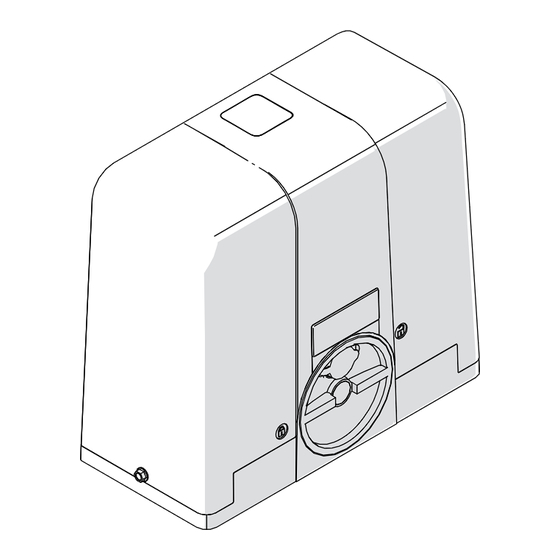
Page 9: Components
3.8 COMPONENT IDENTIFICATION INSTALLATION ACCESSORIES WHICH ARE NOT SUPPLIED 3 7 Installation accessories Foundation plate with mounting hardware Steel rack Spacers for steel rack (to be screwed or welded) Nylon rack Mounting hardware for nylon rack 2 3.9 DIMENSIONAL DRAWING ... -
Page 10: Installation Requirements
4. INSTALLATION REQUIREMENTS to prevent the creation of a shearing hazard. Alternatively, apply protective mesh to any such openings. The mesh should be sufficien- If installing systems that have two opposite opening leaves, two tly fine to prevent introduction of body parts requiring protection, in BLIZZARD 400-800 C ENC must be installed in a MASTER-SLAVE con-... -
Page 11: Example System
4.3 EXAMPLE SYSTEM The example is purely an illustration and is only one of the possible applications of the BLIZZARD 400-800 C ENC. Mains power supply 3 x 1.5mm Circuit breaker Junction box Blizzard gearmotor Bus G-Way TX photocell Bus G-Way RX photocell Key switch Flashing light 5... -
Page 12: Installation Dimensions
5.2 INSTALLATION DIMENSIONS POSITIONING THE FOUNDATION PLATE 90° 90° 0-50 0-50 Opening to the right Opening to the left 6 7 CENTRELINE DISTANCES ø29 8 POSITIONING THE NYLON RACK Foundation Nylon rack 9 BLIZZARD 400-800 C ENC 532104 - Rev.A... -
Page 13: Foundation Plate
POSITIONING THE STEEL RACK Foundation Steel rack 10 5.3 FOUNDATION PLATE RISKS PERSONAL PROTECTIVE EQUIPMENT Before proceeding, check that the necessary cable glands have been installed (§ 4.3). The foundation plate and corresponding hardware are accessories which are not included. 1. -
Page 14: Fastening The Gearmotor
5.4 FASTENING THE GEARMOTOR RISKS PERSONAL PROTECTIVE EQUIPMENT Lift the gearmotor, holding it by the base. Wait for the concrete to set completely before proceeding. 1. Pass the cables through the two holes on the gearmotor (13-1). 2. Position the gearmotor, lining up the slots and the screws on the plate (1 3-2). -
Page 15: Installing The Rack
5.6 INSTALLING THE RACK RISKS PERSONAL PROTECTIVE EQUIPMENT 16 - DO NOT weld the spacers onto the racks. - DO NOT weld the elements of the rack together. - DO NOT apply grease or other lubricants to the racks. Mounting the rack involves moving the leaf manually several times. STEEL RACK - WELD-ON FASTENINGS Welding must be carried out in a workmanlike manner. - Page 16 STEEL RACK - SCREW-ON FASTENINGS The rack installation accessories contain screws for aluminium or steel leaves. Use specific screws for other materials. 1. Open the leaf manually. 2. Rest an element of the rack on the pinion. 3. Place a spacer between the rack and the leaf. Make sure that it is horizontal using a spirit level.
-
Page 17: Adjustments And Checks
Move the leaf manually. Assemble the next interlocking element at the end of the previous one and rest it on the pinion ( 2 4 ). Make sure that it is horizontal using a spirit level. 4. Drill holes at the centre of the slots. Fasten using suitable screws and washers. -
Page 18: Sprint M24 Board
DL3 Signalling LED RADIO1 Terminal board for accessories DL4 Signalling LED RADIO2 Connector for GENIUS RQFZ radio module DL5 Signalling LED - radio memory full Terminal board for flashing light DL6 Status LED FCC (Closing limit switch) Connector for GENIUS battery kit... -
Page 19: Connections
6.1 CONNECTIONS If using a MASTER-SLAVE configuration, first read § 10. Do not exceed the maximum load of the outputs. TERMINAL BOARD FOR ACCESSORIES ( 3 0). Multiple N.O. contacts on the same input must be connected in paral- Example of N.O. - Page 20 A1 or higher. Check the revision number on the label of the battery kit board. 36 RQFZ RADIO MODULE CONNECTOR ( 3 7) Rapid connector for plugging in the GENIUS RQFZ radio module (optional accessory). Plug in the module only when the board is not powered. 37...
- Page 21 Addressing the devices INPUT STOP CONFIGURED AS CLOSING SAFETY EDGE CONNECTIONS ADVANCED PROGRAMMING Position the DIP switches (address) to identify the transmitter-receiver SP = 01 pair and assign the type of operation ( 3 9 -1). WITHOUT FAIL-SAFE O1 ≠ 01 TEST 4 0-2 The transmitter and receiver of a pair of photocells must have the same...
-
Page 22: Start-Up
7. START-UP During operation there is a risk of fingers and hands being trapped between the rack, pinion and cover. 7.1 POWER SUPPLY AND EARTHING RISKS Disconnect power to the system before making the connections and before removing the plastic cover of the electronic board. Before switching power on, make sure that you have replaced the plastic cover. -
Page 23: Installation Of The Limit Switches
7.3 INSTALLATION OF THE LIMIT SWITCHES RISKS PERSONAL PROTECTIVE EQUIPMENT 1. Move the gate to the closed position by hand. 2. Position the closing magnetic limit switch on the rack ( 4 3 -1) and look for the point at which the FCC (closing limit switch) LED turns off. - Page 24 12 Basic Programming BASIC PROGRAMMING Default BASIC PROGRAMMING Default DECELERATION DURING CLOSING: DEFAULT: Sets the closing pre-limit switch deceleration space in cm indicates that all the set values correspond to the defaults. = minimum deceleration space indicates that one or more set values are different from the = maximum deceleration space defaults.
- Page 25 13 Advanced Programming ADVANCED PROGRAMMING Default ADVANCED PROGRAMMING Default INPUT OPEN B OPERATION PRE-FLASHING: OPEN B - partial opening command. = Sets a pre-flashing of 3 s on the LAMP output, before each SAFE - contact for opening edges. movement.
-
Page 26: Operating Logics
7.5 OPERATING LOGICS - AUTOMATIC SAFETY Logic requires only one command: To control the gate through a timed device, logic must be set. In - OPEN when the gate is closed, causes it to open. After the pause the event of a mains power failure and after power has been restored, time, the gate closes automatically. -
Page 27: Bus Devices
7.6 BUS DEVICES 3. Check the status of the LEDs according to the following table. STATUS MEANING devices can be registered and their status checked only on At least one device is engaged/active SPRINT M24 boards that have been programmed as MASTER (§... -
Page 28: Set-Up
8. FINAL OPERATIONS 7.8 SET-UP During Setup, the photocells and the safety edges are disabled; prevent RISKS transit in the area of movement of the gate. The flashing code on the display indicates that the Setup procedure must be carried out. PERSONAL PROTECTIVE EQUIPMENT devices that are connected are registered during the Setup... -
Page 29: Accessories
The SPRINT M24 electronic board is fitted with an integrated two- channel decoding system. The RQFZ module makes it possible to memorise GENIUS RC and JLC radio controls: the two types of radio codes can coexist simultaneously. A maximum of 256 codes can be memorised. -
Page 30: Battery Kit
9.2 BATTERY KIT Disconnect the battery kit if the automation is taken out of service. Battery kits with revision 1 are not compatible: the revision number must be A1 or higher. Check the revision number on the label of the battery kit board. -
Page 31: Maintenance
The warranty shall be forfeited in the event of tampering with com- Deformable edges ponents. Check that they are intact and correctly fastened. For replacements, use only original spare parts GENIUS. Photocells Check condition, fastening and correct operation. 11.1 ROUTINE MAINTENANCE Check the posts, ensuring that they are intact, correctly fastened and free of The Scheduled Maintenance Table ... -
Page 32: Instructions For Use
12. INSTRUCTIONS FOR USE 12.1 SAFETY RECOMMENDATIONS 12.4 MANUAL OPERATION Installations using GENIUS BLIZZARD 400-800 C ENC series gearmo- Before performing the release operation, shut off the power supply tors are designed for use with vehicular traffic. to the automation. - Page 34 Sede legale: FAAC S.p.A. Soc. Unipersonale Via Calari, 10 - 40069 Zola Predosa BOLOGNA - ITALY Tel. +39 051 61724 - Fax +39 051 758518 www.geniusg.com BLIZZARD 400-800 C ENC 532104 - Rev.A...
Need help?
Do you have a question about the BLIZZARD 400 C ENC and is the answer not in the manual?
Questions and answers