Table of Contents
Advertisement
Available languages
Available languages
Quick Links
Advertisement
Chapters
Table of Contents

Subscribe to Our Youtube Channel
Related Manuals for Klarstein 10028784


Summary of Contents for Klarstein 10028784
- Page 1 Elektrischer Grill 10028784...
-
Page 2: Table Of Contents
Konformitätserklärung ..........9 Technische Daten Artikelnummer 10028784 Stromversorgung 220-240 V... - Page 3 • Überprüfen Sie das Gerät und die Verkabelung regelmäßig. Benutzen Sie sie nicht weiter, falls Probleme mit dem Gerät auftreten. • Tauchen Sie das Gerät mit dem Heizelement nicht in Wasser. • Das Gerät sollte ausgeschaltet werden, wenn es nicht benutzt wird. •...
- Page 4 • Tauchen Sie das Netzkabel oder die Thermostatstecker nicht in Wasser oder eine andere Flüssigkeit. • Verwenden Sie Verlängerungskabel nur, nachdem Sie sich vergewissert haben, dass sie geerdet sind, und mindestens 10 A führen können. • Legen Sie das Kabel so, dass ein unbeabsichtigtes Berühren oder Ziehen nicht möglich ist. •...
-
Page 5: Geräteübersicht
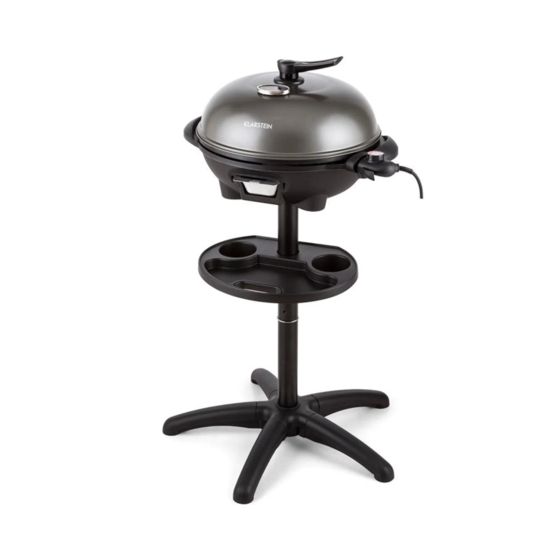
Geräteübersicht 1 Grillhaube 2 Griffe der Haube 3 Grillplatte 4 Fettauffangschale 5 Gerätebasis 6 Zubehör-Ablage 7 Oberes Stativrohr 8 Verzierung 9 Unteres Stativrohr 10 A Standfuß B Standbasis 11 Griff der Gerätebasis 12 Öffnung für die Gerätesteckdose 13 Lampe für die Temperaturanzeige 14 Abnehmbarer Temperaturregler mit Kabel 15 Gerätesteckdose... -
Page 6: Montage
Montage Stecken Sie die Füße Legen Sie die Unter- legscheibe (16) auf (10A) fest in den So- den Sockel und zie- ckel (10B). Wenn ein Fuß richtig einrastet hen Sie die Schrau- ben (17) auf der Un- klickt es. terlegscheibe fest, um den Sockel und die Standfüße fest... - Page 7 Stellen Sie die Fettauf- Stellen Sie die Grill- fangschale(4) in die Hal- platte (3) auf das Gerät terung, die zur Geräte- (5). Führen Sie die Ge- basis gehört. rätesteckdose (15) in die dafür vorgesehene Öffnung (12). Stellen Sie anschließend die Grillplatte waagerecht auf die Gerätebasis.
-
Page 8: Bedienung
Bedienung Bevor Sie das Gerät zum ersten Mal benutzen • Entfernen Sie die Verpackung und reinigen Sie die Grillplatte (3), Fettauffangschale (4) und die Grillhaube (1) vollständig. Das Gerät benutzen 1. Schließen Sie das Gerät an die Stromversorgung an. 2. Stellen Sie den Temperaturregler (14) auf die gewünschte Temperatur ein. (Gewöhnlich braucht das Gerät 3 Minuten zum Aufheizen.) 3. -
Page 9: Reinigung Und Pflege
• Wenn das Grillgut auf der Grillplatte klebt, reiben Sie die Platte hin und wieder mit einem in Öl getränkten Küchentuch ab. Reinigung und Pflege 1. Trennen Sie das Gerät von der Stromversorgung. 2. Lassen Sie den Grill vollständig abkühlen. 3. -
Page 10: Technical Data
Declaration of Conformity ......... 18 Technical Data Item number 10028784 Voltage 220-240 V... - Page 11 • Never immerse the appliance with heating element. • The appliance should be switched off at mains when not in use. • Use only one appliance per plug and always use an earthed extension cable, with cross section of at least 1.0 mm •...
- Page 12 • Only use extension leads after having made sure that their condition is faultless and use an earthed wise with a minimum capacity of 10 A. • Put the wire so that unintentional touching or drawing is impossible. • Never bring the extension wire in touch with the hot grill plate. •...
-
Page 13: Product Overview
Product Overview 1 Metal grill hood 2 Handle of hood 3 Grill Plate 4 Fat collecting bowl 5 Base of appliance 6 Condiment tray 7 Upper stand tube 8 Decoration 9 Nether stand tube 10 A Stand foot B Stand base 11 Handle of base 12 Opening for appliance socket 13 Temperature indicator lamp... -
Page 14: Installation
Installation Place the washer (16) Install the stand feet (10A) into the stand onto the stand base, and then install the base (10B) properly. There will be a “click” screws (17) into the sound when washer to fix the stand feet and stand stand foot is fixed completely base firmly. - Page 15 Put the fat collecting Place the grill plate (3) bowl (4) into the bracket on the base of the ap- supplied for it in the base pliance (5). First of all of the appliance, buckle insert the appliance the hole of fat collecting socket (15) into the bowl onto the screw to opening intended for...
-
Page 16: Operation
Operation Before using the appliance for the first time • Remove all the packaging materials and wash the grill plate (3), fat collecting bowl (4) and metal grill hood (1) thoroughly. • Dry all the different parts thoroughly. This applies especially to the appliance socket (14) .Never immerse the detachable temperature regulator (13) in water. -
Page 17: Cleaning And Care
Tips for grilling • Your meat will be tendered if you marinade it overnight before cooking (the marinade is always made of oil (to and moistness), vinegar (to tenderize) and a mixture of seasonings). • Always use tongs or some form of scoop to turn the grilled food (using a fork to turn the food will dry it out and damage the non-stick coating). -
Page 18: Declaration Of Conformity
Declaration of Conformity Producer: CHAL-TEC Vertriebs- + Handels GmbH, Wallstraße 16, 10179 Berlin. This product is conform to the following European Directives: 2004/108/EC (EMC) 2006/95/EC (LVD) 2011/65/EU (RoHS) -
Page 19: Dati Tecnici
Dichiarazione di conformità ........26 Dati tecnici Numero articolo 10028784 Alimentazione 220-240 V... - Page 20 • Controllare regolarmente il cavo e il dispositivo e in caso si riscontrino dei problemi, non utilizzare il di- spositivo. • Non immergere il dispositivo e l’ e lemento riscaldante nell’ a cqua. • A fine utilizzo spegnere il dispositivo. •...
- Page 21 • Utilizzare una prolunga solo dopo aver accertato che questa sia con messa a terra e adatta a una corrente di minimo 10 A. • Dislocare il cavo in modo che non sia di intralcio o intoppo. • La prolunga non deve entrare in contatto con la graticola. •...
-
Page 22: Descrizione Del Dispositivo
Descrizione del dispositivo 1 Coperchio 2 Manico del coperchio 3 Griglia 4 Vaschetta raccogli-grasso 5 Base del dispositivo 6 Vassoio accessorio 7 Tubo stativo superiore 8 Guarnizione 9 9 Tubo stativo inferiore 10 A Piedi d’ a ppoggio B Base d’ a ppoggio 11 Impugnatura della base... -
Page 23: Montaggio
Montaggio Collocare la rondel- Inserire i piedi di ap- poggio (10A) nelle la di bloccaggio (16) fessure poste sotto sotto la base d’ a p- poggio e, avvitando la base d’ a ppoggio (10B). Un click in- le viti (17) alla ron- della di bloccaggio, dicherà... - Page 24 Inserire la vaschetta rac- Posizionare orizzontal- cogli-grasso (4) nell’ a p- mente la griglia (3) sulla posita apertura. base del dispositivo a forma di ciotola (5) in modo che la presa per il termostato (15) si in- serisca nell’ a pposita apertura (12) posta alla base del barbecue.
-
Page 25: Utilizzo
Utilizzo Prima di utilizzare il dispositivo per la prima volta: • Rimuovere i materiali di imballaggio e lavare accuratamente la griglia (3), la vaschetta raccogli-grasso (4) e il coperchio (1). Impiego del dispositivo 1. Collegare il dispositivo alla rete elettrica. 2. -
Page 26: Pulizia E Manutenzione
• Non grigliare troppo a lungo la carne. La stessa carne di maiale è più saporita e appetitosa se viene servita leggermente rosata. • Se gli alimenti si attaccano alla griglia, passarci sopra un panno da cucina impregnato di olio. Pulizia e manutenzione 1. -
Page 27: Données Techniques
Déclaration de conformité ......... 33 Données techniques Numéro d’article 10028784 Alimentation électrique 220-240 V... - Page 28 seulement une fois que celles-ci aient été entièrement sensibilisées aux consignes d’utilisation et de sécu- rité. Veiller à ce que les enfants ne jouent pas avec l’ a ppareil. • Ne pas brancher l’ a ppareil à une prise télécommandée ou à une minuterie externe. •...
-
Page 29: Aperçu De L'appareil
Aperçu de l’appareil 1 Couvercle 2 Poignée 3 Plaque de grill 4 Collecteur de graisse 5 Tablette 6 Tube de support supérieur 7 Elément décoratif 8 Tube de support inférieur 9 A Pieds B Disque de soutien 10 Poignée 11 Ouverte pour le branchement 12 Témoin lumineux de la température 13 Thermostat avec cordon... -
Page 30: Montage
Montage Introduire les pieds Placer le disque de soutien (16) sur la (10A) dans le sup- partie inférieure du port central (110B) jusqu’ à ce qu’ils s’ e n- support central et le fixer à l’ a ide des clenchent. vis (17), comme l’in- dique l’illustration ci- contre. - Page 31 Introduire le collecteur Placer la grille (8) sur de graisse (9) dans l’ o u- la cuve. Le port pour le verture de la cuve. thermostat et le bran- chement doit s’insérer parfaitement dans le réceptacle de la cuve à cet effet.
-
Page 32: Utilisation
Utilisation Avant la première utilisation • Retirer tous les éléments d’ e mballage et nettoyer la plaque de grill (3), le collecteur de graisse (4) et le couvercle (1) avec précaution Utilisation de l’appareil 1. Rraccorder la fiche du cordon d‘alimentation à une prise de courant. 2. -
Page 33: Entretien Et Nettoyage
• Ne pas laisser la viande griller trop longtemps. La viande de porc est meilleure lorsqu’ e lle est servie légè- rement saignante et juteuse. • Si les aliments collent à la plaque du grill, la frotter avec de l’ e ssuie-tout imbibé d’un peu d’huile. Entretien et nettoyage 1. -
Page 34: Datos Técnicos
Declaración de conformidad ........40 Datos técnicos Artikelnummer 10028784 Suministro eléctrico 220-240 V 50/60 Hz Consumo de energía... - Page 35 y si están supervisadas por otra persona. Los niños deberán estar vigilados para evitar que juegen con el aparato. • No conecte el aparato a tomas de corriente con temporizador ni con control remoto. • Si el cable de alimentación o el enchufe están dañados, no utilice el aparato y contacte con el fabricante para que sustituya la pieza defectuosa.
-
Page 36: Descripción Del Aparato
Descripción del aparato 1 Tapa 2 Asa 3 Parrilla 4 Bandeja recoge grasa extraíble 5 Base de la parrilla 6 Bandeja 7 Soporte superior 8 Embellecedor 9 Soporte inferior 10 A. Base B. Patas 11 Asa 12 Conector para el termostato 13 LED indicador de temperatura 14 Termostato con cable y enchufe 15 Conexión a la red eléctrica... -
Page 37: Montaje
Montaje Encaje las patas (16b) Coloque la junta (17) en la parte inferior de en los enganches de las patas y atorníllela la base (16a) hasta que queden comple- tal y como se indica en la ilustración. tamente fijos. Enrosque la barra Una el soporte a las roscada en el sopor- patas para completar la... - Page 38 SIntroduzca la bandeja Encaje la parrilla en su recoge grasa en la aber- base. El termostato y el tura correspondiente. conector de la red eléc- trica deberán colocarse exactamente en el lu- gar indicado. Fije el asa a la tapa con Introduzca el termó- un tornillo, una arandela metro (18) en el orifico...
-
Page 39: Uso
Antes del primer uso • Retire el embalaje y limpie la parrilla (3), la bandeja recoge grasa (4) y la tapa (1). Utilizar el aparato 1. Conecte el aparato al suministro eléctrico. 2. Ajuste el regulador de temperatura (14) para conseguir la temperatura deseada (el aparato necesita unos tres minutos para calentarse). -
Page 40: Limpieza Y Cuidado
• Si el alimento se queda pegado a la parrilla, frote esta última con un paño empapado en aceite Limpieza y cuidado 1. Desenchufe el aparato. 2. Deje que la parrilla se enfríe completamente. 3. Extraiga el regulador de temperatura del conector del aparato. 4.
Need help?
Do you have a question about the 10028784 and is the answer not in the manual?
Questions and answers