
Summary of Contents for CONVECTAIR 7392 ECP
- Page 1 Installation & Operating Instructions Document to be read and kept by the user. PROGRAMMER MODULE USING A PILOT WIRE IMPORTANT More information on the Programmer’s required installation prior to use at: www.convectair.com/install...
- Page 2 Introduction: We thank you for choosing Convectair’s premium electric heating products and we congratulate you on the purchase of this Programmer. To obtain the best results and the ul- timate in performance and comfort, please take a moment to read the installation and operation instructions detailed in this manual.
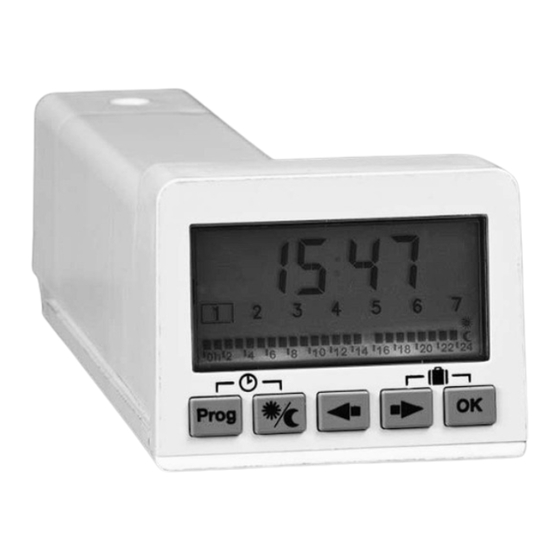
- Page 3 2 - INSTALLATION & CONFIGURATION a) Inserting the module into the heater: Location - Using a small screwdriver, press on the clip and lift the cover of the slot (on the right hand side next to the control panel) and insert the Programmer module.
- Page 4 L1 L2 Individual heating confi guration: Programmer Only the heater fi tted with the Programmer module will follow the selected program. GROUND Connect the pilot wire to an empty / unused (Red) Heater with terminal. MAIN Programmer (Black) PANEL PILOT WIRE (Purple) CONNECTOR 4 - OPERATION...
- Page 5 b) Customize a program: Press Prog . Select the day using and and press OK to validate. PROG Select the hour using et . Press to choose between Comfort or Economy. Press OK to validate your changes. Prog Select another day or exit by pressing Prog .
- Page 6 Copying a program on a group of days: There are 4 pre-programmed groups of days: PROG • 1 - 2 - 3 - 4 - 5 - 6 - 7 Prog • 1 - 2 - 3 - 4 - 5 •...
- Page 7 5 - WARNINGS - Should the back light not activate, leave the cassette programmer in the slot to charge. - When the cassette is not in the slot, the screen may switch off after a while. Press on any button in order to re-activate. If light does not come back, insert the cassette programmer into the slot.
-
Page 8: Warranty Conditions
All damage resulting from faulty installation, misuse, negligence or abuse, accidents, acts of God, or any other circumstance that is beyond Convectair’s control. This also applies to all repairs carried out without Convectair’s supervision. in addition, Convectair may not be held responsible for any damage caused to personal property or real estate caused directly or indirectly by our products, even when such damage is due to a fault or defect in these appliances. - Page 9 7392 ECP/RCP S YSTEM PROGRAMMER NSTALLATION AND PROGRAMMING INSTRUCTIONS...
- Page 10 7392 ECP/RCP S YSTEM PROGRAMMER 1) PRESENTATION............................1 A)OPERATING OPTIONS QUICK START............................2 A) PLANNING YOUR INSTALLATION B) THE FIRST INSTALLATION C) SET THE PROGRAM D) SET THE HOME CODE E) SET THE RECEIVERS ADDRESS F) TEST TIME 3) INSTALLATION AND CONNECTIONS......................5...
- Page 11 (comfort, economy or frost protection). to set time, day and programming. The 7392 ECP CASSETTE is designed to be inserted in the control panel of CONVECTAIR heaters model number; ALTO, MEZZO, SOLO, TENOR and OPERA (7384, 7383, 7382, 7715 and 7720).
-
Page 12: Quick Start
QUICK START A)Planning the installation : Place all the transmitter CASSETTES in their respective compartments, let them charge up. (Aprox. 15 min). Meanwhile, plan your installation: One, two or tree zones? Each zone corresponds to a group of units that will follow the same timetable. Define the group that will share the same timetable. - Page 13 From the Programmer CASSETTE push on “-/Hgel” for about 4 seconds, then “OK”. The screen will indicate ”HG:01" • During this time verify that all Convectair units are in -/Hgel (frost protection mode). The mode selection light should have switched to -/Hgel Mode. This may take up to 30 seconds. •...
- Page 14 FIG. 2A Installation Courant porteur. / Carrier current installation. FIG. 2B Installation avec appareils de salle de bain. / Installation including bathroom heaters.
-
Page 15: Installation And Connections
Depending on the installation this may require specific wiring, such as: NMD 12/3 (The white wire shall be marked and connected to the purple wire of each Convectair unit; the red and black wires will be reserved for electrical power). - Page 16 The 7392 ECP CASSETTE can control up to 20 Convectair units per Zone, it is essential that the phases and loads be respected, for instance 3750 W per 20 A circuit. # IMPORTANT: If using a pilot wire : communication wires carry 120V. Since a zone may have several circuits, switch the circuit breaker to the “OFF”...
-
Page 17: Operation
There are no batteries to replace. - The PROGRAMMER MODULE can be programmed directly on the CONVECTAIR heater (under tension) or out of its socket after being completely charged. - During the charging period (approximately 15 minutes), the signal through the communication wire is comfort. -
Page 18: Other Features
To go into frost protection mode, press the “-/Hgel” key for 4 seconds. With the “+” or “-” key, select the number of days desired and confirm with “OK“ (from 01 to 99) All CONVECTAIR in that PROGRAMMER MODULE’s zone will go into frost protection mode with no possibility of bypassing. -
Page 19: Programming Example
Only a few seconds are necessary to reajust the time and day. The programs, standard or customized, are protected at all times. The screen will display a blinking “00:00". Simply readjust the time and day of the week (See 4A above). 6) LOCKING THE PROGRAMMER MODULE A special screw is provided with the PROGRAMMER MODULE which, when installed properly, makes it impossible to extract the module from its socket. - Page 20 The programming schedule is now complete for the entire week D) Individual programming : Neither pilot wire nor the 7392 RCP CASSETTE are necessary to control a single Convectair heating unit. A single 7392 ECP programmer CASSETTE transmitter, can simply be installed in it’s compartment (see Fig.
- Page 21 7392 ECP programmer CASSETTE. The screen will indicate Zone “1" or “2" or “3". * With the + or - keys select the zone for that this ECP unit is to control. (Zone 1, 2, 3) Press “OK”...
-
Page 22: Testing The System
Check that the frost protection indicator light “ ” of each heater is on. STEP 7: Press on -/Hgel again to return to the proper mode. This test ensures that all the CONVECTAIR in the programming zone receive the signal transmitted by the PROGRAMMER MODULE. 9) TROUBLE SHOOTING... -
Page 23: Warranty
The more heaters you have the less it will transmit. I would like to know what type of protocol the 7392 ECP programmer uses (like x-10 etc.). If you use your own protocol is there a conflict with others? The protocol used in the 7392 ECP transmitter is X2D similar to X-10 protocol.
Need help?
Do you have a question about the 7392 ECP and is the answer not in the manual?
Questions and answers