Table of Contents
Advertisement
Advertisement
Table of Contents

Related Manuals for VTech Go! Go! Smart Wheels Roadmaster Train Set Series


Summary of Contents for VTech Go! Go! Smart Wheels Roadmaster Train Set Series
- Page 1 Parent’s Guide Roadmaster Train Set ™ 91-003715-000...
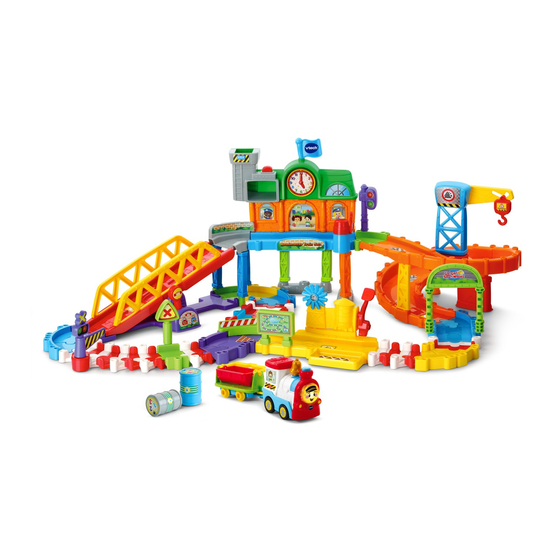
- Page 2 INTRODUCTION Thank you for purchasing the Go! Go! Smart Wheels Roadmaster ® Train Set . Travel around the track triggering the four SmartPoint ™ ® locations included on the train set. The motorized freight train can travel up and down hills, on or off the tracks. 4 SmartPoint Crane ®...
-
Page 3: Included In This Package
INCLUDED IN THIS PACKAGE NOTE: This toy is not intended for teething. One SmartPoint One roof One train station ® motorized train wall One train station One 45° track One traffic light platform One flag Two bridge One bridge track guard rails One bridge base One spiral track top... - Page 4 One crane tower One crane arm One lifting hook One crane tower One road sign One track sign base One unloading One unloading platform One switch gate platform wall for Y-track One arch One gate Two water drums...
- Page 5 One spiral track One spiral track One spiral track support A support B support C One adapter One adapter One 1/4 track, track, A track, B female A One 1/4 track, Two 1/4 tracks C Two track column male B bases Seven track columns Three 45°...
- Page 6 Seven 45° tracks, male A Nine 1/8 tracks Nine 1/8 bendable-tracks One label sheet One parent’s guide...
- Page 7 NOTE: This playset includes adaptors that allow connection with standard Go! Go! Smart Wheels tracks. The tracks are not compatible with ® snap tracks. Adult assembly required. WARNING: All packing materials such as tape, plastic sheets, packaging locks, removable tags, cable ties and packaging screws are not part of this toy, and should be discarded for your child’s safety.
-
Page 8: Getting Started
GETTING STARTED BATTERY INSTALLATION Train 1. Make sure the unit is turned OFF. 2. Locate the battery cover on the back of the train. Use a screwdriver to loosen the screw. 3. Install 3 new AAA (AM-4/LR03) batteries following the diagram inside the battery box. - Page 9 LABEL APPLICATION Please adhere the labels to the playset securely as indicated on the following pages:...
- Page 10 27 24 25 27...
-
Page 11: Assembly Instructions
ASSEMBLY INSTRUCTIONS Go! Go! Smart Wheels Roadmaster ® Train Set With the Go! Go! Smart Wheels Roadmaster Train Set , safety ® ™ comes first. To ensure your child’s safety, adult assembly is required. 1. Insert the two Guard Rails into the Bridge Track, then attach it to the Bridge Base. - Page 12 3. Connect with the Y-Track as shown below. 4. Insert the Flag into the Roof, then attach the Roof to the Train Station Wall as shown below. 5. Connect the Train Station Platform with the 45° Track on the left and the 45°...
- Page 13 6. Insert the Track Columns into the Track Column Base, then connect them with the Train Station Platform. 7. Connect the Train Station Platform with the Bridge Track. 8. Attach the Crane Arm to the Crane Tower. Next, insert the Crane Tower into the Crane Tower Base, then attach the Lifting Hook.
- Page 14 9. Connect the Bottom Spiral Track to the Top Spiral Track, then secure them with Spiral Track Supports A, B and C. 10. Next, insert the Crane into the Spiral Track, then connect additional track pieces as shown in image B below. 11.
- Page 15 12. Connect the Unloading Platform with the Spiral Track, then insert the Road Sign and the Arch into the track. 13. Connect the Spiral Track to the right side of the Train Station on the upper level. 14. Once you’ve completed the steps above, you are ready to play! Arrange your tracks into the configurations below, or connect this playset to other Go! Go! Smart Wheels playsets and tracks (each...
-
Page 16: Product Features
EXPAND & EXPLORE Connect to the Go! Go! Smart Wheels Track Pack ® (as shown below) or ™ other Go! Go! Smart Wheels ® playsets (each sold separately) to expand the Roadmaster Train Set and inspire creativity. For detailed images ™... - Page 17 WARNING: For your child’s safety, only use the motorized freight train on Go! Go! Smart Wheels train tracks. Do not ® roll the train on your clothing, body or hair while the motorized train is turned on. If something gets caught in the train’s wheels while the motor is on, lift the train up so it is no longer touching your child or slide the mode selector switch to the off position...
- Page 18 ACTIVITIES Motorized Train 1. Slide the Motor/Manual/Off Selector to the Manual or Motor ( position to turn the Train On. You will hear a song, a phrase and sounds. The light will flash with the sounds. 2. Press the Light-Up Button or Chimney Button to hear sounds, songs and phrases.
- Page 19 ACTIVITIES Roadmaster Train Set ™ 1. Place the Train or any SmartPoint vehicle (each sold separately) ® on any of the playset’s four SmartPoint locations to trigger fun ® sounds, songs or phrases. 2. Place the Train on the SmartPoint track on the Train Station ®...
- Page 20 4. Send the Train around the Crane and down the Spiral Track. 5. For role-play fun, drop off the Water Drums at the Unloading Platform. Cargo Basket handle must be locked in the position shown below to unload drum. SONGS 1.
-
Page 21: Troubleshooting
4. Come along, it’s a lot of fun, Working hard for everyone! MELODY LIST 1. I’ve Been Working on the Railroad 2. Oh, Susanna 3. Itsy, Bitsy Spider 4. Hickory Dickory Dock 5. Oats, Peas, Beans, and Barley Grow 6. Pease Porridge Hot CARE &... - Page 22 IMPORTANT NOTE: Creating and developing VTech ® products is accompanied by a responsibility that we at VTech ® take very seriously. We make every effort to ensure the accuracy of the information, which forms the value of our products. However, errors sometimes can occur.
- Page 23 • Consult the dealer or an experienced radio/TV technician for help. Caution: Changes or modifications not expressly approved by the party responsible for compliance could void the user’s authority to operate the equipment. Supplier’s Declaration of Conformity Trade Name: VTech ® Model: 5212 Product Name: Roadmaster Train Set Responsible Party:...
- Page 24 Visit our website for more information about our products, downloads, resources and more. vtechkids.com Read our complete warranty policy online at vtechkids.com/warranty TM & © 2019 VTech Holdings Limited. All rights reserved. Printed in China. 91-003715-000...
Need help?
Do you have a question about the Go! Go! Smart Wheels Roadmaster Train Set Series and is the answer not in the manual?
Questions and answers