Table of Contents
Advertisement
Quick Links
Advertisement
Table of Contents

Summary of Contents for Bodypower Fitness BP 200
-
Page 2: Important Safety Precautions
IMPORTANT SAFETY PRECAUTIONS WARNING : Before using the bike, please read the following safety precautions carefully in order to reduce the risk of injury. 1. This bike is designed for household use only. Do not use it in a commercial, rental, or institutional setting. -
Page 3: Before You Begin
BEFORE YOU BEGIN For your benefit, read all instructions carefully. Set-up this Bike in accordance with the steps in the manual. Remove each parts from its packing material. Place all parts on a clear area and check you have all the parts listed before beginning assembly. Do not dispose of the packing materials until assembly is completed. -
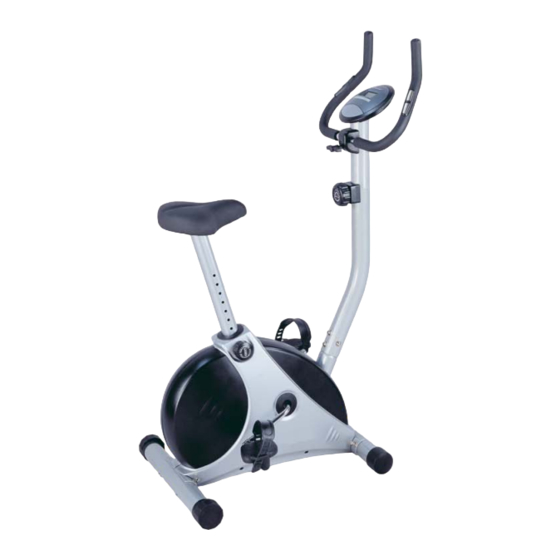
Page 5: Parts Chart
Parts Chart... - Page 6 EXPLOSION CHART...
-
Page 7: Assembly Instruction
Assembly Instruction 1. Attach the two stabilizers (22/24) to the main frame (30) with four coach bolts (25), four curved washers (27) and capsule nut (39). 2. Loose the three nylon nuts (18) and the three-plat washers (17)under the seat (16) Fix the Seat(16) to the seat post (19) using the said three nylon nuts (18) and three washers(17) - Page 8 3. Loose the Adjustable knob (38) on the main frame (30). Slide the saddle post (19) into the rear stem of the main frame (30), and secure with the knob (38) in a proper height. 4. Thread the computer cable (Upper) (28) into the handlebar column(15) carefully lift the end of the Resistance regulator cable (Lower) (40) away from the main frame (30) and dispose of the card slip.
- Page 9 5. Attach the handlebar column (15) to the front stem of the main frame (30) with three plat washers (27) and three M8 x 15 L bolts (26). 6. Fix the front plastic handlebar cover(4) and the handlebar (2) onto the handlebar column (15) with the T-bolt(9),washer (7) and spring washer(9) through the bush (12) .
- Page 10 7.The pedals (33/34) are marked “R” (right) and “L” (left). Carefully tighten the “L” pedal into the left arm of the crank (34) anti-clockwise. Carefully tighten the “R” pedal into the right arm of the crank (33) clockwise.
-
Page 11: Maintenance
Maintenance 1. Regularly check all component parts of the bike and tighten them. 2. To clean the bike, use only mild soapsuds or a generally mild and not abrasive detergent. 3. Always protect the computer from damages. 4. Be sure to always keep liquids away from the computer, adapter and from the plug as well as from the bike at all times. - Page 12 EXERCISE MONITOR INSTRUCTION MANUAL ST8366-7 FUNCTION BUTTON PRESS TO SELECT EACH FUNCTION OF TIME,SPEED,DISTANCE,CALORIES,PULSE MODE DISPLAY ON THE MONITOR. FUNCTIONS SCAN AUTOMATICALLY SCANS THROUGH EACH FUNCTION BETWEEN TIME,SPEED, DISTANCE,CALORIES IN SEQUENCE FOR EVERY 6 SECONDS. TIME ACCUMULATES THE TRAINING TIME FROM 00:00 UP TO 99:59. SPEED THE MONITOR WILL DISPLAY CURRENT TRAINING SPEED.
Need help?
Do you have a question about the BP 200 and is the answer not in the manual?
Questions and answers