Table of Contents
Advertisement
Quick Links
Advertisement
Table of Contents

Summary of Contents for Linvatec Hall Series 4
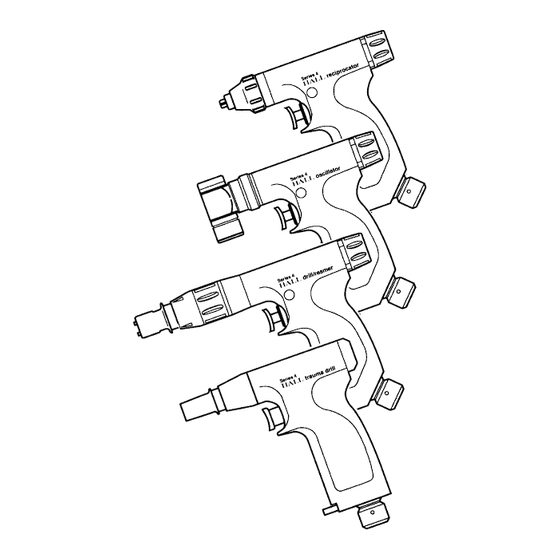
- Page 1 The Hall Series 4 ® ® Instruction Manual...
- Page 2 Linvatec. Linvatec reserves the right to revise this publication and to make changes from time to time in the contents hereof without obligation to notify any person of such revision or changes, unless otherwise required by law.
-
Page 3: Table Of Contents
Table of Contents Page INTRODUCTION Intended Use ............3 General Warnings . - Page 4 Attachments and Accessories ......... . . 32 ® Linvatec and Hall Surgical Instrument Warranty ......34...
-
Page 5: Introduction
3. Use only Linvatec and Hall accessories Intended Use and attachments. 4. Prior to each use, perform the following: The intended use for the Hall Series 4 hand- pieces is in large bone surgery. • Inspect all equipment for proper operation. •... - Page 6 7. Always inspect for bent, dull or damaged 14. Do not lubricate any Series 4 handpiece or blades or drill bits before each use. Do not accessory. attempt to straighten or sharpen. After use, 15. After each use, thoroughly clean and dispose of properly.
-
Page 7: Installation And Operation
CAUTION: Do not exceed 100 psi INSTALLATION and (7 kg/cm ) operating pressure unless a hose OPERATION longer than the standard 10 ft. Universal Hose (5052-010) or extension hose is used. Add an additional 1 psi for every extra foot of hose. - Page 8 2. Install the regulator with a 1 1/8 inch Slowly turn the tank valve fully open wrench. (counterclockwise). This will allow nitrogen to pressurize the regulator. NOTE: The threaded adaptor of the nitrogen regulator is designed to fit nitrogen Insert the male Schrader end of the hose fittings only.
- Page 9 7. Before removing the instrument from the 8. If the Hall Pneumatic Connector* is being regulator: used: (a) Close the tank valve by turning it (a) Locate the button marked “PRESS”. clockwise. (b) Depress and hold the button until the (b) Activate the instrument to bleed off audible release of residual gas is line pressure.
-
Page 10: Equipment Installation And Operation
Attached to the Universal Hose (5052-010) Equipment Installation is the Hall Hose Handler*. This clip allows and Operation fixation of the hose to the surgical drape, reducing the problem of the hose slipping off the patient. 1. Place the handpiece in the “SAFE” position. -
Page 11: Drill/Reamer
❶ ❷ ❹ ❸ ❷ Direction Control Knob - Used to select 2.2.1 Drill/Reamer the operating direction between “FWD” (forward) “REV” (reverse) and “SAFE”. ❶ Mode Selector - Used to select the Place the control knob in the “SAFE” operating mode of the handpiece between position when changing accessories. -
Page 12: Connecting Attachments
To connect attachments: 2.2.1.1 Connecting Attachments (a) Place the Direction Control Knob in the “SAFE” position. The Drill/Reamer Handpiece has a combination collet which will accept all the illustrated shank styles below, without the need for an adaptor. AO shanked products (not pictured) may also be used with the Drill/Reamer Handpiece, utilizing the Zimmer to AO Adaptor. -
Page 13: Mode Selection And Operation
The Drill/Reamer is cannulated and will accept 2.2.1.2 Mode Selection and Operation pins up to 0.156 inch diameter or 4.0mm. WARNINGS: 1. Always make sure you are in the proper mode before the handpiece is activated. 2. Never set bone screws with the handpiece in the “REAM”... -
Page 14: Oscillating Saw
❶ ❷ ❸ ❹ ❺ ❻ 2.2.2 Oscillating Saw 2.2.2.1 Blade Attachment Instructions ❶ Control Knob - Place this knob in the To affix a blade to the blade-locking collet*: “ON” position to activate the handpiece. (a) Place the control knob in the “SAFE” Place in the “SAFE”... - Page 15 (b) Open the blade-locking collet by rotating the blade-locking knob in the direction of the arrow to the “OPEN” position. (d) Rotate the blade locking knob to the closed position. (c) Insert the blade at the desired angle and align the blade holes with the blade- positioning pins.
-
Page 16: Rotating Head Instructions
2.2.2.2 Rotating Head Instructions 2.2.2.3 Operating Instructions 1. The rotating head may be set in any of 12 To operate the handpiece: positions at 30˚ intervals for appropriate (a) Twist the control knob from the surgical access. To change positions and “SAFE”... -
Page 17: Reciprocating Saw
❶ ❷ ❸ ❹ 2.2.3 Reciprocating Saw 2.2.3.1 Blade Attachment and Operation Instructions ❶ Blade Collet - Holds the blade in place. 1. To affix a blade to the handpiece: ❷ Collet Locking Knob - Used to lock the (a) Place the control knob in the “SAFE” blade collet. - Page 18 (b) Open the blade collet by turning the To operate the handpiece: collet locking knob clockwise for (a) Twist the control knob from the adequate blade width. “SAFE” position to the “ON” position. (c) Insert the shank of the blade into the slot and seat completely.
-
Page 19: Trauma Drill
2.2.4 Trauma Drill 2.2.4.1 Connecting Attachments 1. Place handpiece in the “SAFE” position. ❶ (a) Rotate the trigger either left or right. ❷ ❸ Attachment of Trinkle Shank Accessories: ❶ 1. Pull back the outer collet sleeve. Combination Trinkle/AO Collet - Accepts the various Trinkle and AO shank 2. - Page 20 3. Release the collet sleeve. Attachment of AO Drill Accessories: Align the flat portion of the accessory shank with the black arrow on the collet sleeve, and insert the accessory into the collet. Insert the shank as far as it will go without pulling back the collet sleeve.
-
Page 21: Mode Selection And Activation
To select the “SCREW” mode, place the 2.2.4.2 Mode Selection and Activation direction control lever in the center (there is a detent). This automatically limits the 1. To select the desired mode, move the torque in the forward mode to 18-22 in. lbs. direction control lever on the bottom of the for setting bone screws. -
Page 22: Maintenance
MAINTENANCE 3.1.2 Cleaning Instructions NOTE: Care should be taken to keep the nose of the handpieces pointed down while Cleaning and Sterilizing cleaning and rinsing. Remove attachments and accessories from the handpiece. 3.1.1 Care and Cleaning Precautions With the hose attached, thoroughly scrub the handpiece and attachments with a soft 1. -
Page 23: Sterilization
If instruments are to be wrapped, two 3.1.3 Sterilization double thicknesses of #140 thread count wrappers should be utilized. Do not use Steam sterilization is safe and effective, and Tyvek bags, as they retain moisture and there are no contraindications for sterilizing Hall may damage the handpiece. -
Page 24: Pre-Vacuum Steam Sterilization
3.1.3.1 Pre-Vacuum Steam Sterilization If your pre-vacuum steam sterilizer has a pre- fixed cycle, use the hard goods cycle. If it does not have a pre-fixed cycle: Temperature: 270˚-272˚F (132˚-133˚C). Exposure time: 4 minutes Drying time: 8 minutes minimum Wrapped or unwrapped 3.1.3.2 Gravity Air Displacement Steam Sterilization... -
Page 25: Troubleshooting
Troubleshooting Table 1: Troubleshooting Guide Symptom Possible Cause Corrective Action Drill/Reamer Handpiece ♦ Regulator malfunction. ♦ Run handpiece on another regulator Lack of handpiece power. to see if the problem is the handpiece or regulator. Replace appropriate piece of equipment. ♦... - Page 26 Table 1: Troubleshooting Guide Symptom Possible Cause Corrective Action Drill/Reamer Handpiece (Continued) ♦ Operating pressure incorrect. ♦ Set pressure to recommended Handle gets hot during use. operating pressure. ♦ Mode selector ring positioned ♦ Place mode selector ring Handpiece ratchets while drilling or in “SCREW”...
- Page 27 Table 1: Troubleshooting Guide Symptom Possible Cause Corrective Action Trauma Drill AO attachment will ♦ Flat side of attachment is not ♦ Align the flat side of attachment not seat completely. aligned with the arrow on the with the arrow on the collet. collet.
- Page 28 Table 1: Troubleshooting Guide Symptom Possible Cause Corrective Action Reciprocating and Oscillating Saws Reciprocator blade ♦ Collet locking knob not loose. ♦ Loosen the collet locking knob and will not seat in the try seating the blade again. collet. Reciprocator blade ♦...
-
Page 29: Specifications
Specifications Linvatec Corporation is certified by TÜV Product Service to EN ISO 9001 and EN 46001, and to the Medical Device Directive 93/42/EEC with certificates for Annex II, Clause 3; Annex II, section 4; and Annex V. 3.3.1 Drill/Reamer Handpiece... -
Page 30: Oscillating Saw
3.3.2 Trauma Drill Handpiece Operating Speed: Drill Position (forward and reverse): 250 rpm Screw Position (forward only): 250 rpm Average Output Torque: Drill Position (forward and reverse): 40 in. lbs. Screw Position (forward only): 18-22 in. lbs. (Automatic torque limiter) Weight: 28.8 oz. -
Page 31: Reciprocating Saw
3.3.4 Reciprocating Saw Operating Speed: 17,000 Cycles/minute (nominal) 34,000 Strokes/minute (nominal) Stroke: 0.125 inch (3.2 mm) Blade Rotation: May be locked in any position. 90° angles marked with detents Weight: 29.6 oz. (847.4 g) Operating Pressure: 100 psi running (7 kg/cm Recommended Power Source: Medical grade, water-pumped, compressed dry nitrogen... -
Page 32: Customer Service And Warranty
If you need technical assistance regarding the use or application of this product, or you encounter a problem that requires servicing or repair, contact Linvatec Customer Service at 800-925-4255 or your local Hall Surgical Sales Representative. Outside the U.S. contact your local Linvatec Hall Representative. - Page 33 fifteen percent (15%) of the purchase price (minimum charge $25). Products returned as a result of errors attributable to Linvatec are exempt from this fee. Returns must have an authorized Return Goods (R.G.) number prominently displayed on the box and included on all paperwork.
-
Page 34: Attachments And Accessories
Attachments and Accessories Drill/Reamer Handpiece Description 5067-001 Drill/Reamer (Includes: Trinkle Adaptor and Universal Hose) 5067-091 Drill/Reamer without Hose (Includes: Trinkle Adaptor) 5044-004 Torque Control Handle 5044-005 Series 3 & 4 Trinkle Adaptor 5044-006 Series 3 & 4 AO Adaptor 5044-009 Series 3 &... - Page 35 Reciprocating Saw Description 5067-003 Reciprocator (Includes: Universal Hose) 5067-093 Reciprocator without Hose Trauma Drill Description 5067-004 Trauma Drill (Includes: Universal Hose) 5067-094 Trauma Drill without Hose 1368-005 Trinkle to 5/32 inch Jacobs Adaptor 1368-010 Trinkle to 1/4 inch Jacobs Adaptor 5040-011 Wiredriver Attachment 5052-019...
-
Page 36: Linvatec And Hall Surgical Instrument Warranty
Company Twelve (12) Months (hereinafter collectively “Instruments”) have been tested, inspected, and shipped in proper Linvatec recommends that the Hall Series 4 working order. Handpieces and pneumatic regulators described in this manual be returned to the factory for The Company warrants all new Instruments to routine maintenance every twelve (12) months. - Page 37 If within the specified warranty period the 6. Instruments which did not have their Customer discovers that an Instrument has a aforementioned routine maintenance defect in material and/or workmanship, it must schedule followed. promptly notify the Company. If it becomes The foregoing limited warranties are in lieu necessary to return the Instrument to the of all other warranties, expressed or implied,...
- Page 40 11311 Concept Boulevard Largo, Florida 33773-4908 Phone: (727) 392-6464 Customer Service: (800) 925-4255 USA Fax: (727) 399-5256 International Fax: (727) 397-4540 www.linvatec.com © 2000 Linvatec Corporation, a subsidiary of ConMed Corporation 0123 All rights reserved. Printed in USA W41-033-004 Rev. A 01/2000...
Need help?
Do you have a question about the Hall Series 4 and is the answer not in the manual?
Questions and answers