Table of Contents
Advertisement
Quick Links
Advertisement
Table of Contents

Summary of Contents for Packo REM/DX Series
- Page 1 1.00 Installation manual Milk cooling tanks General part – 160251 1/78 06/02/2008...
-
Page 2: Table Of Contents
1.00 Installation manual: General part About this manual ..........................7 About this manual ..........................7 Introduction ................................... 7 Use of the icons ................................7 Procedures ..................................7 Changes ..................................7 Safety instructions ..........................8 Stickers ..................................8 Maintenance and repairs ..............................9 Electricity .................................. - Page 3 1.00 For your information .............................. 24 Introduction................................24 Procedure ................................24 Table for levelling standard LEM tanks ........................25 Table for levelling Australian LEM tanks ........................26 Table for levelling LS ..............................27 Table for levelling ADX .............................. 28 Table for levelling REM tanks ............................ 29 Table for levelling RS ..............................
- Page 4 1.00 Parts ..................................... 47 The IB cooling system ..............................48 The IB cooling system ............................48 Diagram ................................. 48 Parts ..................................49 Operation of the IB cooling system ........................49 Operation of the cooling unit ..........................49 IB: filling the ice water reservoir ..........................51 Introduction................................
- Page 5 1.00 Why clean it? ................................62 Automatic cleaning system ............................62 When to clean ................................62 Operation of the automatic cleaning system ........................ 62 Options ................................63 Automatic dosing ................................ 63 ECO-WASH ................................63 Manual cooling and cleaning ............................63 Separation of the rinse waters ............................
- Page 6 1.00 Checks ..................................72 Solving problems .............................. 73 What to do in case of a problem ..........................73 After-sales department..............................73 Safety fuses ................................. 73 Direction of rotation of the motors ........................73 Cooling compressor ..............................73 Manual cooling and cleaning ............................74 Specials ..............................
-
Page 7: About This Manual
Introduction The company PACKO INOX N.V. thanks you for choosing one of its products. It hopes it may also count you as one of its satisfied customers. That is why it does everything possible to inform and be of service to you as well as possible. -
Page 8: Safety Instructions
1.00 Safety instructions Stickers The stickers below can be fixed on to your tank to assure the safety of the use of the tank. They cannot be removed according to the CE regulations: Sticker Instructions The machine or part of it is built according to the CE regulations. -
Page 9: Maintenance And Repairs
1.00 Sticker Instructions Do not spray water on the pump. Switch off and lock the main switch before 230 / 400V entering the tank. Insure there is nobody in the tank before closing the manhole cover. Maintenance and repairs Only trained personnel may carry out maintenance or repairs. Electricity Before doing the following, turn the main switch to 0 or OFF and lock it: Before opening the electrical control box of the tank. -
Page 10: Entering In The Tank
1.00 Entering in the tank If someone has to get into the tank for specific work, this should be done under supervision, and only when the power has been switched off. It must not be possible for the agitator to start. That is why you should always turn the main switch to 0 or OFF and lock it. -
Page 11: Installation Instructions
1.00 Installation instructions Overview Introduction In this chapter you will find detailed directions for installing your milk cooling tank. Warning Only a recognised installer may carry out the installation. The installation is to be carried out in the order described below. 11/78 06/02/2008... -
Page 12: On Delivery
1.00 On delivery Checking the delivery Check whether the delivery is complete, in other words whether it completely meets the order. Check what has been delivered against what is written on the delivery note. Write any shortcomings on the delivery note before signing it. -
Page 13: Moving Vm/Dx
1.00 Moving VM/DX It is important that the guidelines below are observed when moving a tank with a built on cooling unit. If not, the tank may be damaged. See center of gravity WRONG RIGHT 13/78 06/02/2008... -
Page 14: About Your Milk Cooling Tank
1.00 About your milk cooling tank General specifications The average sound level of the tank (excl. cooling unit) in the working area is less than 70 dBa. Electrical connections: 200 – 240V / 50-60 Hz nominal - Tank: No harmonic interferences - Condensing unit: - Single-phase : 230 V / 50-60 Hz nominal - Three-phase: 3 x 400 V / 50-60 Hz nominal (3Ph+N) A protection against low voltage must be installed... - Page 15 1.00 Item Function Item Function Type of tank: e.g. REM/DX Max. operating current (A) Serial number The absorbed power (KW) Internal code Performance class of the tank (e.g. 2BII) Nominal volume of the tank (L) Nominal kg cooling agent to be charged to the cooling unit Fabrication date Frequency (Hz)
-
Page 16: Measurements
1.00 Measurements Table of measurements and weights of the different DX/DIB-models Type tank Volume (in litres) Milkings L * (in mm) l (in mm) H (in mm) Weight (in kg) T2 – T4 1550 – 1585 1050 1944 1308 T2 – T4 1550 –... - Page 17 1.00 Type tank Volume (in litres) Milkings L * (in mm) l (in mm) H (in mm) Weight (in kg) T4 – T6 10000 4535 2033 2440 - 2560 1280 T4 – T6 5335 2033 2440 - 2560 1495 12000 T4 –...
- Page 18 1.00 Table of measurements and weights of the different models RM/IB Type tank Volume (in litres) Milkings B*(in mm) D (in mm) F (in mm) Weight ( in kg) 1630 – 1750 2710 1300 1600 1825 – 1945 2710 1300 1630 –...
-
Page 19: Placing The Tank
1.00 Placing the tank Before placing If the free area above the tank in the dairy is insufficient, then put the agitator blade(s) inside the milk vessel before placing the tank inside. Directions Put the tank in the dairy, bearing in mind the local regulations and the following directions: The tank must be placed in a frost-free area. -
Page 20: Placing The Agitator
1.00 Placing the agitator Overview Introduction This section covers the installation procedure of the agitator, depending on the type of tank. 20/78 06/02/2008... -
Page 21: Placing The Agitator On Closed Tanks
1.00 Placing the agitator on closed tanks Remark The agitator blades and the motor are delivered separately. The agitator motor has a built-in watercoupling for the automatic cleaning system. If the free area above the tank in the dairy is insufficient, then put the agitator blade(s) inside the milk vessel before placing the tank inside. -
Page 22: Placing The Agitator On Open Tanks (Om/Dx And Om/Ib)
1.00 Placing the agitator on open tanks (OM/DX and OM/IB) Remark The agitator blades and the motor are delivered separately. How to place it Take the following steps to place the agitator: Step Action Open the tank and put the agitator blades inside. Put the shaft trough the hole in the lid or the bridge between the lids. -
Page 23: Placing The Agitator On Vm/Dx
1.00 Placing the agitator on VM/DX Remark The agitator blades and the motor are delivered separately. How to place it? Take the following steps to place the agitator : Step Action Open the tank and put the agitator blades (6) inside. Put the shaft trough the hole in the lid (1). -
Page 24: Levelling The Tank
1.00 Levelling the tank For your information In certain cases, you can find reference points, indicated with a sticker to aid the leveling process. Introduction The milk cooling tank should slope slightly towards the milk outlet to ensure that all the milk is properly removed. -
Page 25: Table For Levelling Standard Lem Tanks
1.00 Table for levelling standard LEM tanks Introduction The table for levelling your LEM milk cooling tank can be found below. In the chapter "Levelling the tank", you can find how to use the table. Figure LR = measuring rod length LC = inside dimensions milk tank L = distance between mounting studs of the dipsticks Table... -
Page 26: Table For Levelling Australian Lem Tanks
1.00 Table for levelling Australian LEM tanks Introduction The table for levelling your LEM milk cooling tank can be found below. In the chapter "Levelling the tank", you can find how to use the table. Figure LR = measuring rod length LC = inside dimensions milk tank L = distance between mounting studs of the dipsticks Table... -
Page 27: Table For Levelling Ls
1.00 Table for levelling LS Introduction The table for levelling your LS milk cooling tank can be found below. In the chapter "Levelling the tank", you can find how to use the table. Figure LR = measuring rod length LC = inside dimensions milk tank L = distance between mounting studs of the dipsticks Table Type... -
Page 28: Table For Levelling Adx
1.00 Table for levelling ADX Introduction The table for levelling your ADX milk cooling tank can be found below. In the chapter "Levelling the tank", you can find how to use the table. Figure LR = measuring rod length LC = inside dimensions milk tank L = distance between mounting studs of the dipsticks Table Type... -
Page 29: Table For Levelling Rem Tanks
1.00 Table for levelling REM tanks Introduction The table for levelling your REM milk cooling tank can be found below. In the chapter "Levelling the tank", you can find how to use the table. Figure LR = measuring rod length LC = inside dimensions milk tank L = distance between mounting studs of the dipsticks Table... -
Page 30: Table For Levelling Rs
1.00 Table for levelling RS Introduction The table for levelling your RS milk cooling tank can be found below. In the chapter "Levelling the tank", you can find how to use the table. Figure LR = measuring rod length LC = inside dimensions milk tank L = distance between mounting studs of the dipsticks Table Type... -
Page 31: Table For Levelling Crm Tanks
1.00 Table for levelling CRM tanks Introduction The table for levelling your CRM milk cooling tank can be found below. In the chapter "Levelling the tank", you can find how to use the table. Figure LR = measuring rod length LC = inside dimensions milk tank L = distance between mounting studs of the dipsticks Table... -
Page 32: Table For Levelling Rm/Ib
1.00 Table for levelling RM/IB Introduction The table for levelling your RM/IB milk cooling tank can be found below. In the chapter "Levelling the tank ", you can find how to use the table. Figure LR = measuring rod length LC = inside dimensions milk tank L = distance between mounting studs of the dipsticks Table... -
Page 33: Table For Levelling Om/Dx
1.00 Table for levelling OM/DX Introduction The table for levelling your OM/DX milk cooling tank can be found below. In the chapter "Levelling the tank", you can find how to use the table. Figure LR = measuring rod length LC = inside dimensions milk tank L = distance between mounting studs of the dipsticks Table Type... -
Page 34: Table For Levelling Om/Ib
1.00 Table for levelling OM/IB Introduction The table for levelling your OM/IB milk cooling tank can be found below. In the chapter "Levelling the tank ", you can find how to use the table. Figure LR = measuring rod length LC = inside dimensions milk tank L = distance between mounting studs of the dipsticks Table... -
Page 35: Table For Levelling Vm/Dx
1.00 Table for levelling VM/DX Introduction The table for levelling your VM/DX milk cooling tank can be found below. In the chapter "Levelling the tank", you can find how to use the table. Figure LR = measuring rod length LC = inside dimensions milk tank L = distance between mounting studs of the dipsticks Table Type... -
Page 36: Cooling
1.00 Cooling Overview Introduction The installation procedure differs depending on the type of cooling system of the milk cooling tank. This section covers the cooling instructions. 36/78 06/02/2008... -
Page 37: The Cooling Unit
1.00 The cooling unit Illustration The drawing below shows the most important parts of a cooling unit supplied by Packo. As not all the parts are standard, you will perhaps not find all of them in your cooling unit. Parts... -
Page 38: Positioning Of The Remote Cooling Unit
1.00 Positioning of the remote cooling unit Placing the cooling unit The cooling unit may be placed both inside and outside. In any case, sufficient air circulation must be provided (see also schematic diagram). If it is placed outside, a sufficiently large lockable protective shelter must be provided. If the cooling unit is placed inside in front of a opening in the wall, the following measures have to be taken: - Keep a free area of at least 25 cm between the wall and the condenser. -
Page 39: Piping The Remote Cooling Unit
1.00 Piping the remote cooling unit Method Take the following steps: Step Action The separate cooling unit is always delivered filled with nitrogen (N Check whether the unit is still under pressure. If not, check for leaks and repair. Place the suction pipe and then the liquid pipe. The diameter of the pipes depends on the type of cooling unit. -
Page 40: Fitting Oil Traps
1.00 Fitting oil traps Element Function Evaporator Suction pipe Oil trap Cooling unit Warnings: Blow dry (moisture content < 7ppm) N through the pipe (5 litres/minute) to prevent oxidation during welding. Use a copper solder to weld the pipes together. Use a silver solder to weld the pipes to the different elements (evaporators, liquid receivers,…) Avoid getting moisture and dirt in the pipes! If cooling agent or oil is accidentally spilt on the milk cooling tank it must be thoroughly cleaned... -
Page 41: Setting The The Pressure Switches
1.00 Setting the the pressure switches Warning For safety reasons, the maximum pressure of the cooling installation may NEVER be exceeded. The setting of the high-pressure pressostat must always be LOWER than the maximum permissible pressure indicated on the identification plate of the cooling group. 1 bottom evaporator segment 2 bottom evaporator segments 4 evaporator segments... -
Page 42: High-Presssure Pressostaat
1.00 High-presssure pressostaat The settings depend on the type of condensing unit and refrigerant being used. You always HAVE TO respect the values (indicated on the identification label) stated by the manufacturer of the cooling unit. Basic values: Type cooling unit R404A R134a (R12) Open... -
Page 43: Fan Speed Controller
1.00 Fan speed controller In case an electronic fan speed controller is used, Packo advises to use a Saginomiya fan speed controller. Description Part Description Schematic Adjusting screw Range: 8 – 28 bar Setting: Turn the adjusting screw clockwise for increasing the setting, and... -
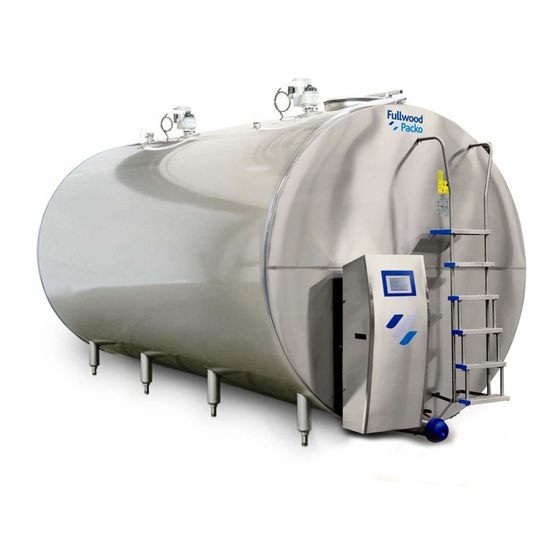
Page 44: Parts Of The Dx/Dib Milk Cooling Tank
1.00 Parts of the DX/DIB milk cooling tank Illustration The drawing below shows the most important parts of the milk cooling tank. The shape of the tank and the control panel may be round or oval, depending on the type. Parts The table below provides an overview of all the parts: Part... -
Page 45: The Dx Cooling System
1.00 The DX cooling system Schedule The drawing below shows the DX cooling system schematically: Parts The table below provides an overview of the parts of the DX cooling system: Description Description High and low pressure switch Solenoid valve Compressor Sight-glass Air-cooled fan condenser Heat Exchanger (option) -
Page 46: Operation
1.00 Operation The table below describes how the DX cooling system works. Phase Description The compressor (2) extracts the gaseous cooling agent under low pressure from the evaporator (10), and forces it under high pressure and high temperature to the condenser (3). The fan sucks air over the cooling fins of the condenser, so that the gas condenses into a fluid at a lower temperature. -
Page 47: Parts Of The Ib Milk Cooling Tank
1.00 Parts of the IB milk cooling tank Illustration The drawing below shows the most important parts of the milk cooling tank. Parts The table below provides an overview of all the parts: Part Description Ice water reservoir Ice water pump Insulation layer Agitator Adjustable legs... -
Page 48: The Ib Cooling System
1.00 The IB cooling system The IB cooling system IB cooling (=Ice Bank cooling) is achieved by spraying ice water on the outer walls of the inner tank (the milk tank itself). This is a fast and efficient way of cooling. As the stock of ice water does not have direct contact with the milk tank, the milk, even in small quantities, does not freeze. -
Page 49: Parts
1.00 Parts The table below provides an overview of the parts of the IB cooling system: Description Description High and low pressure switch Heat exchanger (option) Compressor 10 Evaporator pipes Air-cooled fan condenser 11 Thermostatic expansion valve High pressure switch (option) Spray tube Liquid receiver Milk tank... - Page 50 1.00 Phase Description The liquid formed in this way leaves the condenser under high pressure. The thermostatic expansion valve (11) sprays the cooling fluid into the evaporator (10). The cooling fluid in the evaporator absorbs the heat of the water and evaporates.
-
Page 51: Ib: Filling The Ice Water Reservoir
1.00 IB: filling the ice water reservoir Introduction The ice water reservoir, containing the copper evaporator pipes, must be filled with water of drinking quality. To protect the system an inhibitor must be added to the water before the start-up. Warning The ice water reservoir may only be filled with water after the cooling circuit has been made vacuum and put under pressure. -
Page 52: How To Fill It
1.00 How to fill it Proceed as follows. Step Action Remove the cover plate of the ice water reservoir. Put the overflow pipe with stop in the appropriate opening in the ice water reservoir (right hand corner) Fill the reservoir with water until 1 cm under the overflow pipe. Add the amount of 1, 2, 3 Benzotriazol needed to the ice water reservoir. -
Page 53: Tr15
1.00 If the quantity of milk is increasing without pre cooling the milk with mains water, the selector switch can be set to +50%. Do not forget to switch back to -50% when milk production reduces. TR15 If a time relay (TR15) is installed, the cooling unit is started with a delay. This means if milk cooling (ice- water pump) is started, the time relay is counting down and after the preset time and if not enough ice is available, the cooling unit starts forming ice. -
Page 54: Electrical
1.00 Electrical Electrical connection Introduction All the internal wiring was done at the factory. You will find a circuit diagram inside the control box. Regulations Always observe the local regulations concerning electrical installations. Power required The power required depends on the type of milk cooling tank and the cooling unit. (see table hereafter) Connections The electrical connections should be done by a qualified person;... -
Page 55: Voltage Control Relay
1.00 Voltage control relay The H3US control realy controls the 3-phase network: - overvoltage between phases - undervoltage between phases Description Part Description Schematic Voltage range selection switch (220-380- Select the nominal mains voltage 400-415-440-480V) (Un) Potentiometer for overvoltage setting, Set the maximum threshold +2 ... -
Page 56: Differential Cut-Out
1.00 Differential cut-out We advise you to protect the installation with a differential cut-out of no more than 30 mA. This cut-out has to be choosen in function of the installed electrical power. It is advisable to foresee a main switch for the electrical supply of the milk cooling tank. In case the main electrical cable is equipped with a plug, it is not necessary to install an extra circuit breaker. -
Page 57: Lem/Dx, Rs/Dx
1.00 Type Content P (Watt)/class I max (A)/class 2BII 4BII 6BII 2BII 4BII 6BII (in L) 3800 14674 9587 29,85 20,45 4400 16655 11472 33,05 25,15 5000 21444 11472 42,05 25,15 6150 22628 14674 43,05 29,85 7200 27848 16622 51,45 33,05 8200 32244... -
Page 58: Rem/Dib, Rs/Dib, Lem/Dib, Ls/Dib
1.00 Type content P (Watt)/class I max (A)/class 2BII 4BII 6BII 2BII 4BII 6BII (in L) 25500 30450 REM/DIB, RS/DIB, LEM/DIB, LS/DIB Type content P (Watt)/class I max (A)/class 2BII 4BII 6BII 2BII 4BII 6BII (in L) ≤ 7200 1500 8,25 REM/DIB RS/DIB... -
Page 59: Om/Dx, Om/Ib
1.00 Type Content P (Watt)/class I max (A)/class 2BII 4BII 6BII 2BII 4BII 6BII (in L) 7150 12972 34,00 9650 19222 14073 48,00 40,10 12400 17274 44,80 15400 19222 48,00 OM/DX, OM/IB Type content P (Watt)/class I max (A)/class 2BII 4BII 6BII 2BII... -
Page 60: Supply Cable
1.00 Type Type P (Watt)/class I max (A)/class 23144 45,50 29548 56,50 63688 109,80 8696 19,50 12442 26,50 IBR (low) 13034 27,50 23144 45,50 27461 49,50 5,00 5,50 (compact) 6,00 7,50 ATTENTION: REM/DIB, LS/DIB, LEM/DIB and LS/DIB (single-phase connection). The power and the intensity are only for the tank, so without the ice-builder and its cooling group. -
Page 61: Cleaning
1.00 Cleaning Connection to the water mains (with automatic cleaning) Water quality The cleaning water must be of drinking water quality as determined in European directive 80/778/EEC. You can have the water analysed at a recognised laboratory to check it. Water pressure and flow Water pressure: minimum 1.5 bar, maximum 5 bar Flow: minimum 20 litres/minute... -
Page 62: About Cleaning The Milk Cooling Tank
1.00 About cleaning the milk cooling tank Why clean it? Thoroughly cleaning and disinfecting the tank guarantees: Hygienic storage and therefore higher quality milk. A longer life of the system. Automatic cleaning system It is difficult or impossible to manually clean a closed tank. That is why closed tanks are always fitted with automatic cleaning systems. -
Page 63: Options
1.00 Options Automatic dosing With the automatic dosing, the system ensures that the right amount of cleaning agent is automatically taken into the cleaning water. The alternation of cleaning products occurs automatically (see specific installation manual on controls) ECO-WASH This is an automatic cleaning system that reduces the cleaning time to 50% of the standard automatic cleaning system. -
Page 64: Cleaning Agents
Or to use an acid one at least once a week. Warning Never mix alkaline products with acids or products containing chlorine. Mixing them will cause a chemical reaction resulting in poisonous gases! Recommended products PACKO INOX N.V. recommends the following cleaning agents: Type Name Art. no. content... -
Page 65: Automatic Dosing
1.00 Automatic dosing In case of automatic dosing, the drums of cleaning agent should be connected as follows: Connect a drum with an alkaline product to the blue hose. Connect a drum with an acid product to the red hose. Connect a drum with desinfectant with a white/transparent hose. -
Page 66: The Standard Automatic Cleaning System
1.00 The standard automatic cleaning system Picture This drawing represents the standard automatic cleaning system. Parts The table below provides an overview of the parts of the standard cleaning system. The arrows indicate the flow of the cleaning water. N° Description N°... -
Page 67: The Eco-Wash Automatic Cleaning System
1.00 The ECO-WASH automatic cleaning system Picture This drawing represents the ECO-WASH automatic cleaning system. Parts The table below provides an overview of the parts of the standard cleaning system. The arrows indicate the flow of the cleaning water. N° Description N°... -
Page 68: Manual Cooling And Cleaning (Option)
1.00 Manual cooling and cleaning (option) Warning The manual cooling function is only to be used in case of a breakdown of all automatic functions and under permanent supervision! Manual cooling Proceed as follows to start up manual cooling: Step Action Remove the protective cover from the operator console. -
Page 69: Cleaning Phases
1.00 Cleaning phases First hose the milk residues out of the milk vessel To guarantee a sufficiently clean tank, clean it in three phases as described below: Stage Description Rinse the tank with warm water for 2 minutes. Clean the tank with hot water and a cleaning agent for 12 minutes. The water temperature required depends on the type of cleaning agent. -
Page 70: Commissioning
1.00 Commissioning See relevant installation manuals: Dolphin: 160183 PCV-3: 155480 70/78 06/02/2008... -
Page 71: Maintenance And Trouble Shooting
1.00 Maintenance and trouble shooting Overview Introduction This chapter provides you with guidelines for maintenance and will help you to look for a solution if problems occur. Maintenance and checks Introduction Regular and preventive maintenance: prevents loss of milk quality; guarantees a long life of the system;... -
Page 72: Checks
1.00 Checks These points should be explaned to the farmer when handing over the installation after commissioning. The list below provides an overview of all the checks that should be carried out regularly: Check the milk temperature at the end of each milking and when leaving the milking room. Check the milk outlet pipe and complete tank after each cleaning. -
Page 73: Solving Problems
1.00 Solving problems What to do in case of a problem You can solve a lot of problems yourself using the information in this chapter. Electrical or cooling technical repairs may ONLY be carried out by trained staff. In that case, contact the after-sales department. -
Page 74: Manual Cooling And Cleaning
1.00 Manual cooling and cleaning If your milk cooling tank is equipped with the manual cooling and cleaning option you can, is case of a breakdown of all automatic functions, activate the cooling manually for a short period of time. The tank can also be cleaned semi-automatically. -
Page 75: Specials
1.00 Specials The DIB cooling system The DIB cooling system Together with the milk tank, the double-walled, stainless steel heat exchanger forms one unit. The supporting plate is laser welded to the flat plate of the inner tank (the real milk tank) and expanded under pressure. At the bottom of the milk cooling tank, the ice water is pumped into the heat exchanger through a multi injection manifold. -
Page 76: Operation
1.00 Operation In the table below, you will find a description of the operation of the DIB cooling system: Stage Description The fresh milk runs through the pre-cooler (1). Ice water, coming from the ice builder (4), is pumped in counter flow through the same pre-cooler by means of the ice water pump (5). -
Page 77: Dib: Connection To The Ice Builder
1.00 DIB: connection to the ice builder Introduction You have to connect the milk cooling tank to an ice builder by means of a supply pipe and an outlet pipe. Connection at the milk cooling tank You will find the connection points for the supply and outlet pipe(s) of ice water at the backside of the milk cooling tank. -
Page 78: Pre-Cooling
1.00 Restrict the distance between the ice builder and the milk cooling tank. In order to reduce heat losses, we recommend to properly insulate the pipes for icewater circulation (e.g. 15 mm Armaflex) Pre-cooling Pre-cooling is used to cool down the milk by means of spring water or ice water before the milk enters the milk cooling tank.
Need help?
Do you have a question about the REM/DX Series and is the answer not in the manual?
Questions and answers