Table of Contents
Advertisement
Quick Links
Box Contents
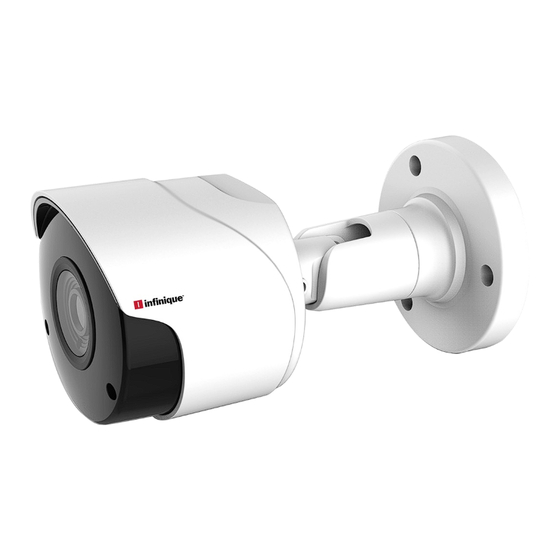
1 x 2MP Night Vision Bullet Camera
1 x 60ft Video and Power Cable with Connectors
Mounting Screws, Installation Template
Power Adapter *, Quick Installation Guide
* Available only in 4 Camera Kits. Power adapter with
splitter is provided in 4 Camera Kits to power four cameras.
Key Points
Use the regulated UL / CSA / BIS approved power supply
which has been supplied with the camera pack. Use of a
non-regulated, non-conforming power supply can damage
this product and voids the warranty.
Camera Features
Camera Dimensions
Disclaimer
1. Not intended for submersion in water. Installation in a
sheltered location recommended.
2. This camera includes an Auto Mechanical IR Cut Filter.
When the camera changes between Day/Night viewing
modes, an audible clicking noise may be heard from
the camera. This clicking is normal, and indicates that
the camera filter is working.
Power Adapter
Two multi-camera power adapters options may be provided
that provided depending on the product configuration.
1. 2A 12V DC 4 Split Power Adapter to power 4 Cameras
2. 4A or 5A 12V DC 8 Split Power Adapter to power 8
Cameras
Read Before You Use
Before attempting to connect or operate this product,
read the instructions carefully and save it for reference.
All instructions should be followed for safe handling of the
product.
Camera should not be disassembled.
Camera should not be focused directly towards sun or
bright lights and where there are no obstructions.
Camera should be installed where vandals cannot easily
reach and the cable should be secured properly in ducts
to avoid damage.
Camera is for indoor and outdoor use, however when
installed outdoors sheltered location is recommended.
Camera should be operated within the given
temperature and humidity range.
Use the regulated UL / CSA / BIS approved power supply
which has been supplied with the camera pack. Use of a
non-regulated, non-conforming power supply can
damage this product and voids the warranty.
Use a damp cloth to clean the camera surface, do not
use any harsh cleaners.
The video and power supplied is rated for surface
mounting only.
Infinique reserve the right to modify product specifications and
prices without notice and without incurring any obligation.
© 2019 Infinique Worldwide Inc. Canada
Infinique is a registered trademark of Infinique Worldwide Inc.
2MP Night Vision Bullet Camera
Quick Installation Guide
English Version 1.0
IHB703 Series
w w w . i n f i n i q u e . c o m
Advertisement
Chapters
Table of Contents

Summary of Contents for Infinique IHB703 Series
- Page 1 mounting only. Disclaimer 1. Not intended for submersion in water. Installation in a Infinique reserve the right to modify product specifications and IHB703 Series sheltered location recommended. prices without notice and without incurring any obligation. 2. This camera includes an Auto Mechanical IR Cut Filter.
- Page 2 DVR. There can be 4, 8 or 16 The cameras are only compatible with Video Inputs based on the AHD DVR Configuration. Infinique AHD DVRs. 4. On the DVR side connect the female power connector to the power adapter splitter.
- Page 3 mounting only. Disclaimer 1. Not intended for submersion in water. Installation in a Infinique reserve the right to modify product specifications and sheltered location recommended. IHD703 Series prices without notice and without incurring any obligation. 2. This camera includes an Auto Mechanical IR Cut Filter.
- Page 4 Installing the Camera Camera Connection Trouble Shooting Problem Solution 1. First test the camera prior to installing by connecting the BNC Connector camera and cable to the DVR. Video captured is Camera should not be directly pointed at a 2. Plan how to run the cables either through or along the wall too bright source of light such as spot light or sun.
- Page 5 DVR system menu. Step 6 - Connect Power Power Connector AHD DVR Infinique reserve the right to modify product specifications and prices without notice and without incurring any obligation. Camera Power Adapter © 2019 Infinique Worldwide Inc. Canada Connect the DVR to the power outlet using the power adapter Infinique is a registered trademark of Infinique Worldwide Inc.
-
Page 6: Package Contents
Internet USB flash drive. Visit Infinique.com, to chat online, to send us email to ecom- connection is required to use NTP. Refer manual for detailed instructions on Search, Playback merce@infinique.com or to download quick guides, instruction DST: Enable DST for auto Daylight Savings Time updates. - Page 7 InfiViewCam Installation Manual Overview InfiViewCam 2.0.1 is compatible with Android Ver5.0 or above and iOS 7.0 and above. It can support live view, remote playback, PTZ control, local playback, snap shot and push notifications, etc. from DVR and NVR via 3G or above, or WIFI. Installation Search for the InfiViewCam App on Google Play Store for Android devices or App Store for iOS devices and install on your smart phone.
- Page 8 InfiViewCam Installation Manual Adding Recorder by Scanning QR Code In the Add New Device window, scan the QR Code Sticker present on the recorder or Scan the QR code from recorder Information menu. Once connected, all the channels will be displayed.
- Page 9 InfiViewCam Installation Manual Adding Recorder using Manual Add In the Add New Device window, Click on Manual Add, and enter all the required parameters for the recorder to be added to the Device List. IP Address/ID: IP Address of the Recorder Media Port: 9000 User Name: admin (default user) Password: Enter the recorder password...
- Page 10 InfiViewCam Installation Manual Liveview Click to go to Live View interface. Under Live View interface, click on top right to go to Devices interface. Icons on Devices interface are shown in the table below: Icons Function Devices Channel Select channel to do live view Return to live view interface Click device to select channels, and then click Start Live View icon to view the cameras.
- Page 11 InfiViewCam Installation Manual Set/Call Preset Points Press PTZ control arrows to move the camera to the requested place. Click to set preset points (1—256). Click Set to complete. Slide up and down to select preset points. Click Call to call preset point.
- Page 12 InfiViewCam Installation Manual Snapshot Record Mute on/off Slide playback time bar can adjust playback time, and hold and drag playback windows can reorder the windows. Zoom Double click to enlarge the window, and then hold or separate fingers to Zoom in/out. Adjust Playback Time During playback, click under playback time bar to Zoom in/out time.
-
Page 13: Delete Devices
InfiViewCam Installation Manual Image Manager Click to go to Image Manager Interface. Under Image Manager Interface, you can view and email snapshots. Delete Devices Under Image Manager interface, hold and move to left until Delete button in Red appears, click Delete to remove device. -
Page 14: User Manual
Hybrid Digital Video Recorders User Manual Before attempting to connect or operate this product, read the instructions carefully and save this manual for future use. RoHS Important Safety Instructions Carefully read the following safety instruction to avoid personal injuries and prevent the equipment and other connected devices from being damaged. - Page 15 Hybrid DVR User Manual Power sources: Use the power supply included or as specified by the manufacturer. Never operate the equipment by using unspecified power supply. Never push objects of any kind through openings of DVR to avoid electric shock or other accidents.
- Page 16 TO REDUCE THE RISK OF ELECTRIC SHOCK, DO NOT REMOVE. NO USER-SERVICEABLE PARTS INSIDE. REFER SERVICING TO QUALIFIED SERVICE PERSONNEL ONLY. The lightning flash with an arrowhead symbol within an equilateral triangle is intended to alert the user to the presence of un-insulated “dangerous voltage” within the product’s enclosure that may be of sufficient magnitude to constitute a risk of electric shock to persons.
-
Page 17: Table Of Contents
TABLE OF CONTENTS IMPORTANT SAFETY INSTRUCTIONS........................1 1. INTRODUCTION .............................. 5 1.1 F ..............................5 EATURES 2. DVR OVERVIEW .............................. 5 2.1 F ..............................5 RONT ANEL 2.2 R ..............................6 ANEL 2.2 R ............................. 7 EMOTE ONTROLLER 3. DVR CONNECTIONS ............................8 3.1 HDD I ............................ - Page 18 Hybrid DVR User Manual 6.4 PTZ ................................27 6.4.1PTZ Control............................28 6.5 M ..............................29 OTION 6.6 PIR ................................31 6.7 V .............................. 33 IDEO OVER 6.8 I ............................... 33 NTELLIGENT 6.8.1 PID - Perimeter Intrusion Detection....................34 6.8.2 LCD - Line Crossing Detection ......................36 6.8.3 SOD - Stationary Object Detection ....................
- Page 19 Hybrid DVR User Manual 11 SYSTEM ................................ 65 11.1 G ..............................65 ENERAL 11.1.1 Date and Time ..........................66 11.1.2 NTP Settings ........................... 67 11.1.3 DST Settings ........................... 67 11.2 O ..........................68 UTPUT ONFIGURATION 11.2.1 LIVE-OUT ............................68 11.3 M .............................
- Page 20 Hybrid DVR User Manual 13.4.2 Playback ............................96 13.4.3 Playback Control Buttons ........................ 97 13.4.4 Remote Setting ..........................98 13.4.5 Local Setting ........................... 99 14 VIEWING BACKED UP VIDEO ON PC AND MAC ..................100 15 REMOTE ACCESS VIA MOBILE DEVICES ...................... 103 16 APPENDIX ..............................
-
Page 21: Introduction
Hybrid DVR User Manual 1. Introduction Infinique’s Hybrid Digital Video Recorder offers a wide range of recording solutions for IP and AHD based video surveillance that are extremely easy to install, use and maintain. The hardware is optimized for video surveillance by consolidating disparate components into a single chassis, which is energy efficient and greatly improves the total cost of ownership. -
Page 22: Rear Panel
Hybrid DVR User Manual Key or Indicator Functions Power Indicator The “Green” indicator shows that the DVR is powered ON. The “Red” flashing indicator shows that the hard drive is being read or HDD Indicator written to. USB port to connect mouse 2.2 Rear Panel Rear Panel for 4, 8, 16 Channel DVR (For reference only, design subjected to change without prior notice) -
Page 23: Remote Controller
Hybrid DVR User Manual 2.2 Remote Controller For Reference Only Icon Description Numeric keys. Press to display channel 1~8 9, 0 Numeric keys Display all channels. Multiple display mode Menu Enter or exit the Main Menu Mute Mute On / Off Submenu Go to submenu Up arrow key;... -
Page 24: Dvr Connections
Hybrid DVR User Manual 3. DVR Connections 3.1 HDD Installation Depending on the configuration purchased, the hard disk drive may be pre-installed in some of the DVR models. If the hard disk is not pre-installed then to install a new hard disk, follow the installation instructions on this user manual. -
Page 25: Dvr Connectivity Diagram
Hybrid DVR User Manual 3.2 DVR Connectivity Diagram Speaker Note: The above connectivity diagram is for reference only; practical connection may be different based on the DVR model. Caution: Make sure that all the connectivity to the DVR ports is accurate and the power cable is connected to power the DVR. -
Page 26: Camera Connection
Hybrid DVR User Manual 3.4 Camera Connection Connect the AHD Cameras to the DVR using the Video and Power Cable provided; the BNC Connecter shall be connected to the video input ports and the power cable to Power Splitter. 3.5 Monitor Connection DVR video output signals are transmitted to a VGA display or HDMI display via VGA or HDMI cable. -
Page 27: Password
Hybrid DVR User Manual 3.8 Password When the DVR is switched on for the first time, change the password immediately in order to protect the privacy. Ensure to record the username and password and save them in a secure place. Language: Choose an OSD language Device ID: Enter the Device ID, Default value is 000000 New Admin Name: Enter the administrator user name... -
Page 28: Dvr Start Up
Hybrid DVR User Manual 4. DVR Start Up 4.1 Start Wizard Startup Wizard will help to configure the DVR quickly in easy steps. Click the Start Wizard to proceed with the setup 4.2 Network Configuration Set the router connector the DVR to use DHCP , check the DHCP box. The router will assign automatically all the network parameters for the DVR. -
Page 29: Date And Time
Hybrid DVR User Manual DNS1/DNS2: DNS1 is the primary DNS server and DNS2 is a backup DNS server. Generally only DNS1 is entered. Port Web Port: This port is used to log in remotely to the DVR (e.g. using the Web Client). If the default port 80 is already taken by other applications, another port can be used. -
Page 30: Ip Camera
Hybrid DVR User Manual NTP stands for Network Time Protocol. This option allows synchronizing date and time automatically on the DVR over Internet. Therefore, the DVR needs to be connected to the Internet. Check the “NTP” box, and select the NTP server. DST stands for Daylight Savings Time. - Page 31 Hybrid DVR User Manual Click Search to search IP cameras in the same network. Choose the IP camera(s) to add, and then click icon to add to the DVR. Enter the camera’s user name and password to add the camera(s). Cameras can also be added individually to a single channel using the button.
-
Page 32: Disk
Hybrid DVR User Manual 4.5 Disk If the HDD is installed in the DVR for the first time, it must be formatted. Select the HDD and then click Format HDD button to format the HDD. Overwrite: Use this option to overwrite the old recordings on the HDD when the HDD is full. For example, if the option 7 days then only the last 7 days recordings are kept on the HDD. -
Page 33: Ummary
Hybrid DVR User Manual 4.8 Summary The system summary information screen displays the information that has been set in the wizard. “Don't show this window next time" check box can be ticked, if display Start Wizard is not to be displayed, when system reboots. -
Page 34: Live View Screen Overview
Hybrid DVR User Manual 5. Live View Screen Overview Status Icons Camera Title Camera Quick Toolbar Start Menu Task Menu Bar System Date and Time Camera Title To display the camera title A-: This indicates that the camera connected is an AHD camera T-: This indicates that the camera connected is a TVI camera C-: This indicates that the camera connected is a CVI camera IP: This indicates that the camera connected is an IP camera... -
Page 35: Camera Quick Toolbar
Hybrid DVR User Manual This icon indicates the HDD is read-only. VIDEO LOSS: The analog camera is disconnected. No Camera: IP camera is disconnected. Decoding Failed :The DVR does not support this kind of IP camera compression standard, change to H.264 compression standard. Click to open Quick Add menu to add IP camera Click to edit current IP camera 5.1 Camera Quick Toolbar... -
Page 36: Start Menu
Hybrid DVR User Manual or choose the playback from the latest 5s, 10s, 30s, 1Min, 5Min. Click to adjust audio volume Click to switch all IP channels between mainstream and substream (for live view resolution) Click to switch among real-time, balanced, or smooth view. The view effect only affects the live view video quality by bitrate and frame rate but do not affect the recording quality. -
Page 37: Shutdown
Hybrid DVR User Manual 5.5 Shutdown Click the Shutdown button from Star Menu, and then Click OK button, system will require the Admin password to authenticate the shutdown. If Logout option is chosen, the live view screen will disappear. Login credentials should be provided for any further operations. -
Page 38: Dvr System Setup
Hybrid DVR User Manual 6 DVR System Setup Using Start Menu, Channel, Record, Alarm, Network, Device and System can be configured. Start MenuSetup. 6.1 Channel Using Channel, camera, live view display, manage IP cameras, adjust IP camera’s image, PTZ setup, motion setup, convert mode, and more can be setup. -
Page 39: Analog Channels
Hybrid DVR User Manual 6.1.1 Analog Channels As this is a hybrid DVR, both Analog and IP cameras can be setup. To disable analog channel, uncheck the box and click Apply to save. Disabling analog channel can increase IP channel input. To do this, the XVR mode in advance at System ... -
Page 40: Protocol Manage
Hybrid DVR User Manual Click Search button to search IP cameras, and then click one of the IP camera in the device list. IP Address/Domain: IP address or domain name of the IP camera Alias: Name of the IP camera Position: Position to display the camera name on the screen. -
Page 41: Live
Hybrid DVR User Manual Protocol Name: To give a name to the custom protocol. Enable Sub-stream: Check to enable sub-stream. Type: Only RTSP available now. Port: Input the RTSP port of the IP camera. Resources Path: Input the RTSP address of the IP camera. 6.2 Live To configure camera parameters. -
Page 42: Image Control
Hybrid DVR User Manual Choose a channel to configure Give a name to the camera Date format to display for the camera (for IP camera only) Time format to display for the camera (for IP camera only) Refresh Rate of the camera (for IP camera only) Choose a camera type (Auto, AHD, TVI, CVI) for analog camera Choose an AHD EQ (Enhanced Quality) level depends on camera video cable... -
Page 43: Ptz
Hybrid DVR User Manual Choose a channel to configure Select the desired built-in IR cut filter mode to ensure the camera works properly both during day and night. Set the delay time of IR-CUT switching Check to enable lens flip and angle flip Set the flip angle To enable or disable Backlight compensation Choose the backlight compensation level... -
Page 44: 1Ptz Control
Hybrid DVR User Manual Channel: Channel name Signal Type: Analog for analog channels, Analog and Digital for IP channels. Protocol: Choose the communication protocol between the PTZ camera and DVR. If the camera support UTC (Up the Coax) function, choose COAX1 or COAX2 to display the camera OSD menu or control the UTC PTZ function. -
Page 45: Motion
Hybrid DVR User Manual Speed Speed Adjust the PTZ speed Click the direction arrow to select the direction of the PTZ camera Pointer Click up/down/left/right arrow to move cursor in UTC OSD menu Panel Click to switch to auto pan mode - ZOOM + Zoom Click to zoom in/out. - Page 46 Hybrid DVR User Manual Motion Detection Area: The whole screen is marked for motion detection (red blocks) as default. To disable the motion detection on a certain area, click the grid cursor and then drag the mouse to highlight the scope to unmark the area into transparent blocks.
-
Page 47: Pir
Hybrid DVR User Manual Post Recording: To set how long after an event occurs that the DVR will continue to record. The recommended recording length is 30 seconds but it can be set higher up to 5 minutes. Show Message: Check the box to display icon on the live view screen when the motion is detected. - Page 48 Hybrid DVR User Manual PIR Detection Area: Click Select All to set the whole screen of the camera as PIR detection area. Click Delete All to clear the area. A custom area can be selected on the screen by drawing a pentagon in the screen.
-
Page 49: Video Cover
Hybrid DVR User Manual Post Recording: To set how long after an event occurs that the DVR will continue to record. The recommended recording length is 30 seconds but it can be set higher up to 5 minutes. Show Message: Check the box to display PIR on the live view screen when the PIR alarm is detected. Send Email: The DVR can be set to send an auto-email when PIR detection is triggered. -
Page 50: Pid - Perimeter Intrusion Detection
Hybrid DVR User Manual 6.8.1 PID - Perimeter Intrusion Detection Perimeter Intrusion Detection function detects people, vehicle or other objects which enter and loiter in a pre-defined virtual region, and some certain actions can be taken when the alarm is triggered. Channel: Select the channel to configure Switch: Enable or disable the PID function Buzzer: Disable or to active the buzzer to emit an alarm tone in 10, 20, 40 or 60 seconds when the... - Page 51 Hybrid DVR User Manual Scene: Scene setting includes Indoor and Outdoor. Choose the scene to match with the place of the installed camera. Post Recording: To set how long after an event occurs that the DVR will continue to record. Latch Time: To configure the external alarm time when the detection is triggered.
-
Page 52: Lcd - Line Crossing Detection
Hybrid DVR User Manual 6.8.2 LCD - Line Crossing Detection Line Crossing Detection function detects people, vehicle or other objects which cross a pre-defined virtual line, and some certain actions can be taken when the alarm is triggered. Channel: Select the channel to be configured Switch: Enable or disable the LCD function Buzzer: Disable or to active the buzzer to emit an alarm tone in 10, 20, 40 or 60 seconds when the detection is triggered... - Page 53 Hybrid DVR User Manual Record Channel: To select the channel(s) to be recorded when detection is triggered. Area: Click [Setup] to draw a virtual line in the camera picture. Choose one of the Rule Number. It is the number of LCD lines. Maximum of 4 lines can be drawn. To enable the detection in Rule Switch Choose a Rule Type.
-
Page 54: Sod - Stationary Object Detection
Hybrid DVR User Manual 6.8.3 SOD - Stationary Object Detection Stationary Object Detection function detects the objects left over or lost in the pre-defined region such as the baggage, purse, dangerous materials, etc., and a series of actions can be taken when the alarm is triggered. - Page 55 Hybrid DVR User Manual Choose one of the rule numbers. It is the number of SOD area. Maximum 4 areas can be set for SOD function. To enable the detection in Rule Switch Choose a Rule Type. Legacy: DVR will only detect the left-over objects; Lost: DVR will only detect the lost objects;...
-
Page 56: Pd - Pedestrian Detection
Hybrid DVR User Manual 6.8.4 PD - Pedestrian Detection Pedestrian Detection function detects the moving people in a pre-defined region, and a series of actions can be taken when the alarm is triggered. Channel: to select the channel to configure Switch: to enable or disable the PD function Buzzer: to disable or to active the buzzer to emit an alarm tone in 10, 20, 40 or 60 seconds when the detection is triggered... -
Page 57: Fd - Face Detection
Hybrid DVR User Manual Choose one of the Rule Number. It is the number of PD area. Maximum 4 areas can be set for PD function. To enable the detection in Rule Switch Choose a Rule Type, only Normal available for this detection. Using mouse click 4 points in the camera picture to draw a virtual region. - Page 58 Hybrid DVR User Manual Channel: to select the channel to configure Enable: to enable or disable the FD function Buzzer: to disable or to active the buzzer to emit an alarm tone in 10, 20, 40 or 60 seconds when the detection is triggered Level: Small, Middle and Big.
-
Page 59: Cc - Cross-Counting
Hybrid DVR User Manual To remove one of the regions from the camera picture, click the red box in the region and then click Remove button. Click Remove All will delete all regions. Note: 1) The region for detection shall not be in the area that people cannot reach. 2) The region should include the complete front face. - Page 60 Hybrid DVR User Manual Send Email: If an alarm is triggered, an Email will be sent to the preset email account. Full Screen: When the detection is triggered, the channel will be displayed in full screen. Record Channel: To select the channel(s) to record when detection is triggered. Area: Click [Setup] to draw a virtual region in the camera picture.
-
Page 61: Intelligent Analysis
Hybrid DVR User Manual 6.8.7 Intelligent Analysis To search and view the statistical result of counting in Intelligent Analysis. The statistical result can be queried by Daily / Weekly / Monthly / Annual for Cross In and Cross Out. TEC-VS-219-1905-V01... -
Page 62: Intelligent Schedule
Hybrid DVR User Manual 6.8.8 Intelligent Schedule In order to active the intelligent function, the schedule should be setup. The schedule will be active in 24 hours x 7 days. To set the schedule, choose one channel then drag the cursor to mark the slots. The sky-blue blocks in the time slots will be active for Intelligent detections. -
Page 63: Record
Hybrid DVR User Manual 7 Record This menu is used to configure the recording parameters 7.1 Encode This menu allows configuring the recording video or network transmission picture quality. Generally, Main stream defines the recording video quality which will be saved in the HDD; Sub stream defines the video quality which is being viewed via remote access, for example web client and CMS;... -
Page 64: Record Parameters
Hybrid DVR User Manual 7.2 Record Parameters Record Switch: Check to enable the recording in this channel. Stream Mode: Choose the recording quality. If Dualstream is chosen, the system will record in both Mainstream and Substream. PreRecord: If this option is enabled, the DVR starts recording a few seconds before an alarm event occurs. -
Page 65: Record Schedule
Hybrid DVR User Manual 7.3 Record Schedule This menu is used to specify set when the DVR records video and defines the recording mode for each channel. The recording schedule is used set up a schedule like, daily and hourly by normal (continuous) recording, motion recording, I/O alarm recording and PIR recording (if supported by the DVR). -
Page 66: Capture
Hybrid DVR User Manual 7.4 Capture This menu allows configuring the image capture function. Enable Capture: Enable or disable automatic capturing on the channel. Stream Type: Select the image resolution by mainstream or substream. Normal Interval: Time interval to capture an image in normal recording. Alarm Interval: Time interval to capture an image when motion, IO alarm or PIR is triggered Manual Capture: Enable or disable manual capture in the channel 7.5 Capture Schedule... -
Page 67: Alarm
Hybrid DVR User Manual IO: When the time slot is marked red, this indicates the channel capture images only when the sensor is triggered during that time slot. PIR: When the time slot is marked purple, this indicates the channel capture images only when the PIR is triggered during that time slot. -
Page 68: Pir
Hybrid DVR User Manual FTP Upload: To upload alarm images to FTP server when I/O alarm is triggered. To enable FTP , refer to section 9.7 FTP . 8.3 PIR Refer to section 6.6 PIR. 8.4 PTZ Linkage If PTZ cameras are connected, the linkage between PTZ cameras and Motion Alarm and/or external I/O sensor alarm can be set using this option. -
Page 69: Exception
Hybrid DVR User Manual 8.5 Exception This menu is used to set the type of events that are required to be set in the DVR for alerts. Event Type: Select the event type from below options: - No Space on Disk: When an HDD is full. - Disk Error: If the HDD is not detected properly. -
Page 70: Network
Hybrid DVR User Manual 9 Network This menu is used to configure network parameters, such as PPPoE, DHCP , and 3G. The most common types are DHCP . Generally the network type is DHCP , unless the network is manually addressed. If an authentication is required using user name and password to the Internet, then PPPoE can be chosen. -
Page 71: Pppoe
Hybrid DVR User Manual Subnet Mask: Subnet mask is a network parameter which defines a range of IP addresses that can be used in a network. If IP address is like a street address then subnet mask is like a neighborhood. The subnet address also consists of four groups of numbers, separated by periods. -
Page 72: Port Configuration
Hybrid DVR User Manual 9.3 3G Prior to using the mobile network, a 3G dongle should be connected to the DVR. Enable the 3G option; enter the APN, Dial Code, User name and password according to the instruction of the 3G dongle devices. Prior to using the mobile network, a 3G dongle should be connected to the DVR 9.4 Port Configuration Web Port: This is the port that will be used to log in remotely to the DVR (e.g. -
Page 73: Ddns
Hybrid DVR User Manual RTSP Port: Default is5 54, if the default port 554 is already taken by other applications, this should be changed. UPNP: To log in to the DVR remotely using Web Client, complete the port forwarding. Enable this option if the router supports the UPnP, and this should be enabled both on the DVR and the router. -
Page 74: Email Configuration
Hybrid DVR User Manual 9.6.1 Email Configuration Email: Check to enable. Encryption: Enable if the email server requires the SSL or TLS verification. If not sure, set it to Auto. SMTP Port: Enter the SMTP port of the email server. SMTP Server: Enter the SMTP server address of the email. -
Page 75: Email Schedule
Hybrid DVR User Manual 9.6.2 Email Schedule To configure the schedule to fully implement the Email notification The color codes on email schedule have the following meanings: Green: Slot for Motion detection. Yellow: Slot for I/O Alarm (optional). Red: Slot for Exception (HDD full, HDD error, or Video Loss). Purple: Slot for PIR (optional). -
Page 76: Ftp
Hybrid DVR User Manual 9.7 FTP This menu is used to enable FTP function to view and load captured snapshots from DVR to the storage device over FTP . FTP Enable: Click to enable FTP function. Server IP: Enter the FTP server IP address or domain name. Port: Enter the FTP port for file exchanges. -
Page 77: Device
Hybrid DVR User Manual 10 Device This menu is used to configure the internal HDD and Cloud storage function. 10.1 Disk This menu is used to check and configure the internal HDD(s). The HDD should be formatted first at the first startup and when a new HDD is installed or replaced. -
Page 78: Disk Group
Hybrid DVR User Manual Disk Type: Read-write, read-only, and redundant. Read-write mode is the normal status for a HDD to save recording or search recording to play. To prevent important video data from being overwritten during cyclic recording, the HDD can be set as Read-only mode. -
Page 79: Cloud
Hybrid DVR User Manual Whole Evaluation not passed, continue to use the disk: If for some reason the hard drive has developed a fault (such as one or more bad sectors), the DVR can be instructed to continue saving to the drive. - Page 80 Hybrid DVR User Manual Before activating the cloud function, we recommend that Dropbox account is created using the same email address and password used for the DVR. Go to www.dropbox.com, input the name, email address and password, agree to the terms and conditions then click the sign up button. Cloud Storage: Check to enable the function.
-
Page 81: System
Hybrid DVR User Manual 11 System Change general system information such as date, time, region, passwords, permissions, and more. 11.1 General Device Name: Enter the DVR name. The name can include both letters and numbers. Device ID: Enter the desired ID for the DVR. The device ID is used to identify the DVR, and can only be composed of numbers. -
Page 82: Date And Time
Hybrid DVR User Manual 11.1.1 Date and Time Date and Time Date: Click the calendar icon to change the date. Time: Click the dialogue box to change the time. Date Format: Select the preferred date format. Time Format: Select the preferred time format. Time Zone: Select a time zone relevant to the region or city. -
Page 83: Ntp Settings
Hybrid DVR User Manual 11.1.2 NTP Settings The NTP (Network Time Protocol) function allows the DVR to automatically sync its clock with a time server. This gives it the ability to constantly have an accurate time setting (DVR will periodically sync automatically). -
Page 84: Output Configuration
Hybrid DVR User Manual 11.2 Output Configuration This menu is used to configure video output parameters. Video Output: To choose the output options: LIVE-OUT is used to configure the main output parameters. SPOT-OUT is used to configure the VGA spot output parameters. 11.2.1 LIVE-OUT Choose LIVE-OUT from the Video Output drop-down menu. -
Page 85: Multi-User
Hybrid DVR User Manual Scale: To adjust the size of the displayed screen by scale. X Offset: To move the displayed screen to left or right. Y Offset: To move the displayed screen to up or down. Click once or press the left mouse button on the arrow to adjust the size and position, or scroll the wheel of the mouse to adjust. -
Page 86: Add New Users
Hybrid DVR User Manual Password Enable: It is strongly recommended to enable the password to protect the privacy. If password protection needs to be disabled, ensure the DVR is placed in a secure place. 11.3.2 Add New Users Select one of the user accounts that is currently disabled, click the User Edit icon Select Enable from the drop-down next to User Enable. - Page 87 Hybrid DVR User Manual Click the edit icon under Permission tab. Check the boxes next to any system menus or capabilities for the specific user to access. Click All to check all boxes. Click Clear to check none of the boxes. Click Save to save the modifications.
-
Page 88: Maintenance
Hybrid DVR User Manual 11.4 Maintenance This menu is used to search and view the system log, load default settings, upgrade the system, export and import system parameters and manager system auto reboot. 11.4.1 Log The system lists important system events, such as motion alarms and system warnings. A backup file of the system for a set time period can be created and saved to a USB flash drive. -
Page 89: Load Default
Hybrid DVR User Manual 2. Click the field next to End Date and End Time to choose the end date and time for the search from the on-screen calendar. 3. Select the type of events to search for from the dropdown next to Log Type, or select All to see the entire system log for the selected time period. -
Page 90: Upgrade
Hybrid DVR User Manual 11.4.3 Upgrade 1. Copy the firmware file (.sw file) to the USB drive, and insert the USB flash drive into the DVR’s USB port. 2. Click Select File button to choose the firmware file in the USB flash drive, then Click OK. 3. -
Page 91: Ip Camera Maintain
Hybrid DVR User Manual Auto Reboot: Check to enable. Time: Set the DVR to reboot by day, week or month. 11.5 IP Camera Maintain This menu is used to upgrade the IP camera’s firmware and restore default settings of IP camera. TEC-VS-219-1905-V01... -
Page 92: Upgrade Ip Camera
Hybrid DVR User Manual 11.5.1 Upgrade IP Camera 1. Choose one of the IP cameras to upgrade firmware. 2. Click Select File select the update file from the USB flash drive, then click OK. 3. Click IPC Upgrade button to start upgrading. Enter Admin password to authenticate. Do NOT power off the DVR and IP camera or remove the USB during the firmware upgrade. -
Page 93: Information
Hybrid DVR User Manual 11.6.1 Information View system information such as device ID, device model name, IP address, MAC address, firmware version and more. If the DVR supports P2P function, the P2P ID and P2P QR code will be displayed in the information page. The QR code can be scanned with mobile app to remotely view the DVR. -
Page 94: Record Information
Hybrid DVR User Manual 11.6.3 Record Information information View recording for each connected camera such as bitrate, stream type, recording resolution and frame rate (FPS). 11.6.4 Network State View network information. Total Band Width: Shows the DVR’s total input bandwidth for IP cameras. Used Band Width: Shows the used bandwidth of all IP cameras. -
Page 95: Search, Playback And Backup
Hybrid DVR User Manual 12 Search, Playback and Backup The Search function is used to search and playback recorded videos as well as take snapshots of the video that is stored on the DVR’s hard drive. There is choice of playing video that matches the recording schedule, manual recordings or motion events only. - Page 96 Hybrid DVR User Manual Stop Fast Forward, x2, x4, x8 and x16 Digital Zoom: Click to zoom in then click-and-drag on a camera image during playback to zoom in on the selected area. Right-click to return to regular playback. Video Clip. Quickly save a section of video to a USB flash drive. Save Video Clip.
-
Page 97: Search And Play Video In General
Hybrid DVR User Manual 12.2 Search and Play Video in General This menu gives an option to search and play recording for a selected date. 1. Select a date to search for video recording from the calendar. 2. Choose a search type. 3. - Page 98 Hybrid DVR User Manual 6. Press and hold the mouse left button, and drag the cursor to the timeline to mark the end of the video clip. 7. The icon has been changed to icon, click to save the video clip. 8.
-
Page 99: Event Search, Playback And Backup
Hybrid DVR User Manual 12.4 Event Search, Playback and Backup Event search is used to view a list of video recordings with the channel, start and end time, and recording type conveniently summarized. It is also used to back up events to a USB flash drive. To search, playback and back up for events: 1. - Page 100 Hybrid DVR User Manual Detailed view: View the details of the events. In the detailed view mode, the video events can be locked to keep events from being overwritten in the hard drive. Click the icon to lock or click to unlock the events.
-
Page 101: Event Playback Control
Hybrid DVR User Manual 12.5 Event Playback Control 1. Event List, is used select the events. 2. Click icon to save the selected event videos to USB flash drive. Click icon to play video. 3. Control the playback with buttons on Video Playback Controls. Click icon or click the mouse right button to exit the playback and return to event search window. -
Page 102: Smart Search And Playback
Hybrid DVR User Manual To search and playback video in sub-periods: 1. Choose the date and time to search. 2. Choose the split-screens the videos to be played in. 3. Check the recording types to search, or check Search Type to choose all. 4. -
Page 103: Smart Search Area
Hybrid DVR User Manual To start a smart search and playback: 1. Choose the date and time to search. 2. Check the recording types to search, or check Search Type to choose all. 3. Choose the channel to search; the motion recording in the selected channel will be searched automatically. -
Page 104: Picture Search And View
Hybrid DVR User Manual Click and hold the edge of the controls bar to reposition it. Smart Controls Bar Click this to define a full screen detection area Click this to delete all areas created. Click this to search and play video based on the areas defined. Click this to return to the playback interface. - Page 105 Hybrid DVR User Manual To search, playback and backup pictures: 1. Choose the date and time to search. 2. Check the picture capture types to search, or check Search Type to choose all. 3. Choose the channels to search, or check Channe lto choose all channels. 4.
-
Page 106: Picture Preview Control
Hybrid DVR User Manual 1. Click the mouse left button on one of the pictures, system will show the picture information on the left bottom corner of the screen. 2. Check the box next the number of the event to select files, or check the box next Select to select all pictures in the page. -
Page 107: Remote Access Via Web Client
Hybrid DVR User Manual 13 Remote Access via Web Client Use the Web Client to remotely access the DVR at any time via a PC. Before accessing the Web Client, ensure that the internet settings of the DVR are configured properly. 13.1 Basic System Environment Requirements The minimum requirements for hardware and OS required to run Web Client are given as below. - Page 108 Hybrid DVR User Manual 3. After installing the plug-in, close and launch again the browser and repeat step 1 to open the login page. Input the user name and password to login the web client. Note: If Google Chrome is used, then use Version V41 or below. If version V42 to V44, then enable NPAPI plugins.
-
Page 109: Mac Safari Setup
Hybrid DVR User Manual 13.2.2 Mac Safari Setup 1. Launch the Safari in the Mac, and enter the DVR IP address or DDNS domain name (Host Name) that has been set on DVR in the URL box. 2. Download the plug-in "SurveillanceClient.dmg", locate the downloaded file and double click it. 3. -
Page 110: Web Client Manager
Hybrid DVR User Manual 4. Close Safari and open again to repeat step 1 to open the Web Client login page. 13.4 Web Client Manager The web client supports to fully control the DVR with administrator account. Make sure to protect the user name and password for preventing illegal login. - Page 111 Hybrid DVR User Manual Substream: View all live videos using middle-quality substream video settings. Mobile Stream: View all live video using lower-quality mobile stream video settings to conserve bandwidth. Available for IP channels only. 3. Main Menus: Live: View live video from cameras. Playback: View recorded video which is saved in DVR’s HDD.
-
Page 112: Playback
Hybrid DVR User Manual Open the images on Live window. Close all the Live channels Original Proportions: Shows live video at the original proportions Stretch: Stretch live video to fit the full area for each channel on screen. To enlarge the web client to full screen. Manual Recording: Click to start manually recording for all displayed channels. -
Page 113: Playback Control Buttons
Hybrid DVR User Manual 2. Select a day on the calendar to search for recordings from. Days with recordings appear with a red underline. 3. Select the recording type to search for from the dropdown next to Type, or select All to search for all recordings. -
Page 114: Remote Setting
Hybrid DVR User Manual Choose the files to download, press Start Download button to begin, the download status is displayed. Press Stop Download button to stop. Playback Speed. Click to choose the playing speed. Play All Channels: Click to play all channels that have been chosen to search. Available when the Synchronous playback option is not checked. -
Page 115: Local Setting
Hybrid DVR User Manual 13.4.5 Local Setting Set download locations for recordings and snapshots taken using Web Client, and choose file type for video files. Record Path: Click to browse for and select the folder where the manual video recordings are to be saved on the computer. -
Page 116: Viewing Backed Up Video On Pc And Mac
Hybrid DVR User Manual 14 Viewing Backed Up Video on PC and Mac This section shows how to play the backup files with the powerful video player which is attached in the For Mac users, install the app “VideoPlayer_x.x.xx_xxxx_xx_x.dmg”, for example: VideoPlayer_1.0.15_2017_01_6.dmg. - Page 117 Hybrid DVR User Manual Video Player Control 4. Play List Add files Remove files To choose play mode: play a single file and stop; play all listed files by sequence; repeat one file; repeat all files. Filter by file name Hide/Show Playlist Click to open files or load a folder.
- Page 118 Hybrid DVR User Manual Basic Settings: Set on-top mode Capture Settings: Set the format and the path to save snapshots. TEC-VS-219-1905-V01...
-
Page 119: Remote Access Via Mobile Devices
Hybrid DVR User Manual 15 Remote Access via Mobile Devices The DVR supports remote access via mobile devices of both Android and iOS operating system. 1. Search InfiViewCam from Google Play Store for android devices or App Store or iOS devices and install. - Page 120 Hybrid DVR User Manual 5. After all settings completed, touch Save to save, the app will turn to Live view display if the device is well connected. TEC-VS-219-1905-V01...
- Page 121 Hybrid DVR User Manual 6. Touch icon to open the Menu list, to check and configure the live view, playback, local recorded videos, captured pictures, push alarm notifications, device manager, local setting and help documents. TEC-VS-219-1905-V01...
-
Page 122: Appendix
Hybrid DVR User Manual 16 Appendix 16.1 Troubleshooting Q: What can I do if the system does not detect the HDD? A: Check if the power supply is properly connected and data cord and power cables are securely connected, and if something wrong with the HDD interface. Or check if the HDD is supported by referring to the specifications or descriptions. -
Page 123: Usage Maintenance
Hybrid DVR User Manual If many decoders are connected, the farthest side of AB line of PTZ decoder should be added 120Ω resistance to realize reflection suppression and impedance matching. Otherwise, PTZ control will be unstable. 12. Q: Why doesn’t dynamic detection work? A: Check if the motion detection time and motion detection regional setting are correct and if the sensitivity is set too low. -
Page 124: Accessories (For Reference Only)
Power Adapter Warranty Card USB mouse © 2019 Infinique. All rights reserved. This product or document is protected by copyright and distributed under licenses restricting its use, copying, distribution and recompilation. No part of this product or document may be reproduced in any form by any means without prior written authorization of Infinique Worldwide Inc and its licensors, if any. - Page 125 Premium Series Recorders CMS Manual Premium Series Recorders CMS User Manual Before attempting to connect or operate this product, read the instructions carefully and save this manual for future use. RoHS TEC-VS-219-1903-V02...
- Page 126 10 System Configuration ........................31 10.1 General ........................... 31 10.2 File ............................32 10.3 Alarm Sound ..........................32 10.4 E-Map ............................33 11 Local Playback ..........................35 11.1 Local Playback ........................35 12 Local Record Management ......................36 Infinique Premium Series Recorders CMS Manual...
- Page 127 Premium Series Recorders CMS Manual 12.1 Record Schedule ........................36 12.2 Record Setting ......................... 36 13 Alarm Configuration ........................37 13.1 Alarm Configuration ......................... 37 TEC-VS-219-1903-V02...
- Page 128 DDR3 8GB RAM or Higher Nvidia 4GB, DirectX 10.0 Compliant or Higher Windows 8, Windows 10, Mac 10.6 or Higher Recommend to use Gigabit NIC Minimum of 1GB space should be available excluding the space required for recording. Infinique Premium Series Recorders CMS Manual...
-
Page 129: Installation
Premium Series Recorders CMS Manual 1 Installation 1.1 CMS Software Installation Double click the installation file “Surveillance_client_1.0.23_2013_07_30” in the CD provided along with the NVR to install the software. The following window will be popped up. Click Next TEC-VS-219-1903-V02... - Page 130 The program‟s shortcut will be created in the following Start Menu folder as shown above. The default installation path is Dvrsoft\Surveillance_client. If you want to select a different folder, please click Browse… to customize. Confirm the installation path and then click Next. Click Next Click Install to start installation. Infinique Premium Series Recorders CMS Manual...
-
Page 131: Uninstall Cms
Premium Series Recorders CMS Manual Click Finish to exit Setup. 1.2 Uninstall CMS User can uninstall the software in Add and Remove Programs of the Control Panel. The steps listed below can also be followed to uninstall the CMS Software: Click Start button All programsDvrsoft\Surveillance_clientUninstall Surveillance_client, the following window will be popped up. -
Page 132: Operation
Run the configuration wizard to setup the NVRs and Cameras, in the Wizard window click Next to add devices. If the Wizard did not open automatically, it can be opened be manually opened by clicking Help Open Wizard in the CMS Software Window. Infinique Premium Series Recorders CMS Manual... - Page 133 Premium Series Recorders CMS Manual Click Add Online Device and the client software will scan all the Network Video Recorders in the LAN and display them in the Devices List. Note:If your NVR is not available in the list, click Exit and then click Add to manually input the IP address of NVR.
-
Page 134: Preview Screen And Control Panel
Click Import All to import all the NVRs to the default group. Click Import All Click Next and then click Finish to complete the wizard. 3 Preview Screen and Control Panel Double click Main View Click and drag default group into the grid. Infinique Premium Series Recorders CMS Manual... -
Page 135: Add A Dvr By Using Ddns
Premium Series Recorders CMS Manual 3.1 Add a DVR by using DDNS Select „Control Panel‟ option and click the Group Device Management. Click Group Device Management TEC-VS-219-1903-V02... - Page 136 Password:Input password. The password field is blank by default unless the password verification has been activated for the DVR. Click Add. Click Import All to import all DVRs to the default group. Click Control Panel Tab. Click Main View. Click Main View. Infinique Premium Series Recorders CMS Manual...
- Page 137 Premium Series Recorders CMS Manual Click and drag default group into the grid. Result TEC-VS-219-1903-V02...
-
Page 138: Control Panel
Local Log Search: Search log of the NVR. Account Management: Set up the account and password for the client software. File Management: View and manage the captured snapshots and recorded files. System Configuration: Configure Surveillance client. Infinique Premium Series Recorders CMS Manual... -
Page 139: Main View
Premium Series Recorders CMS Manual 3.3 Main View The Main View tab allows the users to watch the live videos. To access to Main View, enter Control Panel and click Main View ⑩ ① ⑨ ② ⑧ ③ ④ ⑤ ⑦... - Page 140 :Click to use PTZ control. Stop Video :Click to stop the current channel video. Digital Zoom :Click to use the digital zoom mode. Color setup :Open the color setup menu of the current camera. Infinique Premium Series Recorders CMS Manual...
-
Page 141: Use Multiple Windows Or Monitors
Premium Series Recorders CMS Manual Mute :Mute/unmute the current preview video. CPU status:Display CPU utilization. 3.4 Use Multiple Windows or Monitors The video surveillance client allows the users to create multiple windows. To open multiple windows:Click preview tab page and drag it out of the main window to create the 2 display window. -
Page 142: Ptz Camera Control
Note: Before remote control of PTZ, please make sure the relevant parameters of PTZ have been set in NVR. Refer to operation manual of NVR for the detailed setting of PTZ. In Main View, put cursor on PTZ camera and the toolbar will appear. Click to open PTZ control. Open PTZ control Infinique Premium Series Recorders CMS Manual... - Page 143 Premium Series Recorders CMS Manual PTZ Control Use cursor to control Adjust the zoom the position of camera Adjust the focus Adjust the aperture Adjust PTZ speed Start/Stop PTZ Cruise Configure/Call preset point Set PTZ position Call preset point Click to set Preset point Set preset point Delete preset point...
-
Page 144: Ptz Cruise
When PTZ cruise is enabled, PTZ will start cruising through the saved preset point. Click to start PTZ cruise and click to stop PTZ cruise. Click to enable cruise control Click to start cruising Click to stop cruising Infinique Premium Series Recorders CMS Manual... -
Page 145: Remote Playback
Premium Series Recorders CMS Manual 4 Remote Playback User can view the audios and videos recorded by the NVR in the computer through remote playback. Click remote control on the control panel. Select the video channel(s) for remote playback. Only 4 channels can be played back simultaneously Select playback in calendar. -
Page 146: Remote Playback Control
4.1 Remote Playback Control Select NVR/Camera Group Select Channel(s) Select File Type Enable Synchronous Playback Select Date Search Video Click to select playing time Download Zoom in/out Mute Screenshot Cut video Infinique Premium Series Recorders CMS Manual... -
Page 147: Download Video Files
Premium Series Recorders CMS Manual 4.2 Download Video Files The recorded video in the NVR can be remotely downloaded to the client PC. Hover the cursor on the video and click to open download menu. Click to open the download menu. Select a file and click Download. -
Page 148: Modify Nvr Information
You may remotely configure NVR parameters by the Surveillance Client. Click to set parameters. Click to configure the parameters of the NVR. 5.4 Create Group Click Add. Input a customized name and then click Yes to confirm. ClickQ Add Infinique Premium Series Recorders CMS Manual... -
Page 149: Modify Group
Premium Series Recorders CMS Manual Import DVR channel to group. Select NVR or camera to be imported in the left list to import them to the selected group. Import the selected camera Import all channels of NVR into group. 5.5 Modify Group Click on the Group name and then click Modify. -
Page 150: Local Log Search
Users can back up the log search result to an external device. To backup the log, Search log by following above steps. Click Backup Click Backup Select a folder and input a file name and then click Save. Infinique Premium Series Recorders CMS Manual... -
Page 151: Account Management
Premium Series Recorders CMS Manual To view a backed up log file, Click View Backup. Click to view Backup and open saved log files. Select log file and click Open. 7 Account Management The Surveillance Client software includes the following user types: Admin: The administrator has the privilege to operate client software and remotely configure NVR parameters. -
Page 152: Add User Account
Click Save to create user account. 7.3 Modify User Account Click the account to be modified and click Modify. Click Modify Click user Edit the settings and privileges of the user accounts and click Save. Infinique Premium Series Recorders CMS Manual... -
Page 153: Delete User
Premium Series Recorders CMS Manual 7.4 Delete User Click the user you want to delete and click Delete and then click Yes to confirm. Click Delete Click user Note: Only administrator can delete common user. 8 File Management The File Management Tab is used to view the backed up video and captured files. Click File Management on the Control Panel. -
Page 154: Video Player
9.2 Video Play Control Close Mute On/Off Play by frame Screenshot Play Stop Fast Forward Zoom in/out Pause Fast Backward Zoom in: Click and then click and drag on the picture, and click again to zoom in. Infinique Premium Series Recorders CMS Manual... -
Page 155: System Configuration
Premium Series Recorders CMS Manual 10 System Configuration System configuration is used for configuring the Surveillance_client. Click system configuration on the Control Panel. 10.1 General Configure general settings: Configuration: Language: Select a language. Log Keeping Time: One week/Half month/One month. Enable audio on multiple channels simultaneously: Check to enable multi-channel audio output and play multi-channel audio. -
Page 156: File
This menu allows the users to configure the alarm sound. Any file in the .WAV format can be use or this purpose. Play audio alarm Click to select a audio for alarm (wav file) Save Infinique Premium Series Recorders CMS Manual... -
Page 157: E-Map
Premium Series Recorders CMS Manual 10.4 E-Map To add an E-map, Click “Add-E-Map”. Add E-Map Modify E-Map Delete E-Map Map Name Add Path Click Yes to confirm To change the E-Map, click Modify. To delete the E-Map, Select the map to be deleted and then click Delete. TEC-VS-219-1903-V02... - Page 158 Return to map list preview Hot spot Forward Edit Map Preview Infinique Premium Series Recorders CMS Manual...
-
Page 159: Local Playback
Premium Series Recorders CMS Manual 11 Local Playback 11.1 Local Playback Select NVR/Camera Group Select Camera Playback Select File Type Enable Synchronous Playback Select Playing Date Search Video Move to Previous period the right Click to select playing time Amplify time Narrow time period Zoom in/out Mute... -
Page 160: Local Record Management
Select the days on which the recording has to be scheduled. You can select Everyday if you want continuous recording. Select record time (by time period) Click Save 12.2 Record Setting Loop recording Duration Record drive letter Save Channel selection Start record Stop record Infinique Premium Series Recorders CMS Manual... - Page 161 Premium Series Recorders CMS Manual Select record drive letter. Select loop recording and the duration if you want to overwrite automatically after the duration set has passed. Save drive letter. Select record channel. Start or stop recording. 13 Alarm Configuration The Local Config Management Tab allows the users to configure the alarm output.
- Page 162 Alarm Sound: Raise an alarm when motion is detected. The below picture shows the channel pop up whenever an event is triggered. Alarm trigger popup Alarm Information Infinique Premium Series Recorders CMS Manual...
- Page 163 Premium Series Recorders CMS Manual © 2019 Infinique. All rights reserved. This product or document is protected by copyright and distributed under licenses restricting its use, copying, distribution and recompilation. No part of this product or document may be reproduced in any form by any means without prior written authorization of Infinique Worldwide Inc and its licensors, if any.
Need help?
Do you have a question about the IHB703 Series and is the answer not in the manual?
Questions and answers