Advertisement
Quick Links
Advertisement

Summary of Contents for iSP Technologies BETA BASS DSP
-
Page 2: Important Saftey Instructions
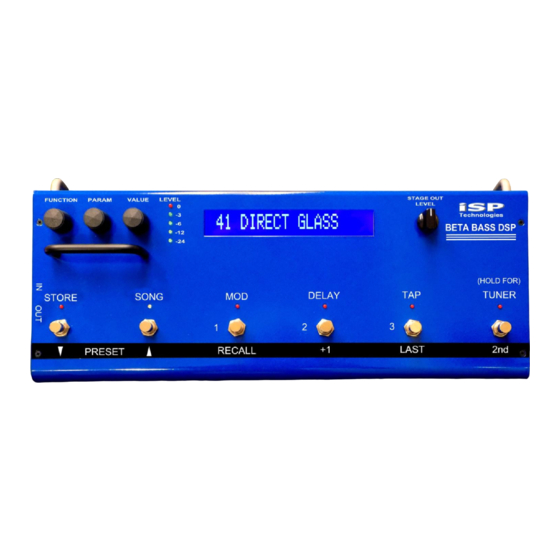
Do not attempt to connect this unit to any power source other than the one supplied with the BETA BASS DSP. The BETA BASS DSP will typically draw on the order of 1.5 amps of current from the AC power adaptor when in use. - Page 3 FIGURE 1 BETA DSP v1 Instruction Manual Quick Start Refer to Figure 1 for the hardware drawing which shows the locations of the switches, knobs, and jacks when reading the following, or even better, just look at your unit. 1. Connect the bass to the IN jack, connect the STAGE OUT jack(s) to a power amp such as the iSP Stealth which is connected to a speaker cabinet, OR connect the DIRECT OUT jacks to the input of a mixer, OR connect the PHONES jack to headphones or earbuds (or connect all...
- Page 4 2. Connect the supplied 9V AC power adaptor to wall power, then to the POWER input on the BETA DSP. The unit will power up and recall Preset 1. Pressing the RECALL 1 switch will display the Preset 1 title. 3.
- Page 5 those presets will display a FAIL message. Storing to presets 201-224 is always allowed. See the section on the Global Parameters for more information on how to turn off the Locks. 10. To copy a preset to a different location, first recall the preset. Then scroll to the desired new location by using the PRESET down or up switches, or the VALUE knob (if FUNCTION is set fully counterclockwise).
-
Page 6: Detailed Operation
DETAILED OPERATION: Refer to the figure above for the hardware drawings which show the locations of the switches, knobs, and jacks when reading the following. Refer to Figure 2 for the signal flow diagram which shows the flow of the signal through the unit from the input to the outputs. - Page 7 B) PREAMP Function 1. DISTORT MIX (0 to 100): Varies the relative amounts of clean and distorted signal. 0 means full clean signal, 100 means full distortion signal. 2. GAIN (1 to 60 dB): Dials up the gain before the clipper stage. Additionally, there is gain available in the Pre EQ (labeled DIST BASS, DIST MID, DIST TREBLE).
- Page 8 12. DIST MID (0.1 to 2.5 OCT): The approximate width in octaves of the midrange boost or cut. Beyond this width, the curve will slowly transition back to 0 if the bass and treble are set flat. 13. DIST TREBLE (-15 dB to +15 dB): The level of pre-clip treble EQ. 14.
- Page 9 Note that this eq section effect both the clean and distorted components. The fully parametric nature of these sections with adjustable frequencies and bandwidths give you the power to create nearly any tone you want. 2. BASS (-15 to +15 dB): The level of boost of the bass EQ. 3.
- Page 10 values of gain may make the residual noise more apparent, so you will want to set this to a higher value on those presets. E) INTELLIGENT SPEAKER(TM) Function 1. INTELLIGENT SPKR(TM) (OFF or ON): This turns on the speaker filter function. It achieves virtually identical sound to a microphone on a speaker cabinet, since it convolves the signal with actual samples of a microphone on a speaker cabinet! This function always affects the signal output on the Direct and Headphone...
- Page 11 expression pedal with a switch to the EXP. SWITCH jack on the rear panel with a mono (2 conductor) ¼” cable and press down on the expression pedal, just like on a separate wah-wah pedal. For this to work, the EXP SWITCH parameter within the EXP PDL function must be set to WAH.
- Page 12 H) TREMOLO Function A tremolo works by simple amplitude (volume) modulation of the signal. It has a MONO output. 1. TREMOLO (OFF or ON): Turns it off or on. The tremolo can also be turned on or off by pressing the switch sequence 2nd, then MOD, if the MOD SWITCH: function is set to TREMOLO.
- Page 13 one click clockwise, then using the PARAM knob to select the parameter to adjust. A chorus works by running the signal through a short delay of about 20 ms, and mixing the delayed signal with the original. The delay time is modulated according to the rate and depth, creating a small amount of pitch bend in the delayed signal.
- Page 14 to find 'best match' splice points to minimize their audibility. 1. PITCH (-1200 to +1200 CENTS): Varies the amount of pitch shift in 20 cent increments. -1200 cents is one octave down, +1200 cents is one octave up, and each 100 cents is one semitone. This parameter can mapped to the expression pedal for real-time foot controlled pitch bending, as in the "WHAM ME"...
-
Page 15: Delay Time
the MOD SWITCH: function is set to FLANGER and the flanger is on and delay is off, or the MOD switch is the last one used to turn on the effect. 5. FLA DEPTH 2 (0 to 100): As described for voice 1. 6. - Page 16 M) REVERB Function 1. REVERB (OFF or ON): Turns the reverb OFF or ON. Controlled by the VALUE knob only. Turning the Reverb OFF mutes only the input to the reverb, so the reverberated output ‘spills over’, even if set to OFF in the next preset. 2.
- Page 17 3. EXP MAX1 (various): Allows you to set the maximum range of the expression pedal sweep. The units that appear with this parameter will change to match the units of the parameter selected above in 1. 4. EXP PDL2 (OFF, WAH FREQ, GAIN, DIRECT PAN, TREBLE, TREBLE FREQ, TREM RATE, PHASER RATE, PHASER DEPTH, CRS RATE 1, CHORUS MIX, FLA RATE 1, PITCH, EF DIR): Allows you to map the EXP PEDAL input to the selected parameter.
- Page 18 selects the particular letter, number, or symbol. When you are finished editing the title, don’t forget to press 2 , then STORE to save it. Q) Dump/Load Function 1. DUMP PRESET (ALL, 1 to 224): Selects the preset to be dumped as a midi sysex message to the MIDI OUT jack.
- Page 19 R) Global Function This function is the last one reached via the FUNCTION knob when in Preset Mode. Even though it appears within every preset, there is only one set of these parameters, and they affect all presets equally. To store changes to these parameters, you must press 2 , then STORE within this function, before changing back to any other function.
- Page 20 7. G: DIRECT EQ (OFF or ON): This turns on a stereo 3-band EQ section on the DIRECT OUTs. Remember, this EQ curve will then be present on all presets, and is usefull for making basic corrections to speakers and rooms. 8.
- Page 21 24. G: P 1-100 LOCK (OFF or ON): Allows you to ‘lock’ the first block of 100 presets so that they cannot be stored to. You can still edit them, but any changes will be lost if another preset is recalled or if you power down.
-
Page 22: Song Mode
mode, in which case a program or bank change on any channel will be acted on. R) TUNER Function The TUNER Function is accessed at any time by pressing and holding the TUNER switch for a few seconds. This is the only way to access the Tuner, it cannot be reached via the FUNCTION knob. - Page 23 RECALL 1 switch to correspond to the first preset you would like to use within that song, assign RECALL 2 to correspond to the next preset you would like to use within that song, etc. It is not necessary to assign a preset to all 3 switches, but the default programming assigns presets 1 to 3 to switches 1 to 3 in all 124 songs, so if you accidently press RECALL 3 and you haven’t programmed it, you will jump to Preset 3.
- Page 24 recalled Song into the new location. The original contents of this location will be overwritten, so be carefull. To exit SONG MODE, press 2 , then SONG. The blue SONG led and red 2 led will turn off, and you will be back in preset mode, where you can edit presets if you wish.
- Page 25 17” W x 3.5” H x 7” D DIMENSIONS WEIGHT 5.5 lbs DIRECT OUTPUT CONNECTION Balanced XLR POWER 9VAC RMS / 1.5 AMPS NOTE:0dbu = .775 VRMS BETA BASS DSP™ is covered under US Patent 7,532,730 BETA BASS DSP™ and INTELLIGENT SPEAKER™ are trademarks of ISP Technologies...
-
Page 26: Warranty And Service
In the event that the unit needs to be repaired, please return the unit to ISP Technologies directly. Simply repack the unit, send a copy of the original receipt, a note stating the problem, your contact information and send it to: ISP Technologies, LLC 5479 Perry Drive Unit B Waterford, MI 48329 Attn: Repair Dept.
Need help?
Do you have a question about the BETA BASS DSP and is the answer not in the manual?
Questions and answers