
Related Manuals for Easy@Home MD 17922


Summary of Contents for Easy@Home MD 17922
- Page 1 User Manual Manual del usuario LAUNDRY 12 STITCH SEWING MACHINE MÁQUINA DE COSER DE 12 PUNTADAS English ..06 Español ..33 ID: #07177...
-
Page 2: Table Of Contents
Contents Overview ................3 Use ..................5 Package contents/device parts ..........6 General information ............7 Reading and storing the user manual ........7 Explanation of symbols ............7 Safety ...................8 Proper use ................. 8 Safety instructions ..............8 Checking the sewing machine and package contents..15 Operating instructions ............ -
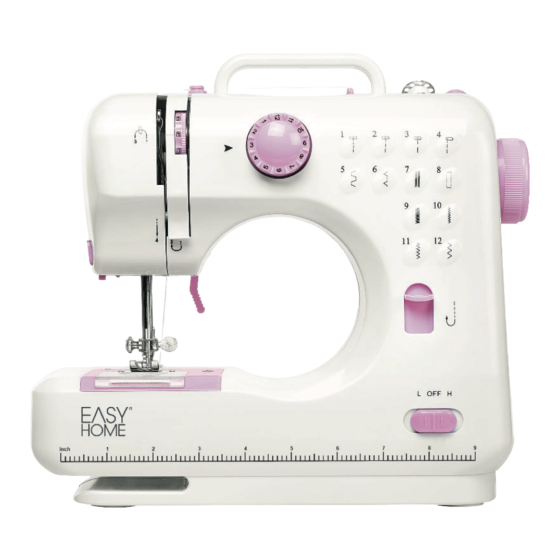
Page 6: Package Contents/Device Parts
Package contents⁄device parts Take up lever Presser foot lifter Pattern selection dial Presser foot locking lever Handwheel Presser foot Reverse stitch lever Power adapter input Drawer Foot pedal input Power OFF/speed switch Bobbin, 2× Bobbin compartment cover Needle threader Needle clamp screw Needle Light button Thread spool, 2×... -
Page 7: General Information
General information General information Reading and storing the user manual This user manual accompanies this 12 stitch sewing machine (hereafter referred to as the “sewing machine”), and contains important information on setup and use. Before using the sewing machine, read the user manual carefully. This particularly applies to the safety instructions. -
Page 8: Safety
Safety ETL Listed products are tested by Intertek and meets the minimum requirements of U.S. and/or Canadian electrical safety standards. It reflects a manufacturers dedication to the safety and quality of their products. The Federal Communications Commission (FCC) requires all commercial electronic devices to comply to this norm (see section ‘Declaration of conformity’). - Page 9 Safety 3. Never operate this appliance if it has a damaged cord or plug, if it is not working properly, if it has been dropped or damaged, or dropped into water. Return the appliance to the nearest authorized dealer or service center for examination, repair, electrical or mechanical adjustment.
- Page 10 Safety electrical and mechanical parts which are essential for providing protection against sources of danger. − Do not use the sewing machine with an external timer or separate remote control system. − Do not immerse the sewing machine, power adapter, power cord, or the foot pedal in water or other liquids.
- Page 11 Safety WARNING! Risk of injury! Improper use of the sewing machine can cause serious injury. − Never operate the sewing machine with any air openings blocked. Keep ventilation openings of the sewing machine and foot pedal free from the accumulation of lint, dust, and loose cloth.
- Page 12 Safety as persons with impaired physical, sensory or mental capacities, or those lacking experience and knowledge. Children may not play with the sewing machine. Cleaning and user maintenance must not be performed by unsupervised children. − Keep children under the age of eight away from the sewing machine and power cord.
- Page 13 Safety WARNING! Risk of injury! If children swallow batteries, the batteries can leak and result in poisoning and death. Touching damaged batteries may result in injury. − Store both new and used batteries so that they are out of the reach of children. −...
- Page 14 Safety − Ensure that the power cord does not come into contact with hot surfaces. − Never expose the sewing machine to high temperatures (heaters etc.) or to the effects of the weather (rain etc.). − Never attempt to clean the sewing machine by immersing it in water and do not use a steam cleaner to clean it.
-
Page 15: Checking The Sewing Machine And Package Contents
Checking the sewing machine and package contents Checking the sewing machine and package contents NOTICE! Risk of damage! If you are not cautious when opening the packaging with a sharp knife or other pointed object, you may quickly damage the sewing machine. −... -
Page 16: Installing/Replacing A Needle
Operating instructions 3. Plug the power adapter into an easily accessible outlet. 4. Connect the foot pedal to the sewing machine by inserting the jack of the foot pedal into the foot pedal input on the back of the sewing machine. -
Page 17: Winding A Bobbin
Operating instructions Winding a bobbin • Always use a metal bobbin, otherwise the magnetized bob- bin case will not be able to function properly, resulting in a lack of tension on the bobbin thread. • Bobbins and thread spools may be stored in the small drawer on the side of the machine (see Fig. -
Page 18: Threading The Sewing Machine
Operating instructions 6. Press the foot pedal (or set the power OFF/speed switch to “L” if you're using batteries) to start winding. 7. Stop winding after the desired amount of thread is wound onto the bobbin. 8. Push the bobbin winder pin and bobbin back to the right. 9. - Page 19 Operating instructions 5. Bring the thread down through the tension disk slot, go around the U-turn, and bring it back up. 6. Pass the thread through the eye of the take up lever from right to left. 7. Bring the thread back down and thread the guide, from top to bottom, on the needle clamp.
-
Page 20: Using The Needle Threader
Operating instructions Using the needle threader 1. Gently push the wire loop of the needle threader through the eye of the needle, from back to front. 2. Pass about 4 inches of thread through the wire loop of the needle threader. 3. - Page 21 Operating instructions 4. Remove the old bobbin and put a filled bobbin into the bobbin compartment. 5. Pull out about 4 inches of thread from the new bobbin, making sure that the bobbin turns clockwise, or you will not have the correct tension when you begin to sew.
-
Page 22: Sewing
Sewing Sewing NOTICE! Risk of damage! Improper handling of the sewing machine may result in damage to the sewing machine. − Never adjust the pattern selection dial while the sewing machine is running. − Always remove all batteries before using the sewing machine with the power adapter. -
Page 23: Selecting/Changing A Stitch Pattern
Sewing 4. Cut the threads using the thread cutter on the side of the sewing machine (see Fig. H). Selecting/changing a stitch pattern Your sewing machine has 12 different stitch patterns. To select a stitch pattern, proceed as follows: 1. Turn the handwheel counterclockwise, until the needle is in its highest position. -
Page 24: Sewing Sleeves And Cuffs
Sewing If the upper thread looks like a straight line, it indicates that the upper thread is too tight. − Turn the thread tension dial to a lower number to decrease the tension until the stitching is balanced. Sewing sleeves and cuffs Hard-to-reach areas such as sleeve cuffs or pant legs can also be sewn with this sewing machine. - Page 25 Sewing 4. Turn the pattern selection dial stitch pattern #8 and sew 5-6 stitches. 5. Turn the handwheel counterclockwise, until the needle is in its highest position. 6. Turn the pattern selection dial to stitch pattern #7, and sew the desired buttonhole length.
-
Page 26: Reverse Stitch Lever
Replacing the presser foot Reverse stitch lever When reverse stitching, turn the thread tension dial to “9” to increase the tension on the upper thread. Turn the thread tension dial back to the preselected setting when you have finished reverse stitching. Reverse sewing (back stitching) is useful for reinforcing the beginning and end of seams. -
Page 27: Removing The Presser Foot Locking Lever
Removing the presser foot locking lever 4. Lift up the presser foot lifter and lift up the presser foot locking lever The presser foot will automatically drop off from the locking device. 5. Put a new presser foot under the presser foot locking device. 6. -
Page 28: Cleaning
Cleaning Cleaning WARNING! Risk of injury! Improper use of the sewing machine can cause serious injury. − Always unplug the sewing machine from the electrical outlet and remove any batteries before cleaning the sewing machine. NOTICE! Risk of short circuit! Water or other liquids that have penetrated the housing may cause a short circuit. -
Page 29: Storage
Storage Storage All parts must be completely dry before being stored. − Always store the sewing machine in a dry area. − Protect the sewing machine from direct sunlight. − Store the sewing machine so that it is not accessible to children, securely locked away and at a storage temperature between 41 °F and 68 °F (+5 °C and +20 °C - room temperature). -
Page 30: Technical Specifications
Needle breaks Needle bent or deformed Insert a new needle Technical specifications Sewing machine Model: MD 17922 Battery output: , 1,200 mA Motor power: approx. 7.2 W max. Lamp power: approx. 0.06 W Sewing speed: approx. -
Page 31: Fcc Compliance Statement
FCC Compliance Statement FCC Compliance Statement WARNING! Changes or modifications to this unit not expressly approved by the party responsible for compliance could void the user’s authority to operate the equipment. NOTE! This equipment has been tested and found to comply with the limits for a Class B digital device, pursuant to Part 15 of FCC Rules. -
Page 32: Disposal
Disposal Disposing of the packaging − Sort the packaging before you dispose of it. Dispose of paperboard and cardboard with the recycled paper service and wrappings with the appropriate collection service. Disposing of the sewing machine − Should the sewing machine no longer be capable of being used at some point in time, dispose of it in accordance with the regulations in force in your city or state. - Page 33 Contenido Contenido Vista de conjunto .................. 3 Uso ......................5 Contenido del paquete/piezas del dispositivo........34 Información general ................35 Lectura y almacenamiento del manual del usuario ......35 Explicación de los símbolos ...............35 Seguridad ....................36 Uso adecuado ....................36 Instrucciones de seguridad ..............36 Verifi...
-
Page 34: Contenido Del Paquete/Piezas Del Dispositivo
Contenido del paquete/piezas del dispositivo Contenido del paquete/piezas del dispositivo Palanca de elevación del Palanca tirahilo prensatelas Palanca de bloqueo del Selector de diseño de puntadas prensatelas Rueda manual Prensatelas Entrada del adaptador de Palanca de puntada en retroceso alimentación Cajón Entrada del pedal Interruptor de Apagar/Velocidad... -
Page 35: Información General
Información general Información general Lectura y almacenamiento del manual del usuario Este manual de usuario acompaña a esta máquina de coser de 12 puntadas (en lo sucesivo denominada "máquina de coser ") y contiene información importante sobre la configuración y el uso. Antes de usar la máquina de coser, lea atentamente el manual del usuario. -
Page 36: Seguridad
Seguridad Los productos ETL Listed fueron examinados por Intertek y cumplen los requisitos mínimos de las normas de seguridad eléctrica de EEUU y/o Canadá. Ello refleja compromiso de los productores con la seguridad y la calidad de sus productos. La Comisión Federal de Comunicaciones (FCC) de los Estados Unidos exige que todos los dispositivos electrónicos comerciales sean conformes a esta norma (ver la sección “Declaración de cumplimiento”). - Page 37 Seguridad 1. No permita que la máquina de coser se use como un juguete. Se necesita mucha atención cuando este aparato es utilizado por niños o cerca de ellos. 2. Use este aparato sólo para los fines descritos en este manual. Utilice únicamente los accesorios recomendados por el fabricante que se incluyen en este manual.
- Page 38 Seguridad − No abra la carcasa; solicite la reparación a un profesional calificado. Póngase en contacto con un centro de reparación calificado para esto. Los reclamos por responsabilidad y garantía se renuncian en el caso de reparaciones realizadas por el usuario, conexiones incorrectas o una operación incorrecta.
- Page 39 Seguridad − Nunca trate de recuperar un dispositivo eléctrico si se ha caído al agua. En ese caso, desconecte de inmediato el enchufe de alimentación. − No use la máquina de coser en superficies blandas, como una cama o un sofá. −...
- Page 40 Seguridad ¡ADVERTENCIA! Este producto es peligroso para los niños y las personas con capacidades físicas, sensoriales o mentales limitadas (por ejemplo, personas con discapacidad parcial, personas mayores con capacidades físicas y mentales reducidas) o carentes de experiencia y conocimiento (por ejemplo, niños de más edad).
- Page 41 Seguridad − Siempre cambie el juego completo de baterías. Nunca mezcle baterías viejas y nuevas o baterías con diferentes cargas. − Cuando inserte las baterías, asegúrese de que la polaridad sea correcta (positivo [+] y negativo [-]). − Nunca exponga las baterías a un calor excesivo, por ejemplo, a la luz solar directa o al fuego.
- Page 42 Seguridad ¡AVISO! ¡Riesgo de daños! El manejo inadecuado de la máquina de coser puede dañar la máquina de coser. − Coloque la máquina de coser en una superficie de trabajo de fácil acceso, nivelada, seca, resistente al calor y suficientemente estable. No coloque la máquina de coser en el borde de una superficie de trabajo.
-
Page 43: Verifi Car La Máquina De Coser Y El Contenido Del Paquete
Verificar la máquina de coser y el contenido del paquete Verificar la máquina de coser y el contenido del paquete ¡AVISO! ¡Riesgo de daños! Si no tiene cuidado al abrir el empaque con un cuchillo afilado u otro objeto puntiagudo, puede dañar rápidamente la máquina de coser. -
Page 44: Instalación/Reemplazo De La Aguja
Instrucciones de funcionamiento 2. Inserte el enchufe del adaptador de alimentación en la entrada del adaptador de alimentación en la parte posterior de la máquina de coser (vea la figura E). 3. Enchufe el adaptador de alimentación a un tomacorriente de fácil acceso. 4. -
Page 45: Para Enrollar Una Bobina
Instrucciones de funcionamiento 3. Inserte una nueva aguja en la abrazadera con el lado plano de la aguja hacia la parte trasera de la máquina de coser. Asegúrese de empujar la aguja completamente en la abrazadera antes de apretar el tornillo de sujeción de la aguja. -
Page 46: Para Enhebrar La Máquina De Coser
Instrucciones de funcionamiento 4. Guíe el hilo hasta el disco guía del hilo y deslícelo para asegurarlo debajo del disco, yendo en sentido contrario a las agujas del reloj. 5. Enrolle el extremo del hilo en sentido de las agujas del reloj alrededor de la bobina varias veces. - Page 47 Instrucciones de funcionamiento 3. Coloque un carrete de hilo en el portacarrete asegurándose de que el hilo salga del carrete en sentido contrario a las agujas del reloj. Cuando sea necesario, utilice la base del portacarrete de hilo y/o el tope del carrete de hilo 4.
-
Page 48: Uso Del Enhebrador De Aguja
Instrucciones de funcionamiento 7. Baje el hilo y enhebre la guía, de arriba hacia abajo, en la abrazadera de la aguja. 8. Enhebre la aguja de adelante hacia atrás, asegurándose de que el hilo esté en la parte posterior de la aguja y en la parte superior del prensatelas. -
Page 49: Para Enhebrar Una Bobina
Instrucciones de funcionamiento Para enhebrar una bobina Utilice siempre una bobina de metal; de lo contrario, la caja de la bobina magnetizada no podrá funcionar correctamente, lo que provocará una falta de tensión en el hilo de la bobina. 1. Gire la rueda manual hacia la izquierda hasta que la aguja esté... - Page 50 Instrucciones de funcionamiento 6. Sujete el hilo de la aguja holgadamente con la mano izquierda y gire la rueda manual en sentido contrario a las agujas del reloj hacia usted, primero bajando la aguja, y continúe girando la rueda manual hasta que la aguja llegue a su posición más alta.
-
Page 51: Para Coser
Para coser Para coser ¡AVISO! ¡Riesgo de daños! El manejo inadecuado de la máquina de coser puede dañarla. − Nunca ajuste el selector de diseños de puntadas mientras la máquina de coser está en funcionamiento. − Siempre quite todas las baterías antes de usar la máquina de coser con el adaptador de alimentación. -
Page 52: Seleccionar/Cambiar Un Patrón De Puntada
Para coser 3. Mueva la palanca del prensatelas hacia arriba para levantar el prensatelas y retire suavemente la tela de la máquina. 4. Corte los hilos usando el cortador de hilo en el costado de la máquina de coser (vea la figura H). Seleccionar/cambiar un patrón de puntada Su máquina de coser tiene 12 patrones de puntadas diferentes. -
Page 53: Para Coser Mangas Y Puños
Para coser Si el hilo de abajo parece una línea recta, esto indica que el hilo de arriba está demasiado flojo. − Gire el selector de tensión del hilo a un número más alto para aumentar la tensión hasta que la puntada esté... -
Page 54: Para Hacer Un Ojal
Para coser Para hacer un ojal 1. Gire la rueda manual en sentido contrario a las agujas del reloj, hasta que la aguja esté en su posición más alta. 2. Alce la palanca de elevación del prensatelas para levantar el prensatelas 3. -
Page 55: Palanca De Puntada En Retroceso
Para coser 8. Gire el selector de diseños de puntadas para el patrón #8, y haga de 5 a 6 puntadas. 9. Gire la rueda manual en sentido contrario a las agujas del reloj, hasta que la aguja esté en su posición más alta. -
Page 56: Reemplazo Del Prensatelas
Reemplazo del prensatelas Reemplazo del prensatelas ¡PRECAUCIÓN! ¡Peligro de lesiones! El manejo inadecuado de la máquina de coser puede provocar lesiones. − Siempre desenchufe la máquina de coser, desconecte el pedal, retire las baterías y asegúrese de que el interruptor de Apagar/Velocidad esté... -
Page 57: Extracción De La Palanca De Bloqueo Del Prensatelas
Extracción de la palanca de bloqueo del prensatelas 6. Baje la palanca de elevación del prensatelas y levante la palanca de bloqueo del prensatelas para volver a conectar el prensatelas. Extracción de la palanca de bloqueo del prensatelas No es necesario quitar la palanca de bloqueo del prensatelas a menos que desee zurcir o bordar, o dejar espacio para limpiar el alimentador de tela. -
Page 58: Limpieza
Limpieza Limpieza ¡ADVERTENCIA! ¡Riesgo de lesión! El uso incorrecto de la máquina de coser puede causar lesiones graves. − Siempre desenchufe la máquina de coser del tomacorriente y quite las baterías antes de limpiar la máquina de coser. ¡AVISO! ¡Riesgo de cortocircuito! El agua u otros líquidos que hayan penetrado en la carcasa pueden provocar un cortocircuito. -
Page 59: Almacenamiento
Almacenamiento Almacenamiento Todas las partes deben estar completamente secas antes de ser almacenadas. − Guarde siempre la máquina de coser en un área seca. − Protege la máquina de coser de la luz solar directa. − Guarde la máquina de coser de modo que no sea accesible para los niños, que esté... -
Page 60: Especifi Caciones Técnicas
Aguja doblada o Insertar una nueva deformada aguja Especificaciones técnicas Máquina de coser Modelo: MD 17922 Salida de la batería: , 1,200 mA Potencia del motor: aprox. 7.2 W máx. Potencia de la lámpara: aprox. 0.06 W Velocidad de costura: aprox. -
Page 61: Declaración De La Fcc
Declaración de la FCC Declaración de la FCC ¡ADVERTENCIA! Los cambios o modificaciones a esta unidad no aprobados expresamente por la parte responsable del cumplimiento podrían anular la autoridad del usuario para operar el equipo. ¡AVISO! Este producto ha sido probado y se ha determinado que cumple con los límites para un dispositivo digital de Clase B, en los términos de la Parte 15 de las reglas de la FCC. -
Page 62: Eliminación
Eliminación Eliminación Eliminación del embalaje − Clasifi que el embalaje antes de que se deshaga de él. Deshágase de los papeles y cartones con el servicio de reciclado de papel y los envoltorios con el servicio de recolección adecuado. Para desechar la máquina de coser −... - Page 63 DISTRIBUTED BY • DISTRIBUIDO POR: ALDI INC., BATAVIA, IL 60510 WWW.ALDI.US AFTER SALES SUPPORT • SERVICIO POSVENTA 57969 1-866-633-4660 us.info@medion.com YEAR WARRANTY MODEL/MODELO: AÑOS DE GARANTÍA MD 17922 02/2019...
Need help?
Do you have a question about the MD 17922 and is the answer not in the manual?
Questions and answers
MD15694 INSTRUCTION MANUAL LOST. CANNOT IDENTIFY WARNING SIGN - 6L with a B above on buttonhole program 98