Table of Contents
Advertisement
Advertisement
Table of Contents

Summary of Contents for Knox MedVault 2.5 Mini
- Page 1 MedVault ® Retrofit Kit PCBA Installation Guide Warning Treat this manual as a confidential document. Limit access to authorized personnel. 1601 W. Deer Valley Road, Phoenix, AZ 85027 Phone: 800-552-5669 ● Fax: 623-687-2299 www.knoxbox.com OPE-MVUSER-0473-C...
- Page 2 Contacting the Knox Company, Limited Warranty and Order Terms and Conditions You can access the Knox Company web site at http://knoxbox.com. From this web site, you can obtain general information about the company, customer support, products and career opportunities. You can also register and log into the system to obtain software updates and new manuals.
-
Page 3: Table Of Contents
Contents MedVault 2.5 Board Installation Instructions ............3 The Knox MedVault 2.5 circuit board includes the following updates: ....3 The tools and materials needed for the installation includes the following items: ........................... 3 MedVault Retrofit Kit 91158 and 91160 Include the following: ......4 Safety precautions: ..................... - Page 4 Step #23 Optional Step to Attach antenna to convert Wi-Fi Ready to Wi-Fi Standard………………………………………………………………………………………………….. 15 Contact Technical Support ..................16 The Knox Company ▪ MedVault ▪ 2 ® OPE-MVUSER-0473-C...
-
Page 5: Medvault 2.5 Board Installation Instructions
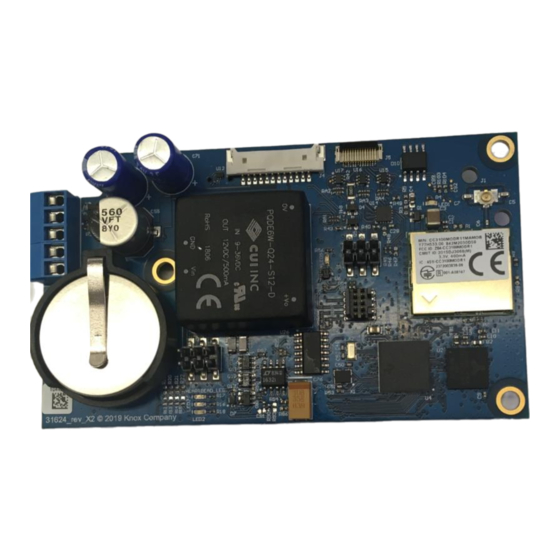
The following document shows the steps to remove the MedVault 2.0 board and replace with the new 2.5 MedVault Board. Removing the MedVault 2.0 board and installing the new Knox MedVault 2.5 circuit board is a simple process that should take approximately ten minutes to complete. The MedVault 2.5 Circuit board will be required for using KnoxConnect cloud-... -
Page 6: Medvault Retrofit Kit 91158 And 91160 Include The Following
Safety precautions: Always disconnect power to the MedVault when removing and installing circuit boards. Knox also strongly recommends the installer wear safety glasses. Always use a grounding strap (included in kit) while installing the circuit board. How to use grounding straps... - Page 7 Important: It is important to track the serial number with the correct circuit board, as the circuit board has been pre-programmed to match the unit serial number on the label. Picture of the label is below. The Knox Company ▪ MedVault ▪ 5 ® OPE-MVUSER-0473-C...
-
Page 8: Circuit Board Removal
Screw for tech key cover Screw for back panel Step #3 Remove the tech key cover • Remove the 2 screws that secure the tech key cover. Screw for tech key cover The Knox Company ▪ MedVault ▪ 6 ® OPE-MVUSER-0473-C... -
Page 9: Step #4 Unlock Back Cover
Step #4 Unlock back cover • Use your Knox Tech Key to unlock the back cover. Step #5 Remove the back plate • Remove the 9 screws from the back plate by using a #2 screwdriver Step #6 Unplug power to board and remove Wi-Fi board •... -
Page 10: Step # 7 Disconnect Lead Wires
Remove the Kapton tape from the keypad display connection and the IO connector • Disconnect keypad display connection, IO connector, and reset switch connection Kapton tape Kapton tape on Keyboard connector The Knox Company ▪ MedVault ▪ 8 ® OPE-MVUSER-0473-C... -
Page 11: Step #9 Remove Screws From Circuit Board
Make sure to save the screws for installation of circuit board Screws Step #10 Unplug wiring on top of board • Remove the ethernet connection from the board • Now the old circuit board can be removed from the MedVault The Knox Company ▪ MedVault ▪ 9 ® OPE-MVUSER-0473-C... -
Page 12: Step #11 Snip The Cable Tie
Once the board is removed, snip the cable tie eyelet or standoff holding the wiring bundle. Be sure to use a fine point wire cutter so that no wires are cut. Snip and remove cable tie eyelet The Knox Company ▪ MedVault ▪ 10 ® OPE-MVUSER-0473-C... -
Page 13: Installing Circuit Board
Insert the blue cable firmly • Next, gently push down on the black tab to secure the keypad display connector Ethernet Keypad display IO Connector connection Keyboard display connection in open position The Knox Company ▪ MedVault ▪ 11 ® OPE-MVUSER-0473-C... -
Page 14: Step #13 Add Kapton Tape To Connectors
For the third location near the terminal block, use the screw that is included in the retrofit kit. This screw is a different length Screw from old circuit board Screw from Retrofit Kit The Knox Company ▪ MedVault ▪ 12 ® OPE-MVUSER-0473-C... -
Page 15: Step #15 Connect Wires To Terminal Block
Secure the white reset switch wire by using a cable tie. The reset switch will not be needed with the new Circuit board. To reset the MedVault 2.5, press the “#” key for 5 seconds. Cable Tie on reset switch The Knox Company ▪ MedVault ▪ 13 ® OPE-MVUSER-0473-C... -
Page 16: Step #17 Move Antenna Cable Fasten Back Plate
Step #21 Initial Set Up • Now you are ready to power up the MedVault and set up KnoxConnect. • Please refer to the Knox Networking guide KnoxConnect guide for setting up your MedVault. The Knox Company ▪ MedVault ▪ 14 ®... -
Page 17: Step #22 Attach Serial Number Label
Antennas are not included in the retrofit kit and must be purchased separately. • Locate antenna connection on MedVault • Tighten antenna connection Antenna connection The Knox Company ▪ MedVault ▪ 15 ® OPE-MVUSER-0473-C... - Page 18 Contact Technical Support For Additional assistance, contact Technical Support at 800.552.5669 or techsupport@Knoxbox.com The Knox Company ▪ MedVault ▪ 16 ® OPE-MVUSER-0473-C...
Need help?
Do you have a question about the MedVault 2.5 Mini and is the answer not in the manual?
Questions and answers