Table of Contents
Advertisement
Advertisement
Table of Contents

Summary of Contents for ELDAN MPR200T
- Page 1 ELDAN MULTI PURPOSE RASPER MPR200T Serial number: 34222 Delivery date: Customer:...
- Page 2 Manual for ELDAN MULTI PURPOSE RASPER MPR200T...
-
Page 3: Table Of Contents
SAFETY EQUIPMENT..............11 Introduction ....................12 Main switch ....................12 Emergency stops..................12 Safety switch ....................12 Service switch .....................13 Fire equipment for MPR200T ..............14 Fire Hazard....................15 INSTALLATION ................16 Introduction ....................17 Lifting points ....................17 Gravity and weight statement..............18 Recommended floor fixing methods ............18 Dimensions of clearance needed for service and maintenance ....19... - Page 4 Maintenance directions ................56 Lubrication scheme summary ..............58 Adjustment of clutch ..................60 Adjustment of belt drive................62 Grinding of knives..................63 SPARE PARTS................66 Introduction ....................67 Spare parts philosophy................67 Spare parts stock level recommendations...........67 DISPOSAL OF THE MPR200T ............ 69 ELDAN Recycling A/S Page 2...
-
Page 5: Introduction
INTRODUCTION Congratulations on your purchase of an ELDAN machine. Like many cus- tomers who have gone before you, you hav e just entered into what we hope will be a long and beneficial partnership with us. To ensure that you get the very best from your machine, we give you this manual, which forms an indispensable part of your operation. -
Page 6: Safety Instructions
Never try to remove jammed material or foreign bodies in the rotor house, etc. until it has been checked that the machine is fully iso- lated electrically. This means turn off and lock all main switches be- fore working on the machine. ELDAN Recycling A/S Page 4... - Page 7 It is dangerous to climb the machine. Always use a platform or a step- ladder where service from the ground is not possible. Dust masks are necessary when cleaning the machine. ELDAN Recycling A/S Page 5...
- Page 8 Oil leaks from hydraulic tubes or pipes may come with such force that the oil may penetrate the skin. In such cases a doctor's help should be sought immediately in order to prevent severe infections. ELDAN Recycling A/S Page 6...
-
Page 9: Machine Information
MACHINE INFORMATION Equipment description of MPR200T..............8 Input definition: ....................8 Technical Specifications for MPR200T............9 ELDAN Recycling A/S Page 7... -
Page 10: Equipment Description Of Mpr200T
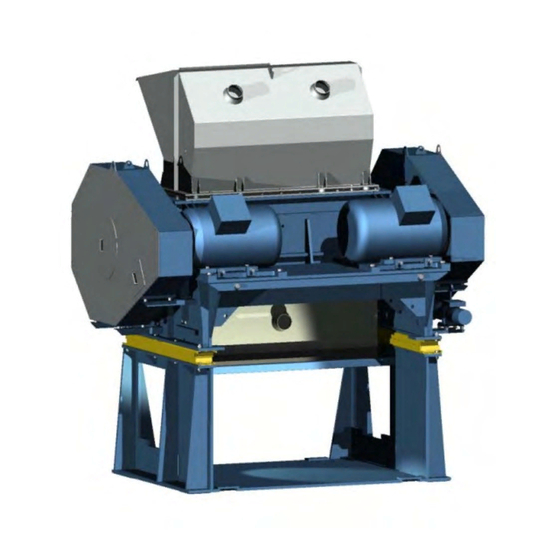
Input definition: The MPR200T has been designed to process whole steel radial car tyres up to a size of max tyre height of 250 and max. tyre diameter of 800 mm or pre-shredded car, light truck and truck tyres with a max. chunk size of 300 mm. -
Page 11: Technical Specifications For Mpr200T
Weight of inlet hopper:- 2300 kg Weight of flywheel cover:- 500 kg/each Motor for hopper lift:- P = 0,75 kW Total width:- 3850 mm Total height:- 4600 mm Total length:- 3000 mm Inlet height:- 4300 mm ELDAN Recycling A/S Page 9... - Page 12 Figure 1 ELDAN Recycling A/S Page 10...
-
Page 13: Safety Equipment
SAFETY EQUIPMENT Introduction ....................12 Main switch ....................12 Emergency stops..................12 Safety switch ....................12 Service switch .....................13 Fire equipment for MPR200T ..............14 Fire Hazard....................15 ELDAN Recycling A/S Page 11... -
Page 14: Introduction
Introduction In this section the safety equipment for the MPR200T will be described. It is important that the instructions ar e followed very carefully to avoid dam- age to the operator and the machine. Main switch The machine is equipped with a main swit ch, which can be locked. The main switch disconnects all voltage to the machine and it is placed on the electrical cabinet. -
Page 15: Service Switch
At the same time the main switch must be disconnected and locked. Note: After the machine has been stopped a fixed period of time will have to pass, before the switches can be released. ELDAN Recycling A/S Page 13... -
Page 16: Fire Equipment For Mpr200T
When processing tyre material in t he MPR200T quite an amount of rubber and textile dust is liberated and this is quite inflammable. During operation sparks are produced in the rotor housing. Therefore a water spraying system is required to moisten t he dusty air in the rotor housing thus reducing the risk of the sparks from setting fire to the dust. -
Page 17: Fire Hazard
that you have involved the advisor y support of the Fire-department in this process. Eldan Recycling A/S rejects any responsib ility for fires, which occur in con- nection with the process. ELDAN Recycling A/S Page 15... -
Page 18: Installation
Introduction ....................17 Lifting points ....................17 Gravity and weight statement..............18 Recommended floor fixing methods ............18 Dimensions of clearance needed for service and maintenance ....19 Power and service details and requirements..........19 Test before starting ..................19 Foundations ....................19 ELDAN Recycling A/S Page 16... -
Page 19: Introduction
Other machine parts are lifted by forkli ft/strap. The strap is placed suitable regarding the centre of gravity. If you are in any doubt regarding safe li fting, seek advice from a specialist lifting company. ELDAN Recycling A/S Page 17... -
Page 20: Gravity And Weight Statement
When final placing of the machine is known the machine is fastened to the floor by means of the enclo sed clamps and expansion bolts, Figure 4 - Pos. 1. Figure 4 ELDAN Recycling A/S Page 18... -
Page 21: Dimensions Of Clearance Needed For Service And Maintenance
Under the machine a certain depth of re inforced concrete is necessary to avoid vibration damages etc. Under this machine it is necessary to cast a foundation of reinforced con- crete in depth of 400 mm. The foundat ion needs a supporting surface of compacted sand basis. ELDAN Recycling A/S Page 19... -
Page 22: Setting The Mpr200T
SETTING THE MPR200T Introduction ....................21 Safety information ..................21 Opening the upper part with hopper ............23 Cleaning the Rasper and surrounding areas ..........24 Information regarding adjustment/exchange of knives ........25 Exchange of the static knives ..............27 Exchange of the flying knives ..............30 Adjustment of the distance between static and flying knives.......33... -
Page 23: Introduction
Within this section we have set out the setting instructions for the ma- chine. To enable you to get the best from y our ELDAN machine it is essential that it is set correctly. Correct setting will make operation easier and will minimise mainte- nance. - Page 24 Before starting the machine check that all protection devices works and are correctly adjusted. Before starting the machine check that no persons or foreign bodies are inside the rotor housing or on the inlet conveyor (or any other kind of feeding device). ELDAN Recycling A/S Page 22...
-
Page 25: Opening The Upper Part With Hopper
Rasper, Figure 5 - Pos. 6. When the hopper has moved to its limit, turn off the hydraulic pump. Lock the inlet hopper with the locking pin, Figure 5 - Pos. 5. ELDAN Recycling A/S Page 23... -
Page 26: Cleaning The Rasper And Surrounding Areas
To enable the easy retrieval of was hers and small bolts and to ensure absolute cleanliness when refitting the blades, we recommend that the Rasper housing and rotor, together with the floor around the Rasper is cleaned properly. ELDAN Recycling A/S Page 24... -
Page 27: Information Regarding Adjustment/Exchange Of Knives
Information regarding adjustment/exchange of knives When considering the setting of t he MPR200T, the normal setting is with regard to the knives and involves either replacing the knives setting the clearance between flying knives and static knives. NB: By exchange of knives it is essential that all knives are re- placed at the same time. - Page 28 16) Lock the safety switch for outlet hopper 17) Sweep or vac floor Knife replacement means that all knives need to be replaced. When setting the Rasper it is essential to use gloves for hand protec- tion. ELDAN Recycling A/S Page 26...
-
Page 29: Exchange Of The Static Knives
All knives can be exchanged without removing the knife holder. The following instructions explain t he whole procedure and the checklist details what steps should be taken for each knife set. ELDAN Recycling A/S Page 27... - Page 30 Adjust knife and tighten the knife bolts. Mount the caps above the knife bolts Remove knife bolts When the knife bolts are removed it is very important that the locking washers are removed as a pair. ELDAN Recycling A/S Page 28...
- Page 31 The knife bolts must be tightened with a torque of 320 Nm. Note: It is very important that the cassette for the static knives is in order. If this is not the case it must be exchanged immediately. ELDAN Recycling A/S Page 29...
-
Page 32: Exchange Of The Flying Knives
Use gloves for hand protection by maintenance work etc. The ma- chine can be very hot after continuous operation. When replacing the knives the use of safety glasses is necessary, because of the danger of splinters when the knives are exposed to strokes and bumps. ELDAN Recycling A/S Page 30... - Page 33 Remove the wedge, Figure 8 - Pos. 5. Remove the flying knife, Figure 8 - Pos. 3. Clean the knife location slot. Insert the new flying knife. Insert the wedge. Tighten the fixing bolts. Figure 8 ELDAN Recycling A/S Page 31...
- Page 34 3 Before attempting to refit the knife, it is essential that the location in the holder, Figure 9 - Pos. 4, is scrupulously clean to ensure that the knife sits firmly on the holder. ELDAN Recycling A/S Page 32...
-
Page 35: Adjustment Of The Distance Between Static And Flying Knives
Having got the setting correct and havi ng tightened the knife bolts with the correct torque, the counter nuts on the adjustment bolts are tightened. This operation should be repeated for all of the static knives. ELDAN Recycling A/S Page 33... -
Page 36: Dismounting And Mounting Of Knife Holders For 25Mm Flying Knives
It is important that all location surfaces are carefully cleaned. Figure 10 Remove the wedge fixing bolts (Figure 10 – Pos 1) Tighten wedge-jacking screws (Figure 10 - Pos. 2) ELDAN Recycling A/S Page 34... - Page 37 The knife holder and wedge should now be set in place and the fixing bolts inserted. It is also recommended that the bolts are greased. The wedge fixing bolts are tightened progressively to a final torque of 120 ELDAN Recycling A/S Page 35...
-
Page 38: Checking
100% tightened against the rotor housing as the machine may otherwise be damaged. The 2 eyebolts are placed in the mounting again and are tightened. Mount the dust pipe Connect the safety switch. ELDAN Recycling A/S Page 36... -
Page 39: Removing The Discharge Hopper And The Screen
4) Turn on the hydraulic motor by tu rning on the start/st op button on the con- trol panel. 5) The screen holder, Figure 12 – Pos. 1, can now be lowered by means of the hydraulic control handle, which is placed on the side of the machine. ELDAN Recycling A/S Page 37... - Page 40 7) The screen is a two-piece screen, whic h not are fixed in the screen holder. See figure 13. 8) The screens, Figure 13 – Pos. 1, are removed. 9) Dismount the wear plate, Figure 13 – Pos. 4, if it is worn. ELDAN Recycling A/S Page 38...
- Page 41 Figure 13 ELDAN Recycling A/S Page 39...
-
Page 42: Mounting Of The Screen And Discharge Hopper
When the screen holder has been co rrectly closed, the hydraulic pump is turned off again. The two lock nuts are inse rted again and tightened with a 30-mm spanner. It is very important that the screen holder is 100% closed. ELDAN Recycling A/S Page 40... - Page 43 Slide in the outlet hopper and refi t by inserting and tightening the 2 bolts using a 17 mm spanner. Lock the safety switch. ELDAN Recycling A/S Page 41...
-
Page 44: Torque
It is very important that the above is re spected, because it may otherwise cause damage to the knives and other vital parts. ELDAN Recycling A/S Page 42... -
Page 45: Motor
This way it is possible to check w hether the motor has the correct di- rection of rotation (as shown by t he arrow). The direction of rotation must only be altered by authorised personnel. ELDAN Recycling A/S Page 43... -
Page 46: Operation
OPERATION Introduction ....................45 Safety statements..................45 Operational procedure.................48 Useful information regarding the process............49 Steel and dust outlet..................51 Safety statement regarding emergency stops ..........52 ELDAN Recycling A/S Page 44... -
Page 47: Introduction
Introduction To enable you to get the best from your ELDAN machine it is essential that it is operated correctly. Therefore the operational manual tells you about start and stop proce- dures, the function and operation of the control desk. The operation procedures tell you about safety statements and operation information. - Page 48 It is recommended to use earplugs or hearing protectors to avoid damage of the hearing. Check that the alarm signal always works. There is danger of explosion and fire if the electrical cabinet is not kept free of dust. ELDAN Recycling A/S Page 46...
- Page 49 When replacing the knives the use of safety glasses is necessary because of the danger of splinters when the knives are exposed to strokes and bumps. When cleaning the machine it is necessary to use dust masks. ELDAN Recycling A/S Page 47...
-
Page 50: Operational Procedure
Operational procedure With regard to information in connec tion with the operational procedure, please see the separate operational manual. ELDAN Recycling A/S Page 48... -
Page 51: Useful Information Regarding The Process
The smaller the screens, the more st eel is liberated from the granu- late. This is an advantage if the mach ine is part of a complete plant because the wear will be concentrated in this machine with regard to the steel in the input. ELDAN Recycling A/S Page 49... - Page 52 This w ay it w ill be pos- sible to obtain max. capacity on the machines. Subsequent the knives should be adj usted as described above and in “Maintenance Directions”. ELDAN Recycling A/S Page 50...
-
Page 53: Steel And Dust Outlet
Dust outlet: On the MPR200T there is mounted dust suction on the inlet hopper. ELDAN Recycling A/S Page 51... -
Page 54: Safety Statement Regarding Emergency Stops
When an emergency stop is activated th is means that the machine as well as all transports in and out of the machine will stop. The main power will be cut off, if an emergency stop is activated, Figure 16 – Pos. 1. Figure 16 ELDAN Recycling A/S Page 52... -
Page 55: Maintenance
MAINTENANCE Introduction ....................54 Maintenance directions ................56 Lubrication scheme summary ..............58 Adjustment of clutch ..................60 Adjustment of belt drive................62 Grinding of knives..................63 ELDAN Recycling A/S Page 53... -
Page 56: Introduction
When cleaning the machine it is necessary to use dust masks. When replacing the knives the use of safety glasses is necessary because of the danger of splinters when the knives are exposed to strokes and bumps. ELDAN Recycling A/S Page 54... - Page 57 Before starting the machine check that all protection devices works and are correctly adjusted. Before starting the machine check that no persons or foreign bodies are inside the rotor housing or on the inlet conveyor (or any other kind of feeding device). ELDAN Recycling A/S Page 55...
-
Page 58: Maintenance Directions
Th is could for instance be in the weekends. ELDAN recommends as follows by processing of tyres: - Tightening of knife bolts after 24 processing hours and then as re- quired. - Clean the screen and the rotor housi ng for steel wire after every 40 processing hours. - Page 59 Adjustment/change of knives a nd cleaning of the machine is therefore very important. ELDAN Recycling A/S Page 57...
-
Page 60: Lubrication Scheme Summary
It is very important that the above items ar e lubricated in accordance with the mentioned specifications and that they are checked at a regular basis and refilled if necessary. SHELL's products are recommended - otherwise a similar product. ELDAN Recycling A/S Page 58... - Page 61 Figure 17 ELDAN Recycling A/S Page 59...
-
Page 62: Adjustment Of Clutch
Figure 18. The order for the ti ghtening is repeated un- til all bolts have been tightened alike. The final tightening for Figure 18 should be 65 Nm. The counter nuts Figure 18, Pos. 2 are tightened again. ELDAN Recycling A/S Page 60... - Page 63 CLUTCH FOR FLYWHEEL Figure 18 Pos.1 Bolts (tightened with 65 Nm) Pos.2 Counter Pos.3 Spring Pos.4 Friction lining ELDAN Recycling A/S Page 61...
-
Page 64: Adjustment Of Belt Drive
Loosen the 4 bolts, Figure 19 – Pos 1, and to adjust the belts tighten or loosen the bolt, Figure 19 – Pos 2. When the above mentioned tension is achieved tighten the 4 bolts, Figure 19 – Pos. 1. ELDAN Recycling A/S Page 62... -
Page 65: Grinding Of Knives
The knife bolts should be adjusted fo r every 24 hours operation or as required. The bolts should be tightened to a torque of 320 Nm. If the knives are ground more than stated on above sketch it will be at the customer's own risk. ELDAN Recycling A/S Page 63... - Page 66 The knife bolts should be adjusted for every 24 hours operation or as required. The bolts should be tightened to a torque of 320 Nm. If the knives are ground more than stated on above sketch it will be at the customer's own risk. ELDAN Recycling A/S Page 64...
- Page 67 The knives should be ground as show n on the sketch, however not fur- ther down than the indicated measures. Max. 10 mm must be ground of the knives If the knives are ground more than stated on above sketch it will be at the customer's own risk. ELDAN Recycling A/S Page 65...
-
Page 68: Spare Parts
SPARE PARTS Introduction ....................67 Spare parts philosophy................67 Spare parts stock level recommendations...........67 ELDAN Recycling A/S Page 66... -
Page 69: Introduction
Introduction Here at ELDAN we recognise that t he availability of spare parts is es- sential to the smooth running of your machine. We have therefore set out in th is section an understanding of the ELDAN philosophy regarding spare parts, recommendations regarding the spare parts stock- holding that you should have together with a list of spare parts available. - Page 70 MPR200T 2 set knives 1 set on stock 1 set to be ground 1 set Knife bolts/nuts and washers 2 each Screen plates ELDAN Recycling A/S Page 68...
- Page 71 Disc spring 34/16,3x1,5 24,00 1596 Self-locking nut M16 DIN 985 - kv. 8.8 EL-Z 3,00 009.1 34728 Inlet hopper - MPR200T 1,00 1099 Set screw M16x40 DIN 933 - 8.8 EL-Z 12,00 1674 Spring washer ø16 DIN 128A EL-Z 12,00 1657 Facet washer ø16 DIN 125B EL-Z...
- Page 72 Eldan Recycling A/S SPARE PART LIST Date: 13-01-2009 Page: 2 Pos. No. Item Description Quantity Unit 1565 Nut M20 DIN 934 - kv. 8.8 EL-Z 8,00 33746 Plate for motor console - MPR 2,00 25392 Electric motor 110 kW 1,00...
- Page 73 Eldan Recycling A/S SPARE PART LIST Date: 13-01-2009 Page: 3 Pos. No. Item Description Quantity Unit 3178 Tab washer 50x20x8 ø10-30 1,00 3259 Spline shaft Ø20x88 1,00 15122 Washer ø51/ø33x14,5 4,00 25445 Upper part - MPR200 1,00 14460 Shaft with groove...
- Page 74 Eldan Recycling A/S SPARE PART LIST Date: 13-01-2009 Page: 4 Pos. No. Item Description Quantity Unit 1676 Spring Washer ø20 DIN 128A EL-Z 8,00 1241 Bolt M20*80 DIN 931 - kv. 8.8 EL-Z 8,00 3094 Flange for adjustment 1,00 1715 Lock washer ø20 - Nordlock...
- Page 75 Eldan Recycling A/S SPARE PART LIST Date: 13-01-2009 Page: 5 Pos. No. Item Description Quantity Unit 1243 Bolt M20x75 DIN 931 - kv. 8.8 EL-Z 20,00 1715 Lock washer ø20 - Nordlock 20,00 1412 Screw MC24x65 DIN 912 - kv. 12.9...
- Page 76 Geometrical Surface Projection- tolerances: DS/EN 22553:1994 tolerances: finish: method: Title: Drawing format: Main scale: MPR200T P49662 1:20 Created by: Created: Spare parts drawing 13-01-2009 Linear unit: Weight: Identificationsno.: ELDAN RECYCLING A/S Copy of this document and giving it to others and the use...
- Page 77 Geometrical Surface Projection- tolerances: DS/EN 22553:1994 tolerances: finish: method: Title: Drawing format: Main scale: MPR200T P49662 1:10 Created by: Created: Spare parts drawing 13-01-2009 Linear unit: Weight: Identificationsno.: ELDAN RECYCLING A/S Copy of this document and giving it to others and the use...
- Page 78 Geometrical Surface Projection- tolerances: DS/EN 22553:1994 tolerances: finish: method: Title: Drawing format: Main scale: MPR200T Standard 1:20 Created by: Created: Spare parts drawing 01-12-2008 Linear unit: Weight: Identificationsno.: ELDAN RECYCLING A/S Copy of this document and giving it to others and the use...
-
Page 79: 10. Disposal Of The Mpr200T
10. DISPOSAL OF THE MPR200T By disposal of the MPR200T there are only a few environmental conditions that should be observed. The oil should be drained off the hydr aulic system before the MPR200T is disposed of. ELDAN Recycling A/S... - Page 80 Manual for Hydraulic System...
- Page 81 AVN HYDRAULIK A-S MANUAL FÜR DER HYDRAULISCHEN ANLAGE MIH 01.07.02-10 HYDR. ANLAGE HR/HPG/TR200 B3533 26939, 81003 Projekt: 49662 Dalager 1 DK-2605 Brøndby Fax 43 24 55 00 Email: avn.hydraulik@avn.dk 70 20 04 11 Suensonsvej 14 DK-8600 Silkeborg Fax 87 22 81 00 Internetadresse: www.avn.dk...
- Page 82 EU - Konformitätserklärung (für Maschinen oder Sicherheitsbauteile, die einzeln in den Verkehr gebracht werden) Hersteller: (ist immer auszufüllen, evtl. Stempel) Firmenname: AVN Hydraulik A-S Anschrift: Dalager 1 PLZ/Ort: DK-2605 Brøndby Land: Dänemark Telefon: +45 70 20 04 11 Telefax: +45 43 24 55 00 dass die Maschine Bezeichnung: Pumpstation...
- Page 83 Inbetriebnahme und Wartung der hydraulischen Anlage AVN HYDRAULIK A-S Vielen Dank für Ihre Wahl einer hydraulik-Anlage von AVN! Um eine lange Lebensdauer und Funktionssicherheit zu erreichen, sollten Sie folgendes bei der Inbetriebnahme und Wartung beachten. Sofern die Anlage als ein komplettes System von AVN Hydraulik A/S geliefert wurde, ist diese getestet und auf den max.
- Page 85 Eldan Recycling A/S Værkmestervej 4 AVN Hydraulik A/S Fåborg STÜCKLISTE NR. B3533 VERSION NR. DIAGRAM MIH 01.07.02-10 DATUM 14-03-07 ZEITE Anlæg HR/HPG/TR200 26939, MIH 01.07.02-10 POSITION VAREN NR. BEZEICHUNG ANZAHL EINHEIT 242250 K0-F16-A1Z-13-S04/01/N01/N03X2 STÜCK 108125 4-P 1,1 KW 480/60HZ B14 STÜCK...
- Page 86 Directional controlvalve AD3 CETOP 3/NG6 AVN HYDRAULIK A-S ARON Order code: AD Directional valve CETOP 3 / NG6 Data: Type og operator (see table 1) Valve type Spool valve Spool type (see table 5) Max. flow 60 l/min Max. Pressure port P/A/B 320 bar Mounting type (see table 2) Max.
- Page 87 Directional controlvalve AD3 AVN HYDRAULIK A-S ARON Table 3 – Voltage Table 1 – Type of operator E = Electrical AC – Voltage Rated power M = Mechanical D = Direct mechanical A = 24V / 50 Hz 57 VA O = Hydraulic J = 115V / 50 Hz - 120V / 60 Hz 52 VA...
- Page 88 Directional control valves CETOP 3 / NG6 AVN HYDRAULIK A-S Aron rev. 0 Page +45 70 20 04 11 Dalager 1 DK-2605 Brøndby Fax +45 4324 5500 E-mail: avn.hydraulik@avn.dk 7.1.3 Suensonsvej 14 DK-8600 Silkeborg Fax +45 8722 8100 Web: www.avn.dk...
- Page 89 Flow regulator AM.3.QF AVN HYDRAULIK A-S Aron Order code: Modular valve CETOP 3 / NG 6 Non compensated throttle valve Data: Control on lines Max. Operating pressure 320 bar A / B / P / AB Max. flow 20 l/min Type of adjustment Flow rate regulation 0-8 omgange...
- Page 90 Pressure-Gauges AVN HYDRAULIK A-S Glycerine filled Ø63 mm Lower connection or back connection. Housing: Stainless steel Technical Data: Sizes: Ø 63 mm. Glass: Plexi glass Precision Class: 1,6 (± 1,6% of maximal Max. working pressure: Constant load: 3/4 x full scale value scale value).
- Page 91 Gauge isolator needle-valve AVN HYDRAULIK A-S TOGNELLA FT 290 FT 291 DIMENSIONS: Model 1/4” G 1/4” G 61,5 M15x1 2018 0,125 FT 290 Model 1/4” G 1/4” G M15x1 2018 0,105 FT 291 FT 290 FT 291 DATA: Max. operating pressure: 400 bar Temperature: -20°C to +100°C...
- Page 92 Modular max. pressure valves CETOP 3 AM.3.VM / AM.3.VI AVN HYDRAULIK A-S Aron rev. 0 Page +45 70 20 04 11 Dalager 1 DK-2605 Brøndby Fax +45 4324 5500 E-mail: avn.hydraulik@avn.dk 5.7.1 Suensonsvej 14 DK-8600 Silkeborg Fax +45 8722 8100 Web: www.avn.dk...
- Page 93 Operational manual...
- Page 94 Setting: Changing Temperature Sensors MPR200 ore Outlet......24 4.4.0 Setting: Min. Rotor Speed ................25 4.4.1 Setting: Time delay ...................26 VIEWING LOAD, ROTATION GUARD AND COUNTER TIME ...................27 Counter time ......................28 Rotor knife counter time ..................29 CHOOSE LANGUAGE............30 SETTING: TIME/DATE ............31 Eldan Recycling A/S Page...
- Page 95 Turning the rotor ....................34 10. PAUSE SCREEN..............34 10. PAUSE SCREEN..............35 11. PUSHBUTTONS ..............36 12. SAFETY SWITCH ...............37 13. MAINTENANCE..............38 13.1 The panel ......................38 13.2 The rest of the system ..................39 14. TROUBLESHOOTING ............40 15. CONTROL PANEL ..............44 Eldan Recycling A/S Page...
- Page 96 The main switch (H1) must always be switched off and locked before service or repair work is commenced. INSTALLATION Installation of cables. Installed at the bottom of the panel only (see layout drawing). Eldan Recycling A/S Page...
-
Page 97: Start/Stop Procedure
Fahrenheit MPR200 Fahrenheit Outlet Motor 1 Motor 2 Rasper Rasper Inlet Inlet Outlet Outlet Alarm Alarm Curve Language Adjustment Time List History The system can now be started using the procedure described on the next page. Eldan Recycling A/S Page... - Page 98 Start the outlet conveyor by pressing the button on the touch panel. Start the inlet conveyor. Inlet Start the inlet conveyor by pressing the button on the touch panel. NB: The Inlet button will flash if motor 1 or 2 on the MPR is overloaded. Eldan Recycling A/S Page...
-
Page 99: Stop Procedure
1.2 Stop procedure Inlet Stop the Inlet conveyor. Outlet Stop the Outlet conveyor. The machine must be empty of material before the MPR is stopped. Stop the MPR. Rasper Eldan Recycling A/S Page... -
Page 100: Fault Messages
Rasper Inlet Inlet Outlet Outlet Alarm Alarm Curve Language Adjustment Time List History The Start screen now appears. Press. Alarm List NB: The pushbutton (Alarm list) will flash if there is a fault in the system. Eldan Recycling A/S Page... - Page 101 EXIT EXIT Press on the alarm fault you want to correct. A screen will then appear at the bottom of the touch panel with a description of how the fault can be corrected. Correct the fault Eldan Recycling A/S Page...
-
Page 102: Alarm History
Press the button. Alarm History ALARM HISTORY 06/04/2006 08:52:01 Max. Temp. Time and date for 06/04/2006 09:00:45 Max. Temp. start of fault. The fault was corrected. EXIT This list shows all previous faults in the system. Eldan Recycling A/S Page... - Page 103 Press on the alarm fault you want to correct. A screen will then appear at the bottom of the touch panel with a description of how the fault can be corrected. Correct the fault. Press the button to return to the Start screen. EXIT Eldan Recycling A/S Page...
-
Page 104: Setting: Load/Time
Load % Load % Rotor Speed Fahrenheit MPR200 Fahrenheit Outlet Motor 1 Motor 2 Max. Load Adjustment Adjustment Time Delay Max. Overload Inlet Adjustment Time Delay Inlet DOWN Alarm Alarm Curve Language Service EXIT List History Eldan Recycling A/S Page... -
Page 105: Setting: Max. Load
Max. Load Percentage setting Adjustment UP/DOWN DOWN The Percentage view can be adjusted by pressing the UP/DOWN buttons. The setting range is 0-100%. Eldan Recycling A/S Page... -
Page 106: Speed Adjustment Of The Inlet Conveyor (P.i.d)
06:37:37 11/04/06 Temperatur Temperatur Load % Load % Rotor Speed Fahrenheit MPR200 Fahrenheit Outlet Motor 1 Motor 2 Rasper Rasper Inlet Inlet Outlet Outlet Alarm Alarm Curve Language Adjustment Time List History Adjustment Press the . Eldan Recycling A/S Page... - Page 107 Max. load value Max. Load PASSWORD Input password Press on the white area. Cancel Keyboard Keyboard CLS BS SPACE ENTER CAPS SHIFT <- -> Type in the code (1234) and press (ENTER) then (OK). Eldan Recycling A/S Page...
- Page 108 06:37:37 11/04/06 Load % Load % Temperatur Temperatur Rotor Speed Fahrenheit MPR200 Fahrenheit Outlet Motor 1 Motor 2 Adjustment Inlet Regulation ON P.I.D. ON Press button to set P.I.D reg. on 0000 0000 0000 0000 EXIT Eldan Recycling A/S Page...
-
Page 109: Procedure For Adjustment Of The Inlet Conveyor
P = proportional to inlet conveyor (P) Regulates the speed from the set value (Max. Load value of TR). 0.1sek. = 1 1sek. I = Integral constant (Tik) Equalize P to an even flow into TR. Eldan Recycling A/S Page... - Page 110 0.1sek. = 1 1sek. D = Derivative constant (Tdk) Regulate the speed to equalize I up and down. S= Sampling period () S is the response time for P.I.D. regulation. Eldan Recycling A/S Page...
-
Page 111: Setting: Max. Overload
A time delay can be set so that the inlet conveyor does not stop if motor 1 or 2 is briefly overloaded. Setting range: 1-3 seconds. Adjustment Time Delay 1. Press the Number to set the time Max. Overload delay. 2. Enter the number as a percentage (1- 3 seconds) and press Enter. Eldan Recycling A/S Page... -
Page 112: Setting: Time Delay (Inlet Conveyor)
This is a time delay before restarting of the Inlet conveyor after overloading of motor 1 or 2 on the MPR. Adjustment Time Delay 1. Press the Number to set the time Inlet delay. 2. Enter the number as a percentage (1- 30 seconds) and press Enter. Eldan Recycling A/S Page... -
Page 113: Setting: Water, Max. Temperature And Maxmax. Temperature
Fahrenheit MPR200 Fahrenheit Outlet Motor 1 Motor 2 Max. Load Adjustment Adjustment Time Delay Max. Overload Inlet Adjustment Time Delay Inlet DOWN Alarm Alarm Curve Language Service EXIT List History Press to go to settings page 2. Eldan Recycling A/S Page... -
Page 114: Setting: Water
Then press the number for the temperature units that have been selected, F or C. When you press the number, a keyboard will appear. You can then enter the value. Setting range for Fahrenheit 32-212 Setting range for Celsius 0- Eldan Recycling A/S Page... -
Page 115: Setting: Max. Temperature
Then press the number for the temperature units that have been selected, F or C. When you press the number, a keyboard will appear. You can then enter the value. Setting range for Fahrenheit 32-302 Setting range for Celsius 0-150 Eldan Recycling A/S Page... -
Page 116: Setting: Maxmax. Temperature
Then press the number for the temperature units that have been selected, F or C. When you press the number, a keyboard will appear. You can then enter the value. Setting range for Fahrenheit 32-302 Setting range for Celsius 0-150 Eldan Recycling A/S Page... -
Page 117: Setting: Changing Temperature Sensors Mpr200 Ore Outlet
4.3.4 Setting: Changing Temperature Sensors MPR200 ore Outlet. button will change between the Sensor in the MPR200 ore the OUTLET. The button will look like this when changed. Eldan Recycling A/S Page... -
Page 118: Setting: Min. Rotor Speed
Adjustment Time Delay Max. Load Max. Overload Inlet Adjustment Time Delay Max. Overload DOWN Alarm Alarm Curve Language Service EXIT List History Press to go to settings page 2. Press to go to settings page 3. Eldan Recycling A/S Page... -
Page 119: Setting: Time Delay
The Time delay setting can be used to set a time delay so that the MPR does not stop if the rotor speed dips briefly. Adjustment Time 1. Press the Number to set the Time delay. 2. Enter the required number (1-3 seconds) and press Enter. Eldan Recycling A/S Page... -
Page 120: Viewing Load, Rotation Guard And Counter Time
Motor 1 Motor 2 Load view. RPM as a % view. Temperature Fahrenheit/Celsius view. NB: Pressing Temperature will cause the MPR to switch between Fahrenheit and Celsius Temperatur Temperatur Press the button. Fahrenheit MPR200 Fahrenheit Outlet Eldan Recycling A/S Page... -
Page 121: Counter Time
Alarm Alarm Curve Language Adjustment Time List History Press. Time Counter Counter Time Time Knife RESET Up in the right-hand corner, the Counter Time view will appear. Press again and the counter time screen will disappear. Eldan Recycling A/S Page... -
Page 122: Rotor Knife Counter Time
Press to reset the counter time. RESET An icon will appear which asks “Are you sure you want to reset counter time for knife change? Press YES to reset the counter time. Press NO to cancel. Eldan Recycling A/S Page... -
Page 123: Choose Language
Language Press the button. A screen will now appear with three buttons: Danish, English, German etc. Select the language you require. The Language panel will disappear when a language is selected or when Language is pressed. Eldan Recycling A/S Page... -
Page 124: Setting: Time/Date
Fahrenheit MPR200 Fahrenheit Outlet Motor 1 Motor 2 Rasper Rasper Inlet Inlet Outlet Outlet Alarm Alarm Curve Language Adjustment Time List History Press Date. Then enter the current year, month and day as shown in the illustration. Eldan Recycling A/S Page... -
Page 125: Curves
Outlet Outlet Alarm Alarm Curve Language Adjustment Time List History Press the button. Curve Temperature curves in Celsius or Fahrenheit. Switches between Celsius and Fahrenheit. Load curves as a % for Motor 1 and Motor 2. Eldan Recycling A/S Page... -
Page 126: Load % Average Per Hour
After one hour's operation, the MPR will be ready for average measurement per hour. Average Press. Per hour Load % Avarage per hour 0.0 % Average Press again and the average screen will disappear. Per hour Eldan Recycling A/S Page... -
Page 127: Servicing
3. Plug in the service key in the electricity socket on the machine (MPR). 4. Press Start/Reset to rotate the rotor. 5. Change the direction of the rotor by turning the middle switch on the service key. Start Change direction Start Eldan Recycling A/S Page... -
Page 128: Pause Screen
PAUSE SCREEN If the control current key has been switched off, there will be a 10 minute delay before the pause screen is activated. Turn the control current key to return to the main menu. Eldan Recycling A/S Page... -
Page 129: Pushbuttons
Emergency stop (B252), (B254), (B255), (B256). Stops the entire system. Reset. Reconnects the control supply to the control cabinet if the emergency stop has been activated or the power supply has been interrupted. Manual water filling for additional cooling (lld). Eldan Recycling A/S Page... -
Page 130: Safety Switch
SAFETY SWITCH The following procedure must be followed in the event of servicing/repairs: Stop the machine. Switch off and lock the main switch (H1). Eldan Recycling A/S Page... -
Page 131: Maintenance
External casings and covers The panel’s outer casings must be checked visually. Covers must be inspected to ensure that they provide the correct protection against direct touch. All covers must be checked for faults on closing devices. Eldan Recycling A/S Page... - Page 132 NB: The control cabinet and electrical junction box must be closed during operation. When repair/maintenance work is carried out on the installation, transport routes or other electrical equipment, the main switch must be switched off and locked. Eldan Recycling A/S Page...
-
Page 133: 14. Troubleshooting
Service switch I0.03 Key switch B151 Blocking I2007 Rotation Check the hopper for guard material in MPR. Check whether the MAX. temperature setting on TEMPERATURE I2008 Temperature sensor the Touch Panel is correct. Eldan Recycling A/S Page... - Page 134 Check the motor Fault protection (F7) Outlet conveyor 1 I1.08 Motor protection (F7) Check the motor Fault protection (F8) Outlet conveyor 2 I1.09 Motor protection (F8) Fault Check the motor I1.10 Outlet conveyor 3 protection (F9) Eldan Recycling A/S Page...
- Page 135 (F9) Motor protection Check the motor Fault protection (F10) Oil pump I1.11 Motor protection (F10) Eldan Recycling A/S Page...
- Page 136 If the fault is not covered by the above examples, the system may be defective. Contact a service technician. NB: Pos. (?) is a reference to the position of the component in the pumping station. The position number is taken in accordance with the manual from the pumping station. Eldan Recycling A/S Page...
-
Page 137: Control Panel
CONTROL PANEL Eldan Recycling A/S Page... - Page 138 Electrical diagram...
- Page 139 E L E C T R I C A L D I A G R A M M P R 2 0 0 I n s t r u c t i o n N o . D a t e : D r a w i n g N o .
- Page 140 I n s t r u c t i o n N o . D a t e : D r a w i n g N o . I ni t .: ELD A N REC Y CL ING A / S T y p e : M ul t i P u r p o s e R a s p er MP R 2 0 0 V A ERK ME S T ER V E J 4...
- Page 141 I n s t r u c t i o n N o . D a t e : D r a w i n g N o . I ni t .: ELD A N REC Y CL ING A / S T y p e : M ul t i P u r p o s e R a s p er MP R 2 0 0 V A ERK ME S T ER V E J 4...
- Page 142 I n s t r u c t i o n N o . D a t e : D r a w i n g N o . I ni t .: ELD A N REC Y CL ING A / S T y p e : M ul t i P u r p o s e R a s p er MP R 2 0 0 V A ERK ME S T ER V E J 4...
- Page 143 I n s t r u c t i o n N o . D a t e : D r a w i n g N o . I ni t .: ELD A N REC Y CL ING A / S T y p e : M ul t i P u r p o s e R a s p er MP R 2 0 0 V A ERK ME S T ER V E J 4...
- Page 144 I n s t r u c t i o n N o . D a t e : D r a w i n g N o . I ni t .: ELD A N REC Y CL ING A / S T y p e : M ul t i P u r p o s e R a s p er MP R 2 0 0 V A ERK ME S T ER V E J 4...
- Page 145 I n s t r u c t i o n N o . D a t e : D r a w i n g N o . I ni t .: ELD A N REC Y CL ING A / S T y p e : M ul t i P u r p o s e R a s p er MP R 2 0 0 V A ERK ME S T ER V E J 4...
- Page 146 I n s t r u c t i o n N o . D a t e : D r a w i n g N o . I ni t .: ELD A N REC Y CL ING A / S T y p e : M ul t i P u r p o s e R a s p er MP R 2 0 0 V A ERK ME S T ER V E J 4...
- Page 147 I n s t r u c t i o n N o . D a t e : D r a w i n g N o . I ni t .: ELD A N REC Y CL ING A / S T y p e : M ul t i P u r p o s e R a s p er MP R 2 0 0 V A ERK ME S T ER V E J 4...
- Page 148 I n s t r u c t i o n N o . D a t e : D r a w i n g N o . I ni t .: ELD A N REC Y CL ING A / S T y p e : M ul t i P u r p o s e R a s p er MP R 2 0 0 V A ERK ME S T ER V E J 4...
- Page 149 I n s t r u c t i o n N o . D a t e : D r a w i n g N o . I ni t .: ELD A N REC Y CL ING A / S T y p e : M ul t i P u r p o s e R a s p er MP R 2 0 0 V A ERK ME S T ER V E J 4...
- Page 150 I n s t r u c t i o n N o . D a t e : D r a w i n g N o . I ni t .: ELD A N REC Y CL ING A / S T y p e : M ul t i P u r p o s e R a s p er MP R 2 0 0 V A ERK ME S T ER V E J 4...
- Page 151 I n s t r u c t i o n N o . D a t e : D r a w i n g N o . I ni t .: ELD A N REC Y CL ING A / S T y p e : M ul t i P u r p o s e R a s p er MP R 2 0 0 V A ERK ME S T ER V E J 4...
- Page 152 I n s t r u c t i o n N o . D a t e : D r a w i n g N o . I ni t .: ELD A N REC Y CL ING A / S T y p e : M ul t i P u r p o s e R a s p er MP R 2 0 0 V A ERK ME S T ER V E J 4...
- Page 153 I n s t r u c t i o n N o . D a t e : D r a w i n g N o . I ni t .: ELD A N REC Y CL ING A / S T y p e : M ul t i P u r p o s e R a s p er MP R 2 0 0 V A ERK ME S T ER V E J 4...
- Page 154 I n s t r u c t i o n N o . D a t e : D r a w i n g N o . I ni t .: ELD A N REC Y CL ING A / S T y p e : M ul t i P u r p o s e R a s p er MP R 2 0 0 V A ERK ME S T ER V E J 4...
- Page 155 I n s t r u c t i o n N o . D a t e : D r a w i n g N o . I ni t .: ELD A N REC Y CL ING A / S T y p e : M ul t i P u r p o s e R a s p er MP R 2 0 0 V A ERK ME S T ER V E J 4...
- Page 156 I n s t r u c t i o n N o . D a t e : D r a w i n g N o . I ni t .: ELD A N REC Y CL ING A / S T y p e : M ul t i P u r p o s e R a s p er MP R 2 0 0 V A ERK ME S T ER V E J 4...
- Page 157 I n s t r u c t i o n N o . D a t e : D r a w i n g N o . I ni t .: ELD A N REC Y CL ING A / S T y p e : M ul t i P u r p o s e R a s p er MP R 2 0 0 V A ERK ME S T ER V E J 4...
- Page 158 I n s t r u c t i o n N o . D a t e : D r a w i n g N o . I ni t .: ELD A N REC Y CL ING A / S T y p e : M ul t i P u r p o s e R a s p er MP R 2 0 0 V A ERK ME S T ER V E J 4...
- Page 159 I n s t r u c t i o n N o . D a t e : D r a w i n g N o . I ni t .: ELD A N REC Y CL ING A / S T y p e : M ul t i P u r p o s e R a s p er MP R 2 0 0 V A ERK ME S T ER V E J 4...
- Page 160 I n s t r u c t i o n N o . D a t e : D r a w i n g N o . I ni t .: ELD A N REC Y CL ING A / S T y p e : M ul t i P u r p o s e R a s p er MP R 2 0 0 V A ERK ME S T ER V E J 4...
- Page 161 I n s t r u c t i o n N o . D a t e : D r a w i n g N o . I ni t .: ELD A N REC Y CL ING A / S T y p e : M ul t i P u r p o s e R a s p er MP R 2 0 0 V A ERK ME S T ER V E J 4...
- Page 162 I n s t r u c t i o n N o . D a t e : D r a w i n g N o . I ni t .: ELD A N REC Y CL ING A / S T y p e : M ul t i P u r p o s e R a s p er MP R 2 0 0 V A ERK ME S T ER V E J 4...
- Page 163 I n s t r u c t i o n N o . D a t e : D r a w i n g N o . I ni t .: ELD A N REC Y CL ING A / S T y p e : M ul t i P u r p o s e R a s p er MP R 2 0 0 V A ERK ME S T ER V E J 4...
- Page 164 I n s t r u c t i o n N o . D a t e : D r a w i n g N o . I ni t .: ELD A N REC Y CL ING A / S T y p e : M ul t i P u r p o s e R a s p er MP R 2 0 0 V A ERK ME S T ER V E J 4...
- Page 165 I n s t r u c t i o n N o . D a t e : D r a w i n g N o . I ni t .: ELD A N REC Y CL ING A / S T y p e : M ul t i P u r p o s e R a s p er MP R 2 0 0 V A ERK ME S T ER V E J 4...
- Page 166 I n s t r u c t i o n N o . D a t e : D r a w i n g N o . I ni t .: ELD A N REC Y CL ING A / S T y p e : M ul t i P u r p o s e R a s p er MP R 2 0 0 V A ERK ME S T ER V E J 4...
- Page 167 I n s t r u c t i o n N o . D a t e : D r a w i n g N o . I ni t .: ELD A N REC Y CL ING A / S T y p e : M ul t i P u r p o s e R a s p er MP R 2 0 0 V A ERK ME S T ER V E J 4...
- Page 168 I n s t r u c t i o n N o . D a t e : D r a w i n g N o . I ni t .: ELD A N REC Y CL ING A / S T y p e : M ul t i P u r p o s e R a s p er MP R 2 0 0 V A ERK ME S T ER V E J 4...
- Page 169 I n s t r u c t i o n N o . D a t e : D r a w i n g N o . I ni t .: ELD A N REC Y CL ING A / S T y p e : M ul t i P u r p o s e R a s p er MP R 2 0 0 V A ERK ME S T ER V E J 4...
- Page 170 I n s t r u c t i o n N o . D a t e : D r a w i n g N o . I ni t .: ELD A N REC Y CL ING A / S T y p e : M ul t i P u r p o s e R a s p er MP R 2 0 0 V A ERK ME S T ER V E J 4...
- Page 171 I n s t r u c t i o n N o . D a t e : D r a w i n g N o . I ni t .: ELD A N REC Y CL ING A / S T y p e : M ul t i P u r p o s e R a s p er MP R 2 0 0 V A ERK ME S T ER V E J 4...
- Page 172 I n s t r u c t i o n N o . D a t e : D r a w i n g N o . I ni t .: ELD A N REC Y CL ING A / S T y p e : M ul t i P u r p o s e R a s p er MP R 2 0 0 V A ERK ME S T ER V E J 4...
- Page 173 I n s t r u c t i o n N o . D a t e : D r a w i n g N o . I ni t .: ELD A N REC Y CL ING A / S T y p e : M ul t i P u r p o s e R a s p er MP R 2 0 0 V A ERK ME S T ER V E J 4...
- Page 174 I n s t r u c t i o n N o . D a t e : D r a w i n g N o . I ni t .: ELD A N REC Y CL ING A / S T y p e : M ul t i P u r p o s e R a s p er MP R 2 0 0 V A ERK ME S T ER V E J 4...
- Page 175 I n s t r u c t i o n N o . D a t e : D r a w i n g N o . I ni t .: ELD A N REC Y CL ING A / S T y p e : M ul t i P u r p o s e R a s p er MP R 2 0 0 V A ERK ME S T ER V E J 4...
- Page 176 I n s t r u c t i o n N o . D a t e : D r a w i n g N o . I ni t .: ELD A N REC Y CL ING A / S T y p e : M ul t i P u r p o s e R a s p er MP R 2 0 0 V A ERK ME S T ER V E J 4...
- Page 177 I n s t r u c t i o n N o . D a t e : D r a w i n g N o . I ni t .: ELD A N REC Y CL ING A / S T y p e : M ul t i P u r p o s e R a s p er MP R 2 0 0 V A ERK ME S T ER V E J 4...
- Page 178 I n s t r u c t i o n N o . D a t e : D r a w i n g N o . I ni t .: ELD A N REC Y CL ING A / S T y p e : M ul t i P u r p o s e R a s p er MP R 2 0 0 V A ERK ME S T ER V E J 4...
- Page 179 I n s t r u c t i o n N o . D a t e : D r a w i n g N o . I ni t .: ELD A N REC Y CL ING A / S T y p e : M ul t i P u r p o s e R a s p er MP R 2 0 0 V A ERK ME S T ER V E J 4...
- Page 180 I n s t r u c t i o n N o . D a t e : D r a w i n g N o . I ni t .: ELD A N REC Y CL ING A / S T y p e : M ul t i P u r p o s e R a s p er MP R 2 0 0 V A ERK ME S T ER V E J 4...
- Page 181 I n s t r u c t i o n N o . D a t e : D r a w i n g N o . I ni t .: ELD A N REC Y CL ING A / S T y p e : M ul t i P u r p o s e R a s p er MP R 2 0 0 V A ERK ME S T ER V E J 4...
- Page 182 I n s t r u c t i o n N o . D a t e : D r a w i n g N o . I ni t .: ELD A N REC Y CL ING A / S T y p e : M ul t i P u r p o s e R a s p er MP R 2 0 0 V A ERK ME S T ER V E J 4...
- Page 183 COMPONENT Pr oduc t T y pe De scr ip tion Fabr ica te Pa ge Par t B 2 1 Z B 5 A A 3 3 3 S T A R T T e l e m e c a n i qu e B 2 2 Z B 5 A A 3 3 3 S T A R T...
- Page 184 COMPONENT Pr oduc t T y pe De scr ip tion Fabr ica te Pa ge Par t e W ON e W ON 4 0 0 1 3 R B 10 5 6 - 1F W 0 5 0 - 2 0 0 A 3 R B 10 5 6 - 1F W 0 5 0 - 2 0 0 A 3 R V 10 2 1- 1H A 10...
- Page 185 COMPONENT Pr oduc t T y pe De scr ip tion Fabr ica te Pa ge Par t 3 R T 10 2 4 - 1A L 2 0 12 A 3 R T 10 2 4 - 1A L 2 0 12 A 3 R T 10 2 4 - 1A L 2 0 12 A...
- Page 186 COMPONENT Pr oduc t T y pe De scr ip tion Fabr ica te Pa ge Par t 2 , 7 A 1,4 K W 2 , 7 A 1,4 K W M V 2 M V 3 M V 10 3 OP E N M V 10 4 C L O S E...
- Page 187 COMPONENT Pr oduc t T y pe De scr ip tion Fabr ica te Pa ge Par t UNI T 2 C J1M - C P U12 C ON T R OL L E R UNI T 4 16 D IGI T A L 0 U T P U T C J1M - O C 2 11 UNI T 5 16 D IGI T A L 0 U T P U T...
- Page 188 TERMINAL STRIP Conn e c tio n 1 T e r mina l Conn e c tio n 2 T y p e Co mm e n t P a g e Pa r t X C:1 B10 3: 2 3 W K 4 / U 4 m m 2 B 10 4:12 M V 10 3:1...
- Page 189 TERMINAL STRIP Conn e c tio n 1 T e r mina l Conn e c tio n 2 T y p e Co mm e n t P a g e Pa r t F 1: 2 3 0 2 8 6 M10 18 5 m m 2 F 1: 4 3 0 2 8 6 M10 18 5 m m 2 F 1: 6...
- Page 190 TERMINAL STRIP Conn e c tio n 1 T e r mina l Conn e c tio n 2 T y p e Co mm e n t P a g e Pa r t í M7 :í 012 8 9 T e r m i n a l j o r d 16 m m 2 K 8: 2 M 8:U1 W K 6 / U 6 m m 2...
- Page 191 TERMINAL STRIP Conn e c tio n 1 T e r mina l Conn e c tio n 2 T y p e Co mm e n t P a g e Pa r t S 6 4: 2 B10 2: 21 W K 4 E B 101: A 2 7 0 0...
- Page 192 TERMINAL STRIP Conn e c tio n 1 T e r mina l Conn e c tio n 2 T y p e Co mm e n t P a g e Pa r t B 2 5 4: 2 2 6 5 6 X A : 6 5 7 W K 4 / U...
- Page 193 TERMINAL STRIP Conn e c tio n 1 T e r mina l Conn e c tio n 2 T y p e Co mm e n t P a g e Pa r t K A 5: 3 X 10:1 W K 4 E / U 4 m m 2 X 10:10 2 4 V D C - 2 0 0...
- Page 194 TERMINAL STRIP Conn e c tio n 1 T e r mina l Conn e c tio n 2 T y p e Co mm e n t P a g e Pa r t - U NI T 3:13 W K 4 / U 4 m m 2 2 4 V D C + 2 01 W K 4 / U 4 m m 2...
- Page 195 -X60 TERMINAL STRIP -X60 Conn e c tio n 1 T e r mina l Conn e c tio n 2 T y p e Co mm e n t P a g e Pa r t - I T 1: R E X A : 6 2 W K 4 E - X 6 0: 3...
- Page 196 List O f Cable s Ca b le De s c r ip tio n T y p e Ca b le le n gth Co nn e c tio n 1 Conn e c tio n 2 P a ge 0 .1A R EF L E X 4 X 5 0 M M 2...
- Page 197 K ABELK ORE LISTE K a b e l K o r e K v a d r a t F a r v e B e m æ r k n i n g T i l s l u t n i n g 1 T i l s l u t n i n g 2 S i d e S t r ø...
- Page 198 K ABELK ORE LISTE K a b e l K o r e K v a d r a t F a r v e B e m æ r k n i n g T i l s l u t n i n g 1 T i l s l u t n i n g 2 S i d e S t r ø...
- Page 199 K ABELK ORE LISTE K a b e l K o r e K v a d r a t F a r v e B e m æ r k n i n g T i l s l u t n i n g 1 T i l s l u t n i n g 2 S i d e S t r ø...
- Page 200 PLC Connection List PL C Unit No . Op e r a n d Sign a l s p e c if ic a tio n S i g n a l C o m m e n t P L C I n C o n n e c t i o n P a g e P a r t...
- Page 201 PLC Connection List PL C Unit No . Op e r a n d Sign a l s p e c if ic a tio n S i g n a l C o m m e n t P L C I n C o n n e c t i o n P a g e P a r t...
- Page 202 PLC Connection List PL C Unit No . Op e r a n d Sign a l s p e c if ic a tio n S i g n a l C o m m e n t P L C I n C o n n e c t i o n P a g e P a r t...
Need help?
Do you have a question about the MPR200T and is the answer not in the manual?
Questions and answers