Advertisement
Advertisement

Summary of Contents for Park Air Electronics T6R
- Page 1 ISSUE 1-2A Maintenance Handbook T6R VHF Receivers ã Park Air Electronics 1999 Park Air Electronics Northfields Market Deeping Peterborough PE6 8UE England Telephone: +44 (0)1778 345434 Fax: +44 (0)1778 342877 PAE Part Number: 31-160000RX 31-160000RX (Amdt. 2A Nov 03) Page i...
- Page 2 Intentionally Blank Page ii 31-160000RX...
-
Page 3: Table Of Contents
CONTENTS Preliminary Pages Title page Contents (this list) Warnings page Amendment record Modification record List of abbreviations used in this handbook Section 1 GENERAL INFORMATION Section 2 TECHNICAL DESCRIPTION Section 3 MAINTENANCE Section 4 VIRTUAL FRONT PANEL (VFP) Section 5 PARTS LIST Section 6 FIGURES... - Page 4 Intentionally Blank Page iv 31-160000RX...
- Page 5 UNAUTHORIZED MODIFICATIONS Changes or modifications made to this equipment, not expressly approved by Park Air Electronics or parties authorized by Park Air Electronics could void the user’s authority to operate the equipment.
- Page 6 Intentionally Blank Page vi 31-160000RX...
-
Page 7: Amendment Record
AMENDMENT RECORD Amdt. Incorporated Date Brief Details Park Air Sep 03 Section 6, List of Figures, Fig 10 title amended. Park Air Nov 03 Section 6, List of Figures, drawing numbers added. 31-160000RX (Amdt. 2A Nov 03) Page vii... - Page 8 Intentionally Blank Page viii 31-160000RX...
-
Page 9: Modification Record
MODIFICATION RECORD MOD No. Details Date 31-160000RX Page ix... - Page 10 Intentionally Blank Page x 31-160000RX...
-
Page 11: List Of Abbreviations Used In This Handbook
LIST OF ABBREVIATIONS USED IN THIS HANDBOOK alternating current analogue to digital audio gain control amplitude modulation built-in test digital to analogue direct current decibel decibels relative to 1 mW digital signal processing elapsed time indicator electrostatic sensitive device hertz input/output kilohertz liquid crystal display... - Page 12 Intentionally Blank Page xii 31-160000RX...
-
Page 13: General Information
This handbook provides the maintenance personnel with sufficient information to maintain and repair the T6R receiver to module level. It provides an overview of the internal architecture of the receiver and describes the various replaceable modules, their function, part number and how to obtain replacements. - Page 14 VFP or through an associated MARC system (or compatible control and data system). Details of how to change the operating frequency are contained in the T6R Receiver User Guide, Section 4 of this handbook (VFP) and the MARC User Guide (MARC).
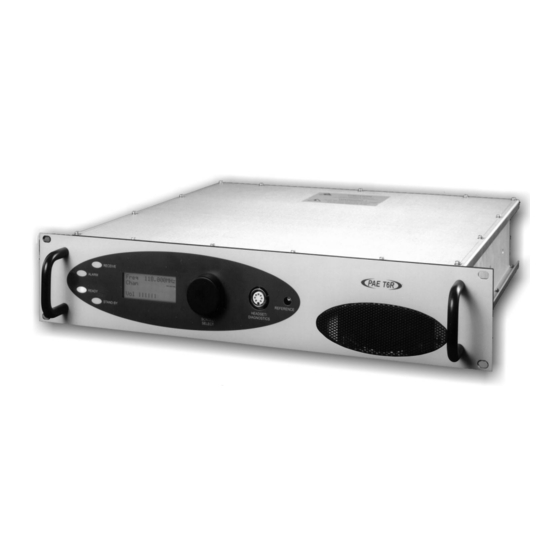
- Page 15 The computer port is used in digital communication modes to connect the receiver to a control computer. 12 See Section 2 for external connector details. T6R Receiver Computer Port Antenna MARC Connector Port Facilities Reference Connector Headset/Diagnostics Connector Connector T6R Receiver Configuration 31-160000RX Section 1 Page 3...
- Page 16 Intentionally Blank Section 1 31-160000RX Page 4...
-
Page 17: Technical Description
Section 2 Technical Description Paragraph INTRODUCTION MODULES AND ASSEMBLIES DSP module Central processor Digital signal processing Programmable gate array Speech coding/decoding Computer interface Serial remote control/data port Facilities port Front panel interface Analogue control interfaces Digital control interfaces Rx RF module RF converter IF filter/converter Synthesiser... - Page 18 INTRODUCTION This section describes the modules and assemblies that comprise the T6R receiver and details the equipment’s connectors. Designed for rack mounting in a standard 19 inch rack the unit operates from standard 120/240 V ac supplies with automatic changeover to 28 V dc in the event of mains failure. The majority of user connections are made through rear mounted connectors.
- Page 19 Digital Signal Processing The Super H processor is supported by two Analogue Devices 2171 DSP microprocessors providing the computational power required to implement the demodulation algorithms. Programmable Gate Array 10 Circuit functions are register mapped into the Super H address space using a Xilinx FPGA. This allows the hardware configuration to be altered or upgraded by downloading new firmware.
- Page 20 Table 1 Facilities Port Connections Inputs: Outputs: Line out (+) Squelch Defeat Line out (-) Rx Disable Squelch Common Bit Interruptive Test Squelch RSSI Ready Tape Output Unregulated Supply Squelch output Front Panel Interface 15 An 8-bit data bus and associated control signals are provided to drive the Front Panel LCD module with separate lines also provided to drive the LEDs and to read the rotary encoder.
- Page 21 Digital Control Interfaces 18 To interface to the Rx RF module, digital I/O signals, as shown in Table 2, are used. Table 2 Digital I/O Signals Outputs Inputs Filter Value (5 bits) BIT Synth Lock Narrow/Wide 8.33 (Rx RF) BIT Control (3 bits) Tx/Rx Detect Power Down Synth Control (4 bits)
- Page 22 27 A BIT output signal (BIT Synth Lock) is provided when the synthesiser is in lock. 28 The Rx RF module is able to provide a module interruptive BIT to determine if it is at fault. This is done by injecting a noise signal, controlled by the DSP module via the BIT Control line, into the front end of the RF conversion stage, after the RF AGC.
- Page 23 RECEIVER POWER SUPPLY MODULES 35 The power supply is to run off ac mains or dc backup. If ac is present then it is used as the power source and an ac detect output is asserted. If ac is not present then the input source is automatically switched to dc.
- Page 24 EXTERNAL CONNECTORS AND FUSES EXTERNAL CONNECTORS 39 This sub-section describes the external connectors fitted to the receiver. These connectors are: Reference connector Headset/diagnostics connector CN5 Facilities rear panel connector CN6 MARC rear panel connector CN7 Computer rear panel connector ac input connector dc input connector.
- Page 25 Table 3 Microphone/Headset Connections Headset/Diagnostics Signal Notes Connector Pin Number Ground 0 volt. Headset drive Maximum = 3 volt peak-to-peak. 200 ohm output impedance. Table 4 Diagnostics PC Connections Headset/Diagnostics Signal Notes Connector Pin Number Transmit data RS232 Receive data RS232 Ground 0 volt...
- Page 26 -50 to +50 V (100 mA maximum) and can be configured, at the front panel, to be normally open or normally closed. Note that the configuration follows the polarity of the squelch indication signal (see the T6R User Guide for more detail). Squelch Indication This grounding output, when active, indicates a signal above the squelch threshold is being received.
- Page 27 MARC Port CN6 45 A 9-way D-type socket used to connect remote signals to a MARC system or other compatible control and data system. The pin-out of this connector is given in Table 6. MARC connector CN6 as seen when looking at the rear panel. Connections should be made using a 9-way D-type plug, PAE part number: 20-01090100 (plug), and 20-09090101 (cover).
- Page 28 Computer port CN7 as seen when looking at the rear panel. Connections should be made using a 25-way D-type plug, PAE part number: 20-01250100 (plug), and 20-09250101 (cover). Table 7 Computer Port CN7 Pin-Out Signal Name Level Input or Output CN7 Pin Number Ground 0 volt...
- Page 29 AC Input Connector 47 A 3-pole IEC chassis plug for connecting the ac input supply. The plug has an integral 20 mm fuse (F2) that protects the Line (L) input circuit. The fuse is rated at 3.15 amps (see Section 5 for further detail).
- Page 30 Intentionally Blank Section 2 31-160000RX Page 14...
-
Page 31: Maintenance
Section 3 Maintenance Paragraph Introduction Tools, materials and test equipment required SCHEDULE MAINTENANCE Schedule maintenance procedure Cleaning the equipment Security of external connections Setting the receiver’s internal reference frequency To initiate an interruptive BIT test ac and dc change-over check DISMANTLING AND ASSEMBLY INSTRUCTIONS Introduction Top cover... - Page 32 WHEN THE POWER SWITCH IS SET TO THE OFF POSITION, LETHAL VOLTAGES ARE STILL PRESENT IN THE RECEIVER'S INTERNAL POWER SUPPLY CIRCUITRY. TO ENSURE SAFE WORKING, THE AC AND DC INPUT SUPPLIES MUST BE DISCONNECTED FROM THE RECEIVER. CAUTIONS ... This equipment contains static sensitive devices.
- Page 33 SCHEDULED MAINTENANCE PAE recommends that this is carried out at twelve-monthly intervals. Schedule maintenance comprises: Ensuring the equipment is clean (see Paragraph 7). Ensuring that the external connectors are securely fitted to the receiver (see Paragraph 8). Checking and resetting (if required) the receiver's frequency standard (see Paragraph 9). Performing a BIT interruptive test (see Paragraph 10).
- Page 34 Setting the Receiver’s Internal Reference Frequency Use the following procedure to set the receiver’s internal reference frequency. Note that references to the switch in the procedure mean the Scroll/Select switch. Connect a high impedance frequency counter to the front panel Reference connector. From the Main screen, press the switch to F r e q u e n c y display the Options menu.
- Page 35 To Initiate an Interruptive BIT Test 10 Use the following procedure to initiate an interruptive BIT test from the receiver’s front panel. Note that references to the switch in the procedure mean the Scroll/Select switch. From the main screen, press the switch to F r e q u e n c y display the Options menu.
- Page 36 DISMANTLING AND ASSEMBLY INSTRUCTIONS INTRODUCTION 12 This sub-section provides the user with detailed instructions on the removal and replacement of modules and assemblies. Access to a PC and the maintenance kit (PAE part number 70-6100MKIT) is essential when carrying out these instructions. 13 The receiver’s modules and assemblies are accessed by removing the top and bottom covers.
- Page 37 TOP COVER 14 To remove the top cover, locate and unscrew the 13 captive fasteners securing the top cover to the mainframe. Access can then be gained to the following modules: DSP module Power Supply Unit (PSU) module PSU Regulator module. REMOVING AND REFITTING THE DSP MODULE 15 The DSP module is located as shown in Section 6, Fig.
- Page 38 b. Ensure the module’s interface connectors CN7, CN5 and CN6 are located correctly and are aligned with the screw holes in the rear panel; do not secure them at this time. c. Fit the seven M3 x 8 captive washer screws that secure the module to the receiver’s mainframe.
- Page 39 b. Locate the PSU Regulator module and disconnect the following connectors: CN4 14-way connector (14-way ribbon cable to DSP module) CN5 10-way connector (10-way ribbon cable to Rx RF module) CN2 2-way connector (2 wire cable from dc input connector on rear panel) CN1 4-way connector (2 wire cable from power supply) CN7 2-way connector (2-wire loom to rear panel On/Off switch), refer to Caution (3) following Paragraph 13.
- Page 40 REMOVING AND REFITTING THE POWER SUPPLY UNIT (PSU) 22 The Power Supply Unit (PSU) is located as shown in Section 6, Fig. 4. A module removal diagram is shown in Fig. 7. Removal 23 Before attempting to remove the PSU, ensure that the receiver power is switched off at the rear mounted POWER switch and the receiver is isolated from the ac and/or dc input supplies.
- Page 41 BOTTOM COVER 25 To remove the bottom cover, locate and unscrew the 13 captive screws securing the bottom cover to the mainframe. Access can then be gained to the Rx RF module. REMOVING AND REFITTING THE RX RF MODULE 26 The Rx RF module is located as shown in Section 6, Fig. 4. A module removal diagram is shown in Fig.
- Page 42 d. Connect the following connectors: CN5 10-way connector (10-way ribbon cable from Power Regulator module) CN2 SMB connector (from DSP module) CN3 40-way connector (40-way ribbon cable from DSP module) e. Re-establish the ac and/or dc supplies. Switch power on at the radio using the rear mounted POWER switch. g.
- Page 43 Refitting 31 To refit the Front Panel assembly PCB, proceed as follows: a. Place the PCB in position at the Front Panel assembly. Ensure the spindle of the control knob and headset/diagnostics connector are correctly located. Secure the PCB to the Front Panel assembly using the eight M3 x 6 mm panhead screws and wavy washers (see Fig.
- Page 44 FAULT DIAGNOSIS PROCEDURE 32 If the receiver becomes unserviceable, the faulty module may be traced by the aid of the front panel LCD and Scroll/Select control, VFP or MARC. The following information is in respect of the front panel LCD and Scroll/Select control; VFP information is dealt with in Section 4 of this handbook and MARC information in the MARC User Guide.
- Page 45 35 By turning the Scroll/Select control right or left scrolls the menu through the BIT screens. To scroll forward turn the control right, to scroll backwards turn the control left. The following shows the BIT screens when scrolling forward: Indicates the presence of an ac supply and S u p p l y dc supply.
- Page 46 This screen is the last BIT View screen. A d v i s e Selecting Advise selects the Advise menu. B a c k Back displays the BIT menu. < < 36 The Advise menu when selected will show and advise the user of the actions that need to be taken in order to repair a faulty equipment.
- Page 47 BIT inoperative 40 Certain fault conditions can result in the BIT facility being inoperative, namely power supply failure or complete failure of the DSP module, Front Panel module, PSU Regulator module or PSU module. Table 1 provides a guide for fault finding under these conditions. 41 Before carrying out the procedures listed in Table 1 check all external connectors for security of attachment and serviceability.
- Page 48 Table 1 Non-BIT Fault Finding Guide (continued) Fault No. Symptom Action On the DSP module (see diagram A on Page 20), check for the following: (1) Unregulated dc between test point TP18 (+) and the wire link coupling TP6 to TP7 (-). (2) +15 V dc between test point TP4 (+) and the wire link coupling TP6 to TP7 (-).
- Page 49 Table 1 Non-BIT Fault Finding Guide (continued) Fault No. Symptom Action Fuse FS1 on PSU Regulator Restore the ac and/or dc supplies and switch the module blows again receiver on. Observe fuse FS1 on the PSU Regulator module. If blown, remove ac and/or dc supplies, switch off and replace the PSU Regulator module.
- Page 50 Diagram A Section 3 31-160000RX Page 20...
-
Page 51: Virtual Front Panel (Vfp)
Section 4 Virtual Front Panel (VFP) Paragraph Introduction INTRODUCTION This section is divided into chapters to separate the VFP operational requirements for receivers configured in different operating modes. The chapters are divided as follows: Chapter 1 provides VFP operational information that is specific for receivers configured in AM-voice mode. - Page 52 Intentionally Blank Section 4 31-160000RX Page 2...
- Page 53 AM-voice operation. The VFP software is located on the CD-ROM supplied with this handbook. The T6R's operating frequency and settings can be selected at the receiver's front panel using the multi-function Scroll/Select switch and LCD (see Fig. 1). Procedures for setting the receiver from the front panel are given in the T6R Receiver User Guide.
- Page 54 The receiver's original operating software can be reloaded from the VFP should the DSP module ever be replaced (this facility is not available from the receiver's front panel). New operating software for the receiver can be downloaded through the VFP (this facility is not available from the receiver's front panel).
- Page 55 VFP Format USING THE VFP To set the parameters applicable to the radio’s operation five main screens can be selected by the user; these screens are as follows: Frequency Management Settings Versions Equipment Profiles. The two indicators at the bottom right of the screen indicate data communications activity between the VFP and radio.
- Page 56 FREQUENCY MANAGEMENT SCREEN The Frequency Management screen allows the receiver's operational frequency to be selected, and allows up to 100 preset frequency channels to be stored in the receiver's internal memory. Frequency Management Screen Four functions are available and selectable from this screen; these are: RECALL EDIT STORE...
- Page 57 b. With the selected channel frequency highlighted and using the mouse and keyboard, edit the frequency display to set-in the required frequency. c. When the required frequency has been set-in, press the keyboard Enter key. The frequency value and channel number change colour to red. This means the parameter has been changed but has not, as yet, been saved to the radio.
- Page 58 SETTINGS SCREEN 15 The Settings screen allows the user to select most of the receiver’s operational settings. Table 1 shows a list of parameters and settings, giving the range adjustment and example settings. Settings Screen 16 To change a setting proceed as follows: a.
- Page 59 Table 1 Operational Settings Parameter Adjustment Range Comments Max 20 characters Equipment ID alpha/numeric & space LCD Backlight Timeout 15 - 120 s Frequency Trim 0 - 100% Equipment Standby State Off - On Pull-down menu to select Front Panel Lock State Unlocked - Locked Pull-down menu to select Marc Baud rate...
- Page 60 BIT SCREEN 17 The BIT screen allows the user to initiate a BIT test from the VFP. Table 2 shows a list of hardware tested and example test results. BIT Screen 18 To initiate a BIT test, click-on TEST using the mouse. The TEST control will be disabled for the duration of the test and an interruptive BIT test will be performed.
- Page 61 20 Failures are put to the top of the list and highlighted in red (errors) and orange (warnings). 21 All tests, apart from BIT supply, BIT Marc and BIT Hdlc will show either Pass or Fail. The BIT supply test will cause the value of the internal unregulated supply to be shown. BIT Marc and BIT Hdlc are not strictly tests of serviceability but merely give an indication as to whether there is anything connected to the MARC or HDLC interfaces.
- Page 62 Note ... The Emergency Fill (Fill 4) is for future use. This Fill cannot be erased but can be reprogrammed. It is strongly recommended that before any attempt is made to reprogram this area, you contact PAE. Reboot Function 26 The Reboot function allows you to change the Main software from Flash to Boot or vice versa. To change the Main software from Flash to Boot proceed as follows: Flash to Boot a.
- Page 63 28 Only the sectors in the non-shaded areas can be erased. These are the Flash code (main operating software) and Fill code (mode specific software). The erase operation is the same for both these codes. 29 As an example, to erase the Flash code proceed as follows: a.
- Page 64 c. Using the mouse click-on Browse. Using the Windows Open screen search for the specified file that contains the Flash code. This could be updated code from a floppy disk (the example screen shown above displays A:\flash.bin as the file containing the Flash code). d.
- Page 65 EQUIPMENT PROFILES SCREEN 33 The Equipment Profiles screen allows the user to perform the following functions: LOAD/SAVE equipment profiles (all settings) to/from a specified file, i.e. T6R.prf. SEND/RECEIVE equipment profiles (all settings) to/from an equipment. EDIT any equipment profile setting.
- Page 66 SAVE Function 36 To save a Settings profile from the VFP to a specified file, click-on SAVE. A standard Windows display will prompt you for the file details (folder, file and file type). Once these details are entered press Save in Windows; the settings profile will then be saved to file. LOAD Function 37 To load a Settings profile from a specified file, click-on LOAD.
-
Page 67: Parts List
Fuses PAE model identification INTRODUCTION This section details the accessories supplied with the PAE T6R receiver and part numbers of the replaceable modules and assemblies. The PAE T6R receiver’s part number is: B6100. ACCESSORIES SUPPLIED WITH RECEIVER Accessories supplied with the receiver are as follows:... - Page 68 SPARE PARTS Spare parts consist of fully tested, burnt-in replacement modules and assemblies, Spare Parts Part Number Comments DSP Module B68-63500010 To order spare parts contact PAE by PSU Regulator Module B68-60000013 phone, fax or by written request. Front Panel Module B68-63500016 PAEs address and fax number are detailed Rx RF Module...
- Page 69 T6R front and rear panels ....DEV083-10/DEV083-11 T6R overall block diagram ......DEV083-26 Wiring and interconnection diagram .
- Page 70 Intentionally Blank Section 6 31-160000RX Page 2...
- Page 71 (DEV083-10 Iss. 2) (DEV083-11) T6R Front and Rear Panels Fig. 1...
- Page 72 (DEV083-26) T6R Overall Block Diagram Fig. 2...
- Page 73 (GA10035-2) Wiring and Interconnection Diagram Fig. 3...
- Page 74 (DEV083-25) Module Location Diagram Fig. 4...
- Page 75 (DEV-83-19-2) DSP Module - Removal and Refitting Detail Fig. 5...
- Page 76 (DEV083-16-2) PSU Regulator Module - Removal and Refitting Detail Fig. 6...
- Page 77 (DEV083-18-2) Power Supply Unit (PSU) - Removal and Refitting Detail Fig. 7...
- Page 78 (DEV083-17-2) Rx RF Module - Removal and Refitting Detail Fig. 8...
- Page 79 (DEV083-27-2) Front Panel Assembly PCB - Removal and Refitting Detail Fig. 9...
- Page 80 (DEV083-28-2) Diagnostic/Set-up Interconnection Lead Fig. 10...
Need help?
Do you have a question about the T6R and is the answer not in the manual?
Questions and answers