Table of Contents
Advertisement
Advertisement
Table of Contents

Related Manuals for Pop-A-Shot Home Dual Shot

Summary of Contents for Pop-A-Shot Home Dual Shot
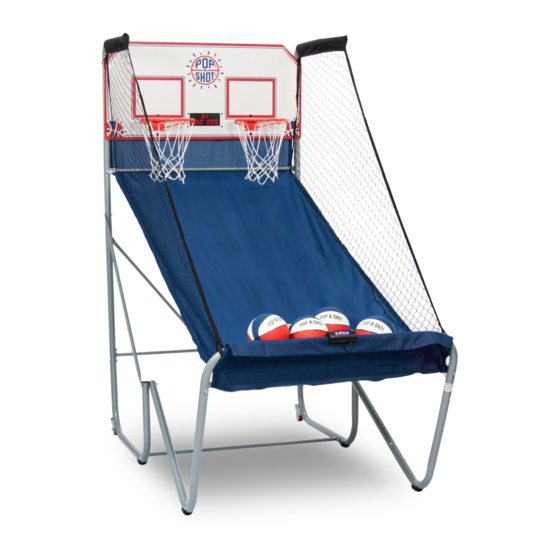
- Page 1 HOME DUAL SHOT OWNER’S MANUAL...
-
Page 2: Important Safety Instructions
There you’ll find more hints and hacks to help you put together your new game. We hope you love your Pop-A-Shot Home Dual Shot and will let your friends and family (and any review sites) know how you feel. If you do have a problem (and it happens), please let us know first and give us a chance to fix it. -
Page 3: Parts List
PARTS LIST Top Tube Board Tube Base Tube pre-installed Connector Tube Cross Tube Side Tube RampTube Lean Bar Cross Bar Side Arm Forward Tube Back Board Score Unit Adapter Screws Ball Return Ramp Allen wrench Balls Pump Back Plate Extra Long Bolt Bolt Bolt Bolt... - Page 4 Attach the Base Tubes (#3) with one Connector Tube (#5) using STEP 1 a Bolt (#26), two Washers (#30) and a Nut (#31) (Fig. 1A). Fig. 1A Attach the Board Tubes (#2) to the STEP 2 Base Tubes (#3) using the spring locks (Fig. 2A). Fig.
- Page 5 STEP 3 Attach the Board Tubes (#2) and Base Tubes (#3) with the other Connector Tube (#5) using a Bolt (#26), two Washers (#30) and a Nut (#31) (Fig. 3A). Fig. 3A STEP 4 Attach the Top Tubes (#1) to the Fig.
- Page 6 STEP 5 Attach two Cross Tubes (#6) to one Board Tube (#1) Fig. 5B using a Bolt (#26), two Washers (#30) and a Nut (#31) (Fig. 5A). Then take one of those attached Cross Tubes and attach its other end to the other Board Tube and Take the two dangling a Cross Tube using a Bolt (#26),...
- Page 7 STEP 7 Attach the Side Tubes (#7) to the Ramp Tubes (#8) using the spring locks (Fig. 7A). Fig. 7A Locking Pin STEP 8 Fig. 8B Attach the Side Tubes (#7), Base Tube (#3) and Side Arms Attach the Cross Bar (#10) to the (#11) using an Extra Long Bolt Top Tubes (#1) using a Bolt (#26), two (#24), two Washers (#30) and a...
- Page 8 STEP 9 Loop the Nets (#23) through the Net Hooks on the Rims (#21). Tip: If you can, grab a helper for this part. STEP 10 Attach the Rims (#21) to the Backboard (#14) using a Short Bolt (#27) and a Washer (#30) on the front and a Back Plate (#22), Washer (#30) and Nut (#31) on the back.
- Page 9 STEP 11 Tip: Try to keep your buddy around for this part. Attach the Scoring Unit (#15) to the Backboard (#14) with a shorter Bolt (#29) through the front of the Backboard and the Scoring Unit and secure with a Nut (#33) in the back (Fig.
- Page 10 STEP 12 Tip: This is the last step where help is very helpful. Attach the Backboard (#14) to the Top Tubes (#1) using a Bolt (#25), two Washers (#30) and a Nut (#31) for each of the top two holes. Tip: Don’t attach the bottom of the Backboard yet.
- Page 11 Fig. 14B STEP 14 Slide the Lean Bar (#9) through the sleeve at the end of the Ball Return Ramp (Fig. 14A). Then attach the Lean Bar to the Ramp Tubes (#8) using the spring locks (Fig. 14B). Fig. 14A STEP 15 Fig.
- Page 12 COMPLETED GAME ELECTRONIC SCORER OPERATION Install Batteries Battery Box: Unscrew bolt using a screwdriver and open the e t t “ ” A e t t of polarity as shown on the inside cover. Then close the cover using a screwdrive r. Turn the power ON using the ON/OFF switch.
-
Page 13: Limited Warranty
LIMITED WARRANTY (the “Company”) warrants the Product to be free from defects in Pop-A-Shot workmanship and materials under normal use and conditions FOR A PERIOD OF 90 DAYS FROM THE DATE OF ORIGINAL PURCHASE in the United States and Canada.
Need help?
Do you have a question about the Home Dual Shot and is the answer not in the manual?
Questions and answers