
Summary of Contents for Crux 14791
- Page 1 8 Cup Food Processor Instruction Manual Styled for Life Designed & Engineered in New York City...
- Page 2 Thank You for choosing We hope your new CRUX small kitchen appliance will add sleek elegange to your kitchen...
-
Page 3: Table Of Contents
Table of Contents Important Safeguards ........................ 2-4 Additional Important Safeguards ....................5 Notes on the Plug ..........................6 Notes on the Cord ..........................6 Plasticizer Warning ...........................6 ELECTRIC POWER ...........................7 Life is Busy ............................7 Getting To Know Your 8 Cup Food Processor ..............8-9 Assembly Instructions ...................... -
Page 4: Important Safeguards
IMPORTANT SAFEGUARDS When using electrical appliances, basic safety precautions should always be followed including the following: READ ALL INSTRUCTIONS. 2. To protect against risk of electrical shock, do not put cord, plug, or appliance in water or other liquid. 3. Close supervision is necessary when any appliance is used by or near children. - Page 5 8. Do not operate any appliance with a damaged cord or plug or after the appliance malfunctions, or is dropped or damaged in any manner. Contact consumer service for examination, repair or adjustment. 9. The use of attachments not recommended or sold by the manufacturer may cause fire, electric shock or injury.
- Page 6 18. Be certain lid is securely locked in place before operating appliance. 19. Never feed food by hand. Always use food pusher. 20. Do not attempt to defeat either the base/bowl or the lid/bowl interlock. SAVE THESE INSTRUCTIONS FOR HOUSEHOLD USE ONLY...
-
Page 7: Additional Important Safeguards
ADDITIONAL IMPORTANT SAFEGUARDS IMPORTANT: To maintain peak performance, do not use your Food Processor for the following: grinding grain, coffee beans or hard spices such as nutmeg; slicing frozen meat; or crushing ice. All users of this appliance must read and understand this manual before operating or cleaning this appliance. -
Page 8: Notes On The Plug
NOTES ON THE PLUG This appliance has a polarized plug (one blade is wider than the other). To reduce the risk of electric shock, this plug will fit in a polarized outlet only one way. If the plug does not fit fully into the outlet, reverse the plug. -
Page 9: Electric Power
Life is Busy Keep it simple in the kitchen with CRUX. Committed to efficiency, ease of use, and sleek design, our entire line of appliances was developed to make your life simpler. High quality products that get the job done, all while looking great on your countertop. -
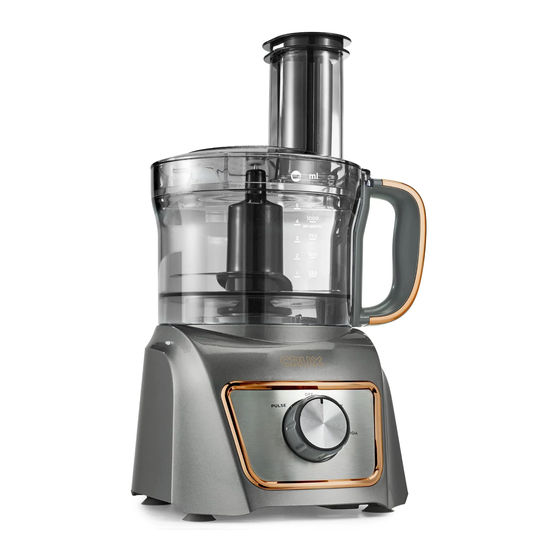
Page 10: Getting To Know Your 8 Cup Food Processor
PULSE HIGH 1000 MAX LIQUID FILL Getting To Know Your 8 Cup Food Processor Product may vary slightly from illustration 1. Base 7. 8 cup food processing 11. Lid work bowl 2. Nonslip Feet 12. Lid/Bowl 8. Work bowl handle Interlock Channel 3. - Page 11 Processing Blade (Sabatier Blade) Stainless steel chopping/mixing/dough blade designed to chop, mix, blend, knead doughs, whisk, crumb, and emulsify. Ideal for chopping raw and cooked meat, grating Parmesan cheese, cake and pastry making, preparing pate, dips, pureed soups. IMPORTANT: The texture of processed foods (such as grated Parmesan cheese) is determined by processing speed and time.
-
Page 12: Assembly Instructions
Before Using For The First Time WARNING: Blade and disc attachments are very sharp. Use extreme care when handling blades and disc. Failure to do so can result in personal injury. 1. Carefully unpack the Food Processor and remove all packaging materials. 2. - Page 13 Attaching the Stainless Steel Processing Blade Figure 5 WARNING: Blade attachment is very sharp. Use extreme care Center Hub to always grasp the center hub when handling the blade. Failure to do so can result in personal injury. Spindle 1. Fit the processing blade’s center hole over the spindle. (See Figure 5.) Turn the blade until it drops to the bottom of the processing bowl and is securely fastened.
-
Page 14: Operating Instructions
Lid Assembly 1. Align the large tab on the lid to that it sits slightly Figure 7 directly over the lid/bowl interlock channel, slightly to the left of the handle. Lid/Bowl 2. Holding the handle of the processing bowl with Interlock Channel one hand, grip the feed chute with the other hand and rotate the lid counter-clockwise;... -
Page 15: Automatic Thermal Protector
7. Use even, constant pressure on the food pusher to feed food into the feed chute. 8. For best results, do not fill processing bowl to maximum. Limit food quantity to 5 cups for optimal food processing performance. NOTE: When processing multiple ingredients for one recipe, avoid over-processing foods at the bottom of the bowl by chopping small batches of each ingredient. - Page 16 • Fruits and Vegetables: Before processing fruits and vegetables, clean and cut into 2-inch x 1-inch pieces. • Mix: Quantities that can be processed in the processing bowl will vary depending upon the density of the ingredients being used. • Adding liquid ingredients: Pour liquid ingredients through the feed chute in the lid while the Food Processor is in operation.
-
Page 17: Food Processing Guide
• Long Slices: Pack up to 2-inch wide food items horizontally in feed chute. (See Figure 8.) • Short Slices: Pack food items vertically in feed chute. (See Figure 9.) • Slicing/Shredding: For best results remember that softer foods such as cheese (Cheddar, mozzarella or Swiss) should be well chilled before processing. -
Page 18: Attachments For Food Processing
Attachments for Food Processing Stainless Steel Processing Blade Push food from sides of processing bowl with spatula when necessary. NOTE: Grating foods such as cheese or vegetables can be achieved by using the processing blade. The length of time and processing speed will determine the final consistency. FOOD SPEED Apple... -
Page 19: User Maintenance Instructions
Reversible Slicing/Shredding Disc NOTE: Cut food to fit feed chute. For best results: Use PULSE, then LOW Speed to process. FOOD DISC/SIDE Apple Slicing/Shredding Carrots Slicing/Shredding Cheese, soft or semi-soft Cheddar, Mozzarella, Swiss Shredding Mushrooms Slicing/Shredding Parmesan, Romano Shredding Potatoes Slicing/Shredding Summer Squash/Zucchini Slicing/Shredding... -
Page 20: Storing Instructions
4. Wipe the Food Processor base with a soft, moistened cloth. WARNING: Never immerse the Food Processor base in water or any other liquid. 5. Rinse and dry each part thoroughly before next use. Storing Instructions 1. Never store the Food Processor while it is wet. Make sure all parts are clean and dry before storing. -
Page 21: Recipes
Recipes Sheet Pan Ranch Potato Chips A healthy alternative to French fries: baked white and sweet potato chips are easy to make and a family favorite. Using the slicing blade, home-made Baked Ranch Potato Chips are ready to eat in under 30 minutes. Other sheet pan potato chip options are: BBQ (use dry bar-b-que seasoning), Parmesan (mix equal parts onion powder, garlic powder, Parmesan), Buffalo (drizzle with hot sauce and melted butter. - Page 22 Recipes Artichoke Hummus Enjoy as a dip with falafel, as a sandwich spread, or serve alongside vegetable crudités. Makes 3 cups • 1 cup cannellini beans, • 4 tablespoons tahini paste drained and rinsed • 4 tablespoons olive oil, or more to thin •...
- Page 23 Recipes Recipes Mango Slaw Sweet & crunchy good. Serve on top of tacos, sandwiches, as a side salad, over fish. Great with sausages, pulled pork, beef short ribs. Makes 3-1/2 cups Serves 4 • 1 large beet • 1 handful red radishes, cleaned •...
- Page 24 Recipes Recipes Light Egg Salad Skip the mayo! We’ve replaced the full fat with light and tangy Greek yogurt. Briny capers and fresh dill brighten the flavor. Add hot sauce to taste. Serves 4-6 • 12 extra-large eggs, hard boiled •...
-
Page 25: Recipes
Recipes Green Pesto Perfect for breakfast or a light lunch… Enjoy avocado toast dabbed with this fresh and vibrant Green Pesto. Try poached eggs and Green Pesto, Green Pesto salad dressing, Green Pesto chicken salad, Green Pesto pizza, or liven up your day with a Green Pesto burger! Makes: 1-1/2 cups •... -
Page 26: Warranty
Limited Two-Year Warranty SENSIO Inc. hereby warrants that for The warranty is only valid for the a period of TWO YEARS from the date original retail purchaser from the of purchase, this product will be free date of initial retail purchase and is from mechanical defects in material not transferable. - Page 27 How To Obtain Warranty Service: You must contact Customer Service at Also, include a copy of the original our toll-free number: 1-866-832-4843. sales receipt. Carefully package A Customer Service Representative the tagged product with the sales will attempt to resolve warranty issues receipt, and send it (with shipping over the phone.
- Page 28 For customer service questions or comments 1-866-832-4843 For Recipes and Cooking tips cruxkitchen.com crux.kitchen cruxkitchen cruxkitchen cruxkitchen CRUX kitchen CRUX is a trademark of 8479950 Canada Inc., Montreal, Canada H3C 4S9. All rights reserved...
Need help?
Do you have a question about the 14791 and is the answer not in the manual?
Questions and answers