Table of Contents
Advertisement
Available languages
Available languages
Advertisement
Table of Contents

Related Manuals for Okoia HML6


Summary of Contents for Okoia HML6
- Page 2 Catalogue language of introduction page English --------------------------------------------- EG1—EG5 French -------------------------------------------- FR6—FR11 Dutch ------------------------------------------- NL12—NL17 Italy ----------------------------------------------- IT18—IT22 Espa ---------------------------------------------- ES23—ES27 Česko -------------------------------------------- CZ28—CZ32 Slovenskýjazyk/Slovenčina------------------SK33—SK37...
-
Page 3: Important Safety Instructions
WARNINGS This appliance is intended for domestic household use only and should not be used for any other purpose or in any other application, such as for none domestic use or in a commercial environment. This appliance is not intended for use by persons (including children) with reduced physical, sensory or mental capabilities, or lack of experience and knowledge, unless they have been given supervision or instructions concerning use of the appliance by a person responsible for their safety. -
Page 5: Operation
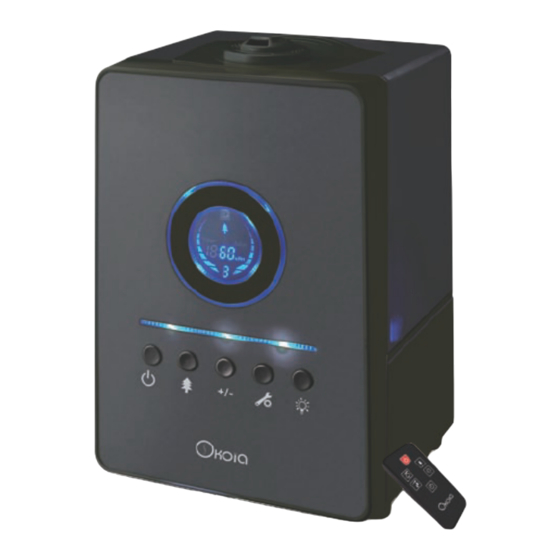
Control Panel Nightlight button Misting/Humidity/Timer setting Power button Ion button Auto/Misting/Humidity/Timer mode Remote Control Power button Misting control button Ion button Humidity adjustment button Nightlight button Timer button OPERATION 1. Place the humidifier on a firm, flat and level surface, about 10 cm away from the wall. 2. - Page 6 7. Plug the humidifier into the mains socket and turn it on by pressing The power indicator light will be illuminated. The humidifier will produce mist. Automatic Mode Press on the control panel until the “Auto” indicator light will flash to select the automatic mode. The humidity and misting level will be adjusted automatically.
-
Page 7: Cleaning And Maintenance
For continuous operation, press until the indicator light goes off. Nightlight Press to turn on the nightlight. Press again to turn it off. Auto Shut-Off When the humidifier is empty, it will turn off automatically and the red indicator light will flash. Turn the humidifier off and unplug it before removing and refilling the water tank. -
Page 8: Consignes De Sécurité Importantes
AVERTISSEMENTS Cet appareil est destiné à un usage domestique uniquement. Toute utilisation autre que celle prévue pour cet appareil, ou pour une autre application que celle prévue, par exemple une application commerciale, est interdite. Cet appareil n’est pas prévu pour être utilisé par des personnes (y compris des enfants) dont les capacités physiques, sensorielles ou mentales sont réduites, ou des personnes dénuées d’expérience ou de connaissance, sauf si elles ont pu bénéficier, par l’intermédiaire d’une personnes responsable de leur sécurité, d’une surveillance ou d’instructions préalables concernant l’utilisation de l’appareil. - Page 11 UTILISATION 1. Posez l’humidificateur sur une surface plane, horizontale et rigide, à environ 10 cm au minimum des murs. 2. Enlevez le réservoir d’eau. 3. Dévissez et retirez le bouchon présent sous le réservoir. 4. Remplissez le réservoir avec de l’eau du robinet froide. NE LE REMPLISSEZ PAS avec de l’eau chaude, car cela peut provoquer une fuite.
-
Page 12: Nettoyage Et Entretien
Appuyez plusieurs fois sur la touche du panneau de contrôle pour sélectionner le mode de réglage de l'humidification, puis appuyez plusieurs fois sur la touche pour régler le taux d’humidité. Vous pouvez régler le taux d’humidité relative entre 45% et 90% par incrément de 5%. Quand le taux d’humidité... -
Page 13: Spécifications
Secouez le filtre à eau, puis nettoyez-le à l’eau du robinet. REMARQUE : Veillez à ce que le panneau de contrôle n’entre jamais en contact avec de l’eau ni aucun autre liquide. Rangement Vérifiez que l’humidificateur est entièrement sec avant de le ranger. Rangez l’appareil dans un endroit sec et frais. -
Page 14: Belangrijke Veiligheidsinstructies
WAARSCHUWINGEN Dit apparaat is alleen bedoeld voor huishoudelijk gebruik en mag niet voor andere doeleinden of toepassingen worden gebruikt, zoals niet-huishoudelijk gebruik of in een commerciële omgeving. Dit apparaat is niet bestemd voor gebruikers (inclusief kinderen) met beperkte fysieke, zintuiglijke of mentale mogelijkheden, of die een gebrek hebben aan ervaring en kennis, tenzij ze onder toezicht staan of instructies hebben ontvangen omtrent het gebruik van het apparaat van een persoon die verantwoordelijk is voor hun veiligheid. - Page 16 Bedieningspaneel Nachtlampknop Nevel/ Vochtigheid / Timerinstelling Automatisch / Nevel/ Stroomknop Ionknop Vochtigheid / Timermodus Afstandsbediening Stroomknop Nevelregelingsknop Ionknop Afste knop voor vochtigheid Nachtlampknop Timerknop WERKING 1. Plaats de bevochtiger op een stevig, vlak oppervlak, op circa 10 cm van de muur. 2.
- Page 17 7. Steek de stekker in een stopcontact en druk op om de bevochtiger in te schakelen. Het stroomcontrolelampje brandt. De bevochtiger produceert nevel. Automatischemodus Druk op op het bedieningspaneel totdat het “Auto” controlelampje knippert om de automatische modus te selecteren. De vochtigheid- en nevelinstelling worden automatisch aangepast.
-
Page 18: Reiniging En Onderhoud
Als de vochtigheid in de kamer gelijk of hoger is dan de ingestelde vochtigheid, dan zal er geen verneveling plaatsvinden. Timer De timer laat toe om de bevochtiger tussen 1 en 12 uur in werking te stellen. Om de afteltimer in te stellen, druk herhaaldelijk op op de afstandsbediening om de gewenste tijd te selecteren. - Page 19 witte azijn. Schud de waterfilter en maak deze vervolgens onder stromend water schoon. OPMERKING: Zorg dat er geen water of een andere vloeistof met het bedieningspaneel in aanraking komt. Opslag Zorg dat de bevochtiger volledig droog is alvorens deze op te bergen. Berg het apparaat in een koele en droge ruimte op.
-
Page 20: Importanti Istruzioni Di Sicurezza
ATTENZIONE Questo apparecchio è destinato esclusivamente a un uso domestico e non deve essere utilizzato per altri scopi o applicazioni, come utilizzi extra-domestici o in ambienti commerciali. Questo apparecchio non deve essere utilizzato da persone (bambini inclusi) con ridotte capacità fisiche, mentali o sensoriali o senza esperienza e conoscenza del prodotto, se non supervisionate e istruite sulle modalità... -
Page 22: Funzionamento
Pannello di controllo Pulsante Luce notturna Impostazione Nebulizzazione / Umidità / Timer Modalità Auto / Nebulizzazione / Pulsante di Pulsante Ioni Umidità / Timer accensione Telecomando Pulsante di accensione Pulsante controllo nebulizzazione Pulsante Ioni Pulsante regolazione umidità Pulsante Luce notturna Tasto timer FUNZIONAMENTO 1. - Page 23 La spia luminosa rossa si accende. L'umidificatore inizia a produrre vapore. Modalità automatica Per selezionare la modalità automatica, premere sul pannello di comando fino a quando l'indicatore "Auto" inizia a lampeggiare. Il livello di umidità e nebulizzazione viene regolato automaticamente. Per disattivare la modalità...
-
Page 24: Pulizia E Manutenzione
Premere più volte sul pannello di comando per selezionare la modalità di regolazione del timer, quindi premere più volte per impostare il tempo desiderato. La spia luminosa "Timer" si accende. Per un funzionamento continuo, premere fino a quando la spia si spegne. -
Page 25: Medidas De Seguridad Importantes
ADVERTENCIAS Este aparato ha sido diseñado para uso doméstico y, por lo tanto, no deberá utilizarse en ningún caso para un propósito distinto al indicado, tales como usos no domésticos o comerciales. Este aparato no ha sido diseñado para ser utilizado por personas o niños con deficiencias fí sicas, sensoriales o mentales, o que no tengan la experiencia o conocimientos necesarios, a menos sean supervisados o hayan sido instruidos en el uso del aparato por una persona responsable por su seguridad. - Page 27 Panel de control Botón de luz nocturna Ajuste de Neblina / Humedad / Temporizador Modo de Neblina / Humedad / Botón de Botón de ionizador Temporizador encendido Mando a distancia Botón de encendido Botón de control de neblina Botón de ionizador Botón de ajuste de humedad Botón de luz nocturna Botón del temporizador...
- Page 28 7. Enchufe el humidificador a la toma de corriente y enciéndalo pulsando La luz indicadora de encendido se iluminará. Ahora el humidificador comenzará a producir una neblina. Modo automático Pulse en el panel de control hasta que el indicador luminoso de «Auto» parpadee para seleccionar el modo automático.
-
Page 29: Limpieza Y Mantenimiento
El indicador del «Temporizador» se iluminará. Para un funcionamiento continuo, presione hasta que el indicador se apague. Luz nocturna Pulse para encender la luz nocturna. Pulse de nuevo para apagarla. Apagado automático El humidificador se desactivará automáticamente cuando se vací e y la luz indicadora parpadeará. -
Page 30: Důležité Bezpečnostní Pokyny
VAROVÁNÍ Přístroj je určen pouze k domácímu použití a nesmí se používat k žádným jiným účelům nebo jiným způsobem, jako např. používání mimo domácnosti nebo ke komerčním účelům. Spotřebič není určen pro používání osobami (včetnë dëtí) s omezenými fyzickými, smyslovými nebo duševními schopnostmi nebo nedostatkem zkušeností... - Page 32 Ovládací panel Tlačítko nočního osvětlení Zamlžení / Vlhkost / Nastavení časovače Auto / Zamlžení / Vlhkost / Vypínač Iontové tlačítko Nastavení časovače Dálkové ovládání Vypínač Ovládací tlačítko zamlžení Iontové tlačítko Knoflík vlhkosti Tlačítko nočního osvětlení Tlačítko časovače OBSLUHA 1. Umístëte zvlhčovač na pevný, plochý a rovný povrch asi 10 cm od zdi. 2.
- Page 33 7. Zapojte zvlhčovač do zásuvky a zapnëte stisknutím Rozsví tí se kontrolka napájení . Zvlhčovač začne produkovat páru. Automatický režim Stisknëte na dálkovém ovládání , dokud kontrolka “Auto” nezačne blikat pro výbër automatického programu. Hladina vlhkosti a zamlžení se nastaví automaticky. Pokud chcete vypnout program, stisknëte pro výbër jiného programu.
-
Page 34: Čištění A Údržba
Opakovanë mačkejte na ovládací m panelu pro výbër časovacího programu a pak opakovanë stisknëte pro výbër požadovaného času. Rozsvítí se kontrolka "Časovač". Pro nepřetržitý provoz stisknëte , dokud kontrolka nezhasne. Noční osvětlení Stisknëte pro zapnutí nočního osvëtlení. Stisknëte znovu pro vypnutí . Automatické... -
Page 35: Dôležité Bezpečnostné Pokyny
VAROVANIA Spotrebič je určený iba na domáce použitie a nesmie sa používať na žiadne iné účely alebo iným spôsobom, ako napr. používanie mimo domácnosti alebo na komerčné účely. Spotrebič nie je určený na používanie osobami (vrátane detí) s obmedzenými fyzickými, zmyslovými alebo duševnými schopnosťami alebo nedostatkom skúseností... - Page 37 Ovládací panel Tlačidlo nočného osvetlenia Rosenie / Vlhkosť / Nastavenie časovača Auto / Rosenie / Vlhkosť / Vypínač Iónové tlačidlo Režim časovača Diaľkové ovládanie Vypínač Ovládacie tlačidlo rosenia Iónové tlačidlo Gombík pre nastavenie vlhkosti Tlačidlo nočného osvetlenia Tlačidlo časovača OBSLUHA 1.
- Page 38 6. Umiestnite nádrž na vodu na základňu a uistite sa, či je na svojom mieste. 7. Zapojte zvlhčovač do zásuvky a zapnite ho stlačením Napájacia kontrolka sa rozsvieti. Zvlhčovač začne vytvárať paru. Automatický režim Stlačte na ovládacom paneli, pokiaľ nezačne blikať kontrolka “Auto” pre výber automatického režimu. Hladina vlhkosti a rosenia sa nastaví...
-
Page 39: Čistenie A Údržba
Opakovanie stláčajte na ovládacom paneli pre výber režimu časovača a potom opakovane stláčajte pre výber požadovaného času. Rozsvieti sa kontrolka "časovača". Pre nepretržitú prevádzku stlačte , až pokiaľ kontrolka nezhasne. Nočné osvetlenie Stlačte pre zapnutie nočného osvetlenia. Stlačte znovu, ak ho chcete vypnúť. Automatické...
Need help?
Do you have a question about the HML6 and is the answer not in the manual?
Questions and answers