Table of Contents
Advertisement
Available languages
Available languages
Advertisement
Chapters
Table of Contents

Summary of Contents for Sega Toys Homestar Original
- Page 1 Sega Toys Homestar Original Manual Bedienungsanleitung...
-
Page 3: Table Of Contents
Contents 1 Introduction Introducing the Sega Toys Homestar Original ....Introducing the Collaborator Takayuki Ohira .... -
Page 4: Introduction
“Light pollution” is spreading and stars are becoming harder to see everywhere. Sega Toys Homestar Original was developed to allow people to experience the real beauty of the disappearing night skies easily, in their own homes. -
Page 5: Safety Precautions
2 Safety Precautions Please read this instruction manual before use. It contains important information that when followed may prevent injury to the user or damage to their property. After reading, store the instruction manual with or near the product for future reference. This product is manufactured with strict safety procedures. -
Page 6: Warnings
Do not use any AC adaptor other than the one included. Doing so could cause electrocution or fire. When removing the AC adaptor, do not pull on the cord. Hold the adaptor and then remove it. If the cord is damaged it could cause electrocution or fire. Do not place the cord near a heating device. -
Page 7: The Sega Toys Homestar
If not using the product for a prolonged period, make sure the disc is removed. Leaving it in may cause damage. 3 The Sega Toys Homestar 3.1 Accessories If parts are damaged or missing on opening the box, please contact our the retail outlet where the product was purchased and do not attempt to use the product. -
Page 8: Part Names And Functions
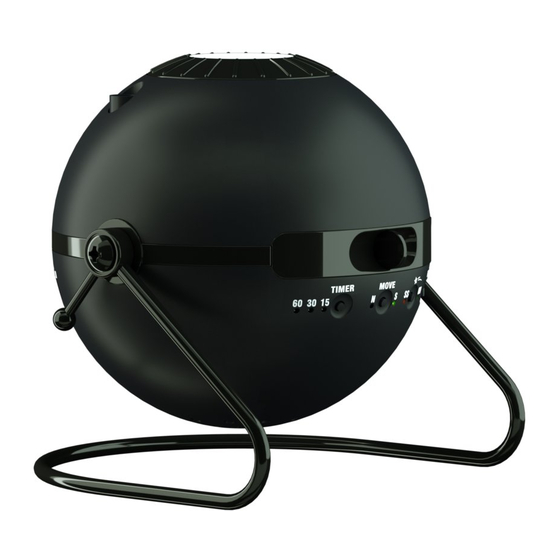
3.2 Part Names and Functions 1. Focus dial. Used to adjust the focus. 2. Disc tray. Used when inserting and removing the interchangeable discs. 3. Projector angle adjustment button. Used to alter the angle of the projector. 4. ON/OFF switch. 5. -
Page 9: Instructions
4 Instructions 4.1 Points for Effective Use When using the product and in order to fully enjoy the images projected, ensure that the room is dark and the targeted ceiling or walls are not lit. The darker the surface and environs, the clearer the stars will be. When entering a darkened room from a bright area, it may take from 5 to 10 min- utes for your eyes to adjust to the darkness. -
Page 10: How To Focus
Remove the lens cap. Switch on the projector. The ON/OFF display lamp will light up. If you darken the room the projected stars will be visible. 4.3 How to Focus If the centre of the projected image is blurred, rotate the focus dial on the projector and adjust the focus. -
Page 11: Inserting The Discs
The knobs on both sides of the projector are in fact screws for holding the angle of the projector in place. Moving the projector by holding the screws, trying to change the angle without loosening them or twisting them too hard may cause them to break. 4.5 Inserting the Discs Switch off... -
Page 12: Using The Shooting Star Function
4.6 Using the Shooting Star Function Please note that shooting stars appear approximately once every 30 seconds. The timing of them is random and they appear in one place. Switch on the shooting star Next, push the diurnal mo- Shooting stars will appear button on the front of the tion switch to ON. -
Page 13: Using The Timer Function
4.8 Using the Timer Function With a convenient automatic switch off function when resting. Push the timer switch on the front of the projector to switch on the timer. Push it once to set the time for 15 minutes, twice for 30 minutes and three times for approximately 60 minutes. - Page 14 If the timer switch is OFF, after about three hours the projector will switch off. In this case, restart the projector. The projector does not work. Ensure that the electric cord is correctly inserted. Ensure that the disc has been inserted. The shooting stars do not appear.
- Page 15 1 Vorwort Vorstellung des Sega Toys Homestar Original ....16 Vorstellung des Entwicklers Takayuki Ohira ....16 2 Vorsichtsmassnahmen Ernste Gefahren .
-
Page 16: Vorwort
Sterne für uns heutzutage nahezu unsichtbar geworden. Die sogenannte „Licht- verschmutzung“ breitet sich mehr und mehr aus und es wird immer schwieriger, Orte zu finden, an denen die Sterne beobachtet werden können. Sega Toys Homestar Original wurde entwickelt, damit jeder die Möglichkeit hat, die einmalige Schönheit des Nacht- himmels direkt zu Hause zu bewundern. -
Page 17: Vorsichtsmassnahmen
2 Vorsichtsmassnahmen Bitte lesen Sie die Bedienungsanleitung vor Gebrauch aufmerksam durch. Sie enthält wichtige Informationen und Hinweise, die zur Sicherheit des Benutzers und zur Vermei- dung von Sach- und Personenschäden unbedingt zu befolgen sind. Bewahren Sie die Anleitung nach dem Durchlesen auf, um später jederzeit darin nachschlagen zu kön- nen. - Page 18 Das Stromkabel darf weder verdreht noch gezogen oder gequetscht werden. Ein schadhaftes Kabel kann Stromschläge oder Brände verursachen. Setzen Sie das Gerät keiner direkten Sonneneinstrahlung aus: Die Linsen können Brände verursachen. Schließen Sie das Gerät nicht direkt an eine Gleichstromquelle an, um die Gefahr von Stromschlägen bzw.
-
Page 19: Gefahren
Falls das Gerät für längere Zeit nicht benutzt werden soll, nehmen Sie die Projekti- onsscheibe heraus, um das Gerät nicht zu beschädigen. 3 Der Sega Toys Homestar 3.1 Zubehör Sollten Sie beim Öffnen der Packung feststellen, dass Teile fehlen, bzw. beschädigte Teile vorhanden sind, versuchen Sie nicht, das Gerät zu benutzen, sondern kontaktieren Sie so-... -
Page 20: Bezeichnungen Der Teile Und Funktionen
1 Projektor 2 austauschbare Projektionsscheiben 1 Netzteil 1 Linsenabdeckung 1 Bedienungsanleitung 1 Sternposter 3.2 Bezeichnungen der Teile und Funktionen 1. Fokus-Einstellring. Dient zur Fokussierung. 2. Schublade für die Projektionsscheibe. Einlegeschacht für die Projektionsscheibe. 3. Stellschraube zum Verstellen des Projektionswinkels. Dient zum Ändern des Projektionswinkels. 4. -
Page 21: Gerätespezifikationen
3.3 Gerätespezifikationen Außenmaße 167 mm 159 mm 151 mm (5,5 in 5 in 4,5 in) Gewicht 1 kg (2.25 lbs) Eingang des Netzteils AC 100 V bis 240 V, 50 Hz bis 60 Hz, 0,2 A Ausgang des Netzteils DC 5 V, 1,2 A Stromverbrauch 4 Gebrauchsanleitung 4.1 Tipps für optimalen Gebrauch... -
Page 22: Anwendung
4.2 Anwendung Stellen Sie den Projektor Schließen Sie den Adap- Öffnen Sie die Schublade auf eine ebene und sta- ter an einem Ende an den der Projektionsscheibe am bile Fläche, zum Beispiel Projektor und am ande- Griff, legen Sie die Scheibe auf einen Tisch. -
Page 23: Einstellen Des Projektionswinkels
4.4 Einstellen des Projektionswinkels Lockern Sie die Schrauben Heben Sie den Projektor in Ziehen Sie die auf beiden auf beiden Seiten des Pro- der Mitte an und stellen Sie Seiten wieder an. jektors. den Projektionswinkel ein. Versuchen Sie nicht, den Winkel zu ändern, ohne die Schrauben zu lockern und ziehen Sie die Schrauben nicht zu fest an. -
Page 24: Benutzen Der Sternschnuppenfunktion
Das Wechseln der Projektionsscheibe bei eingeschalte- tem Projektor kann Augenverletzungen verursachen. Es wird empfohlen, die Projektionsscheibe einzulegen bzw. herauszunehmen, solange der Raum beleuchtet ist, und nicht, wenn der Projektor die einzige Lichtquelle ist, da der Projektor zum Einlegen und Herausnehmen der Scheiben ausgeschaltet werden muss. -
Page 25: Benutzen Der Timerfunktion
Stellen Sie die Taste der Drücken Sie die Taste ein Drücken Taste Rotationsfunktion auf ON. Mal, drehen die Bilder ge- noch einmal, gen den Uhrzeigersinn, um Rotationsfunktion zu deak- die Bewegung des Him- tivieren: Der Sternhimmel melsgewölbes in der nörd- bewegt sich nicht mehr. -
Page 26: Fragen Und Antworten Zu Problemen
5 Fragen und Antworten zu Problemen Die Sterne sind nicht deutlich zu sehen. Stellen Sie sicher, dass die Mitte der Projektion fokussiert ist. Geben Sie den Augen etwas Zeit, um sich an die Dunkelheit zu gewöhnen. Vergewissern Sie sich, dass der Raum, die Decke, die Wände oder die Stelle, auf die die Bilder projiziert werden, nicht beleuchtet sind. - Page 27 Der Nachthimmel dreht sich nicht. Aktivieren Sie die Rotationsfunktion. Stellen Sie sicher, dass sich die Projektionsscheibe und die Schublade der Scheibe in der richtigen Position befinden.
Need help?
Do you have a question about the Homestar Original and is the answer not in the manual?
Questions and answers