
Summary of Contents for TELETRAC NAVMAN DASHCAM 3000
- Page 1 Dashboard Camera DASHCAM 3000 INSTALLATION GUIDE Begin typing title here. Recommend the title does not exceed two lines. First name Surname Presenter’s title Presenter’s email address Date, if needed teletracnavman.com...
- Page 2 If you are not sure of the device location, or of your ability to locate installed devices, please contact Teletrac Navman support, and an authorized installation technician can be dispatched to complete the installation.
- Page 3 Table of Contents Our Priority is Safety, Accuracy and Accountability INTRODUCTION SAFETY CONTENTS OF BOX CAMERA INSTALLATION PAIRING CAMERA CALIBRATION...
- Page 4 Safety To Prevent damage, Electrical Shock or Fire • Do not use broken or damaged cables. • Do not touch the dashboard camera power cable with wet hands. • Do not let the camera get wet. • Do not use non-manufacturer approved power supplies or cables.
-
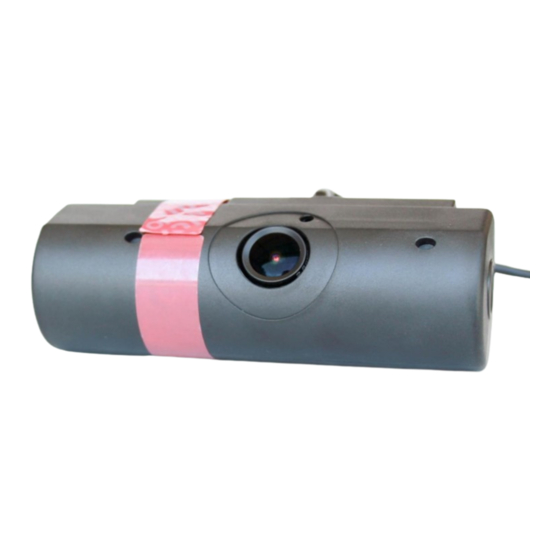
Page 5: Contents Of Box
Mounting bracket/Shield Dashboard Camera Power Cable Antenna and Antenna Cable Contents of Box The dashboard camera is a forward facing vehicle camera, designed to be fitted to any vehicle, using the shield/mounting bracket. The dashboard camera offers full telemetry data and HD video, transmitted through a cellular network. - Page 6 INSTALLATION OVERVIEW The process for installing the camera and pairing into the vehicle- • Securely affix the camera mount to the windshield. • Mount camera into the bracket. • Make power connections and run power cable to camera. • Mount antenna and run cable to camera.
-
Page 7: Installing The Mounting Bracket
Installing the Mounting Bracket • Place the mounting bracket in the desired position inside the vehicle. • Clean the windshield with an alcohol swab. Wait for area to completely dry before attempting to mount bracket in place. • Secure the mounting bracket using the included double-sided tape. - Page 8 Install The Camera Into The Mounting Bracket The dashboard camera cannot be located within the windshield wiper sweep area, although exceptions are made when the vehicle is equipped with a windshield mounted rear view mirror. In vehicles with a rearview mirror, fix the dashboard camera in front of or slightly towards the passenger side of the rearview mirror, so that it is hidden from the driver's view and not a distraction.
-
Page 9: Running The Cables
Running the Cables • Connect the 6-pin Molex to the camera. • Connect the antenna cable to the camera. • Route power cable up to the headliner, and then over the A-Pillar, down to the power connection location. • Route the antenna cable up to the headliner, over to the A-Pillar. - Page 10 Antenna • Antenna cabling should be routed in a manner that will not allow the cabling to come loose and interfere with drivers view out of the windshield. • Secure the antenna into the mounting location. The antenna doesn’t need a clear view of the sky it is only for cellular.
-
Page 11: Power Connections
Power Connections • Locate a source for the constant, ground, and true ignition connections. True ignition will have power while the key is in the on/run position and while the vehicle is cranking. • 5 amp fuses and fuse holders are provided for the constant and ignition connections. - Page 12 Black – True ignition power Power Connections Cont’d • Make sure constant and ignition connections are properly fused using provided fuse holders and 5 amp fuses. • Do not connect to the cigarette lighter for power. • Do not connect the camera to power until it is securely mounted, the camera will start transmitting video otherwise.
-
Page 13: Camera Calibration
Camera Calibration Once the dashboard camera has been secured in position, connect the power to the camera and turn the ignition on, the camera will then display a sequence of lights (refer to the table below). - Page 14 How to: add charts and tables Use the template slides as a guide Pair the camera to the Teletrac Navman installed Telematics Once the camera is installed complete calibration of the camera and verification/pairing of the camera using RIMU or calling into Verifications.
- Page 15 Pairing Camera using RIMU Log into RIMU • Log into RIMU on your mobile device and tap Device Installer > Add Peripheral. Enter Serial Number • Enter the serial number of the device you are pairing with the camera. Follow the ignition sequence •...
- Page 16 Pairing Camera using RIMU Cont’d Confirm video and accept pairing • Confirm the video displayed is the one recorded when the button was pressed • If you do not see the video repeat the test in RIMU Note: The test video clip does not count against the customers fleet video allowance.
- Page 17 Dash camera must be verified at time of installation, failure to verify and pair camera at this time will require a revisit to complete this procedure. Teletrac Navman verification number – 877.778.2478 Verifications is available Mon-Fri 6am-8pm Central, Sat. 6am-6pm Central Before calling in for verification please be sure you have completed the installation and the lights on the camera are correct.
Need help?
Do you have a question about the DASHCAM 3000 and is the answer not in the manual?
Questions and answers