Table of Contents
Advertisement
Available languages
Available languages
Quick Links
Advertisement
Table of Contents

Summary of Contents for Melchioni UCAM 2015
- Page 1 UCAM 2015 / UCAM 2016 Telecamere WiFi per smartphone...
- Page 2 Potrete rivedere foto e filmati in qualsiasi momento. Può essere utilizzata anche per sorvegliare i bambini grazie all’audio bidirezionale (disponibile su UCAM 2015). •...
- Page 3 Figura 1 “Finestra elenco telecamere” Ci sono due opzioni per proseguire nella semplice impostazione della vostra telecamera IP. Installazione della telecamera IP con la MODALITÀ ROUTER Accensione Inserite il connettore dell’alimentatore nella porta d’ingresso dell’alimentazione della telecamera IP e l’alimentatore nella presa di corrente. Il LED di stato sulla telecamera IP diventerà verde per circa 15 secondi.
- Page 4 Nella schermata successiva toccate il pulsante: poi toccate il pulsante: per passare al punto successivo (vedi figura 2). Seguite passo dopo passo le istruzioni nella Finestra elenco telecamere (vedi figura 3 e figura 4). Inserite un nome e una password personalizzati per la telecamera (valori predefiniti: 0000). Per questioni di sicurezza, vi invitiamo a modificare la password predefinita una volta terminata la procedura di impostazione.
- Page 5 APPLE Impostate la telecamera IP affinché si colleghi al router Wi-Fi Aprite “Settings” sul vostro dispositivo iOS, selezionate “Wi-Fi” e attendete la ricerca di una rete. La rete si chiamerà “Wi-Fi-cam-p2p”. Collegatevi a “Wi-Fi-cam-p2p”. A questo punto, aprite l’app “uCare Cam” e selezionate la scheda “Wi-Fi Connect” che si trova nella parte bassa dello schermo.
- Page 6 Premete il pulsante WPS sulla vostra telecamera IP Attendete che il LED di stato si illumini alternativamente di rosso e di verde, poi tenete premuto per circa 2 secondi il pulsante WPS/RESET sulla telecamera IP per entrare in modalità WPS. Il LED di stato diventerà...
- Page 7 Una volta completato il collegamento Wi-Fi, attivate la telecamera IP Accensione Inserite il connettore dell’alimentatore nella porta d’ingresso dell’alimentazione della telecamera IP e l’alimentatore nella presa di corrente. Il LED di stato sulla telecamera IP diventerà verde per circa 15 secondi. Caricamento del programma Il LED di stato diventerà...
- Page 8 Ricerca del router Wi-Fi Il LED di stato diventerà verde e lampeggerà fin- ché non viene trovato il router Wi-Fi (la procedura potrebbe richiedere fino a 5 minuti). Una volta trovato il router, il LED di stato diventerà arancione. Se la telecamera IP non riesce a collegarsi con il router Wi-Fi, controllate lo stato del router o pro- vate con una nuova installazione.
- Page 9 Inserite un nome e una password personalizzati per la telecamera e toccate il pulsante: (vedi figura 17). La nuova telecamera verrà aggiunta all’elenco (vedi figura 18). Figura 16 Figura 17 Figura 18 APPLE Aprite l’app “uCare Cam” Selezionate, nella Finestra elenco telecamere, il segno “+” in alto a destra dello schermo. Selezionate l’opzione “Scan camera QR code”.
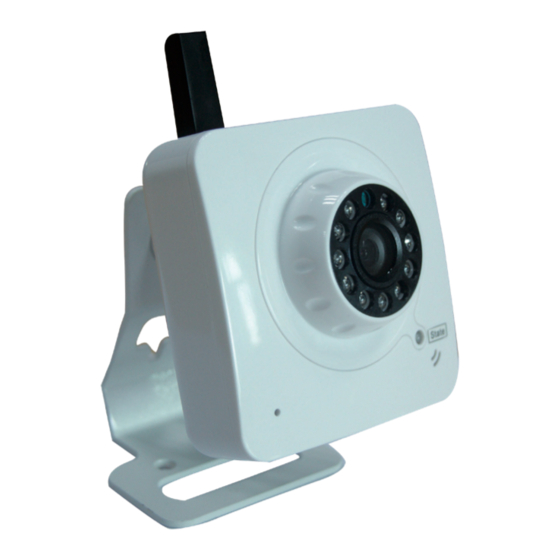
- Page 10 Descrizione prodotto UCAM 2015 1. Antenna Wi-Fi 2. Sensore di intensità luminosa 3. LED IR 4. Nessuna funzione 5. Microfono 6. Indicatore LED 7. Pulsante WPS/RESET 8. Lettore schede Micro SD 9. Altoparlante 10. Attacco per fissaggio telecamera 11. Ingresso 5V CC UCAM 2016 1.
- Page 11 La documentazione ufficiale è disponibile su richiesta. Essa include a titolo esemplificativo ma non limitativo: Dichiarazione di conformità (e di identità del prodotto), scheda di sicurezza dei materiali, rapporto di prova del prodotto. Made in China Importato e distribuito da: MELCHIONI SPA Via Colletta, 37 - 20135 Milano espertiinelettronica@melchioni.it...
-
Page 12: System Requirements
Apple App Store. Advanced features provide you e-mail or app notification when motion is detected. Photo and/or video footage can be played back at any moment. Also suitable for use as a baby monitor due to the 2-way audio function (function available on UCAM 2015). •... - Page 13 Figure 1 “Camera List Window” There are two options to continue the easy set up of your IP camera. Install your IP camera by ROUTER MODE Power On Plug the power adapter DC connector into the DC input port of the IP camera and then plug the power adapter into a wall outlet.
- Page 14 In the following screen select the tab: then select the tab: to enter the next step (see Figure 2). Follow the instructions in the Camera List window step by step (see Figure 3 and Figure 4). Please enter a personal camera name and password (default 0000). You are encouraged to change the default password after setup for security purposes.
- Page 15 APPLE Set the IP camera to connect to the Wi-Fi router Open up “Settings” on your iOS device and select “Wi-Fi” and let it search for a network. The network will be “Wi-Fi-cam-p2p”. Select “Wi-Fi-cam-p2p” to connect. Now, open the “uCare Cam” app and select the tab at the bottom of the screen that says “Wi-Fi Connect”.
- Page 16 Press the WPS button on your IP camera Wait until the status LED flashes between red and green, then press and hold the WPS/RESET button on your IP camera for about 2 seconds to enter WPS mode. The status LED will be flashing green. Enter WPS mode on the Wi-Fi router Press the WPS button on the Wi-Fi router.
- Page 17 Start up the IP camera after the Wi-Fi connection has been completed Power On Plug the power adapter DC connector into the DC input port of the IP camera and then plug the power adapter into a wall outlet. The status LED on the IP camera will turn green for about 15 seconds.
- Page 18 Searching Wi-Fi Router The status LED will flash green until the Wi-Fi router is found (up to 5 minutes). Once the router is found, the status LED will become orange. If the IP camera cannot connect to the Wi-Fi router, please check the Wi-Fi router status or re-install.
- Page 19 Enter a personal camera name and password and select the tab: (see Figure 17). The new camera will be added to the list (see Figure 18). Figure 16 Figure 17 Figure 18 APPLE Open the App “uCare Cam”. Select, in the camera list window, the “+” sign on the right top of the screen. Select option “Scan camera QR code”.
-
Page 20: Product Description
Product description UCAM 2015 1. Wi-Fi antenna 2. Light intensity sensor 3. IR LED 4. No function 5. Microphone 6. LED indicator 7. WPS/Reset button 8. Micro SD card slot 9. Loudspeaker 10. Connection for camera mount 11. 5V DC input UCAM 2016 1. - Page 21 Formal documentation is available upon request. This includes, but is not lim- ited to: Declaration of Conformity (and product identity), Material Safety Data Sheet and product test report. Made in China Imported and distributed by: MELCHIONI SPA Via Colletta, 37 - 20135 Milano espertiinelettronica@melchioni.it...
Need help?
Do you have a question about the UCAM 2015 and is the answer not in the manual?
Questions and answers