Table of Contents
Advertisement
Advertisement
Table of Contents

Summary of Contents for Minuteman RPM1521E
- Page 1 Remote Power Manager RPM1521E User’s Manual...
-
Page 2: Table Of Contents
RPM1521E Table of Contents 1. Product Introduction ....................4 1-1 Applications ......................4 1-2 Product Features ....................5 1-3 Control and Indicators ..................6 1-4 Specifications ...................... 7 1-5 Package Contents ....................8 1-6 Receiving Inspection ................... 8 2. Installation and Setup ....................9 2-1 Hardware Installation .................. - Page 3 RPM1521E Appendix .......................... 39 A1 Shutdown Agent Installation ................. 39 A2 Reset to Default ....................45 A3 Obtaining Technical Support ................46 A4 Limited Product Warranty ..................47 © COPYRIGHT 2015 BY PARA SYSTEMS, INC. All Rights Reserved. All rights of this User Manual (“Manual”), including but not limited to the content, information, and figures are solely owned and reserved by Para Systems, Inc.
- Page 4 RPM1521E An Important Notice This manual contains important safety instructions that should be followed during the installation and the operation of the Remote Power Manager (RPM). SAVE THESE INSTRUCTIONS To ensure safety in all applications ensure that a Qualified Service Personnel installs the system.
-
Page 5: Product Introduction
RPM1521E 1. Product Introduction The RPM1521E is an Internet ready SNMP device designed with integrated versatile functions including power control, temperature monitoring, and remote web administration, event alerts, which helps system administrators or IT personnel to monitor and control their connected equipment and take preventive measures when needed. -
Page 6: Product Features
Control power equipment remotely via the Internet without the presence of service personnel. The power switch is used to completely power down the RPM1521E. Each AC power outlet can be independently switched ON/OFF, power cycled for immediate reboots or rebooted with timed delays, power cycle sequencing with assigned priority and power event scheduling. -
Page 7: Control And Indicators
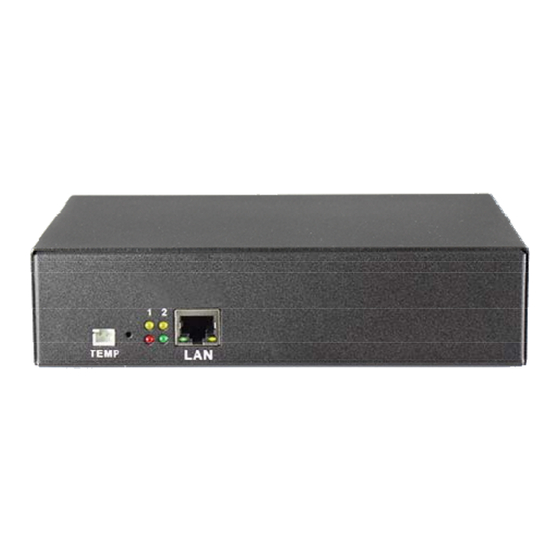
RPM1521E 1-3 Control and Indicators LED #1 is illuminated when output receptacle #1 is ON. LED #2 is illuminated when output receptacle #2 is ON. Reset LED will flash when the Reset function is being performed. Utility Power LED will flash when there is an acceptable AC voltage present. -
Page 8: Specifications
RPM1521E 1-4 Specifications Number of Phase Single (1Ø 2W + G) Input & Output Voltage 100 - 120VAC Input & Output Frequency 47 - 63Hz Total Output Current (max) 12 Amp (at 120V) Surge Energy Rating 800 J Input Protection... -
Page 9: Package Contents
RPM was shipped in are carefully designed to minimize any shipping damage. In the unlikely case that the RPM needs to be returned to MINUTEMAN, please use the original packing material. Since MINUTEMAN is not responsible for shipping damage incurred when the system is returned, the original packing material is inexpensive insurance. -
Page 10: Installation And Setup
2. Installation and Setup 2-1 Hardware Installation The RPM1521E is intended to be installed in a temperature controlled environment that is free of conductive contaminants. Select a location, which will provide good air circulation for the RPM1521E at all times. Avoid locations near heating devices, water or excessive humidity, or where the RPM1521E is exposed to direct sunlight. - Page 11 RPM1521E This is a typical application for the RPM1521E. Input utility power LAN / WAN connection Temperature Probe (optional)
-
Page 12: Setup Procedure
RPM1521E 2-2 Setup-Procedure The minimum requirement to operate the RPM1521E is to setup the IP Address, subnet mask, and the gateway. DHCP is enabled as the default. Contact your system administrator or use the IP Search Utility program (on the CD) to obtain the IP address. If... - Page 13 RPM1521E 4. Configure the Host settings and the click on the Next button. 5. Configure the DNS setting and then click on the Next button. 6. Configure the Web Server setting and then click on the Next button.
- Page 14 RPM1521E 7. Configure the Time Server setting and then click on the Next button. 8. Configure the Time Zone setting and then click on the Next button. 10. Select the Date and Time format and then click on the Next button.
- Page 15 12. This completes the initial Setup-Procedure of the RPM1521E. 13. Now you are able to monitor and control the RPM1521E via a Web browser. See Section 3 for the Web Operation. Setup Procedure using the IP Search Utility program 1.
- Page 16 RPM1521E 8. Click on the Refresh button to search for all of the RPM1521E’s in the LAN. A list of the RPM1521Es will be displayed. 9. Select an RPM1521E from the list that you want to configure. Make the changes to the IP address, the Gateway and the NetMask (Subnet) and then click on the Configure button.
-
Page 17: Web Operation
RPM1521E 3. Web Operation System Login 1. Open a Web Browser (Internet Explorer, Firefox, etc.). 2. Enter the RPM1521E’s IP Address. 3. Enter the Account name (admin) and Password (admin). NOTE: The Account name and the Password are lower case. -
Page 18: Monitor Tab
RPM1521E Monitor Tab The Monitor tab allows the user to monitor and configure the outlets and the external temperature probe. -
Page 19: Power Switch Operation
RPM1521E 3-2-1 Power Switch Operation Clicking on the ALL ON button will turn ON both of the outlets. Clicking on the ALL OFF button will turn OFF both of the outlets. Clicking on one of the bottom buttons will turn ON that individual outlet or turn OFF that individual outlet. -
Page 20: Power
Once the setup is complete click the Save button to save all of the changes. 3-2-3 Safety Shutdown This tab is for setting up the RPM1521E to send the shutdown command to the Shutdown Agent software on the computer. MAC: Enter the computer’s MAC address that you want to shutdown. -
Page 21: Schedule
Once the setup is complete click the Save button to save all of the changes. 3-2-5 Auto-Ping The RPM1521E can be setup to ping an IP-addressable device and detect when that device has stopped communicating. If the Reboot action is selected the power to the connected device will be cycled OFF and then ON. -
Page 22: Peripheral
You may choose the terms of >, < or =. Value: Set the temperature threshold to trigger the command. Duration: Set the time for the RPM1521E to wait before issuing the command. ADD: Click the ADD button to add this action. Delete:... -
Page 23: Copy
3-2-7 Copy After configuring one of the outlets you can copy the same configuration to the other outlet. 3-2-8 Temperature The RPM1521E has an optional External Temperature Probe and it also reports its internal (Device) temperature. Device Temp: Internal temperature of the RPM1521E. -
Page 24: System Tab
System Tab 3-3-1 Network The RPM1521E can be configured with a Static IP address or setup to use DHCP. The default setting is DHCP Enabled. If there is no DHCP service then the following Static addresses are the default settings: Static IP address: 192.168.1.10... -
Page 25: Mail Server
3-3-2 Mail Server This menu allows the administrator to configure the email setting to send notifications once an event has occurred. The RPM1521E does support secure email (TLS) such as Gmail. Email Test: This is used to verify that the email works properly. -
Page 26: Sms Server
Select the correct protocol based on your specific ISP to transmit the SMS message. Device Name: When an event occurs the RPM1521E will send an SMS notification. The device name will identify the device. Account: Enter the account name if required. -
Page 27: Snmp
RPM1521E 3-3-4 SNMP This menu allows the administrator to configure the RPM1521E to send SNMP Traps to Network Management Stations (NMS). SNMP v1-v2c Enable: Check the box to enable SNMP v1 & v2c Traps. SNMP Port: Set the SNMP Access port. The default is 161. -
Page 28: Syslog
RPM1521E 3-3-5 Syslog This menu allows the administrator to configure the RPM1521E to send Systems logs. SYSLOG Test: This is used to verify that the SYSLOG works properly. Host: The IP address of the Server where the System Logs should be sent. -
Page 29: Other
RPM1521E 3-3-7 Other This menu allows the administrator to configure the General and Security settings. System Timeout (Min): The time interval between no activity and when the user will be logged out. Time Format: There are three choices for the time and date format:... -
Page 30: Firewall Tab
If you only want to authorize one IP address, then input 192.168.1.100 in the first four sections and then input 100 in the last section. The default IP address range is the IP address of the computer that you initially use to view the RPM1521E. ADD: Click the ADD button to add this action. -
Page 31: Mac Filter
The administrator can give specific rights to certain users to access the RPM1521E. Enter the MAC address of the user that you want to have access to the RPM1521E. The default MAC address is the MAC address of the computer that you initially use to setup the RPM1521E. -
Page 32: Account Tab
RPM1521E Account Tab This menu allows the administrator to setup authorized user accounts and other privileges. The administrator can assign specific access levels for each user account. Example: The administrator can assign user “A” to have access to outlet number 1 and receive email notifications when an event occurs to that specific outlet. - Page 33 RPM1521E User Level: There are three different user levels: 1. Administrator: Highest level of authority. Can change System and Parameter settings and has outlet control. 2. Manage: Second level of authority. Can change Parameter settings and has outlet control. 3. General: Outlet control only.
- Page 34 RPM1521E Email Tab This menu allows the administrator to setup the email recipient for each account and which alert they will receive. SMS Tab This menu allows the administrator to setup the SMS recipient for each account and which alert they will receive.
-
Page 35: Timesync Tab
RPM1521E TimeSync Tab This menu allows the administrator to set the date and time for the RPM1521E. Device Time: The device time cannot be manually changed. The device time will be automatically changed when using the Time Synchronization or a Time Server. -
Page 36: Chart
RPM1521E Chart This menu allows you to see the Device and External Temperature in a graphical format. Moving the cursor over the chart will display the date, time and the temperature in a text box. Category: Select either the Device temperature or the External temperature to view. -
Page 37: Event Tab
RPM1521E Event Tab This menu displays the events that have occurred with the RPM1521E. Refresh: Click on the Refresh icon to refresh the screen. Download: Click on the Download icon to save the event log information. The event log is saved in .txt format. -
Page 38: Upgrade Tab
Upgrade Tab This menu allows the administrator to upgrade the firmware and download the configuration (settings) file of one RPM1521E and then upload it to another RPM1521E. Upload firmware: Click on Choose File and select the proper firmware file. The firmware file is in .bin format. - Page 39 Open the RPM1521E that you want to configure. Click on the Choose File button. Select the proper configuration file (cfg.bin). Click the Open button and the uploading process will start. Once the upload is complete the RPM1521E will reboot to save the changes.
-
Page 40: Appendix
Agent software is optional. The Shutdown Agent is installed on the computer that you want the RPM1521E to shutdown based on a specified event. The WOL command will be sent to the computer based on one of the Actions configured in Power Tab, Schedule Tab, or the Auto-Ping Tab. - Page 41 RPM1521E 3. The destination location can be changed by clicking on the “Browse” button or click on the “Next” button to install the software in the default location. 4. Click on the “Next” button to continue with the installation.
- Page 42 RPM1521E 5. The Shutdown Agent is being installed. 6. Click on the “Finish” button to complete the installation...
- Page 43 8. After the installation is complete, in the lower right-hand corner of the taskbar the icon for the Shutdown Agent will be displayed. You can also start the program by going to the Start menu. Start -> All Programs -> RPM1521E ShutDown Service (folder) -> Shutdown Service As shown below,...
- Page 44 RPM1521E 9. Right click on the Shutdown Agent icon and then select "Setup(s)" in the menu. 10. After selecting "Setup(s)", the following screen will open.
- Page 45 Shutdown command. File: The user can create a batch file to run before the computer shuts down. The batch file will be triggered once the Shutdown command from the RPM1521E has been received. Delay Time: The amount of time before running the batch file.
-
Page 46: A2 Reset To Default
RPM1521E A2 Reset to Default If you forgot the password and/or the user name the RPM1521E can be reset back to the factory default settings. The reset button is located in the small hole next to the reset Red LED. Insert a pointed object like a paper clip into this hole. -
Page 47: A3 Obtaining Technical Support
RPM1521E A3 Obtaining Service For Technical Support on the Web, please visit the Support section of our Web site or visit our online Discussion Forum. 1. Verify there are no tripped circuit breakers. A tripped circuit breaker is the most common issue. -
Page 48: A4 Limited Product Warranty
RPM1521E A4 Limited Product Warranty Para Systems, Inc. (Para Systems) warrants this equipment, when properly applied and operated within specified conditions, against faulty materials or workmanship for a period of three years from the date of purchase. For equipment sites within the United States and Canada, this warranty covers depot repair or replacement of defective equipment at the discretion of Para Systems.
Need help?
Do you have a question about the RPM1521E and is the answer not in the manual?
Questions and answers