Table of Contents
Advertisement
Tête + Tetrapad Manual
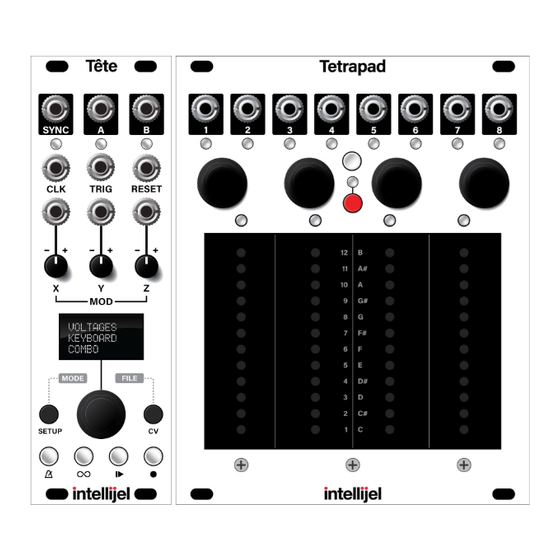
Tête + Tetrapad
Recordable, Syncable, Multi-Dimensional Performance Touch Controller
IMPORTANT!
This manual discusses Tête and Tetrapad when the two are used together. Tetrapad, when used
without Tête, operates significantly different and has its own dedicated manual.
Manual Revision: 2019.12.11
Advertisement
Table of Contents

Subscribe to Our Youtube Channel
Related Manuals for Intellijel Tete

Summary of Contents for Intellijel Tete
- Page 1 Tête + Tetrapad Manual Tête + Tetrapad Recordable, Syncable, Multi-Dimensional Performance Touch Controller IMPORTANT! This manual discusses Tête and Tetrapad when the two are used together. Tetrapad, when used without Tête, operates significantly different and has its own dedicated manual. Manual Revision: 2019.12.11...
-
Page 2: Table Of Contents
Tête + Tetrapad Manual TABLE OF CONTENTS TABLE OF CONTENTS COMPLIANCE PART ONE: INSTALLATION INSTALLATION Installing Your Modules Connecting Tête to Tetrapad Setting Tetrapad’s DIP Switches The microSD Card PART TWO: OVERVIEW OVERVIEW TETRAPAD PANEL OVERVIEW Tête PANEL OVERVIEW Outputs Inputs &... - Page 3 Tête + Tetrapad Manual Quantizing Fader Values Combo Mode: Bipolar Fader Assigning Bipolar Fader Functionality To A Pad Using Bipolar Faders Slew Between Fader Settings Quantizing Fader Values Combo Mode: Crossfader Assigning Crossfader Functionality To A Pad Selecting a Crossfader Type Using Crossfaders Slew Between Fader Settings Combo Mode: Euclidean...
- Page 4 Tête + Tetrapad Manual PART FOUR: NOTES MODE NOTES MODE Entering Notes Mode Setting the Number of Virtual Keys Tuning Mode Choosing a Note Assignment Method Set Notes by Scale Assigning Notes to the Tetrapad ‘Keyboard’ w/Scale Playing the Keyboard Slew Between Notes Set Notes by Chord Assigning Notes to the Tetrapad ‘Keyboard’...
- Page 5 Tête + Tetrapad Manual Slew Between Voltages Quantizing Voltage Values Edit View for Voltages Mode Copying & Pasting Voltage Banks PART SIX: MENUS MENU OVERVIEW MODE Select Menu Mode SETUP Menu Combo Mode SETUP Menu Notes Mode SETUP Menu Voltages Mode SETUP Menu Global Setup Menu System Mode CV Setup Menu...
- Page 6 Tête + Tetrapad Manual PART SEVEN: LOOPING & SEQUENCING THE LOOPER Combo Mode Looping Record & Play with Touch Sync Record & Play with Looper Sync Record & Play Unsynced Overdubbing The Encoder Bar (In Looper) Combo Mode Encoder Bar (Looper) Notes Mode Encoder Bar (Looper) Voltages Mode Encoder Bar (Looper) Save, Load, Rename and Delete Loops...
- Page 7 Tête + Tetrapad Manual LOOPY Loopy with Sequences Loopy Length with Sequences Loopy Shift with Sequences Position Sync with Sequences Loopy with Loops Loopy Shift with Loops Position Sync with Loops PART EIGHT: MISCELLANEOUS CALIBRATION Calibrating Tête Calibrating Tetrapad FIRMWARE VERSION DISPLAY Displaying Tetrapad Firmware Version on Tête Displaying Tetrapad Firmware Version on Tetrapad Version 3 Firmware Display Method...
-
Page 8: Compliance
(2) this device must accept any interference received, including interference that may cause undesired operation. Changes or modifications not expressly approved by Intellijel Designs, Inc. could void the user’s authority to operate the equipment. Any digital equipment has been tested and found to comply with the limits for a Class A digital device, pursuant to part 15 of the FCC Rules. -
Page 9: Part One: Installation
Tête + Tetrapad Manual PART ONE: INSTALLATION Page 8... -
Page 10: Installation
Tête + Tetrapad Manual INSTALLATION Intellijel Eurorack modules are designed to be used with a Eurorack-compatible case and power supply. We recommend you use Intellijel cases and power supplies. Before installing these modules in your case, you must ensure your power supply has a free power header and sufficient available capacity to power the modules: ●... - Page 11 Eurorack case. Ensure the red stripe on the cable lines up with the -12V pins on the bus board. On Intellijel power supplies the pins are labelled with the label “-12V” and a thick white stripe: If you are using another manufacturer’s power...
-
Page 12: Connecting Tête To Tetrapad
Tête + Tetrapad Manual Connecting Tête to Tetrapad IMPORTANT : Tetrapad must be running version 3.0 firmware or higher. See F irmware Version Display After connecting both the Tête and Tetrapad to power, you will need to connect the two modules to each other. -
Page 13: The Microsd Card
This card has been verified and tested by Intellijel, and is the only officially supported card, though it’s possible others might work. One important caveat is that larger cards often have slower read times, so proceed with caution —... -
Page 14: Part Two: Overview
Tête + Tetrapad Manual PART TWO: OVERVIEW Page 13... -
Page 15: Overview
Four push encoders and a shift function give you even more tactile control over your modular system. Tête connects directly to the Intellijel Tetrapad module — enhancing and expanding upon its capabilities; adding additional inputs, outputs, CV control, clocking, sequencing, looping, and many more features and modes. - Page 16 Tête + Tetrapad Manual ● Voltages : This mode divides Tetrapad’s four pads into 8, 12, or 16 zones. Each zone is a voltage storage bank, which sends 8 different memorized voltages to Tetrapad’s eight outputs. Besides taking control of (and expanding) Tetrapad’s Mode assignment features, Tête offers the following additional capabilities: ●...
-
Page 17: Tetrapad Panel Overview
Tête + Tetrapad Manual TETRAPAD PANEL OVERVIEW Below is a general overview of Tetrapad’s front panel. Each of these features will be discussed in detail later in the manual. 1. Pads 1-4 Four identical touch strips, each of which is sensitive to both vertical position and finger pressure. - Page 18 Tête + Tetrapad Manual 4. Pad Status LEDs 1-4 Some modes use these LEDs to indicate a pad’s status. For example, they may indicate whether or not a pad’s fader level is latched; or the octave to which a note is assigned. 5.
- Page 19 Tête + Tetrapad Manual 9. Output Status LEDs In general, the color of these LEDs glow solid and indicate the type of signal appearing at the output jack for the active mode. See the table below. When using Tetrapad, an Output Status LED’s brightness (as well as its color) can provide useful status information.
-
Page 20: Tête Panel Overview
Tête + Tetrapad Manual Tête PANEL OVERVIEW Below is a general overview of Tête’s front panel. Many of these features will be discussed in greater detail in the appropriate sections of the manual. Outputs 1. SYNC OUT By default the S YNC OUT jack is assigned to the “EOL/EOS”... -
Page 21: Inputs & Attenuverters
Tête + Tetrapad Manual 3. B OUT By default the B OUT jack is assigned to the “Touch” function for both Combo and Voltages Modes, meaning it outputs a +5V trigger whenever you touch any of Tetrapad’s four pads. In Notes Mode, the ... - Page 22 Tête + Tetrapad Manual 5. TRIG IN Connect an external trigger or gate to this input, and assign that trigger/gate to control any one of a number of global functions using the C V Setup Menu , accessed by pressing the ...
- Page 23 Tête + Tetrapad Manual For Combo Mode, the X input is unassigned by default. Numerous alternative assignments are available for each mode, including: Reset and Run options; Loopy control options, Slew control; Notes Mode assignment modifications; Voltages Mode bank changes; Combo Mode’s Euclidean and LFO features, and many more.
- Page 24 Tête + Tetrapad Manual All the Notes Mode CV Assignment possibilities for Inputs X, Y and Z are discussed in C V Setup: Input X, Y and Z (Notes Mode) . X, Y, and Z input options for Voltages Mode and ...
- Page 25 Tête + Tetrapad Manual 10. X Attenuverter Adjusts the attenuation and inversion of the voltage appearing at X IN [7] . At the 12:00 o’clock position, the X input voltage is fully attenuated, and no inversion occurs. Clockwise rotations decrease the attenuation, thus increasing the amount of X input voltage that passes through and modulates the parameter to which it’s assigned.
-
Page 26: Controls
Tête + Tetrapad Manual Controls A. SCREEN The screen provides a visual overview of everything happening on Tête, including menu selection, parameter settings, and sequencer/looper feedback. B. SCREEN Encoder This is a push encoder, which is used to select menus, set parameters and control screen operations. - Page 27 Tête + Tetrapad Manual E. TEMPO ( ) Button This button controls and displays Tête’s tempo, and flashes in time with it. Long-press (>1 sec) the button to display Tête’s TEMPO menu, in which you can choose whether the tempo is set externally or internally. Internal tempos can be set directly in the TEMPO menu, or by tapping the TEMPO button repeatedly at the desired beat.
-
Page 28: Mode Overview
Tête + Tetrapad Manual MODE OVERVIEW Tetrapad, when controlled by Tête, offers three entirely unique modes of operation. They are: ● COMBO MODE : In this mode, each of Tetrapad’s four pads can be assigned a function independent of the other three pads, such as: a fader; a bi-polar fader; a crossfader; an LFO; a dual switch;... -
Page 29: Part Three: Combo Mode
Tête + Tetrapad Manual PART THREE: COMBO MODE Page 28... -
Page 30: Combo Mode
Tête + Tetrapad Manual COMBO MODE Combo Mode enables you to assign a unique function to each of Tetrapad’s four pads and its two associated outputs. In Combo Mode, different pads can perform different functions (i.e. one pad might be an LFO; one might be a pair of switches; and two more might be assigned as faders). Available functions in Combo Mode are: ●... - Page 31 Tête + Tetrapad Manual ● Euclidean A E uclidean pad generates a euclidean gate pattern at the pad’s left output jack, with full user control over both the number of gates and the total number of steps. Tête must be clocked (either internally or externally) in order for the euclidean pattern to play. Euclidean rhythms can be modified in real-time, and they respect whatever swing setting is set in the Mode Menu.
-
Page 32: Entering Combo Mode
Tête + Tetrapad Manual Entering Combo Mode To enter Combo Mode: 1. Long-press (>1 sec) the S ETUP button to display the MODE Select Menu. MODE 2. Rotate the screen encoder to highlight C ombo , then press the encoder to select it. The Combo Mode screen appears and Tetrapad switches to Combo Mode. - Page 33 Tête + Tetrapad Manual 4. Rotate Tetrapad E ncoder 1 to change the function assigned to P ad 1 . As you rotate the encoder, you’ll see two things happen: 1) Pad 1’s function icon on Tête’s main screen will change as you rotate through the various functions, and 2) the Tetrapad pad animation will change to reflect the selected function.
-
Page 34: Main Screen & Menus In Combo Mode
Tête + Tetrapad Manual Main Screen & Menus in Combo Mode In Combo Mode, Tête’s main screen offers a wealth of options and visual feedback. Specifically: ● Pad ( n ) An icon is displayed for each of the four pads on Tetrapad, with the icon representing the function to which the pad is assigned. -
Page 35: Combo Mode: Unipolar Fader
Tête + Tetrapad Manual Combo Mode: Unipolar Fader Page 34... -
Page 36: Assigning Unipolar Fader Functionality To A Pad
Tête + Tetrapad Manual A unipolar fader converts a pad into a pressure and position sensitive fader. Slide your finger up and down the pad to operate it as a virtual fader — with the bottom position sending 0V to the pad’s left output, and the top position sending 5V. -
Page 37: Using Unipolar Faders
Tête + Tetrapad Manual Using Unipolar Faders 1. Slide a finger up and down a pad, just as if you were moving an actual fader. Alternately, you can simply tap a pad anywhere along its vertical scale and the fader will jump to that level directly (using a slew rate you define, as discussed shortly). -
Page 38: Slew Between Fader Settings
Tête + Tetrapad Manual Slew Between Fader Settings If you prefer to tap a fader (rather than drag it) or if you choose to latch a fader, you’ll appreciate the ability to set the rate at which fader values move from one touched level to the next. 1. -
Page 39: Combo Mode: Bipolar Fader
Tête + Tetrapad Manual Combo Mode: Bipolar Fader Page 38... -
Page 40: Assigning Bipolar Fader Functionality To A Pad
Tête + Tetrapad Manual A bipolar fader converts a pad into a pressure and position sensitive fader (much like a unipolar fader), but with its null (0V) position in the c enter of the pad. This means it transmits positive voltages to the pad’s left output when touched above the midpoint, and negative voltages when touched below the midpoint. -
Page 41: Using Bipolar Faders
Tête + Tetrapad Manual Using Bipolar Faders 1. Slide a finger up and down a pad, just as if you were moving an actual fader. Alternately, you can simply tap a pad anywhere along its vertical scale and the fader will jump to that level directly (using a slew rate you define, as discussed shortly). -
Page 42: Slew Between Fader Settings
Tête + Tetrapad Manual Slew Between Fader Settings If you prefer to tap a fader (rather than drag it) or if you choose to latch a fader, you’ll appreciate the ability to set the rate at which fader values move from one touched level to the next. 1. -
Page 43: Combo Mode: Crossfader
Tête + Tetrapad Manual Combo Mode: Crossfader Page 42... -
Page 44: Assigning Crossfader Functionality To A Pad
Tête + Tetrapad Manual A Crossfader sends a pair of related voltages to the pad’s two associated outputs, with the voltages changing proportionally to your finger’s vertical position. By default, the pad works as a l inear crossfader : touching the bottom of a pad sends +5V to the pad’s left jack and 0V to the right jack. -
Page 45: Selecting A Crossfader Type
Tête + Tetrapad Manual Selecting a Crossfader Type In general, a crossfader sends a pair of related voltages to the pad’s two associated outputs, with the voltages changing proportionally to your finger’s vertical position. The exact relationship between these two voltages is determined by the selected crossfader type. You can select one of four crossfader types by pressing Tetrapad’s red SHIFT button (making the LED glow red), then pressing the pad’s encoder to step through the available shapes. - Page 46 Tête + Tetrapad Manual This type of crossfader sends 100% of the maximum voltage to both the left and right jacks when your finger is in the middle of the pad. Sliding your finger up the pad (from center) decreases the voltage being sent to the left output until, at the top of the pad, 0V is sent to the left jack. ...
-
Page 47: Using Crossfaders
Tête + Tetrapad Manual Using Crossfaders 1. Slide a finger up and down a pad, just as if you were moving an actual crossfader. Alternately, you can simply tap a pad anywhere along its vertical scale and the crossfader will jump to that level directly (using a slew rate you define, as discussed below). -
Page 48: Slew Between Fader Settings
Tête + Tetrapad Manual Slew Between Fader Settings If you prefer to tap a crossfader (rather than drag it) or if you use latch mode, you’ll appreciate the ability to set the rate at which crossfade values move from one touched level to the next. 1. -
Page 49: Combo Mode: Euclidean
Tête + Tetrapad Manual Combo Mode: Euclidean Page 48... -
Page 50: Assigning Euclidean Functionality To A Pad
Tête + Tetrapad Manual A Euclidean pad generates a euclidean gate pattern at the pad’s left output jack. The pad’s right output provides an additional source of continuous position-based modulation, which can be used to modulate another module, or quantized and sent to the pitch input of an oscillator. Tête must be clocked (either internally or externally) in order for the euclidean pattern to play. -
Page 51: Using Euclidean Pads
Tête + Tetrapad Manual Using Euclidean Pads When you assign the Euclidean function to a pad, many of its parameters are indicated by the pad graphic on Tête’s screen. ● Length of Pattern: Displays the overall length of the euclidean pattern in number of steps. Adjust by press-turning encoder (in Normal, unshifted mode). - Page 52 Tête + Tetrapad Manual To program a basic euclidean rhythm: 1. Set a tempo in Tête, using either its internal clock or an external clock plugged into the C LK input (as discussed in T empo Menu 2. Push-turn the pad’s encoder to set the desired pattern length (number of steps). 3.
-
Page 53: Creating & Rotating Syncopated Patterns
Tête + Tetrapad Manual Creating & Rotating Syncopated Patterns Assigning two or more pads to the Euclidean function and patching them to different sound sources results in interesting musically syncopated patterns. In the following example, we’ve set Pad 1 to a 4/16 (four on the floor) pattern and Pad 2 to a syncopated 5/16 pattern (five gates spaced as evenly as possible across the 16 steps). -
Page 54: Using Euclidean Pads As Simple Drum Pads
Tête + Tetrapad Manual Using Euclidean Pads as Simple Drum Pads If you’d prefer to use a pad as a simple 1-shot drum trigger (rather than triggering a euclidean sequence), you can do this by setting the euclidean sequence length to zero. Specifically: 1. -
Page 55: Slew Between Vertical Output Voltages
Tête + Tetrapad Manual Slew Between Vertical Output Voltages When you touch a pad at various heights, the output voltage normally jumps to the touched voltage instantly. However, you can have Tête slew between voltage changes, at a user-determined rate. 1. -
Page 56: Combo Mode: Switches
Tête + Tetrapad Manual Combo Mode: Switches Page 55... -
Page 57: Assigning Switch Functionality To A Pad
Tête + Tetrapad Manual When designated as a switch, a single pad becomes two independent switches — one on the top half of the pad (whose value appears at the pad’s left output); and one on the bottom half of the pad (whose value appears at the pad’s right output). -
Page 58: Using Switches
Tête + Tetrapad Manual Using Switches 1. Touch a switch to send +5V to the corresponding Out jack. Each pad is divided into two switches — one assigned to the top half of a pad, and the other assigned to the bottom. The top switch controls the pad’s left (odd numbered) output. -
Page 59: Combo Mode: Lfo
Tête + Tetrapad Manual Combo Mode: LFO Page 58... -
Page 60: Assigning Lfo Functionality To A Pad
Tête + Tetrapad Manual When configured as an LFO, a single pad becomes a performance controller for a built-in Low Frequency Oscillator (LFO). The LFO output appears on the pad’s left output jack, while an inverted version of the LFO is sent to the right output jack. Using a combination of the pad itself, plus the SHIFT button and encoders, you can set the LFO rate, waveshape, polarity, level, quantization, and other LFO attributes and control them in real time. -
Page 61: Using An Lfo (Overview)
Tête + Tetrapad Manual Using an LFO (Overview) When a pad is designated as an LFO, its left (odd numbered) output transmits an LFO whose shape is set by turning the pad’s encoder, and whose rate is determined by the vertical position of your finger on the pad. -
Page 62: Locking The Lfo Rate
Tête + Tetrapad Manual touching the bottom of the pad would divide that clock by 32, resulting in a cycle nearly 6.5 minutes long. The maximum LFO rate will, however, always top out at 100Hz. You can also assign Tête’s CV inputs to further modify the LFO rate, as discussed in CV Setup: Input X, Y and Z (Combo Mode) ... -
Page 63: Unipolar, Bipolar And Quantized Lfos
Tête + Tetrapad Manual Unipolar, Bipolar and Quantized LFOs Any LFO can be made bipolar (-5V to +5V, without attenuation); unipolar positive (0V to +5V, without attenuation); or unipolar negative (-5V to 0V, without attenuation. In addition, the LFO can be quantized according to the root and scale set in the ... -
Page 64: Part Four: Notes Mode
Tête + Tetrapad Manual PART FOUR: NOTES MODE Page 63... -
Page 65: Notes Mode
Tête + Tetrapad Manual NOTES MODE Page 64... - Page 66 Tête + Tetrapad Manual Notes Mode turns Tetrapad into either a 4, 8, 12, or 16-key keyboard, with each “key” capable of sending a different note to Outputs 1-4. This mode divides each of the four pads into one, two, three or four zones (user selectable).
-
Page 67: Entering Notes Mode
Tête + Tetrapad Manual Entering Notes Mode To enter Notes Mode: 1. Long-press (>1 sec) the S ETUP MODE button to display the MODE Select Menu. 2. Rotate the screen encoder to highlight N otes , then press the encoder to select it. The Notes Mode screen appears and Tetrapad switches to Notes Mode. -
Page 68: Setting The Number Of Virtual Keys
Tête + Tetrapad Manual Setting the Number of Virtual Keys One of the first things you’ll wish to do in Notes mode is to configure Tetrapad’s ‘keyboard’ to play either 4, 8, 12, or 16 pads, or virtual ‘keys’. To do so: 1. -
Page 69: Tuning Mode
Tête + Tetrapad Manual Tuning Mode Notes Mode features a special Tuning Mode that instantly re-configures all four of Tetrapad’s note outputs (1 - 4) to send 0V, and its TRIG and GATE outputs (7 - 8) to send high gate signals. This lets you use Tetrapad as a quick tuning reference for any connected oscillators. -
Page 70: Set Notes By Scale
Tête + Tetrapad Manual Set Notes by Scale This mode uses Tetrapad’s encoders to auto-map notes to its virtual ‘keys’ & output jacks using the built-in Scale Library (accessed via the Mode SETUP Menu). You can also assign a root note and starting octave to those scales. - Page 71 Tête + Tetrapad Manual The following illustration shows how Tetrapad’s push-encoders, SHIFT button, and Outputs function when assigning notes by Scale. The other functions (common across all Notes Modes) are also shown for convenience. Page 70...
-
Page 72: Assigning Notes To The Tetrapad 'Keyboard' W/Scale
Tête + Tetrapad Manual Assigning Notes to the Tetrapad ‘Keyboard’ w/Scale The following steps discuss using the Scale feature to assign note values to Tetrapad “keys” and outputs: 1. Select whether you want Tetrapad split into 4, 8, 12 or 16 virtual ‘keys’ using the Mode SETUP Menu (accessed by short-pressing the ... -
Page 73: Playing The Keyboard
Tête + Tetrapad Manual zero-range cause the Pad Status LED to glow red. With each subsequent octave decrease, the LED will brighten. Tetrapad gives you a 10 octave range. NOTE: Pressing Encoder 2 resets the keyboard to the zero octave. 5. - Page 74 Tête + Tetrapad Manual The following flow diagram illustrates these basic note setting and performance instructions graphically: Page 73...
-
Page 75: Slew Between Notes
Tête + Tetrapad Manual Slew Between Notes Tetrapad also gives you the ability to slew between notes. To do so, press the red SHIFT button and continue holding it while turning Encoder 1. Clockwise turns increase the time it takes to move from one note to another (up to approximately a 4 second glide). -
Page 76: Set Notes By Chord
Tête + Tetrapad Manual Set Notes by Chord This mode uses Tetrapad’s encoders to auto-map notes to its virtual ‘keys’ & output jacks using a built-in Chord Library. You can also assign a root note and starting octave to those chords. Four notes within each chord appear at the four outputs. - Page 77 Tête + Tetrapad Manual The following illustration shows how Tetrapad’s push-encoders, SHIFT button, and Outputs function when assigning notes by Chord. The other functions (common across all Notes Modes) are also shown for convenience. Page 76...
-
Page 78: Assigning Notes To The Tetrapad 'Keyboard' W/Chord
Tête + Tetrapad Manual Assigning Notes to the Tetrapad ‘Keyboard’ w/Chord The following steps discuss using the Chord feature to assign note values to Tetrapad “keys” and outputs: 1. Select whether you want Tetrapad split into 4, 8, 12 or 16 virtual ‘keys’ using the Mode SETUP Menu, as described in ... -
Page 79: Playing Chords
Tête + Tetrapad Manual 7. Turn Encoder 3 to r otate the output assignment of each note. With each clockwise rotation, the output assignments shift to the right by 1. So if you rotate Encoder 3 one turn CW, the root note moves to Out 2 and all the other output assignments shift to the right by 1, with note 4 now appearing at Out 1. -
Page 80: Slew Between Chords
Tête + Tetrapad Manual Slew Between Chords Tetrapad gives you the ability to slew between chord changes. To do so, press the red SHIFT button and continue holding it while turning Encoder 1. Clockwise turns increase the time it takes to move from one chord to another (up to approximately a 4 second glide). -
Page 81: Set Notes Manually
Tête + Tetrapad Manual Set Notes Manually This mode uses Tetrapad’s encoders to manually map each virtual “key” to a specific note for each output. Manual note assignment is for anyone who wants direct control over the pitch of every key and output, and doesn’t wish to be constrained by traditional scales or chords. - Page 82 Tête + Tetrapad Manual The following illustration shows how Tetrapad’s push-encoders, SHIFT button, and Outputs function when assigning notes manually. The other functions (common across all Notes Modes) are also shown for convenience. Page 81...
-
Page 83: Assigning Notes To The Tetrapad 'Keyboard' Manually
Tête + Tetrapad Manual Assigning Notes to the Tetrapad ‘Keyboard’ Manually The following steps discuss assigning note values to Tetrapad “keys” and outputs: 1. Select whether you want Tetrapad split into 4, 8, 12 or 16 virtual ‘keys’ using the Mode SETUP Menu, as described in ... -
Page 84: Playing The Keyboard
Tête + Tetrapad Manual Playing the Keyboard 1. Touch any of the 4, 8, 12 or 16 keys (as chosen in S etting the Number of Virtual Keys ) to send the assigned notes to Outputs 1-4. CV representing the vertical position of your tap on the key is sent to Out 5. CV representing the pressure you apply to any key is sent to Out 6. -
Page 85: Copying & Pasting Notes
Tête + Tetrapad Manual Copying & Pasting Notes You can copy one pad’s note assignments to another pad’s. To do so: 1. Touch a nd hold the virtual pad whose note assignments you want copied. 2. With your finger still on the pad, press Tetrapad’s white EDIT button. That pad’s note assignments will be copied into temporary memory. -
Page 86: Edit View For Notes Mode
Tête + Tetrapad Manual Edit View for Notes Mode Normally, when you make any changes to a note assignment for a “key”, the edits are applied instantly and are sent immediately to the Tetrapad outputs. However, there may be instances when you would like to make changes to your “keyboard”... -
Page 87: Part Five: Voltages Mode
Tête + Tetrapad Manual PART FIVE: VOLTAGES MODE Page 86... -
Page 88: Voltages Mode
Tête + Tetrapad Manual VOLTAGES MODE Page 87... -
Page 89: Entering Voltages Mode
Tête + Tetrapad Manual Imagine pushing a single button that sends one voltage to a filter’s cutoff frequency, another voltage to its resonance, a third to a Quadrax CV to control a function’s attack time, and a fourth to another Quadrax CV input to control its decay time. -
Page 90: Setting The Number Of Voltage Banks
Tête + Tetrapad Manual Setting the Number of Voltage Banks One of the first things you’ll wish to do in Voltages Mode is to divide Tetrapad’s four physical pads into either 8, 12, or 16 virtual pads, with each virtual pad capable of storing a bank of 8 voltages. To do so: 1. - Page 91 Tête + Tetrapad Manual NOTE: You can quickly scroll through all 8 outputs and see their assigned values by entering Edit View for Voltages Mode (short-press the white EDIT button), then rotating Tête’s encoder to select which output’s voltage value you wish to view. Page 90...
-
Page 92: Random Voltage Assignment
Tête + Tetrapad Manual Random Voltage Assignment You can randomize a single output voltage in a bank; all output voltages in a bank; or all output voltages for all banks. Specifically: To randomize a single output voltage in a bank: 1. -
Page 93: Reset A Voltage
Tête + Tetrapad Manual Reset a Voltage To quickly reset a voltage to 0V: 1. Touch a virtual pad and keep your finger on the pad (bank). 2. Press an Encoder to reset the corresponding output voltage to 0V. If the SHIFT LED is reen... -
Page 94: Edit View For Voltages Mode
Tête + Tetrapad Manual Edit View for Voltages Mode Normally, when you make any changes to a voltage bank, the edits are applied instantly and are sent immediately to the Tête and Tetrapad outputs. However, there may be instances when you would like to make changes to a bank (or banks) without affecting the output. -
Page 95: Copying & Pasting Voltage Banks
Tête + Tetrapad Manual Copying & Pasting Voltage Banks You can copy one bank of voltages to another bank. To do so: 1. Touch a nd hold the virtual pad that corresponds to the bank of voltages you want to c opy . 2. -
Page 96: Part Six: Menus
Tête + Tetrapad Manual PART SIX: MENUS Page 95... -
Page 97: Menu Overview
Tête + Tetrapad Manual MENU OVERVIEW Various menus are accessible on the Tête screen. Specifically: ● MODE Select Menu: This is the top-level Tête menu, and is used for assigning Tête/Tetrapad’s operational mode. To access this menu, long-press (>1 sec) the S ETUP MODE ... -
Page 98: Mode Select Menu
Tête + Tetrapad Manual MODE Select Menu Long-press (>1 sec) the S ETUP button to MODE display the MODE Select Menu: Rotate the screen encoder to highlight the desired mode, then press the encoder to select it. Mode options are: ●... -
Page 99: Combo Mode Setup Menu
Tête + Tetrapad Manual Combo Mode SETUP Menu When in Combo Mode, the Mode SETUP Menu contains the parameters shown to the right. The configuration of some parameters affects the availability of other parameters, as indicated. To select a parameter for editing, rotate the encoder to highlight it. - Page 100 Tête + Tetrapad Manual ● Looper Sync: (Off, On) On : Synchronizes Tête’s recording length to the clock (internal or external) or to a TRIG signal (if defined in the CV Setup menu), meaning recording commences ‘on the beat,’ and it stops ‘on the beat.’ Looper Sync works in conjunction with the L oop Length...
- Page 101 Tête + Tetrapad Manual ● LFO Sync: (On, Off) On : Any Combo Mode pad assigned as an LFO will synchronize its LFO rate to Tête’s clock (which can be either internally generated or synchronized to an external clock via Tête’s CLK input), as discussed in ...
- Page 102 Tête + Tetrapad Manual ● Scale: (n) If you enable quantization for any pad in Combo mode, then the selection you make here determines the scale to which the pad’s values are quantized. ● Scale Root: (n) If you enable quantization for any pad in Combo mode, then the selection you make here determines the root note of the scale to which the pad’s values are quantized.
-
Page 103: Notes Mode Setup Menu
Tête + Tetrapad Manual Notes Mode SETUP Menu When in Notes Mode, the Mode SETUP Menu contains the parameters shown to the right. The configuration of some parameters affects the availability of other parameters, as indicated. To select a parameter for editing, turn the encoder to highlight it. - Page 104 Tête + Tetrapad Manual ● Seq. Swing: ( 50%, 54%, 58%, 62%, 66%, 70%, 75%, 78%) Sets the amount of swing to apply to the beat. Swing adds a delay to every other beat (thus, causing it to ‘swing’). Tête’s swing percentages match those available in the Steppy module, and also conform to the MPC “standard”...
- Page 105 Tête + Tetrapad Manual ● Scale: (n) ( Available if Assign = “w/Scale”) Sets to the scale to which Tetrapad’s ‘keys’ (virtual pads) are assigned to notes when using Notes Mode and assigning notes using the A ssign: w/Scale option (described above). The following scales are available (all illustrations assume a root of C): ●...
-
Page 106: Voltages Mode Setup Menu
Tête + Tetrapad Manual Voltages Mode SETUP Menu When in Voltages Mode, the Mode SETUP Menu contains the parameters shown to the right. The configuration of some parameters affects the availability of other parameters, as indicated. To select a parameter for editing, turn the encoder to highlight it. - Page 107 Tête + Tetrapad Manual ● Seq. Swing: ( 50%, 54%, 58%, 62%, 66%, 70%, 75%, 78%) Sets the amount of swing to apply to the beat. Swing adds a delay to every other beat (thus, causing it to ‘swing’). Tête’s swing percentages match those available in the Steppy module, and also conform to the MPC “standard”...
- Page 108 Tête + Tetrapad Manual ● Scale: (n) If you enable voltage quantization in Voltages mode (pressing a pad’s encoder toggles output quantization on/off), then the selection you make here determines the scale to which those voltages are quantized. ● Scale Root : (n) If you enable voltage quantization in Voltages Mode (pressing a pad’s encoder toggles output quantization on/off), then the selection you make here determines the root note of the scale to which those voltages are quantized.
-
Page 109: Global Setup Menu
Tête + Tetrapad Manual Global Setup Menu This menu contains a number of global settings. ● Pres. Curve: (Square, Linear, Exponential, Logarithmic) Sets the desired pressure response curve on Tetrapad. There are four options: Square (factory default); 2: Linear; 3: Exponential; and 4: Logarithmic. These are indicated graphically in the following illustration: ●... -
Page 110: System Mode
System Mode (accessed by selecting and pressing the Tête Version display in the Global Setup Menu) contains various housekeeping, test, and maintenance features. These modes are meant for use at Intellijel, and will likely never need to be used. These are: ● Calibration : See ... -
Page 111: Cv Setup Menu
Tête + Tetrapad Manual CV Setup Menu Tête features three user-assignable output jacks and five user-assignable input jacks. User assignments are made in Tête’s CV Setup Menu, which is accessed by pressing the C V FILE b utton to the right of Tête’s screen encoder. -
Page 112: Cv Setup: Sync Output
Tête + Tetrapad Manual CV Setup: SYNC Output Assign a function to Tête’s S YNC output jack using the “Sync” setting in Tête’s CV Settings Menu. The options are as follows: ● - (off) : No signal is sent out the S YNC jack. ●... -
Page 113: Cv Setup: Output A
Tête + Tetrapad Manual CV Setup: Output A Assign a function to Tête’s A output jack using the “A” setting in Tête’s CV Settings Menu. The options are as follows: ● - (off) : No signal is sent out the A jack. ●... -
Page 114: Cv Setup: Trig And Reset Inputs
Tête + Tetrapad Manual CV Setup: TRIG and RESET Inputs Assign functions to Tête’s T RIG and R ESET input jacks using the “Trig” and “Reset” settings in Tête’s CV Settings Menu. The assignment options for both inputs are identical. The following assignment descriptions apply to the TRIG input, but the same options are available for the RESET input: ●... -
Page 115: Cv Setup: Reset Input
Tête + Tetrapad Manual In Voltages Mode, Tête offers these additional CV assignments: ● Bank Rand* : An input trigger patched into the T RIG jack selects a random voltage bank. ● Bank Fwd* : An input trigger patched into the T RIG jack selects the next higher-numbered voltage bank. -
Page 116: Cv Setup: Input X, Y And Z (Notes Mode)
Tête + Tetrapad Manual CV Setup: Input X, Y and Z (Notes Mode) The CV Setup menu changes somewhat depending on whether Tête/Tetrapad is operating in Combo, Notes, or Voltages mode. This section discusses the CV setup options that are available when you’re using Notes Mode. - Page 117 Tête + Tetrapad Manual ● Loopy Length : If the L oopy feature is engaged, then a CV patched into the assigned jack will modify the Loopy length. At 0V, Loopy is set to its minimum length. At +5V, Loopy plays at its maximum length.
- Page 118 Tête + Tetrapad Manual ● Semitone (PAD) : Similar to the S emitone option, except CV control is not continuous. Rather, the incoming CV is sampled each time you touch a pad, and is held until the next touch. This enables you to synchronize semitone changes to touches on Tetrapad’s virtual keyboard.
- Page 119 Tête + Tetrapad Manual ● Rotate (Pad) : Similar to the R otate option, except CV control is not continuous. Rather, the incoming CV is sampled each time you touch a pad, and is held until the next touch. This enables you to synchronize rotations to touches on Tetrapad’s virtual keyboard.
-
Page 120: Cv Setup: Input X, Y And Z (Voltages Mode)
Tête + Tetrapad Manual CV Setup: Input X, Y and Z (Voltages Mode) The CV Setup menu changes somewhat depending on whether Tête/Tetrapad is operating in Combo, Notes, or Voltages mode. This section discusses the CV setup options that are available when you’re using Voltages Mode. - Page 121 Tête + Tetrapad Manual ● Loopy Length : If the L oopy feature is engaged, then a CV patched into the assigned jack will modify the Loopy length. At 0V, Loopy is set to its minimum length. At +5V, Loopy plays at its maximum length.
- Page 122 Tête + Tetrapad Manual ● Level (Pad) : Similar to the L evel option, except CV control is not continuous. Rather, the incoming CV is sampled each time you touch a pad, and is held until the next touch. This enables you to synchronize level changes to touches on Tetrapad’s pads.
- Page 123 Tête + Tetrapad Manual ● Bank Rand* : A trigger patched into the corresponding CV input jack selects a random voltage bank. ● Bank Fwd* : A trigger patched into the corresponding CV input jack selects the next higher-numbered voltage bank. For example, if Voltage Bank 5 is the current bank, then an input trigger will select Voltage Bank 6 —...
- Page 124 Tête + Tetrapad Manual ● Bank CV : CV Offsets Current/Played Position linearly. With this assignment, you can use the B ank CV to directly select any available voltage bank. For example, assume you have Tetrapad configured for 16 Voltage Banks. Positive voltages will select bank numbers higher than the current bank (roughly one every 1/3 Volt when 16 Banks are used).
- Page 125 Tête + Tetrapad Manual ● Bank X CV (CLK) : Similar to the B ank X CV option, except CV control is not continuous. Rather, the incoming CV is sampled by the clock (using either the internal clock or an external clock patched into Tête’s ...
- Page 126 Tête + Tetrapad Manual ● Bank Y CV (CLK) : Similar to the B ank Y CV option, except CV control is not continuous. Rather, the incoming CV is sampled by the clock (using either the internal clock or an external clock patched into Tête’s ...
-
Page 127: Cv Setup: Input X, Y And Z (Combo Mode)
Tête + Tetrapad Manual CV Setup: Input X, Y and Z (Combo Mode) The CV Setup menu changes somewhat depending on whether Tête/Tetrapad is operating in Combo, Notes, or Voltages mode. This section discusses the X, Y and Z CV setup options that are available when you’re using Combo Mode. - Page 128 Tête + Tetrapad Manual The assignment choices for Inputs X, Y and Z are as follows: ● - (off) : Any signal patched into the corresponding CV input jack is ignored. ● Reset* : An input trigger patched into the corresponding CV input jack causes the current loop to reset to the beginning.
- Page 129 Tête + Tetrapad Manual ● Slew (Pad) : Similar to the S lew option, except CV control is not continuous. Rather, the incoming CV is sampled each time you touch a pad, and is held until the next touch. This enables you to synchronize slew rate changes to touches on Tetrapad’s pads.
- Page 130 Tête + Tetrapad Manual ● Offset (Pad) : Similar to the O ffset option, except CV control is not continuous. Rather, the incoming CV is sampled each time you touch a pad, and is held until the next touch. This enables you to synchronize offsets to touches on Tetrapad’s pads.
- Page 131 Tête + Tetrapad Manual For example, assume you created a 4|16 pattern on Tetrapad (4 pulses in a 16-step length). Since only 12 pulses are needed to reach the maximum value of 16 (¾ of the 16 pulses added by +5V), only 3.75 V are needed to maximize the number of pulses. ●...
-
Page 132: Load Defaults
Tête + Tetrapad Manual Load Defaults The final item in the CV Setup menu, “Load Defaults,” lets you return Tête’s CV setups to their factory default assignments. To do so: 1. With the CV Setup menu visible, rotate Tête’s Screen Encoder to select the “Load Defaults” entry. -
Page 133: File Menu
Tête + Tetrapad Manual FILE Menu Use the FILE menu to load, save, rename and delete Tête presets, and to set whether or not a preset uses Tête’s global CV setup, or memorizes its own CV setups. Tête can store as many as 297 presets — up to 99 for each of its three modes (Combo, Notes, and Voltages). - Page 134 Tête + Tetrapad Manual 3. Rotate the Screen Encoder to select the first letter, then press it to move the cursor to the right. The second character is ready for entry. 4. Continue rotating/pressing the Screen Encoder until you’ve entered the last character in the name.
-
Page 135: Tempo Menu
Tête + Tetrapad Manual Delete : Select this option, then press the Screen Encoder to delete the highlighted preset. This action brings up a confirmation screen, in which you rotate the Screen Encoder to select between “Yes” and “No,” then press the Screen Encoder to confirm. TEMPO Menu Tête/Tetrapad features comprehensive clocking for recording and playing back gestural performances in... -
Page 136: Part Seven: Looping & Sequencing
Tête + Tetrapad Manual PART SEVEN: LOOPING & SEQUENCING Page 135... -
Page 137: The Looper
Tête + Tetrapad Manual THE LOOPER Tête supports two entirely different recording paradigms: s tep-recording and r eal-time recording . Têtes real-time recorder is called t he looper , which (like an audio looper pedal) records an input signal and plays it back in a loop. -
Page 138: Combo Mode Looping
Tête + Tetrapad Manual Combo Mode Looping The Looper works with all three operating modes: Notes Mode, Voltages Mode and Combo Mode. In Notes and Voltages modes, the Looper records all pad touches since, in these modes, all pads work together in support of the mode. -
Page 139: Record & Play With Touch Sync
Tête + Tetrapad Manual Record & Play with Touch Sync 1. Press the S ETUP button to display the Mode SETUP Menu MODE 2. Rotate Tête’s encoder to select the R ecord Wait option, and set it to T ouch (pressing the encoder cycles between “Off”... - Page 140 Tête + Tetrapad Manual 9. Press the R ECORD ( ) button to stop recording. The R ECORD ( ) button turns off and the P LAY ( ) button flashes green, indicating that there is now a recording in memory, but it will not start to play back until you press the P LAY ( )...
-
Page 141: Record & Play With Looper Sync
Tête + Tetrapad Manual Record & Play with Looper Sync 1. Press the S ETUP button to display the Mode SETUP Menu. MODE 2. Rotate Tête’s encoder to select the L ooper Sync option, and set it to O n (pressing the encoder cycles it on and off). - Page 142 Tête + Tetrapad Manual 7. Tête’s R ECORD ( ) button automatically lights solid red (no flashing) when recording begins. 8. Record your pad touches and gestures. 9. Press the R ECORD ( ) button to stop recording. NOTE: If you assigned a ...
-
Page 143: Record & Play Unsynced
Tête + Tetrapad Manual Record & Play Unsynced 1. Press the S ETUP button to display the Mode SETUP Menu. MODE 2. Rotate Tête’s encoder to select the R ecord Wait option, and set it to O ff (pressing the encoder cycles between “Off”... -
Page 144: Overdubbing
Tête + Tetrapad Manual Overdubbing You can overdub a new loop (or section of a loop) on top of an existing recording. To do so: 1. Load a loop as described in the F ILE Menu discussion (or use the one you just recorded). 2. -
Page 145: The Encoder Bar (In Looper)
Tête + Tetrapad Manual The Encoder Bar (In Looper) The Encoder Bar provides immediate access to numerous mode-specific touch-modifications that are useful when you perform, record or play loops and sequences. This section discusses the mode-specific Encoder Bar options that are available when using the Looper. Combo Mode Encoder Bar (Looper) In Combo Mode, turning Tête’s encoder selects between two touch options: Touch / Record Pad... -
Page 146: Voltages Mode Encoder Bar (Looper)
Tête + Tetrapad Manual Voltages Mode Encoder Bar (Looper) In Voltages Mode, turning Tête’s encoder selects between four touch options: Touch / Record Bank/Gate This is the ‘normal’ mode of operation. Touching a pad sends the programmed bank of voltage values to the outputs, along with a gate signal to one of Tête’s assignable CV outputs (If you assigned it to output “touch”). -
Page 147: Save, Load, Rename And Delete Loops
Tête + Tetrapad Manual Save, Load, Rename and Delete Loops You can save your loops to Tête’s micro SD card, load an existing one, rename loops, and delete them. All these functions are handled through the F ILE Menu , which was described earlier, and is accessed by long-pressing (>1 sec) the ... -
Page 148: The Sequencer
Tête + Tetrapad Manual THE SEQUENCER Tête supports two entirely different recording paradigms: s tep-recording and r eal-time recording . Têtes real-time recorder is called t he looper , while its step-recorder is referred to simply as t he sequencer. -
Page 149: Recording A Note Sequence
Tête + Tetrapad Manual Recording a Note Sequence To record a sequence: 1. Press Tête’s R ECORD ( ) button. 2. Step-enter notes by pressing the desired “key” on your Tetrapad. Each time you press a “key” on Tetrapad, it’s note value is displayed on the scrolling piano roll and the sequencer advances one step. -
Page 150: Playing Back A Note Sequence
Tête + Tetrapad Manual Playing Back a Note Sequence To play back a sequence: 1. Press Tête’s P LAY ( ) button. The sequence plays back at the tempo defined in the T EMPO Menu (accessed by pressing Tête’s ... -
Page 151: Record & Play A Voltage Sequence
Tête + Tetrapad Manual Record & Play A Voltage Sequence 1. Long-press (>1 second) the S ETUP button to display the MODE Select Menu; turn MODE the encoder to highlight V oltages and press the encoder. Tête and Tetrapad are now in Voltages Mode. -
Page 152: Recording A Voltage Sequence
Tête + Tetrapad Manual Recording a Voltage Sequence To record a voltage sequence: 1. Press Tête’s R ECORD ( ) button. 2. Step-enter voltages by pressing the desired pad on your Tetrapad. Each time you press a pad on Tetrapad, the top half of Tête’s screen shows a graphical indication of all 8 voltages stored in that pad’s bank, plus the numerical value of the voltage being sent to Out 1. -
Page 153: Playing Back A Voltage Sequence
Tête + Tetrapad Manual Playing Back a Voltage Sequence To play back a voltage sequence: 1. Press Tête’s P LAY ( ) button. The sequence plays back at the tempo defined in the T EMPO Menu (accessed by pressing Tête’s ... -
Page 154: Editing Sequences
Tête + Tetrapad Manual Editing Sequences There are several ways to edit an existing sequence: ● Append : use this method to create or extend a sequence. The default state when pressing the R ECORD ( ) button while the sequencer is stopped. ●... -
Page 155: Overwriting Sequences
Tête + Tetrapad Manual Overwriting Sequences You can overwrite steps in an existing sequence. To do so: 1. If the sequence is currently playing back, press the P LAY ( ) button to stop playback. 2. Press the R ECORD ( )... -
Page 156: Overdubbing Sequences
Tête + Tetrapad Manual You can toggle between I nsert and O verwrite Mode b y repeatedly pressing the L OOPY button. 5. Rotate the Encoder to move the cursor around inside the existing sequence. NOTE: If you move the cursor to the end of the sequence, you’ll exit Insert Mode, and be back in Append Mode. -
Page 157: Save, Load, Rename And Delete Sequences
Tête + Tetrapad Manual Save, Load, Rename and Delete Sequences You can save your sequences to Tête’s micro SD card, load an existing one, rename loops, and delete them. All these functions are handled through the F ILE Menu , which was described earlier, and is accessed by long-pressing (>1 sec) the ... -
Page 158: Loopy
Tête + Tetrapad Manual LOOPY Loopy is a special performance feature, which lets you play back short, looping sections taken from within a longer Sequence or Loop. In general, you engage Loopy by pressing the L OOPY ( ) button during playback, which causes a user-definable subsection of the recording to loop repeatedly. -
Page 159: Loopy Length With Sequences
Tête + Tetrapad Manual Loopy Length with Sequences Loopy lengths can be as short as a single step or as long as your entire sequence. To change Loopy’s length: 1. Press the L OOPY ( ) button (lighting it). Tête’s Encoder Bar highlights, showing the current Loopy length setting. -
Page 160: Position Sync With Sequences
Tête + Tetrapad Manual Position Sync with Sequences After Loopy has played back a series of sub-steps, playback of the full-length sequence is resumed. The precise position at which playback resumes is determined by the L oopy Pos. Sync parameter, located in the Mode SETUP Menu. - Page 161 Tête + Tetrapad Manual 2. Assume you start playing Loopy at the position indicated by the ED arrow (below), and that you play the Loopy segment 3 times. If L oopy Pos. Sync is set to O n , then when Loopy stops playing, the original full length Sequence will continue playing from the point marked by the BLUE...
-
Page 162: Loopy With Loops
Tête + Tetrapad Manual Loopy with Loops When using the Loopy feature with Loops, Tête’s encoder bar sets Loopy’s length in “number of milliseconds.” In this way, Loopy performs like a granular sampler — enabling you to define both the length of a repeating segment and its starting point. -
Page 163: Loopy Shift With Loops
Tête + Tetrapad Manual Loopy Shift with Loops Whenever you’re playing back a loop, Loopy starts its sub-loop at whatever time you press the LOOPY ( ) button. As Loopy plays, you can shift the start of Loopy’s playback either forward or backward within the recorded loop. -
Page 164: Position Sync With Loops
Tête + Tetrapad Manual Position Sync with Loops After Loopy has played back a series of sub-loops, playback of the full-length loop is resumed. The precise position at which playback resumes is determined by the L oopy Pos. Sync parameter, located in the Mode SETUP Menu. -
Page 165: Part Eight: Miscellaneous
Tête + Tetrapad Manual PART EIGHT: MISCELLANEOUS Page 164... -
Page 166: Calibration
Tête + Tetrapad Manual CALIBRATION Tête and Tetrapad are both calibrated at the factory prior to shipment, so it’s unlikely you’ll ever need to perform any custom calibration. But if you do, these instructions (along with an external voltage meter) are all you need to calibrate either module. Calibrating Tête To enter Calibration Mode on your Tête: 1. - Page 167 Tête + Tetrapad Manual To Calibrate Tête’s inputs: Now that OUT A and OUT B are calibrated, you can use them as reference points to calibrate the inputs. 1. Patch O UT A into the X Input . Note: The positions of the X, Y, and Z attenuverters are ignored while calibrating.
-
Page 168: Calibrating Tetrapad
Tête + Tetrapad Manual Calibrating Tetrapad To enter Output Calibration Mode on your Tetrapad: 1. Power off the Tetrapad. 2. On Tetrapad’s back panel, disconnect the I2C cable that connects it to Tête, and power the module back on. 3. Long-press (>1 sec) Tetrapad’s white EDIT button. 4. - Page 169 Tête + Tetrapad Manual To Calibrate a Tetrapad Output: 1. Rotate the right-most encoder (Encoder 4) to select which of the 8 output voltages you wish to calibrate. The single LED moves beneath the selected output jack to indicate which output is to be calibrated.
- Page 170 Tête + Tetrapad Manual 4. Rotate the three left encoders to set the output voltage as close to 0V as possible. The third encoder from the left (Encoder 3) is the coarse setting. The first encoder on the left (Encoder 1) is the fine setting. Between them is Encoder 2, which provides a voltage adjustment between fine and coarse.
-
Page 171: Firmware Version Display
Tête + Tetrapad Manual FIRMWARE VERSION DISPLAY Displaying Tetrapad Firmware Version on Tête Tête can display its own firmware version, along with a connected Tetrapad’s. To do so: 1. Short-press (<1 sec) the S ETUP MODE button to enter the Mode Setup Menu. 2. -
Page 172: Version 1 & 2 Firmware Display Method
Tête + Tetrapad Manual For example, version 3.1.2.0 would appear as shown below: Version 1 & 2 Firmware Display Method For Tetrapad versions 1 and 2, the four pads represent version xx.yy as follows: For example, version 1.10 would appear as shown on the left, and version 2.0 firmware would appear as shown on the right: Page 171... -
Page 173: Firmware Change Log
Tête + Tetrapad Manual FIRMWARE CHANGE LOG 1.0.0.4 (December 4, 2019) ● Initial Release TECHNICAL SPECIFICATIONS Tetrapad: Width 20 hp Maximum Depth 19 mm Current Draw 130 mA @ +12V 15 mA @ -12V Tête: Width 8 hp Maximum Depth 39 mm Current Draw 120 mA @ +12V...
Need help?
Do you have a question about the Tete and is the answer not in the manual?
Questions and answers