Table of Contents
Advertisement
When using electrical appliances, basic safety precautions
should always be followed. Do not use the Power Fit until
you have read this manual thoroughly.
PF_IB_TP_ENG_V1_191206.indd 1
Owner's Manual
Save These Instructions – For Household/Residential Use Only
MODEL: ETF012C
MODEL: ETF012C-Smart
POWER: 150W, 110V~12Hz
POWER: 120W, 110V~12Hz
Visit TristarCares.com for tutorial
videos, product details, and more.
Guarantee Information Inside
12/6/19 5:42 PM
Advertisement
Table of Contents

Summary of Contents for Tristar Cares Power Fit Elite
- Page 1 Owner’s Manual Save These Instructions – For Household/Residential Use Only MODEL: ETF012C POWER: 150W, 110V~12Hz MODEL: ETF012C-Smart POWER: 120W, 110V~12Hz When using electrical appliances, basic safety precautions Visit TristarCares.com for tutorial should always be followed. Do not use the Power Fit until videos, product details, and more.
- Page 2 Power Fit BEFORE YOU BEGIN It’s very important that you read this entire manual, making certain that you are completely familiar with this Unit’s operation and precautions. ELITE DELUXE ELITE ETF012C ETF012C-Smart Model Number Supply Power Rated Power Maximum Weight ETF012C-Smart AC 110V~12Hz 120W...
-
Page 3: Table Of Contents
Table of Contents IMPORTANT SAFEGUARDS _______________________________________________________________________________ Features & Benefits _______________________________________________________________________________ Parts & Accessories _______________________________________________________________________________ Walking, Jogging and Running _______________________________________________________________________________ General Operating Instructions 10-11 _______________________________________________________________________________ Stretching 12–14 _______________________________________________________________________________ Complementary Workouts 15–17 _______________________________________________________________________________ Maintenance & Cleaning _______________________________________________________________________________ 60-Day Guarantee _______________________________________________________________________________ Replacing the Fuse _______________________________________________________________________________ Power Fit ®... -
Page 4: Important Safeguards
IMPORTANT SAFEGUARDS WARNING: READ ALL INSTRUCTIONS BEFORE USING THIS APPLIANCE. CONSULT YOUR DOCTOR BEFORE BEGINNING ANY NEW HEALTH REGIME. When using an electrical appliance, basic precautions 7. Keep the power cord away from heated surfaces. should always be followed, including the following: 8. - Page 5 IMPORTANT SAFEGUARDS CAUTION: Attaching the Power Cord Grounding Instructions The Power Fit is fitted with a Quick- • NOTE: Release Magnetic Power Cord. This product must be grounded. If it should malfunction or breakdown, grounding provides a path DO NOT USE WITH ANY OTHER ELECTRICAL •...
-
Page 6: Features & Benefits
Features & Benefits How Does it Work? By placing your feet in different positions on the exercise area, you will be able to simulate walking, jogging, and running while you stand on Power Fit inside the comfort of your own home. It is recommended to use Power Fit for 10 minutes a day 3 days a week. -
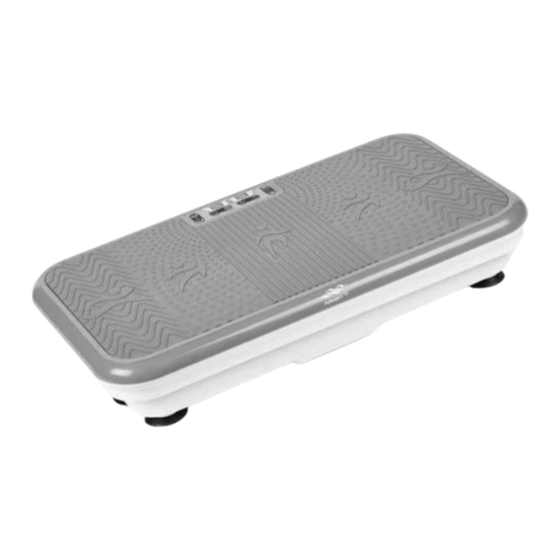
Page 7: Parts & Accessories
Parts & Accessories Your Power Fit has been shipped with the parts and accessories shown below. Check everything carefully before use. If any part appears damaged, do not use this product and contact Customer Service using the number located in the back of this manual. ANTI-SLIP COVER INTERMEDIATE COVER BASE COVER... - Page 8 Parts & Accessories Power Fit Control Panel 1. TIME/PROGRAM DISPLAY 2. SPEED/PROGRAM DISPLAY 3. INFRARED RECEPTOR FOR THE REMOTE CONTROL 4. INCREASE TIME 5. DECREASE TIME 6. INCREASE SPEED 7. DECREASE SPEED 8. ON/OFF 9. PROGRAM SELECTION 10. START EXERCISE 11.
-
Page 9: Walking, Jogging And Running
Walking, Jogging and Running Power Fit is a vibrating platform that simulates the action of walking, jogging, or running through horizontal oscillatory movements. Placing your feet closer together while standing on the Unit simulates walking, while placing your feet farther apart simulates jogging. The Three Stances Feet Position With Power Fit, you can experience... -
Page 10: General Operating Instructions
General Operating Instructions Modes of Use Power Fit gives you two modes of use: manual mode and automatic mode. In both modes, you can use the exercise Elastic Bands. To use the Elastic Bands, attach the hook on each Elastic Band to one of the Elastic Band Anchor Points, located at the back of the Unit. - Page 11 General Operating Instructions Automatic Mode Speed for Each Program When using Automatic Mode, the Unit will follow your selected preset exercise program. To use Time Beginners Intermediate Advanced (minutes) Automatic Mode: 1. Connect the Power Cord of the Unit to the outlet. Use the Power Switch to turn on the Unit.
-
Page 12: Stretching
Stretching Stretching Routines TALK TO YOUR PHYSICIAN BEFORE STRETCHING AND USING THIS PRODUCT. Before starting any exercise routines with this device, we recommend stretching to gain flexibility and reduce muscle pain. Stretching routines must be done slowly and gently without any swift movements or jumping. Perform the exercises until you feel a slight but not painful tension while stretching for 20–30 seconds. - Page 13 Stretching Calf And Hip Stretching With your toes facing forward, step forward with your right foot. Lean forward while bending your right knee.Do not allow your knee to pass the tip of your foot. Keep your left leg straight and your left heel on the floor.
- Page 14 Stretching Triceps Stretching Raise your left elbow and reach toward your upper back. Stand straight with your feet spread apart and your knees bent slightly. Point your left elbow toward the ceiling and touch the center of your upper back with your left hand.
-
Page 15: Complementary Workouts
Workout Complementary Workouts All workouts should be performed with the Unit NOTE: powered on. A Stand on the Unit with your legs separated and aligned with your shoul ders. Take the Elastic Bands in your hands. Place your hands on the outside of your legs and then raise your arms upward and outward as far as you can with your elbows always in a straight position. - Page 16 Workout F Place the heel of one foot on the Unit. Bend your legs without moving the other foot from the floor and keep your back tight. WORKS: Calf, thighs, and buttocks. G Place your left foot on the Unit and the other foot on the floor.
- Page 17 Workout M Place your palms on the Unit and the tips of your toes on the floor. Keep your whole body straight and tighten your abs and buttocks. WORKS: Arms, back, abs, buttocks, thighs, calf, and shoulders. Also helps to strengthen the neck. N Lie on your back on the floor with the soles of your feet on the Unit.
-
Page 18: Maintenance & Cleaning
Maintenance & Cleaning Before cleaning the Unit, make sure that the • Clean the remote control with a clean cloth. Power Switch is off and that the Power Cord is • If you are not using the Unit for a long time, put unplugged from the outlet. -
Page 19: Replacing The Fuse
Replacing the Fuse 1 Use a screwdriver to pry the fuse holder in the middle of the socket. Note: Screwdriver not included. Fuse Holder 2 Remove the fuse from the fuse holder illustrated in Fig. A & Fig. B . Fig. - Page 20 Replacing the Fuse 3 Install a new fuse into the fuse holder. Note: New Fuse not included. 4 Insert the new fuse and holder into the middle of the switch socket according to the direction of the notch illustrated in Fig. C & Fig. D . Fig.
- Page 21 Exercise Log Power Fit ® Elite & Power Fit ® Elite Deluxe PF_IB_TP_ENG_V1_191206.indd 21 12/6/19 5:42 PM...
- Page 22 Power Fit ® Elite & Power Fit ® Elite Deluxe PF_IB_TP_ENG_V1_191206.indd 22 12/6/19 5:42 PM...
- Page 23 60-Day Money-Back Guarantee If you decide that you don’t love this product, your order is covered by our 60-Day Money-Back Guarantee. You have 60 days from the day you receive your product to request a replacement product or refund of the purchase price minus processing and handling fees. To receive a refund or replacement, you must return the product to us at your expense.
- Page 24 We are very proud of the design and quality of our Power Fit ® This product has been manufactured to the highest standards. Should you have any questions, our friendly customer service staff is here to help you. Visit us at www.TristarCares.com, email us at customerservice@tristarproductsinc.com, or call us at 973-287-5186 Distributed by:...
Need help?
Do you have a question about the Power Fit Elite and is the answer not in the manual?
Questions and answers
my remote quit working. It isn't the batteries and I didn't drop it. Where can I get a new remote
You can contact Tristar Products Customer Service to request a replacement remote for the Power Fit Elite.
This answer is automatically generated