
Summary of Contents for TFA Dostmann KlimaLogg Pro
- Page 1 100*140mm INSTRUCTION MANUAL KlimaLogg Pro Kat.No. 30.3039.IT Temperature and Humidity Logger...
- Page 2 INSTRUCTION MANUAL KlimaLogg Pro Cat. No. 30.3039.IT Temperature and Humidity Logger INTRODUCTION: Thank you for choosing this this professional temperature and humidity data logger from TFA. BEFORE YOU USE IT Please be sure to read the instruction manual carefully. This information will help you to familiarise yourself with your new device, learn all of its functions and parts, find out important details about its first use and how to operate it, and get advice in the event of faults.
- Page 3 Caution! Risk of injury: Keep this instrument and the batteries out of reach of children. Batteries must not be thrown into the fire, short-circuited, taken apart or recharged. Risk of explosion! Batteries contain harmful acids. Low batteries should be changed as soon as possible to prevent damage caused by a leaking battery.
-
Page 4: Table Of Contents
CONTENTS: Chapter: Features Additional transmitters Installation and replacement of the batteries First installation DCF radio controlled time reception LCD display Buttons Function of the buttons Basic settings Transmitters Learning-Mode Recording interval setting Max.Min.-values and current dew point Alarm-setting mode Alarmevent-data set-function History mode PC-connection Open-collector hardware output... - Page 5 FEATURES: LCD display Hanging hole Stand (fold out) Battery Buttons compartment Indication of the current temperature and humidity DCF radio controlled time and date MIN/MAX values and time of reception Indication of the current dew point ...
-
Page 6: Additional Transmitters
Note: If you have purchased external transmitters, you should insert the batteries into the transmitters just before into the KlimaLogg Pro. For more information, please have a look at the chapter “transmitters” of this manual or refer the instruction manual of the transmitter. -
Page 7: First Installation
Insert compartment cover and close it. FIRST INSTALLATION: When the KlimaLogg Pro is powered up, a short beep will sound and all LCD segments will light up. The KlimaLogg Pro shows the current temperature and humidity values. “INDOOR” is displayed in the text field, and 00:00:00 and 01.01.10 are... - Page 8 In case the clock cannot detect the DCF-signal (for example due to disturbances, transmitting distance, etc.), the time can be set manually. The clock will then work as a normal quartz clock. (see: Basic settings/Time and calendar). The radio controlled clock receives the signals at 2:00 and 3:00 o'clock in the morning.
-
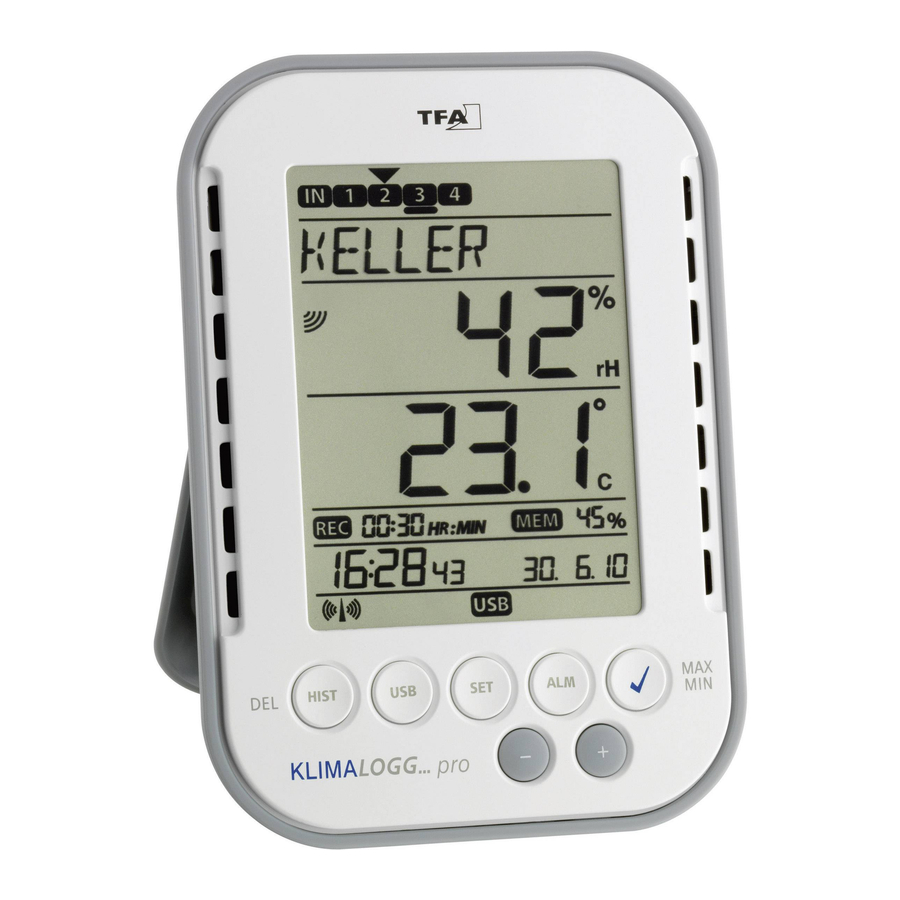
Page 9: Lcd Display
LCD DISPLAY: The LCD display is split into 7 sections. The designation of each section can be found on the following figure: Channel Display Indication of the transmitters that were entered, status information, current selected channel Text Display Indication of the channel’s name (or serial number) or guidelines Indication Humidity Indication Temperature... -
Page 10: Basic Settings
FUNCTIONS OF THE BUTTONS IN THE NORMAL VIEW: History / Delete go to the history-mode of the recorded data sets (single press) initiate the contact with the known USB transceiver (press and hold for three seconds) Synchronization to an USB transceiver (single press) go to the setting mode of the transmitter (Learn mode). - Page 11 Pressing the SET button once again takes you to the next setting option. If no button is pressed for 20 seconds, the KlimaLogg Pro automatically switches back to the normal view. You can return to the normal view at any time by pressing the “HIST/DEL”, the “USB”...
- Page 12 “MAIN RESET” appears on the text display. If the “OK/MAX.MIN.” button is now pressed and held for three seconds, the KlimaLogg Pro deletes all settings and recorded data. The KlimaLogg Pro is reset to factory settings. After the “OK/MAX.MIN.” button has been...
- Page 13 Note that through the main reset also all recorded data will deleted. If necessary, please ensure that there is no relevant data on the KlimaLogg Pro that has not yet been retrieved or transferred to the PC. If the device shows a malfunction, we recommend that you firstly check the batteries and try a normal reboot of the unit.
-
Page 14: Learning-Mode
LEARNING and the channel numbers appear on the display with a black bar. The KlimaLogg Pro searches for transmitter signals for three minutes. If a transmitter signal is received, the bar under the corresponding channel number disappears. -
Page 15: Recording Interval Setting
1 min, 5 min, 10 min, 15 min, 30 min, 1 hr, 2 hrs, 3 hrs und 6 hrs Note: This function allows you to set the interval in which the KlimaLogg Pro records the data sets. The KlimaLogg Pro automatically creates a data set in the corresponding interval. -
Page 16: Alarm-Setting Mode
The recorded data sets can be called up in history mode or transferred to a PC using the USB wireless transceiver. MAX./MIN VALUES AND THE CURRENT DEW POINT in the selected channel: Press OK/MAX/MIN button in normal mode. MAX appears in the display and the highest humidity is displayed. - Page 17 The alarm sound can be deactivated in the basic settings of the KlimaLogg Pro if desired. You can use the USB wireless transceiver and the PC software to easily make all alarm settings on the PC and transfer those to the KlimaLogg...
-
Page 18: Alarmevent-Data Set-Function
Note: The AlarmEvent data records can be displayed in the history mode on the KlimaLogg Pro and also in the PC software separately. HISTORY MODE: You also have the option to read the data sets and the AlarmEvent data sets on the KlimaLogg Pro itself. -
Page 19: Pc-Connection
The KlimaLogg Pro has a USB button. When the PC software requests that synchronization be started, please press and hold the USB button on the KlimaLogg Pro for three seconds until a brief beep is heard and the USB symbol on the toolbar flashes. The synchronization must then... -
Page 20: Open-Collector Hardware Output
Synchronization is only required once in order to assign the logger to the software. In order to initiate contact to the software during the next start, it is only necessary to press the USB button once. The KlimaLogg Pro then attempts to establish the connection for 5 seconds and displays the assignment received from the software on the text display. - Page 21 Please get sure, while you plug in any external hardware that this unit is not under electrical power. We assume no liability for damage to the KlimaLogg Pro due to incorrect use of the hardware output or for external devices that are connected.
-
Page 22: Troubleshooting
When the logger malfunctions, check the batteries and reboot the device if necessary. We recommend that you allow the KlimaLogg Pro to rest for several minutes and then insert the batteries again. Do not use rechargeable batteries. 1.5 V batteries should be used for proper function of the KlimaLogg Pro. -
Page 23: Positioning Of The Logger
POSITIONING OF THE LOGGER The KlimaLogg Pro can be placed on a table or mounted on a wall. Before mounting it on a wall, ensure that any transmitters in use can be correctly received at the desired mounting location. -
Page 24: Battery Replacement
BATTERY REPLACEMENT: The user should change the batteries of the logger as soon as possible after the “battery low” indicator appears (symbol “RX” in the time and date display area). The device may malfunction if the batteries are not changed. Note: After the batteries are changed, it is not necessary to re-install the logger. -
Page 25: Specifications
150 gram No part of this manual may be reproduced without written consent of TFA Dostmann. The technical data are correct at the time of going to print and may change without prior notice. The latest technical data and information about your product can be found by entering your product number on our homepage.
Need help?
Do you have a question about the KlimaLogg Pro and is the answer not in the manual?
Questions and answers
how do I change the time on my kilma logg pro
To change the time on the TFA Dostmann KlimaLogg Pro manually:
1. Enter the time setting mode by selecting "TIME SET" on the text display.
2. The hour digits will start flashing. Use the "+" or "-" button to adjust the hours.
3. Press the "SET" button again to move to the minutes.
4. Use the "+" or "-" button to adjust the minutes.
Repeat these steps to complete the manual time setting.
This answer is automatically generated