Table of Contents
Advertisement
Quick Links
Advertisement
Table of Contents

Summary of Contents for nosstec 8344
- Page 1 Bending Roll Machine 8344 Operating instructiOns...
-
Page 3: Table Of Contents
Contact information ..........See back Note: We reserve the right to alter specifications without prior notice. For copyright reasons all reproduction and copying of the texts, tables and illustrations within this manual is prohibited without written permission from Nosstec AB. 8344 English, rev 2... -
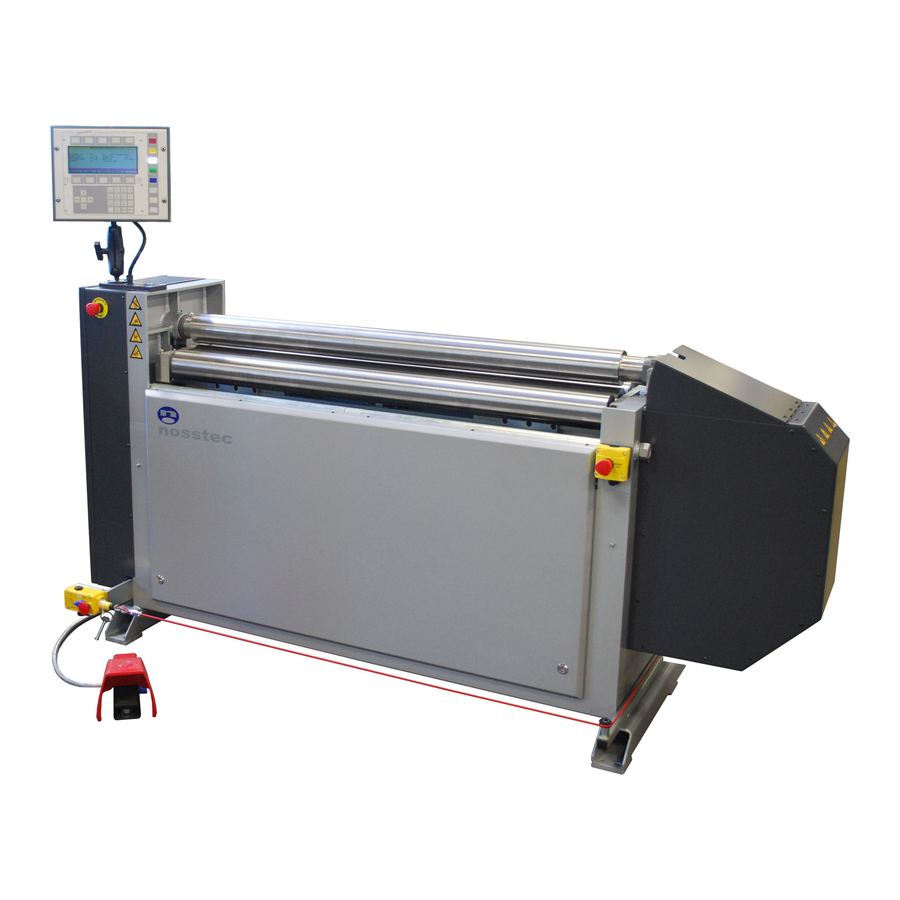
Page 4: Main Components
Operating instructiOns 8344 Main coMponenTs Front side Control panel Top roll Prebending roll Emergency stop Emergency stop Left side (fixed side) Right side (openable side) Emergency stop Safety equipment Foot switch Back side Bending roll Left side (fixed side) Main switch... -
Page 5: Installation
When lifting, place the forks under the lowest part of the framework. The centre of gravity lies just in the middle of the machine. Regarding weights: see technical data. Approximate placement of lifting forks 8344 English, rev 2... - Page 6 Operating instructiOns 8344 insTallaTion Electrical connection Always check the sign on the machine, or the wiring diagram (located in the door to the electrical cabinet), that explains the electrical data for the specific machine. Follow local regulations for electrical connection...
-
Page 7: Safety
Area for maintenance and service. There should always be a free space of at least 2 meters in front of the machine and at least 1 meter on the remaining three sides of the machine for service and maintenance. 8344 English, rev 2... - Page 8 Broken parts or safety com- ponents must be changed by authorized staff. Contact Nosstec in case spare parts are needed. The ma- chine has a 24 month applicable warranty from date of delivery. The warranty is only applicable as long as original spare parts are used.
- Page 9 While it is being rolled, the work piece may move forwards, backwards, up and down in the machine. Pinching risk of the workpiece Note that there is a pinching risk between the ends of the workpiece, see figure. Pinching risk 8344 English, rev 2...
- Page 10 Operating instructiOns 8344 safeTy Deburring of the workpiece Burrs and sharp edges must be removed from the workpiece before bending. Jamming If for some reason the machine stops while bending a workpiece, proceed as follows: • Crank down the bottom roll and possibly also the bending roll.
- Page 11 Important: The operator must know the location of all the stop and emergency stop functions and how to operate them. All protective devices must be fitted and the transmission doors must be locked. 8344 English, rev 2...
-
Page 12: Operation
Operating instructiOns 8344 operaTion Outline of control panel functions The operating system is run from the control panel. The panel is logically designed to simplify operation. Function keys Display Mode selector Reset Auto Program Manual Arrow keys and ESC Keypad... - Page 13 The four rolls are driven by an electric motor situated on the left side of the machine. Raising and lowering of the lower bending-rolls is carried out with the help of 2 separate electric motors. Operation is carried out via a drive shaft with worm gear motors. 8344 English, rev 2...
- Page 14 Operating instructiOns 8344 operaTion Display window The display of the machine provides the ope- rator with the necessary information about the current operation and the settings. The display shows various screens depending on the cur- rent mode of the machine.
- Page 15 SHIFT SHIFT SHIFT + 0 Where SHIFT is underlined, press and hold down the key while pressing the relevant letter key. Password The keyboard can be protected with a 5-digit code that the machine supervisor receives from Nosstec. The machine can otherwise only be run without any program changes unless the code is entered. 8344 English, rev 2...
- Page 16 Operating instructiOns 8344 operaTion Menu structure, Program mode Program Use the relevant function key to change the screen shown on the display. 2013-03-01...
- Page 17 Checking functions Check the function of all rolls using the relevant function key with the pedal pressed down to the opera- tion position. 8344 English, rev 2...
- Page 18 Operating instructiOns 8344 operaTion Manual mode Manual Use the relevant function keys for feed, prebending and bending. Feed position Indicates the current feed position of the work piece. You can re- Top roll set the value by pressing the number key 0. Feed + Feed – Bending/prebending rolls Indicates the current position of the prebending and bending...
- Page 19 To save programs in other folders, see under USB on how to change storage folder. A..Z This function key toggles the sorting of the stored programs between the program number ("Prog") and the drawing number/name ("drawing-no") stored. 8344 English, rev 2...
- Page 20 Operating instructiOns 8344 operaTion Program storage in general, continued Pressing this function key opens the storage folder management. When you use the "Load" and "Save" functions within the USB storage folder management, you load/save an entire library of up to 99 programs in one go. The currently loaded storage folder is marked with an asterisk (*).
- Page 21 ”Clr prog” function key on program step 1, the entire program is deleted. ”Clr prog” deletes the line containing the marker and all lines after it. The fun- ction key labelled ”Delete” deletes only the line con- taining the marker. 8344 English, rev 2...
- Page 22 Operating instructiOns 8344 operaTion Machine data settings Program If you press the function key labelled ”Machine” from the BASIC DATA menu, a screen appears with machine data. You cannot change the data—it is displayed for information only. You can also use this menu to select the language you want the control system display to use.
- Page 23 Select whether you want to use front stop mode or roll stop mode. In roll stop mode, you must also set the roll opening to a suitable value. Front stop mode is the standard mode. Front stop Roll stop + Roll stop − 8344 English, rev 2...
- Page 24 Operating instructiOns 8344 operaTion Entering program sequence Program Now that you have entered all the basic data, you can input the actual program sequence. From the BASIC DATA menu, press the function key label- led ”Program” to access the program sequence. Sequence steps are numbered with line numbers (see figure). You can use the function...
- Page 25 8344 English, rev 2...
- Page 26 Operating instructiOns 8344 operaTion Check parallelism Manual Raise the pinch roll so that the distance between the upper and lower rolls is 0.5- 1.0mm. To check parallelism, use a feeler gauge to measure the distance between rolls. Adjust the rolls if necessary.
- Page 27 Important: Verify the zero point and other functions in accordance with the instructions above before starting to use the machine or after it has been disassembled. 8344 English, rev 2...
-
Page 28: Programming
Operating instructiOns 8344 prograMMing Programming example: Cylinder ø120mm Sheet thickness: 1,2mm Width: 110mm Length: ( 120 × ∏ ) = 379mm (value of ∏ (pi) used is 3.14) A bending performed for a cylindrical part like the one illustrated is... - Page 29 Infoga Åter Row 1: Since Front + is used approximately 41mm in the current machine (8344, ø90mm rolls) must be run backwards. The workpiece is now in the middle of the mid rolls, e.g. the starting point of section a.
-
Page 30: Service And Maintenance
Operating instructiOns 8344 service and MainTenance Daily check • All emergency stop functions • Lubrication according to grease chart Crowning support All machines with rolls bigger or equal to 60mm are equipped with an adjustable crowning support. If necessary, this support can be adjusted by adjusting the screw (see picture) found below the pinch roll. - Page 31 (4 bolts) Accessories To facilitate the above service measures the following accessories are delivered together with the machine: • 1 x Instruction manual • 1 x Electrical wiring diagram • 1 x Set of commonly used tools 8344 English, rev 2...
-
Page 32: Lubrication / Grease Chart
/ grease charT Lubrication points As lubricant, use some sort of universal grease. Contact Nosstec if you are uncertain whether a specific grease is suited for this machine. Every day: Top roll bearing and bushings on locking arm (1 nipple). - Page 33 Guides for up and down movement should be greased with a brush. Crowning supports should be greased every month. Each support has four The drive chain should be brushed with thin grease nipples, and the number of supports depends on machine size. chain oil every six months. 8344 English, rev 2...
-
Page 34: Fuses And Motor Protection
Operating instructiOns 8344 fuses and MoTor proTecTion Resetting and changing fuses The main switch must be off before any service or maintenance work commen- ces. In the electrical cabinet main fuses (circuit breakers) can be found. See pic- ture. If any of these breakers are activated, it can be restored by pressing them up- wards. -
Page 35: Technical Data
..............Deviation from the normal execution: 8344 English, rev 2... -
Page 36: Machine Plates And Stickers
Operating instructiOns 8344 Machine plaTes and sTickers Productionyear: Current: Type: Voltage: Capacity: Phase: Weight: Frequency: Nosstec AB Järnvägsgatan 19 Serial No: 465 30 Nossebro SWEDEN Aluminium plate, blue anodized. MAIN SWITCH MUST BE ONLY TRAINED DISCONNECTED FOR ALL STAFF MAY HANDLE... -
Page 37: Declaration Of Conformity
......... . Place and date Signature, Managing Director 8344 English, rev 2... - Page 38 Operating instructiOns 8344 noTes 2013-03-01...
- Page 40 Nosstec AB • Kristineholmsvägen 12, 441 39 Alingsås, SWEDEN Tel: +46 (0)512 298 85 • Fax: +46 (0)512 298 89 • E-mail: info@nosstec.se For copyright reasons all reproduction and copying of the texts, tables and illustrations within this manual is prohibited without written permission from Nosstec AB.
Need help?
Do you have a question about the 8344 and is the answer not in the manual?
Questions and answers