Table of Contents
Advertisement
WARNING
Do not operate BrakeMate® before carefully reading and understanding
the operating and safety instructions contained in this manual.
Brake maintenance should only be undertaken by properly trained
personnel.
Standard workshop personal protection equipment should be worn.
Operating Manual
®
Advertisement
Table of Contents

Summary of Contents for Tulip BrakeMate
- Page 1 ® Operating Manual WARNING Do not operate BrakeMate® before carefully reading and understanding the operating and safety instructions contained in this manual. Brake maintenance should only be undertaken by properly trained personnel. Standard workshop personal protection equipment should be worn.
-
Page 2: Table Of Contents
TABLE OF CONTENTS 1. CORRECT APPLICATION..............3 2. DESCRIPTION OF BRAKEMATE® SYSTEM........3 System overview...............3 b. Main technical data..............3 3. WARNINGS AND SAFETY INSTRUCTIONS........5 4. DAILY INSPECTION................5 5. OPERATING INSTRUCTIONS............6 a. Preparation of vehicle..............6 b. Calliper removal..............6 c. Hub/Rotor removal..............7 Separating Hub and Rotor............9 e. -
Page 3: Correct Application
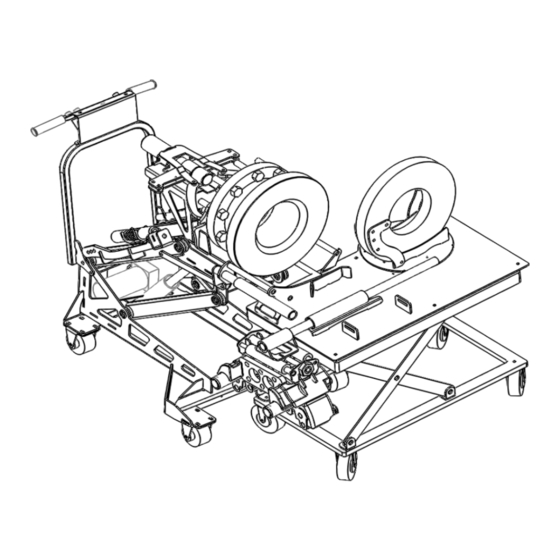
The BrakeMate® Hub/Rotor Trolley and the BrakeMate® Service Trolley are engineered specifically for this task and are not to be used for general lifting or any other purpose. BrakeMate® is designed to be used in a workshop environment on a firm, level surface. - Page 4 Fig.1 - BrakeMate® Hub/Rotor Trolley Fig.2 - BrakeMate® Service Trolley...
-
Page 5: Warnings And Safety Instructions
Compressed air can be dangerous. Exercise caution when connecting and disconnecting BrakeMate® from air supply. Safety glasses and gloves should be worn. BrakeMate® controls should only be operated by one person at a time. Before raising or lowering BrakeMate® Hub/Rotor Trolley or BrakeMate® Service Trolley, ensure all persons are well clear of the area. -
Page 6: Operating Instructions
5. OPERATING INSTRUCTIONS a. PREPARATION OF VEHICLE The following steps must be undertaken to prepare the vehicle prior to using BrakeMate®. Remove wheel Remove Brake Booster Remove Calliper bolts (Leave 2 bolts finger tight for security) Remove Hub Nut and/or Drive Axle Ensure vehicle is correctly supported and standard workshop practices are followed during this process. -
Page 7: Hub/Rotor Removal
Remove remaining calliper bolts and lift calliper clear of rotor by raising trolley using foot pedal. Manoeuvre Service Trolley until calliper is clear of the vehicle. Loosen knob on linear shaft and retract linear shaft until calliper is against Service Trolley. Tighten knob again to secure. - Page 8 IMPORTANT - DO NOT use extension bars on handle of Hydraulic Puller. BrakeMate® is not designed to remove hubs with seized or welded bearings. If hub does not separate from axle using BrakeMate's10 tonne puller, use other means to break bond prior to continuing to use BrakeMate®.
-
Page 9: Separating Hub And Rotor
d. SEPARATING HUB AND ROTOR Raise Hub/Rotor Trolley to the full height position. This is a set position governed by a limit switch. Raise Service Trolley to match height of locating rod on Hub/Rotor Trolley. Manoeuvre Hub/Rotor trolley to insert the locating rod into tube on Service Trolley, then tighten knob to secure (Fig. -
Page 10: Changing Rotor
e. ROTOR CHANGE OVER Remove Blue Arms and return to storage position. Release Red Arms and lower Hydraulic Puller. Slide old rotor forward onto Rotor Support Cradle, then roll rotor into bracket on carousel of Support Trolley. (Fig. 13)Tighten knob to secure rotor. Rotate carousel through 180°... -
Page 11: Manufacturer And Warranty Details
That the following machine complies with the appropriate basic health and safety requirements of the EC Directive based on design and type as brought into circulation by Tulip Corporation. In case of alteration of the machine, not agreed by Tulip, this declaration will lose its validity. Machine Description: BrakeMate®... - Page 14 OTHER WARRANTIES, EXPRESSED OR IMPLIED, INCLUDING THE IMPLIED WARRANTIES OF MERCHANTABILITY AND FITNESS FOR A PARTICULAR PURPOSE. Manufactured in Australia by: Tulip Corporation Pty Ltd 1 Apollo Drive Hallam Victoria 3803 Ph: 61 3 9796 3133 Fax : 61 3 9796 4933 Email: sales@tulip.com.au...
Need help?
Do you have a question about the BrakeMate and is the answer not in the manual?
Questions and answers