Table of Contents
Advertisement
Quick Links
1 QUICK GUIDE
1.1 P
OWER ON
1.2 C
HARGE
1.3 P
AIR
1.4 S
TART
1.5 S
ELECT PROJECT
1.6 S
ELECT TRACK
1.7 P
LACE NOTES
1.8 R
ECORD LIVE
1.9 Q
UANTIZE
1.10 G
LIDE
1.11 C
HANGE TEMPO
1.12 "S
TEP COMPONENTS
1.13 P
-
UNCH
IN EFFECTS
1.14 P
ERFORMANCE MODE
1.15 "C
" 1-4
OLOR DIALS
1.16 P
ARAMETER PAGES
1.17 M
ORE CONTROLS
2 USER GUIDE
2.1 H
ARDWARE OVERVIEW
2.2 I
NTERFACE OVERVIEW
2.3 G
ENERAL OPERATION
2.4 P
ARAMETER PAGES
2.5 T
RACK
2.6 S
TEP COMPONENTS
2.7 P
ROJECT
2.8 M
IXER
2.9 T
EMPO
2.10 S
CREEN
2.11 T
RACKS
2.12 A
RP
2.13 T
APE
2.14 M
ASTER
2.15 L
IGHTS
2.16 P
-
UNCH
IN EFFECTS
2.17 M
ICROPHONE
2.18 USB
2.19 MIDI
2.20 D
ISK MODES
2.21 A
PP
2.22 R
EFERENCE
Teenage Engineering – User Guide (LD)
Teenage Engineering OP-Z1
Multimedia synthesizer & sequencer
User Guide v 1.0
"
Janvier 2019
Quick Guide - 1.1 Power on
2
2
2
2
3
3
3
3
3
3
3
3
4
4
4
4
4
4
5
6
8
13
16
18
21
23
26
28
30
31
35
36
37
39
41
42
43
44
46
49
55
1/59
Advertisement
Table of Contents

Related Manuals for teenage engineering OP-Z1


Summary of Contents for teenage engineering OP-Z1
- Page 1 2.12 A 2.13 T 2.14 M ASTER 2.15 L IGHTS 2.16 P UNCH IN EFFECTS 2.17 M ICROPHONE 2.18 USB 2.19 MIDI 2.20 D ISK MODES 2.21 A 2.22 R EFERENCE 1/59 Teenage Engineering – User Guide (LD) Janvier 2019...
-
Page 2: Quick Guide
In the app, go to “devices” and press “scan”. Push the button on the back of OP–Z and press “connect” in the app. The led will be blinking blue when available for pairing, and solid green when paired. 2/59 Teenage Engineering – User Guide (LD) Janvier 2019... -
Page 3: S
You can also hold TEMPO and press the numbers 0-9 corresponding to the bpm you want. Finally you can tap tempo by holding TEMPO and tapping any of the white piano keys. 3/59 Teenage Engineering – User Guide (LD) Janvier 2019... -
Page 4: Step Components
Holding MIXER controls drum and synth bus levels, global compressor and global level. Hold TEMPO to adjust bpm, swing, and the sound and level of the metronome. See chart § 2.4.3 au-dessous for reference. 4/59 Teenage Engineering – User Guide (LD) Janvier 2019... -
Page 5: Parameter Pages
ROJECT 2.8 M IXER 2.9 T EMPO 2.10 S CREEN 2.11 T RACKS 2.12 A 2.13 T 2.14 M ASTER 2.15 L IGHTS 2.16 P UNCH IN EFFECTS 2.17 M ICROPHONE 5/59 Teenage Engineering – User Guide (LD) Janvier 2019... -
Page 6: Power On / Off
Pro-tip: USB charging can be disabled by holding SCREEN and pressing e2 (the right- most piano key). This can sometimes cancel noise related to USB. When holding SCREEN in this mode the “track led”1-16 lights are yellow. 6/59 Teenage Engineering – User Guide (LD) Janvier 2019... -
Page 7: Replacing The Battery
Read more about how to use the microphone here § 2.2.13 au-dessous. Note: make sure never to feed phantom power in to OP-Z as this will damage the electronics and void 7/59 Teenage Engineering – User Guide (LD) Janvier 2019... -
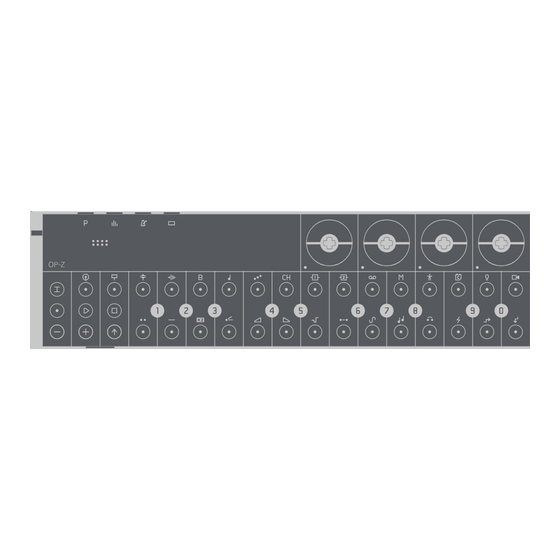
Page 8: Nterface Overview
2.2.5 T RACK SELECT BUTTON 2.2.6 T RACKS PATTERNS STEP BUTTONS 2.2.7 R ECORD BUTTON 2.2.8 T RANSPORT BUTTONS 2.2.9 M USICAL KEYBOARD 2.2.10 T RANSPOSE BUTTONS 2.2.11 S HIFT BUTTON 8/59 Teenage Engineering – User Guide (LD) Janvier 2019... -
Page 9: Pitch Bend 2.2.13 M
/ mid green state toggled static values of the value at 50 % corresponding dial, in any of the following ways: 9/59 Teenage Engineering – User Guide (LD) Janvier 2019... - Page 10 Pressing STOP twice playback from the sequencer is playing to sequencer is stopped to while sequencer is start of the active stop playback end all active notes stopped will also pattern. While playing 10/59 Teenage Engineering – User Guide (LD) Janvier 2019...
-
Page 11: Bouton Shift
SHIFT different color in effects on the active Release SHIFT to parameter LEDs. track revert back to previous setting. This is great when live jamming! 11/59 Teenage Engineering – User Guide (LD) Janvier 2019... -
Page 12: Microphone
The built-in speaker on OP-Z is used to play the startup sound, and to play the main sound, if no headphones or speakers are connected in the line out. Control the volume of the built in speaker using the main volume knob. 12/59 Teenage Engineering – User Guide (LD) Janvier 2019... -
Page 13: General Operation
2.3.3 Editing There are many ways to edit your recorded or programmed material. Here is an overview of the various edit operations. 13/59 Teenage Engineering – User Guide (LD) Janvier 2019... - Page 14 One of the most powerful features of the OP-Z is its many possibilities to record your tweaks and operations, whether it is through live recording or through careful step by step recording. 14/59 Teenage Engineering – User Guide (LD) Janvier 2019...
- Page 15 Held without the need for recording will be armed notes will now be holding down REC and any note will start removed from active record lock mode steps 15/59 Teenage Engineering – User Guide (LD) Janvier 2019...
-
Page 16: Parameter Pages
Turning the “coloror dials”1-4 is the main way to control the parameters of OP-Z. 2.4.2 Toggle pages Press and release SHIFT to toggle parameter page. The parameter “led lights” indicate by color which page you are on. 16/59 Teenage Engineering – User Guide (LD) Janvier 2019... - Page 17 17/59 Teenage Engineering – User Guide (LD) Janvier 2019...
-
Page 18: Track
Settings for synth note length from 1/64 tracks: poly notes to a whole bar mono Turning all the way to legato the right enables drone mode 18/59 Teenage Engineering – User Guide (LD) Janvier 2019... -
Page 19: Step Count
To select a plug hold TRACK and press the black value keys 2.5.7 Randomize Preset To randomize a new preset hold TRACK and press REC. This is a great way to come up with new sounds. 19/59 Teenage Engineering – User Guide (LD) Janvier 2019... -
Page 20: Store Preset
Playing and triggering the original track will now also trigger linked tracks. To unlink the tracks select the original track again. Pro-tip: try linking audio tracks together with the motion track for tightly integrated audio / graphics. 20/59 Teenage Engineering – User Guide (LD) Janvier 2019... -
Page 21: Step Components
Quickly pressing an applied component will remove it. Pro-tip: try combining the last three “step components” (spark components) with the note- based “step components”. It’s possible to get some very interesting results. 21/59 Teenage Engineering – User Guide (LD) Janvier 2019... -
Page 22: Clear "Step Components
2.6.5 “Step components” + app While using OP-Z paired with the app, and using the main OP-Z interface, you will get a visual guide briefly explaining the “step components”. 22/59 Teenage Engineering – User Guide (LD) Janvier 2019... -
Page 23: Project
Active pattern chains can be saved by holding enter chain mode. Keep holding PROJECT and PROJECT together with a white piano key select up to 32 patterns to create a pattern chain or song sequence 23/59 Teenage Engineering – User Guide (LD) Janvier 2019... -
Page 24: Copy Pattern
Press and hold PROJECT and STOP and SHIFT to clear the entire STOP and wait for the bar to fill project up to clear the Pattern. When full the pattern is cleared release before full to cancel the operation 24/59 Teenage Engineering – User Guide (LD) Janvier 2019... -
Page 25: Bounce Pattern
The project page gives an overview of the current project, pattern and pattern chain. There are also some handy shortcut hints for button combinations, as well as visual progress feedback when performing operations. 25/59 Teenage Engineering – User Guide (LD) Janvier 2019... -
Page 26: Mixer
Tracks that are lit are active, playing audio and sending midi 1-16 keys act as toggles for information by default. “tracks” 1-16 that are unlit are muted muting and unmuting the corresponding tracks 26/59 Teenage Engineering – User Guide (LD) Janvier 2019... - Page 27 The mixer page gives an overview of your track levels. On this page it is possible to adjust the faders with your fingers much like a traditional mixing desk. The buttons below the faders allow you to mute / unmute tracks. When muted the fader will be greyed out. 27/59 Teenage Engineering – User Guide (LD) Janvier 2019...
-
Page 28: Tempo
0 - 9 LEDs keys ways to set bpm on OP-Z example: holding TEMPO and pressing 1 + 2 + 0 will set bpm to 120 28/59 Teenage Engineering – User Guide (LD) Janvier 2019... -
Page 29: Lock Tempo
Sending midi clock to OP-Z will automatically activate the external sync mode. This is indicated by the “track LEDs” 1-16 blinking green, in groups of four. By default, incoming midi clock is disabled, this can be configured in the midi settings. 29/59 Teenage Engineering – User Guide (LD) Janvier 2019... -
Page 30: S Creen
When using the OP-Z connected to the app, holding SCREEN and at the same time turning the “color dials”1-4 will allow you to navigate through app pages. SCREEN is also used to activate the camera on photometric. 30/59 Teenage Engineering – User Guide (LD) Janvier 2019... -
Page 31: T Racks
2.11.2 Tracks overview drum group synth group control tracks kick bass perform snare lead module perc tape lights sample chord master motion 2.11.3 Audio tracks 1-4 (drum group) kick snare perc sample 31/59 Teenage Engineering – User Guide (LD) Janvier 2019... - Page 32 2.11.5 Control tracks 9-16 There are a total of 8 control tracks on the OP-Z. These are FX1, FX2, TAPE, MASTER, PERFORM, MODULE, LIGHTS and MOTION. 32/59 Teenage Engineering – User Guide (LD) Janvier 2019...
- Page 33 Hold the piano keys to add punch-in effects. You can record, copy and delete punch-in effects in the same way you would work with notes on a drum/synth track. Read more about “punch-in effects” here § 2.16 au-dessous. 33/59 Teenage Engineering – User Guide (LD) Janvier 2019...
- Page 34 Use your iOS device or computer and sequence locally, or go big and program your entire live show using OP-Z. 34/59 Teenage Engineering – User Guide (LD) Janvier 2019...
- Page 35 down arpeggio. There are six the pattern up/down different rhythms down/up random Pro-tip: put the arpeggio track into mono mode then increase the Portamento for a sliding Arp. 35/59 Teenage Engineering – User Guide (LD) Janvier 2019...
-
Page 36: Tape
The white keys are used The black keys choose the length of the tape loop with 1 being the shortest to choose from which part and 0 being the longest of the buffer playback begins 36/59 Teenage Engineering – User Guide (LD) Janvier 2019... -
Page 37: M Aster
/ low-pass filter, with an add a subtle stereo unaffected neutral setting effect in the middle 37/59 Teenage Engineering – User Guide (LD) Janvier 2019... - Page 38 Hold TRACK + SHIFT and choose playback speed using the value keys. A setting of 4 gives you a four bar loop. Pro-tip: extend the master track duration by lowering the playback speed to allow for longer sequences. 38/59 Teenage Engineering – User Guide (LD) Janvier 2019...
-
Page 39: L Ights
OP-Z. It can be connected OP-Z is convenient but might deplete you battery directly to the USB port faster than you want. in that case, use a powered 39/59 Teenage Engineering – User Guide (LD) Janvier 2019... - Page 40 7 0 ‒ 255 yellow dial (page 2) dial 8 0 ‒ 255 red dial (page 2) 0 ‒ 255 0 ‒ 255 custom fixed value always on always off 40/59 Teenage Engineering – User Guide (LD) Janvier 2019...
- Page 41 While using OP-Z paired with the app, and using the main OP-Z interface, you will get visual feedback when using the punch-in effects. These graphics can be a striking way to add some visual action to your live performance. 41/59 Teenage Engineering – User Guide (LD) Janvier 2019...
- Page 42 This will disable the built-in microphone and activate the headset mic. the mic led on OP-Z will be orange 42/59 Teenage Engineering – User Guide (LD) Janvier 2019...
- Page 43 Kingston nucleum usb adapter direct needs external power comments Apple c to a aukey c to a DMX interface direct needs external power comments enttec dmxusb pro enttec dmxusb pro mk2 43/59 Teenage Engineering – User Guide (LD) Janvier 2019...
- Page 44 / false Enable midi per track track channels 1 ‒ 16 set outgoing channel per track parameter_cc_out 0 ‒ 255 set outgoing cc value per parameter per track 44/59 Teenage Engineering – User Guide (LD) Janvier 2019...
- Page 45 0-15 parameter page stop continue program change 1-10 0-15 program change 1, 2 0-127 clock pitch bend 1-16 song pointer not used sense not used 45/59 Teenage Engineering – User Guide (LD) Janvier 2019...
- Page 46 You can either export samples from OP-1, build your own packs using the OP-1 drum utility, or download packs from the web. To import sounds and sample packs into OP-Z do the following: 46/59 Teenage Engineering – User Guide (LD) Janvier 2019...
- Page 47 OP-Z disk connected to a computer type modify remove projects Sample packs bounces config This chart shows which operations are available per type of content. 47/59 Teenage Engineering – User Guide (LD) Janvier 2019...
- Page 48 LEDs. Safely eject the factory settings. unit and then power cycle it. OP-Z is now ready Note: any custom user content will be removed when a factory reset is performed. 48/59 Teenage Engineering – User Guide (LD) Janvier 2019...
- Page 49 2.21.3 Navigating the app Apart from acting as a screen for the OP-Z, the app provides a number of unique features of its own. Everything can be accessed through the main menu. 49/59 Teenage Engineering – User Guide (LD) Janvier 2019...
- Page 50 OP-Z a wiring diagram Punch-in effects are also overlain on the audio will display temporarily track screens when the SHIFT key is held on OP-Z on screen. 50/59 Teenage Engineering – User Guide (LD) Janvier 2019...
- Page 51 flip vertical changes just like you sequences punch zoom musical notes. white out black out sharpen kill red kill green kill blue 51/59 Teenage Engineering – User Guide (LD) Janvier 2019...
- Page 52 White keys apply various effects while free unity toolkit held. You can sequence these changes Access the selection of videolab just like you sequences musical notes installed videopaks tapping current videopak text in the status 52/59 Teenage Engineering – User Guide (LD) Janvier 2019...
- Page 53 The app user interface stays adapter. Simply connect the on the iOS device screen adapter to your iOS device and run an hdmi cable from the adapter to an external display or projector 53/59 Teenage Engineering – User Guide (LD) Janvier 2019...
- Page 54 - the app iTunes will rebuild it once you relaunch. When you are done drag and drop the photomatic folder back to iTunes to replace the old folder 54/59 Teenage Engineering – User Guide (LD) Janvier 2019...
- Page 55 FX engines crush delay dist rymd type: vector type: basic digital type: overdrive type: digital reverb amount cutoff amount cutoff amount cutoff amount cutoff 55/59 Teenage Engineering – User Guide (LD) Janvier 2019...
-
Page 56: Table Of Contents
” -/+ RANSPOSE BUTTONS 2.2.11 B SHIFT OUTON 2.2.12 P ITCH BEND 2.2.13 M ICROPHONE 2.2.14 S PEAKER 2.3 G ENERAL OPERATION 2.3.1 P LAYING NOTES 2.3.2 P LAYBACK 2.3.3 E DITING 56/59 Teenage Engineering – User Guide (LD) Janvier 2019... - Page 57 UTE AUDIO 2.8.6 M IXER 2.9 T EMPO 2.9.1 T EMPO INTRODUCTION 2.9.2 T EMPO PARAMETERS 2.9.3 S ET TEMPO 2.9.4 T EMPO NUDGE 2.9.5 L OCK TEMPO 2.9.6 A DJUST SWING 57/59 Teenage Engineering – User Guide (LD) Janvier 2019...
- Page 58 PGRADE MODE 2.20.7 S OFTWARE UPDATE 2.20.8 F ACTORY RESET 2.21 A 2.21.1 A PP INTRODUCTION 2.21.2 P OP-Z AIRING WITH 2.21.3 N AVIGATING THE APP 2.21.4 S CREEN 2.21.5 C ONFIGURATOR 58/59 Teenage Engineering – User Guide (LD) Janvier 2019...
- Page 59 User Guide - 2.22 Reference 2.21.6 P HOTOMATIC 2.21.7 M OTION 2.21.8 D EVICES 2.21.9 MIDI SETUP 2.21.10 G UIDE 2.21.11 V IDEO OUT 2.21.12 F ILE TRANSFER 2.22 R EFERENCE 59/59 Teenage Engineering – User Guide (LD) Janvier 2019...
Need help?
Do you have a question about the OP-Z1 and is the answer not in the manual?
Questions and answers