Table of Contents
Advertisement
Quick Links
Advertisement
Table of Contents

Summary of Contents for Subtech DrainCam Mini ST 5500
- Page 1 DRAINCAM USER’S MANUAL DrainCam Mini ST 5500 DrainCam ST 5700...
-
Page 2: Table Of Contents
Table Of Contents Warning and Safety Information ---------------------------------------------------------------4 Contents and Accessories ----------------------------------------------------------------------5 Assembly ---------------------------------------------------------------------------------------6 Mounting the display -------------------------------------------------------------------------6 Skid Installation -------------------------------------------------------------------------------6 DrainCam Battery Removal/Installation ---------------------------------------------------- 7 Set Up and Operation --------------------------------------------------------------------------8 Basic operation -------------------------------------------------------------------------------8 Locator Panel Description ------------------------------------------------------------------- 9 Locating ------------------------------------------------------------------------------------- 10 Multi-Level Softkey Menu System --------------------------------------------------------- 11 Main Menu Functions ----------------------------------------------------------------------- 11 Second Level Menu Functions ------------------------------------------------------------- 11... - Page 3 General Safety Precautions People who use hand and power tools and who are exposed to the hazards of falling, flying, abrasive and splashing objects, or exposed to harmful dusts, fumes, mists, vapors or gases, must be equipped with the appropriate personal protective equipment (e.g.,safety goggles, gloves, appropriate safety footwear Ect.).
-
Page 4: Contents And Accessories
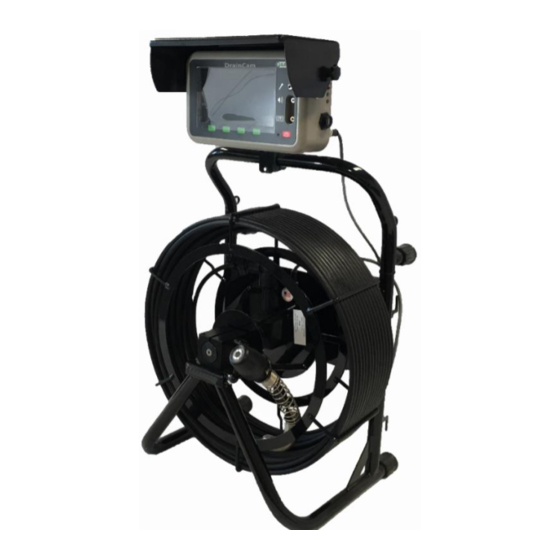
Contents & Accessories Standard Equipment 1. DrainCam Display 2. Cart & Reel 3. User’s Manual 4. AC Adapter * 5. Display Mounting Hardware 6. Skid 7. Camera Optional Equipment 8. 18v Battery Receptacle 9. USB Recorder 10. WIFI 11. Self Leveling Camera... -
Page 5: Assembly
Assembly Mounting the Display Removal/Installation Place 1 clamp half onto the black metal bracket on the back of the display. Hold the display in place against the cart try so that the half clamp is centered on the tube of the cart . Place the other clamp half over the tube so that the holes line up. -
Page 6: Battery Installation
Battery Installation: The 18 volt battery receptacle uses an M18 style Milwaukee Battery & charger not included battery ( The receptacle plugs into the rear of the reel. The A/C adapter now plugs into the rear of the LCD monitor The 18 volt battery should last for 3-4 hrs. - Page 7 Basic Operation (Quick Start) Position the DrainCam within a few feet of the pipe opening. The unit may be operated in either the vertical or horizontal position. Connect the included AC adapter to the hubpower input jack. Connect the other end of the AC adapter to a 110 volt AC outlet.
-
Page 8: Set Up And Operation
Set up and Operation DrainCam... -
Page 9: Counter Menu Functions
Counter Menu Functions Reset - Resets the counter to 0. Feet – Sets the unit of distance measurement to feet. Meter – Sets the unit of distance measurement to meters. Model – Go to the model menu level Model Menu Function This setting is set at the factory- Changing the reel type may alter the functions of the unit Exit –... -
Page 10: Text Menu Functions
Text Menu Functions DEL- deletes the currently highlighted character. <and>- moves the cursor to select characters. Enter- pressing enter momentarily adds the character to the current text string on the display. Press and hold enter for approximately 3 seconds to save and exit the text writer. -
Page 11: Date Menu Functions
Date Menu Functions ->- moves to the next column. Down and Up- Allows you to increment the currently selected column value up or down. 01/xx/xx- select the month xx/01/xx- select the day xx-/xx/01- select the year Enter- Saves the currently displayed date information and return to the Main Menu. Fourth Level Menu Functions Clear- clears the screen of all text and menu information allowing you... - Page 12 USB Recording A 4Gb drive will hold approx.. 4 hrs of of video. Please note; Each time the record button is pressed a new record file is created. Voice over narration can be done with a microphone. A self powered USB hard disk can be plugged in place of a thumb drive to record up to 2 TB of Video! ` The USB drive can be installed to the LCD at anytime, with unit on or off makes no difference...
- Page 13 WIFI- Screen Mirror The WIFI feature (available option) is to mirror the screen. Useful for allowing client to screenshare, and useful for rooftop without taking the entire cart. WiFi transmission, support iPhone, iPad, and Android phone ⚫ Transmission distance with no obstacle more than 150meters ⚫...
- Page 14 show whether the change is successful, and clicking to cancel the new SSID set. NOTICE: • User could press the RESET button of the transmitter to renew the default factory SSID and password. Operations for iOS Applesystem client: 1. Go to the Apple APP store. 2.
- Page 15 3. Click APP icon on your phone. The screen should now be mirrored. NOTE: Record and screenshot icons in the APP are not active for our use. Locating the Camera Sonde frequencies available are: 50/60Hz • 512Hz • 640Hz • 33 kHz •...
- Page 16 Service Center Information If the equipment does not function properly, replace the batteries as described above. If the equipment still malfunctions, contact the Subtech Mfg. Inc. Service department. Disclaimer: Product and accessory specification and availability information is subject to change...
- Page 17 Be sure the LCD frequency is set to 512 and position the locator within the pipe access chamber leaving it still Hold the locator above the Camera head at ground visible. level. Adjust the sensitivity of the locator by pressing the “+”...
- Page 18 Specifications Standard Camera Mini Camera Line Capacity 3”-12” (7cm to 30cm) 2”-6” Max Distance 400 ft. (121m) 200 ft. (61m) Operating Depth 350 ft. (150 psi) 350 ft. (150 psi) Resolution 330(H) x 400(V) 420TVL Pixels 512(H)x492(V) 512(H) x 492(V) Sensitivity 0.3 Lux 0.3 Lux...
-
Page 19: Troubleshooting Guide
Bad Video Check that Video In/Out switch is set to “in” Subtech Manufacturing Inc. with input on video connector LED’s working, but no picture Check that LED’s are not set to dim...
Need help?
Do you have a question about the DrainCam Mini ST 5500 and is the answer not in the manual?
Questions and answers