
Related Manuals for morning station MS-T7

Summary of Contents for morning station MS-T7
- Page 1 Vehicle Video Recorder | Quick User Manual MS-T7 » Please read this user manual before using the device to ensure safe and proper use.
- Page 3 To get download the user manual for more information, refer to our website Copyright SDsystem, Co., Ltd. has intellectual property rights including copyright for Morning Station and this quick user manual. No part of this quick user manual may be used, photocopied, or distributed or shown to a third party without the prior written permission of SDsystem, Co., Ltd.
-
Page 4: Table Of Contents
Table of contents Safety information Installing Device installation layout (recommend) Instructional icons Installing the main device WARNING Installing the cameras CAUTION Installing the GPS Package components Installing the E-call kit Product specification Mount the SD cards and USIM card Getting started Connect constant power cable Device layout Device status... -
Page 5: Safety Information
Safety information Please read this safety information carefully before you use the device. Follow the warning and caution to prevent any unexpected risks or property damage. Instructional icons Situations that may cause injury or death in case of failure to follow the instruction. WARNING Situations that may cause injury or property damage in case of failure to follow the instruction. -
Page 6: Warning
• If the device is used beyond the optimal temperature liquids. range (0°C ~ 60°C), performance can decline or For repair, contact the SDsystem, Co., Ltd. Service malfunction can be caused. Representative or the sales headquarter. • Avoid exposing the device to high temperature such as Safety information MS-T7... - Page 7 microwave ovens, stoves, or hair driers. It can cause explosion or malfunction when overheated. • Avoid exposing the device to direct sunlight in summer. It can cause fire or malfunction. • Use only accessories provided by the manufacturer. Using generic accessories may cause the device to malfunction or an accident.
-
Page 8: Caution
• Clean the lens regularly. When the malfunction is found, stop operating and contact Foreign material attached to the lens can affect the the SDsystem, Co., Ltd. Service Representative or the sales recording quality. headquarter. Safety information MS-T7... - Page 9 • Back up important data to other storage media. It is required to back up important data regularly to other separate storage media to store safe for long time. • If you want to connect the device with the constant power cable, the installation must be serviced by a professional car mechanic.
-
Page 10: Package Components
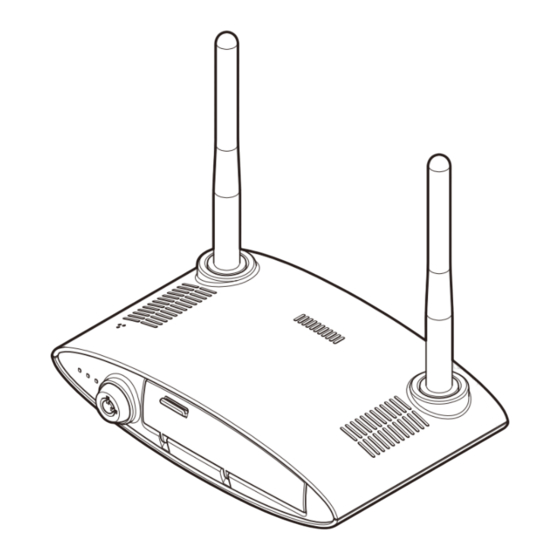
Pictures of the components may differ from the actual ones. • To enhance the performance of the device, components may be changed without prior notice. • To download the dedicated PC viewer, APPs, firmware and manuals, login to the user webpage. Safety information MS-T7... - Page 11 Description Body (including antenna) Body of the device. Body holder Used to fix the body. Front view camera (3 m) Camera to be Installed on the front of the vehicle. External GPS (3 m) GPS unit that sends the vehicle’s location information. Power supply cable (5 m) Long cable used to supply power.
- Page 12 Extension cables Different lengths of cable to supply to the cameras. 4/8/12 m cables available. Emergency button (voice call kit) Used for emergency call. Dome camera case Camera protection. Right angle connector Provides more space during installation stage. Safety information MS-T7...
-
Page 13: Product Specification
Product specification The specifications of the product are as follows: Device Specifications Channel Max 2 channels Type External Video CAM 1 / CAM 2 HD 15 FPS Speed 1 Hz / 9600 bps Viewing Angle CAM 1 140° Sensor G-Sensor 3-axis Accelerometer CAM 2 162°... -
Page 14: Getting Started
P : Power off Pinhole (Only works when using internal battery) Bluetooth dongle slot for OBD scanner Double SD card slots : 128GB of data can be stored Sim card slot : data are sent via 3G/4G network Getting started MS-T7... - Page 15 Rear View 1 2 3 GPS slot for receiving location info HDMI port is only used for testing Cam slots for front & rear cameras Power cord slot E-button slot for emergency voice call When removing the connectors from their slots, you must hold the very end part of the connectors when pulling them out.
-
Page 16: Mounting The Micro Sd Cards
Note that the Micro SD card is a consumable item. Therefore it may needs to be replaced once in a while. • Note that when the Micro SD card (as well as cable and SIM card) is removed from its slot, the error sound (three beeps) is generated. Getting started MS-T7... -
Page 17: Insert The Micro Sd Card
]Insert the Micro SD card Open the cover of the Micro SD card slot. Insert the Micro SD card with the gold-colored contacts facing downward until it locks into the slot with a click sound. Close the cover of the Micro SD card slot. Quick User Manual Getting started... -
Page 18: Remove The Micro Sd Card
» Make sure that the Micro SD card doesn’t pop out while trying to remove it. Close the cover of the Micro SD card slot. Getting started MS-T7... -
Page 19: Mounting The Usim Card
Mounting the USIM card ]Insert the USIM card Open the cover of the USIM card slot. Insert the USIM card with the gold-colored contacts facing downward until it locks into the slot. Close the cover of the USIM card slot. »... -
Page 20: Remove The Usim Card
Push the top edge of the USIM card inwards to release it, and pull it out of the slot. » Make sure that the USIM card doesn’t pop out while trying to remove it. Close the cover of the USIM card slot. Getting started MS-T7... -
Page 21: Installing
Installing Please read this quick start guide before installing the device to ensure safe and proper use. • Before installing, make sure the engine is turned off and the key is not inserted. • If you want to connect the device with the constant power cable, the installation must be serviced by a professional vehicle mechanic. -
Page 22: Device Installation Layout (Recommend)
Front cam can be installed on the dashboard or on the window • Rear cam can be installed rear side of a vehicle or outside. • GPS should be placed near the window side of dashboard and must face towards the sky. Installing MS-T7... -
Page 23: Installing The Main Device
Installing the main device You may use the constant power cable to connect the main device as below instruction. In order to install the device, follow the steps below: • If you want to connect the device with the constant power cable, the installation must be serviced by a professional vehicle mechanic. - Page 24 Clean the installation place with a dry cloth. Remove the double-sided tape from the body holder and place it on the installation spot. You can also fix the device holder on the installation spot with screw bolts into a desired position. Installing MS-T7...
- Page 25 Connect the antennas by turning them in clockwise. They do not lock in to the place so please stop turning them when they become firm to turn. After assembly of antennas, adjust to prevent communication interference between them as shown in the following figure Attach the body of the device to the body holder.
-
Page 26: Installing The Cameras
Installing the cameras Remove the double-sided tape from the mounting bracket. Install the front camera at the front side of the vehicle (windshield, rear-view mirror or dashboard). Unscrew the bolt on the camera cradle and adjust the camera angle. Installing MS-T7... - Page 27 Remove the double-sided tape from the mounting bracket. Install the rear camera at the rear side of the vehicle to the center. Interconnect the extension cable with the rear camera cable and insert it into the camera port of device. Tidy up the cables by filling them in the gaps of the plastic frames around the windows.
- Page 28 If necessary, connect a monitor to a HDMI port and check how the videos are being recorded from the monitor. Press the pinhole with a P-mark on the device to switch the monitor screen to the rear camera view. Installing MS-T7...
-
Page 29: Installing The Gps
Installing the GPS Connect the cable of the external GPS on the window side facing the sky direction. Quick User Manual Installing... -
Page 30: Installing The E-Call Kit
Keep a distance of 30 cm from driver so that he can easily touch it. • Install the Emergency button to face it towards the driver. • Remove the cable from the device while pressing the clip on its head. Installing MS-T7... -
Page 31: Mount The Sd Cards And Usim Card
Mount the SD cards and USIM card Open the cover of the front panel and insert the SD card into the first SD card slot. Insert the USIM card. To enable the network connection, type in the APN information from the viewer program before hand. -
Page 32: Connect Constant Power Cable
Start the engine and check if the device works properly by seeing the status lights of device; red, green and blue, are all turned on. Installing MS-T7... -
Page 33: Device Status
Device status ]Operation modes Ignition Power ACC power Device internal battery Driving mode Charging Parked mode On hold GPS mode Parked mode stops driving when it reaches the selected voltage and the device activates GPS mode in which the internal battery is used. Quick User Manual Installing... -
Page 34: Led Status Display
Network connection made with the server Always ON Network connection failure Special Case Occurrence of error All LEDs blink three times Rebooting All LEDs blink once Firmware update All LEDs blink consecutively, followed by all LEDs blinking altogether Installing MS-T7... -
Page 35: Video Recording
Video recording ]SD card memory proportion per settings » The flowing table shows the recording times for each folder in your SD card. TOTAL RECORDING TIME OF RECORDING FILES PER FOLDER MEMORY (UNIT: GB) RECORDING TIME RECORDING TIME (APPROX. IN MIN) 1CH (APPROX. - Page 36 MS-T7 www.morningstation.com Name Network Vehicle DVR (Tracking/Monitoring) Manufacturer SDsystem Co., Ltd. / Korea Service Representative +82 70 8299 5910 Address 2F Korea Design Center Bldg., 322, Yanghyeon-ro, Bundang-gu, Seongnam-si, Gyeonggi-do, Korea...
Need help?
Do you have a question about the MS-T7 and is the answer not in the manual?
Questions and answers