Table of Contents
Advertisement
Quick Links
Advertisement
Table of Contents

Related Manuals for AccuEnergy AXM WEB2


Summary of Contents for AccuEnergy AXM WEB2
- Page 1 Acuvim II Series Power Meter AXM WEB2 User's Manual...
- Page 2 Copyright © 2020 V1.10 This manual may not be altered or reproduced in whole or in part by any means without the expressed written consent of Accuenergy. V: 1.10 Revised: January 2020 www.accuenergy.com...
- Page 3 Accuenergy shall not be responsible or liable for any damages or injuries caused by improper meter installation and/or operation.
-
Page 4: Table Of Contents
10.3.4 THD .............................35 10.3.5 Harmonics ..........................36 10.3.6 Phase Angles ........................37 10.3.7 Sequence ..........................37 10.3.8 I/O ............................38 10.4 Logs............................40 10.4.1 Trendlog ..........................41 Realtime ........................41 Energy ..........................42 Data Preview .......................43 10.4.2 Trendlog Management ....................44 Clear Logs ........................45 V: 1.10 Revised: January 2020 www.accuenergy.com... - Page 5 10.6.5 Module Firmware Update ....................113 Auto Firmware Update ....................113 Manual Update ......................114 Remote Update ......................116 10.6.6 Meter Firmware Update ....................118 Manual Update ......................119 Remote Update ......................121 10.6.7 Emergency Mode ......................124 10.6.8 Config Management .......................125 V: 1.10 Revised: January 2020 www.accuenergy.com...
-
Page 6: Introduction To Ethernet
The AXM-WEB2 protocol supports HTTPS protocol. It is used as an HTTPS server and where the default value of the protocol port is 443. Using the HTTPS protocol, the AXM-WEB2 can send post requests to both HTTP and HTTPS servers. V: 1.10 Revised: January 2020 www.accuenergy.com... -
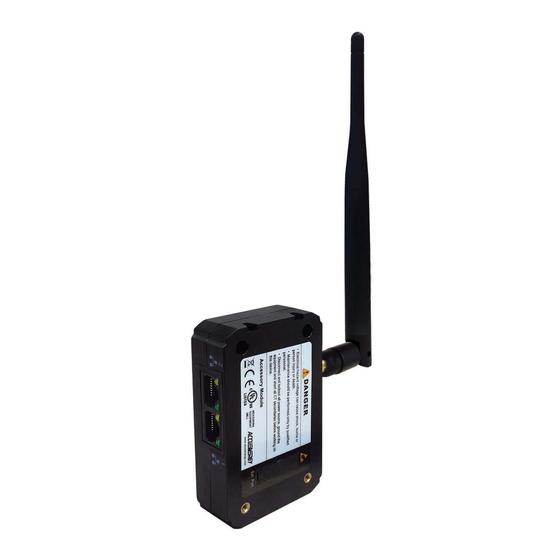
Page 7: Appearance And Dimensions
• HTTP/HTTPs • FTP • sFTP • WiFi WPA, WPA2 Enterprise 3. Appearance and Dimensions The dimensions in the following diagram are in millimeters. Dimensions listed in the brackets are inches. 90.00 (3.543) 22.00 (0.866) V: 1.10 Revised: January 2020 www.accuenergy.com... -
Page 8: Installation Method
AXM-WEB2 module lightly to establish a linking between meter and module. 3) Tighten the installation screws. NOTE: Installation with power to the meter is forbidden. The module must be installed/unin- stalled while the meter is powered off. V: 1.10 Revised: January 2020 www.accuenergy.com... -
Page 9: Definition Of Rj45
LED represents a speed of 10Mbps. LED_R (Green): Displays the link and activity status. When the LED is on it indicates the link status. When the LED is flashing it indicates that there is activity. V: 1.10 Revised: January 2020 www.accuenergy.com... -
Page 10: Initializing The Ethernet Module
WEB2 module: • Press the 'H' and 'V/A' buttons simultaneously on the Acuvim II series. Release the buttons and the meter will enter the meter selecting mode, as indicated by the flashing 'Meter' cursor. V: 1.10 Revised: January 2020 www.accuenergy.com... - Page 11 Modbus address of the meter for a second before prompting for the password of the device. • You will be required to type in a password in the ‘PASSWORD’ screen. Leave the password as default ‘0000’ and press ‘V/A’ to enter the parameter selection Mode. V: 1.10 Revised: January 2020 www.accuenergy.com...
- Page 12 Press the 'H' button to exit the system setting, you will be directed to the parameter selection screen. Press the 'P' or 'E' button to move the cursor to 'NET' and press the 'V/A' button to enter the Ethernet module settings. V: 1.10 Revised: January 2020 www.accuenergy.com...
- Page 13 Manual. Press 'V/A' to configure the IP address. The cursor of the first digit will begin to flash. Press the 'H' button to scroll through the digits, press the 'P' or 'E' to change the value of the flashing cursor and press 'V/A' to confirm. V: 1.10 Revised: January 2020 www.accuenergy.com...
- Page 14 Press the 'H' button to scroll through the digits, press the 'P' or 'E' to change the value of the flashing cursor and press 'V/A' to confirm. V: 1.10 Revised: January 2020 www.accuenergy.com...
- Page 15 The cursor of the first digit will begin to flash. Press the 'H' button to scroll through the dig- its, press the 'P' or 'E' to change the value of the flashing cursor and press 'V/A' to confirm. V: 1.10 Revised: January 2020 www.accuenergy.com...
- Page 16 Press 'P' to get to "N08 HTTP Port". Press 'V/A' to configure the HTTP Port. The cursor of the first digit will begin to flash. Press the 'H' button to scroll through the digits, press the 'P' or 'E' to change the value of the flashing cursor and press 'V/A' to confirm. V: 1.10 Revised: January 2020 www.accuenergy.com...
- Page 17 Press the 'P' or 'E' button to change the setting to 'Re- set' and press 'V/A' to confirm. The cursor will return to 'No' once successful. V: 1.10 Revised: January 2020 www.accuenergy.com...
- Page 18 Press 'P' to get to 'N12 IP2'. This is the IP address for Ethernet port 2, it is preset as dynamic DHCP. A new IP address will be assigned to it when it is connected to the internet via Ether- net port 2. V: 1.10 Revised: January 2020 www.accuenergy.com...
-
Page 19: Cable
IP address. The following steps outline how to change the computers IP using a computer running the Windows OS:: • Manually connect the meter via Ethernet cable to the computer • Right click on the connection icon • Select "Open Network Sharing Center" V: 1.10 Revised: January 2020 www.accuenergy.com... - Page 20 AXM-WEB2 for Acuvim II Series Power Meter • Click on Change adapter options • Once there, right click on the local area connection icon and select properties. V: 1.10 Revised: January 2020 www.accuenergy.com...
- Page 21 Chapter 8: Connection Method • Select the icon that says Internet Protocol Version 4 TCP/IP • The Internet Protocol Version 4(TCP/IP) Properties box will pop up V: 1.10 Revised: January 2020 www.accuenergy.com...
- Page 22 Before selecting the OK button make note of the IP address you have assigned to the meter and then press OK. NOTE: The meter and computer cannot have the same IP address, they must be different. V: 1.10 Revised: January 2020 www.accuenergy.com...
-
Page 23: Direct Connect To A Router/Switch
AXM-WEB2. The module will appear in the WiFi network as AXM-WEB2-WIFI-(serial number of module) as the SSID or name of the wireless network. By default, the network key or password will be ''accuenergy''. • Once connected to the network, open an internet browser and type in the IP address of the WIFI module: 192.168.100.1... -
Page 24: Description Of Modbus-Tcp Protocol
Identification of a Modbus Transaction Identifier 2 Bytes Request/Response transaction Protocol Identifier 2 Bytes Modbus Protocol = 0 Length 2 Bytes Number of following bytes Unit Identifier 1 Byte Slave address, in the range of 0-247 decimal V: 1.10 Revised: January 2020 www.accuenergy.com... -
Page 25: Function Field
V: 1.10 Revised: January 2020 www.accuenergy.com... -
Page 26: Format Of Communication
Data start register hi: High byte of starting register address Data start register lo: Low byte of starting register address Data #of registers hi: High byte of number of registers Data #of registers lo: Low byte of number of registers V: 1.10 Revised: January 2020 www.accuenergy.com... -
Page 27: Read Status Of Relay (Function Code 01)
The status of relay output 1 and 2 is corresponds to the last 2 bits of data. Relay 1: bit0 Relay 2: bit1 Transaction Transaction Protocol Protocol Unit Length hi Length lo identifier hi identifier lo identifier hi identifier lo identifier Byte count Data V: 1.10 Revised: January 2020 www.accuenergy.com... -
Page 28: Read Status Of Di (Function Code 02)
The response includes the MBAP header, function code, quantity of data characters and the data. An example response from the meter to read the status of 4 DIs(DI1-On, DI2=On, DI3=On, DI4=On) is shown below. The status of each corresponds to the last 4 bits of the data. V: 1.10 Revised: January 2020 www.accuenergy.com... -
Page 29: Read Data (Function Code 03)
An example response is provided to read the time (2006-12-18 14:15:20). Transaction Transaction Protocol Protocol Unit Length hi Length lo identifier hi identifier lo identifier hi identifier lo identifier V: 1.10 Revised: January 2020 www.accuenergy.com... -
Page 30: Control Relay (Function Code05)
Transaction Transaction Protocol Protocol Unit Length hi Length lo identifier hi identifier lo identifier hi identifier lo identifier Data start Data start Value hi Value lo reg hi reg lo V: 1.10 Revised: January 2020 www.accuenergy.com... -
Page 31: Preset/Reset Multi-Register (Function Code 16)
Transaction Transaction Protoco- Protocol Unit Length hi Length lo identifier hi identifier lo lidentifier hi identifier lo identifier Data start Data start Data #of Data #of reg hi reg lo reg hi reg lo V: 1.10 Revised: January 2020 www.accuenergy.com... -
Page 32: Web Interface Readings And Parameter Settings
The Admin level is ideal for users who need access to configurations on the meter or the web interface and to view readings. The default password for the Admin level is admin . V: 1.10 Revised: January 2020 www.accuenergy.com... -
Page 33: Dashboard
The dashboard also displays how long the AXM-WEB2 module has been connected to the network since the last reboot of the module in the bottom let corner of the page. The parameters on this page are updated every 5 sec. V: 1.10 Revised: January 2020 www.accuenergy.com... -
Page 34: Metering Web Page
The values displayed in this webpage will depend on the wiring configuration mode of the meter. For example, if the meter is configured as '2LL' or '3LL' then the metering webpage will not display the phase readings, only the total values will be shown. V: 1.10 Revised: January 2020 www.accuenergy.com... -
Page 35: Power & Energy
This webpage also shows the Demand parameters for the Active, Reactive and Apparent Power as well as the three phase Current demands. The parameters in this webpage are updated every 5 sec. V: 1.10 Revised: January 2020 www.accuenergy.com... -
Page 36: Min/Max
The parameters in this web page are updated every 10 sec. V: 1.10 Revised: January 2020 www.accuenergy.com... -
Page 37: Thd
The THD web page shows the power quality data such as the THD, THFF, Crest and K Factor for both the voltage and current. The parameters in this web page are updated every 15 sec. V: 1.10 Revised: January 2020 www.accuenergy.com... -
Page 38: Harmonics
Select between voltage and current to view their respective harmonics as well as between 2nd - 31st harmonics or 32nd - 63rd from the drop down list. The parameters in this web page are updated every 15 sec. V: 1.10 Revised: January 2020 www.accuenergy.com... -
Page 39: Phase Angles
10.3.7 Sequence The Sequence web page will show the positive, negative and zero components of the volt- age and current waveform being measured. The parameters in this web page are updated every 10 sec. V: 1.10 Revised: January 2020 www.accuenergy.com... -
Page 40: I/O
IO11 module will display the Relay Output status(on/off), DI status/counter. The I/O module can be configured in the general settings section of the web interface which is discussed later in the manual. The parameters in this web page are updated every 5 sec. V: 1.10 Revised: January 2020 www.accuenergy.com... - Page 41 NOTE: Relay must be configured for Control Mode for toggle function to work • Read Analog Input Channels 1 and 2, either 4-20mA, 0-20mA, 0-5V, 1-5V signals • Reset DI Counter back to 0 (Counters 1-4) V: 1.10 Revised: January 2020 www.accuenergy.com...
-
Page 42: Logs
There are five kinds of logs that can be viewed, they are "Trend Log", "Data Log", "Alarm Log", "SOE Log" and "Waveform Log"(Only available in AcuVim IIW model). Each web page shows data from the Acuvim II series meter. V: 1.10 Revised: January 2020 www.accuenergy.com... -
Page 43: Trendlog
1 hour 15 minutes Yesterday 1 hour 15 minutes Last 7 days 1 hour 1 day 1 hour Last 30 days 1 day 1 hour Last Month 1 day Custom Range Dependent on range specified V: 1.10 Revised: January 2020 www.accuenergy.com... -
Page 44: Energy
1 hour 1 day 1 hour Last 30 days 1 day 1 hour This Month 1 day 1 hour Last Month 1 day 1 day Last Year 1 month Custom Range Dependent on range specified V: 1.10 Revised: January 2020 www.accuenergy.com... -
Page 45: Data Preview
Chapter 10: Web Interface Readings and Parameter Settings Data Preview The data preview allows the user to view the graphical data in tabular form. User can also download this data into a csv file for further examination. V: 1.10 Revised: January 2020 www.accuenergy.com... -
Page 46: Trendlog Management
All other parameter types such as Energy, Power Quality, and IO only support the instantaneous values displayed in the the data log. The log file will be downloaded as a .gz file and will need to be unzipped in order to view the csv file. V: 1.10 Revised: January 2020 www.accuenergy.com... -
Page 47: Clear Logs
To clear the logs click on "Clear Logs", a warning message is displayed notifying users that this action is irreversible once done. NOTE: This cannot be undone, once the trend log is cleared all data in meter database is cleared. V: 1.10 Revised: January 2020 www.accuenergy.com... -
Page 48: Data Log
'Delete Selected' button at the bottom of the page. Users will be prompted by a window asking to confirm the data log delete. NOTE: Deleting the data log is permanent, this cannot be undone once deleted. V: 1.10 Revised: January 2020 www.accuenergy.com... -
Page 49: Alarm Log
Once all 16 alarm events are full, the newest alarm event will then wrap around to alarm 1. The parameters in the alarm status web page are updated every 10 seconds. V: 1.10 Revised: January 2020 www.accuenergy.com... -
Page 50: Soe Log
Acuvim II series meter with timestamps and will display the DI status for up to 20 SOE events. The SOE must be enabled from the Acuview software. The SOE log parameters are updated every 10 sec. V: 1.10 Revised: January 2020 www.accuenergy.com... -
Page 51: Waveform Log
The wave- form file name includes the timestamp when the event occurred as well as the parameter name/event name that triggered the power quality event. V: 1.10 Revised: January 2020 www.accuenergy.com... - Page 52 Users can perform a manual waveform capture by clicking on 'Manual Capture'. This will manually capture voltage and current waveforms of the system being monitored. Once the waveform is capture it will take approximately 1-2 minutes to appear in the waveform log. V: 1.10 Revised: January 2020 www.accuenergy.com...
- Page 53 Simply click on the check box next to the file to select it, alternatively users can click on the 'Select All' button. Once all files are selected click on delete to remove the files from the waveform log. V: 1.10 Revised: January 2020 www.accuenergy.com...
-
Page 54: Comtrade
AXM-WEB2 module. The Device Information contains the model of the Acuvim II meter, serial number, firmware version and the meter addresses. It also contains the serial number, firmware version, hardware version and the MAC addresses of the AXM- WEB2 module. V: 1.10 Revised: January 2020 www.accuenergy.com... -
Page 55: Settings
NOTE: If the voltage input is connected directly to the meter and there are no PTs (Potential Transformers) stepping down the voltage to the meters voltage input then the PT1 and PT2 settings can be left as the default of 400. V: 1.10 Revised: January 2020 www.accuenergy.com... - Page 56 CT2: Select the rated output of the current transformer from the drop down list. By de- fault this setting is already configured. NOTE: CT2 is configurable only for 5A and mA current inputs, 5A can be either 5A or 1A and mA can be either 80mA, 100mA or 200mA. V: 1.10 Revised: January 2020 www.accuenergy.com...
- Page 57 Sub Interval: The sub interval setting is only relevant if the Rolling Window Method is select- ed, this method requires a sub-interval time that must be a factor of the demand calculation period. the range for this setting is from 1-30 minutes. V: 1.10 Revised: January 2020 www.accuenergy.com...
- Page 58 By default it is 0000, the range for this setting is 0000-9999. New Password: Enter in a new four digit password. Repeat Password: Repeat the new password configured in the previous setting V: 1.10 Revised: January 2020 www.accuenergy.com...
- Page 59 211kW and the meters current input type is 5A, then the load per- centage would be calculated as follows: Load Percentage = (211kW / (5 * 576kW)) * 100 = 7% V: 1.10 Revised: January 2020 www.accuenergy.com...
- Page 60 VAR/PF Convention: The VAR/PF convention can either be set to IEEE or IEC. IEC the power factor is dependent on the direction of the real power flow IEEE the power factor is dependent on the nature of the load, i.e. capacitive, inductive. V: 1.10 Revised: January 2020 www.accuenergy.com...
- Page 61 • Generalized Method - UsesFryze's concept to calculate the 'Generalized' reactive power. This method separates instantaneous current into two components, active and reactive currents. Active current is calculated as: and reactive current as: V: 1.10 Revised: January 2020 www.accuenergy.com...
- Page 62 • Communication Channel 1 • Communication Channel 2 Once all settings have been configured users can click on save and then perform a module reboot in order for the settings to be saved to the meter. V: 1.10 Revised: January 2020 www.accuenergy.com...
-
Page 63: Io Settings
• Momentary - Manually turn on relay for a short moment of time, the RO On time range is from 50-3000ms • Alarm Mode - The relay can be configured to trigger based on the alarm settings of the meter. V: 1.10 Revised: January 2020 www.accuenergy.com... - Page 64 • DO Active Energy Pulse Constant - Select the Pulse Constant for Active Energy Pulse, the range is from 1-60000 • DO Reactive Energy Pulse Constant - Select the Pulse Constant for Reactive Energy Pulse, the range is from 1-60000 V: 1.10 Revised: January 2020 www.accuenergy.com...
- Page 65 Users can import this value to the pulse constant setting by clicking on the 'Set as Active Energy Constant' or 'Set as Reactive Energy Constant' button. V: 1.10 Revised: January 2020 www.accuenergy.com...
- Page 66 The interface displays a graph for the Analog output signal according to the input range that has been configured. Similar to Analog Output channel 1, the second analog output channel can also be configured in the same manner from the web interface. V: 1.10 Revised: January 2020 www.accuenergy.com...
- Page 67 • Momentary - Manually turn on relay for a short moment of time, the RO On time range is from 50-3000ms • Alarm Mode - The relay can be configured to trigger based on the alarm settings of the meter. V: 1.10 Revised: January 2020 www.accuenergy.com...
- Page 68 WEB2 communications module. Simply click on the drop down menu and select the corresponding logic address. NOTE: The meter be physically power cycled in order for the logic address change to take effect. V: 1.10 Revised: January 2020 www.accuenergy.com...
-
Page 69: Alarm Settings
• Users have the ability to set a delay for the alarm trigger, the range is from 0-30000 ms. • Users can use the 'AND' function to trigger an alarm event when two conditions have been met. V: 1.10 Revised: January 2020 www.accuenergy.com... -
Page 70: Custom Read
Users can choose between different parameters by clicking on the drop down menu under 'Parameter Type'. The available parameter types include: • Real-Time Metering • Demand • Energy • THD • Sequence V: 1.10 Revised: January 2020 www.accuenergy.com... - Page 71 Once the block is configure, users can click on 'Save'. A copy of the custom read register block can be viewed by selecting 'Custom Reading Table'. The table can be downloaded as a csv file by clicking on 'Export Table'. V: 1.10 Revised: January 2020 www.accuenergy.com...
-
Page 72: Waveform Settings
304V. Voltage Sag • Triggering Waveform Capture - Select enable to capture voltage sag events • Threshold - Enter in the percentage of the voltage sag to be captured, the range is from 20- V: 1.10 Revised: January 2020 www.accuenergy.com... - Page 73 50-150%. For example if the rated current is 1000A, and the over current threshold is set for 50%. The over current event would be captured when the current is 50% of the rated current, which is 500A. V: 1.10 Revised: January 2020 www.accuenergy.com...
-
Page 74: Communications
The AXM-WEB2 supports the RSTP protocol where users can daisy chain the Ethernet ports on the AXM-WEB2 module to a network switch. Users can configure the meters IP manually or by setting the DHCP set as Auto. V: 1.10 Revised: January 2020 www.accuenergy.com... - Page 75 1 network switch/router to be used with up to 32 devices. Each device can be accessed by configuring a unique IP address or having the IP addresses assigned automatically by the network. V: 1.10 Revised: January 2020 www.accuenergy.com...
- Page 76 Gateway: If the DHCP is configured to Manual, the Gateway can be configured from this web page. The status of the Ethernet 2 port will display if it is connected or disconnected. V: 1.10 Revised: January 2020 www.accuenergy.com...
- Page 77 WiFi network which is common in many colleges/universities, hospitals, etc. When attempting to connect to an enterprise level WiFi network the interface will show options to connect to the network with a username and password. V: 1.10 Revised: January 2020 www.accuenergy.com...
- Page 78 1.00-5.00 Hz/s, by default this is set for 1 Hz/s. • The minimum range is 45Hz and the max range is 65Hz, any frequency outside of the range will not have the frequency adjustment applied. V: 1.10 Revised: January 2020 www.accuenergy.com...
- Page 79 After making any changes on the network settings page, click 'Save'. Users will be prompted to reboot the AXM-WEB2 immediately or later. If later is chosen the AXM-WEB2 will need to be rebooted from the 'Management' page in order for the settings to take effect. V: 1.10 Revised: January 2020 www.accuenergy.com...
-
Page 80: Ipv6
Ethernet Link Local Address: Is an IPv6 address that is automatically configured on the device with prefix 'fe80' followed by the MAC address of the module. Ethernet Status: Displays whether there is an Ethernet cable connected or disconnected. V: 1.10 Revised: January 2020 www.accuenergy.com... -
Page 81: Email
Start Time to Send Email: Select the date and time for when the emails should begin to send. • Click on the icon to configure the time and date. • Click on the icon in the bottom right to clear the time and date. V: 1.10 Revised: January 2020 www.accuenergy.com... - Page 82 AXM-WEB2 for Acuvim II Series Power Meter SMTP Server: Enter the URL of a valid SMTP server. I.E. mail.accuenergy.com smtp.gmail. SMTP Port: Enter the port number associated with the SMTP server. SMTP From: Enter a name or phrase which will appear to let you know who the mail is from. I.E.
- Page 83 Alarm: Report of the alarm log. SOE Record: Report of the SOE log. Waveform: Report of the waveform log. V: 1.10 Revised: January 2020 www.accuenergy.com...
-
Page 84: Time/Date
Device Clock: Configure the date and time on the meter • Click on the icon to configure the date and time. • Click on the icon in the bottom right to clear the time and date. V: 1.10 Revised: January 2020 www.accuenergy.com... - Page 85 Click 'Save' after configuring the time settings. Users will be prompted to reboot the AXM-WEB2 immediately or later. If later is chosen the AXM-WEB2 must be rebooted from the 'Management' page in order for the settings to take effect. V: 1.10 Revised: January 2020 www.accuenergy.com...
-
Page 86: Data Log
Users can also use the 'All' or 'Clear' buttons to add all or clear all parameters to and from the data log. The supported parameter types include real-time readings, energy readings, demand readings, power quality readings and I/O readings. V: 1.10 Revised: January 2020 www.accuenergy.com... - Page 87 Column D highlighted in red shows the maximum value for Phase A voltage between each 5 minute interval. • Column E highlighted in orange shows the average value for Phase A between each 5 min- ute interval. V: 1.10 Revised: January 2020 www.accuenergy.com...
- Page 88 Post File Name Format. By default "logger1" will be appended to the beginning of the log file. NOTE: The Post File Length and Local Log File Length must be less than or equal to the log interval selected. V: 1.10 Revised: January 2020 www.accuenergy.com...
- Page 89 Chapter 10: Web Interface Readings and Parameter Settings V: 1.10 Revised: January 2020 www.accuenergy.com...
-
Page 90: Post Channel
Port: 22 By default the password for retrieving the backup log files is accuenergy. The user can config- ure any password or can reset to the default of accuenergy by clicking on the "Reset SFTP Pass- word". NOTE: Affter enabling the SFTP function the user must reboot the communication module in order to access the data logs with the default password of 'accuenergy'. - Page 91 NOTE: The 'TEST Post Channel' button should only be utilized after clicking the 'Save' button otherwise a fail response will be observed. If a fail response occurs after clicking 'Save' confirm the network settings or credentials for the server. V: 1.10 Revised: January 2020 www.accuenergy.com...
- Page 92 Otherwise file name will be based on the Log File Name Format configuration from the Data Log settings Post File Name: User can enter a name for the file that will be posted as if Post Name Fixed is enabled V: 1.10 Revised: January 2020 www.accuenergy.com...
- Page 93 Click 'Save' after changing any settings. Users will be prompted to reboot the AXM-WEB2 imme- diately or later. If later is chosen the AXM-WEB2 must be rebooted from the 'Management' page in order for the settings to take effect. V: 1.10 Revised: January 2020 www.accuenergy.com...
- Page 94 Click 'Save' after changing any settings. Users will be prompted to reboot the AXM-WEB2 immediately or later. If later is chosen the AXM-WEB2 must be rebooted from the 'Manage- ment' page in order for the settings to take effect. V: 1.10 Revised: January 2020 www.accuenergy.com...
-
Page 95: Waveform Post
For example if the scan interval is set for 15 minutes the module will scan for all the power quality events that occurred within 15 minutes and post it to the server. V: 1.10 Revised: January 2020 www.accuenergy.com... - Page 96 There is no interval setting for sending the waveform data using the waveform post, the data will post directly to the FTP/HTTP server when a power quality event has occurred. NOTE: All waveform capture settings must be configured on the Acuview software. V: 1.10 Revised: January 2020 www.accuenergy.com...
-
Page 97: Acucloud
Chapter 10: Web Interface Readings and Parameter Settings AcuCloud The AXM-WEB2 module can directly interface with the Accuenergy Cloud software AcuCloud. The AXM-WEB2 will post data to the cloud software every five minutes. AcuCloud will require the serial number of the AXM-WEB2 module which will then provide a to- ken that will be used to configure the AXM-WEB2 so it can send its data to AcuCloud. -
Page 98: Bacnet/Ip
Users must have sufficient access to add devices on their account in order to correctly configure the meter on the software. For inquiries on creating your AcuCloud account please contact Accuenergy Technical Support. Click 'Save' after changing any settings. Users will be prompted to reboot the AXM-WEB2 imme- diately or later. - Page 99 Click 'Save' after changing any settings. Users will be prompted to reboot the AXM-WEB2 imme- diately or later. If later is chosen the AXM-WEB2 must be rebooted from the 'Management' page in order for the settings to take effect. V: 1.10 Revised: January 2020 www.accuenergy.com...
-
Page 100: Snmp
By default, this setting is configured to 0 so the notification will be sent immediately after an event occurs. This setting could be configured from 0-30 seconds. V: 1.10 Revised: January 2020 www.accuenergy.com... -
Page 101: Dnp
The settings for the DNP protocol can be found by clicking on the 'Settings' tab and selecting 'Communications'. Select 'DNP' to access the settings to configure the AXM-WEB2 to commu- nicate with a DNP master. V: 1.10 Revised: January 2020 www.accuenergy.com... - Page 102 Local TCP Port: Enter the port number for the local TCP server. Local UDP Port: Enter the port number for the local UDP server. Destination IP address: The default IP address is set as *.*.*.* to allow all incoming requests. V: 1.10 Revised: January 2020 www.accuenergy.com...
- Page 103 Supports Unsolicited Reporting: Select 'Enable' to enable the function and further configure the settings related to the unsolicited report. Number of Unsolicited Retries: Number of retries can be selected as '0', '10' and 'infinite'. V: 1.10 Revised: January 2020 www.accuenergy.com...
- Page 104 An offset can be applied to the reading. The dead band can be set for each parameter, where if the value of the parameter exceeds the dead band value a DNP event will occur. V: 1.10 Revised: January 2020 www.accuenergy.com...
-
Page 105: Iec61850
Select 'IEC61850' to access the settings to configure the AXM-WEB2 to communicate using the standard. IEC61850 Enable: Select 'Enable' to enable the function and to further configure the settings related to the IEC61850 function. V: 1.10 Revised: January 2020 www.accuenergy.com... - Page 106 Once all settings are entered in correctly click on 'Save' and reboot the communications mod- ule. If the user decides to reboot the module later, users will have to perform the reboot manu- ally from the 'Management' page in order for the settings to take effect. V: 1.10 Revised: January 2020 www.accuenergy.com...
-
Page 107: Ethernet/Ip
The AXM-WEB2 has a remote access function. This will allows users to provide other users with remote access to the meters web interface. Users will have full functionality and access to all meter readings and settings with this function. V: 1.10 Revised: January 2020 www.accuenergy.com... - Page 108 Current Status: Will provide user with a status of the Remote Access on whether it is 'Regis- tered' or 'Unregistered'. Users can click on the 'Manual Register' button to register the remote access. The following page will be displayed. V: 1.10 Revised: January 2020 www.accuenergy.com...
-
Page 109: Management
The Management web page allows the user to clear and reset certain parameters in the me- ter. The following parameters can be reset from the Management page: • Demand • Energy • Max and Min • Alarm Record • Device Run Time V: 1.10 Revised: January 2020 www.accuenergy.com... -
Page 110: Reboot Meter & Communications Module
Acuvim II meter. Change Password The access level passwords can be changed from the Management page as well, all new pass- words must be 6 characters or more. V: 1.10 Revised: January 2020 www.accuenergy.com... -
Page 111: Reset To Factory
Users can click on the advanced link, to turn on or off specific debug logs. If certain debug logs are enabled the current status will show 'Partial On'. NOTE: The system performance may be affected by enabling the debug logs. V: 1.10 Revised: January 2020 www.accuenergy.com... -
Page 112: Diagnostic File
The is a diagnostic file on the WEB2 module that users can download which can be used to ana- lyze the modules diagnostics. NOTE: Please send the diagnostic file to Accuenergy Technical Support (support@accuenergy.com) for analysis. V: 1.10 Revised: January 2020... -
Page 113: Network Diagnostic
Chapter 10: Web Interface Readings and Parameter Settings 10.6.4 Network Diagnostic The Network Diagnostic page can be used to monitor the network status of the module. V: 1.10 Revised: January 2020 www.accuenergy.com... - Page 114 Users can also use the 'ping6' function to ping an IPv6 address. User can also use the 'Connection Test' function to test the local network that the module con- nected to. The test result will show SUCCESS and PASS if there is no issues found. V: 1.10 Revised: January 2020 www.accuenergy.com...
-
Page 115: Module Firmware Update
There is an Auto Firmware Update feature available also, this allows users to update the module automatically without manually going into the web server and performing the update. NOTE: Users can also contact Accuenergy Technical Support for latest firmware. Auto Firmware Update The auto firmware update allows users to select three different updating options. -
Page 116: Manual Update
Manual Update Select and upload the AXM-WEB2 firmware file, it is a .aup file extension. V: 1.10 Revised: January 2020 www.accuenergy.com... - Page 117 Click 'OK' to log out the web interface and wait for 1-2 minutes to complete the reboot. Login to the web interface of AXM-WEB2 after the reboot is complete, and go to the 'About' page to check if the module firmware version is updated. V: 1.10 Revised: January 2020 www.accuenergy.com...
-
Page 118: Remote Update
Users can also use the remote firmware server to update the module firmware. Click on 'Check' to verify if there is a firmware update available. If there is a update available users can proceed to download the firmware. V: 1.10 Revised: January 2020 www.accuenergy.com... - Page 119 Chapter 10: Web Interface Readings and Parameter Settings Once the download is complete the updating process will begin. When the firmware update is complete, the module will reboot. The rebooting process will take 1-2 minutes to complete. V: 1.10 Revised: January 2020 www.accuenergy.com...
-
Page 120: Meter Firmware Update
10.6.6 Meter Firmware Update The AXM WEB2 allows users to update the meters firmware from its web server. The meters firmware can be updated manually by uploading the required firmware file or by connecting to our remote firmware server. -
Page 121: Manual Update
Users can update the meter firmware manually by loading the firmware file to the web server. Click on 'Choose File' and upload the correct file. All firmware files are .abin type files. Once the file is selected click on 'Upload'. V: 1.10 Revised: January 2020 www.accuenergy.com... - Page 122 'About' tab located on the top right corner of the web page to view the 'Device Infor- mation' page. From the Device Information page users can ensure that the meter was updated correctly to the right firmware version. V: 1.10 Revised: January 2020 www.accuenergy.com...
-
Page 123: Remote Update
Click on 'Check' to verify if there is a firmware update available. If there is a update available users can proceed to download the firmware. Once the download is complete the updating process will begin. V: 1.10 Revised: January 2020 www.accuenergy.com... - Page 124 AXM-WEB2 for Acuvim II Series Power Meter Users can click on 'Show Details' to view the update percentage of the firmware. When the firmware update is complete, the module will reboot. The rebooting process will take 5-10 minutes to complete. V: 1.10 Revised: January 2020 www.accuenergy.com...
- Page 125 'About' tab located on the top right corner of the web page to view the 'Device Infor- mation' page. From the Device Information page users can ensure that the meter was updated correctly to the right firmware version. V: 1.10 Revised: January 2020 www.accuenergy.com...
-
Page 126: Emergency Mode
NOTE: The meter will only go into emergency mode if the Meter firmware update fails, emergen- cy mode is not applicable if the Module firmware update fails. V: 1.10 Revised: January 2020 www.accuenergy.com... -
Page 127: Config Management
• Most Network settings (RSTP, DHCP, IP, Submask, Gateway, HTTP Port for both Ethernet 1 and 2. All WiFi settings, Fast Read Mode, HTTP enable, and HTTPS port are not changed) • IPv6 • AcuCloud • Remote Access V: 1.10 Revised: January 2020 www.accuenergy.com... - Page 128 The backup is displayed in the List of Local Configurations. The file has a file format that in- cludes the module serial number, module firmware version, and time stamp that the file was created. NOTE: Users cannot have more than 10 configurations in the List of Local Configurations. V: 1.10 Revised: January 2020 www.accuenergy.com...
- Page 129 A module reboot is required for the configuration to take effect. if users decided to reboot lat- er the reboot must be performed from the Management page in order for the settings to take effect on the device. V: 1.10 Revised: January 2020 www.accuenergy.com...
- Page 130 NOTE: Users cannot import a file that already exists on the local configurations, when the list already contains 10 config files, and cannot import a config file that has been exported from a WEB2 module with a higher firmware version. V: 1.10 Revised: January 2020 www.accuenergy.com...
- Page 131 MAKE ENERGY USAGE SMARTER ACCUENERGY (CANADA) INC. TF: 1-877-721-8908 INT: +1-416-497-4100 2 Lansing Square, Suite 700 FAX: +1-416-497-4130 Toronto, ON M2J 4P8, Canada E: marketing@accuenergy.com...
Need help?
Do you have a question about the AXM WEB2 and is the answer not in the manual?
Questions and answers